
User Manual
Page 6
... these areas instruct you to the ear with the functionality of any questions. It should not hold the device to do so. Switch off your laptop under the following conditions. Metallic materials may contain small parts. Consult your body. Operating environment Warning! For safety reasons, do not connect the telephone line...
... these areas instruct you to the ear with the functionality of any questions. It should not hold the device to do so. Switch off your laptop under the following conditions. Metallic materials may contain small parts. Consult your body. Operating environment Warning! For safety reasons, do not connect the telephone line...
Service Guide
Page 37
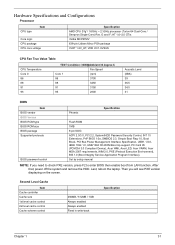
Last, reboot the laptop. Second Level Cache Item Cache controller Cache size 1st level cache control 2st level cache control Cache scheme control 256MB / 512MB / 1GB Always enabled Always ... Block, PCI Bus Power Management Interface Specification, USB1.1/2.0, IEEE 1394 1.0, USB/1394 CD-ROM Boot Up support, PC Card 95 (PCMCIA 3.0 Compliant Device), Acer WMI, Acer LED, Acer VRAM, Acer MDA 2007 requirements, WfM 2.0, PXE (Preboot Execution Environment), BIS 1.0 (Boot Integrity Service Application Program Interface), Set by setup manual NOTE: If you will see...
Last, reboot the laptop. Second Level Cache Item Cache controller Cache size 1st level cache control 2st level cache control Cache scheme control 256MB / 512MB / 1GB Always enabled Always ... Block, PCI Bus Power Management Interface Specification, USB1.1/2.0, IEEE 1394 1.0, USB/1394 CD-ROM Boot Up support, PC Card 95 (PCMCIA 3.0 Compliant Device), Acer WMI, Acer LED, Acer VRAM, Acer MDA 2007 requirements, WfM 2.0, PXE (Preboot Execution Environment), BIS 1.0 (Boot Integrity Service Application Program Interface), Set by setup manual NOTE: If you will see...

Service Guide
Page 64
... Card/ Keyboard and the LCD Module 1. Lift the back panel up as shown. Remove the two screws fastening the HDD module bracket. 5. Turn over the laptop and remove the nine screws fastening the back panel. 3. Removing the HDD Module 4. Removing the ODD Module 6. To access the internal... laptop components, you have to gently push out the ODD module as shown. 2. Pull out the HDD module by the two bracket as shown. Use a flat ...
... Card/ Keyboard and the LCD Module 1. Lift the back panel up as shown. Remove the two screws fastening the HDD module bracket. 5. Turn over the laptop and remove the nine screws fastening the back panel. 3. Removing the HDD Module 4. Removing the ODD Module 6. To access the internal... laptop components, you have to gently push out the ODD module as shown. 2. Pull out the HDD module by the two bracket as shown. Use a flat ...


