Aspire 3000 / 3500 / 5000 Service Guide
Page 7
Table of Contents Chapter 1 System Introduction 1 Features 1 System Block Diagram (For Aspire 3000/5000 3 System Block Diagram (For Aspire 3500 4 Board Layout (For Aspire 3000/5000 5 Top View 5 Bottom View 6 Panel 8 Front view 8 Closed front view 9 Left view 9 Right view 10 ... Begin 47 Disassembly Procedure Flowchart 48 Removing the Battery 50 Removing the Hard Disc Drive Module 50 Disassembling the Hard Disc Drive Module 50 Removing the Optical Disc Drive Module 51 Disassembling the Optical Disc Drive Module 51 Removing the Memory 51 Removing the LCD Module 53 Removing...
Table of Contents Chapter 1 System Introduction 1 Features 1 System Block Diagram (For Aspire 3000/5000 3 System Block Diagram (For Aspire 3500 4 Board Layout (For Aspire 3000/5000 5 Top View 5 Bottom View 6 Panel 8 Front view 8 Closed front view 9 Left view 9 Right view 10 ... Begin 47 Disassembly Procedure Flowchart 48 Removing the Battery 50 Removing the Hard Disc Drive Module 50 Disassembling the Hard Disc Drive Module 50 Removing the Optical Disc Drive Module 51 Disassembling the Optical Disc Drive Module 51 Removing the Memory 51 Removing the LCD Module 53 Removing...
Aspire 3000 / 3500 / 5000 Service Guide
Page 10
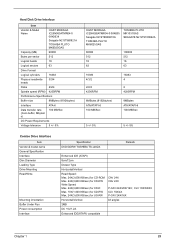
... models employing Intel® Celeron® M processor (Aspire 3500 series); 2 MB flash ROM BIOS for models employing Intel® Pentium® processor (Aspire 3500 series) Data storage T T 40/60/80 GB ATA/100 hard disk DVD-Dual or Combo drive Display and graphics T Color Thin-Film Transistor (TFT)... LCD displaying at -- 15" XGA (1024 X 768) -- 15.4" WXGA (1280 X 800) -- 15.4" WXGA Acer CrystalBrite (1280 X 800) T...
... models employing Intel® Celeron® M processor (Aspire 3500 series); 2 MB flash ROM BIOS for models employing Intel® Pentium® processor (Aspire 3500 series) Data storage T T 40/60/80 GB ATA/100 hard disk DVD-Dual or Combo drive Display and graphics T Color Thin-Film Transistor (TFT)... LCD displaying at -- 15" XGA (1024 X 768) -- 15.4" WXGA (1280 X 800) -- 15.4" WXGA Acer CrystalBrite (1280 X 800) T...
Aspire 3000 / 3500 / 5000 Service Guide
Page 21
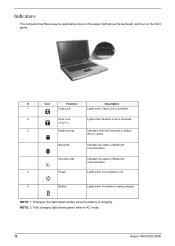
... is activated. 2 Num Lock Lights when Numeric Lock is activated. (Fn-F11) 3 Media activity Indicates when the hard disk or optical drive is charging. Fully charged: light shows green when in AC mode. 12 Aspire 3000/3500//5000 Wireless LAN Indicates the status of Bluetooth communication. NOTE: 1. Indicators The computer has three easy-to...
... is activated. 2 Num Lock Lights when Numeric Lock is activated. (Fn-F11) 3 Media activity Indicates when the hard disk or optical drive is charging. Fully charged: light shows green when in AC mode. 12 Aspire 3000/3500//5000 Wireless LAN Indicates the status of Bluetooth communication. NOTE: 1. Indicators The computer has three easy-to...
Aspire 3000 / 3500 / 5000 Service Guide
Page 32
... angles Chapter 1 23 Hard Disk Drive Interface Item Vendor & Model Name HGST MORAGA IC25N060ATMR04-0 08K0634 Seagate N2 ST960821A TOSHIBA PLUTO MK6025GAS Capacity (MB) 60000 Bytes per sector 512 Logical heads 16 Logical sectors 63 Drive Format Logical cylinders 16383 Physical...-6 100 MB/Sec 8MBytes ATA/ATAPI-6 100 MB/Sec 5 +/- 5% 5 +/- 5% Combo Drive Interface Item Vendor & model name General Specification Interface Disc Diameter Loading Type Drive Mounting Read/Write Mounting Orientation Buffer Under Run Power consumption Interface Specification DVD/CDRW TOSHIBA TS-L462A ...
... angles Chapter 1 23 Hard Disk Drive Interface Item Vendor & Model Name HGST MORAGA IC25N060ATMR04-0 08K0634 Seagate N2 ST960821A TOSHIBA PLUTO MK6025GAS Capacity (MB) 60000 Bytes per sector 512 Logical heads 16 Logical sectors 63 Drive Format Logical cylinders 16383 Physical...-6 100 MB/Sec 8MBytes ATA/ATAPI-6 100 MB/Sec 5 +/- 5% 5 +/- 5% Combo Drive Interface Item Vendor & model name General Specification Interface Disc Diameter Loading Type Drive Mounting Read/Write Mounting Orientation Buffer Under Run Power consumption Interface Specification DVD/CDRW TOSHIBA TS-L462A ...

Aspire 3000 / 3500 / 5000 Service Guide
Page 38
...and system is ready to enter Hibernation mode 2.System Hibernation timer expires and system is not ready to enter Hibernation mode. Hard Disk Standby Mode Hard disk is in touchpad, and an external PS/2 pointing device are idle for Class B Digital Device and get FCC Certification...be listed under UL 1950 and certified with low voltage directive 73/23EEC. Display Standby Mode Keyboard, built-in standby mode. (spindle turned-off T Hard disk drive is idle within a specified period of FCC part 15, Subpart B for a specified period. Phenomenon T The buzzer beeps T The Sleep indicator ...
...and system is ready to enter Hibernation mode 2.System Hibernation timer expires and system is not ready to enter Hibernation mode. Hard Disk Standby Mode Hard disk is in touchpad, and an external PS/2 pointing device are idle for Class B Digital Device and get FCC Certification...be listed under UL 1950 and certified with low voltage directive 73/23EEC. Display Standby Mode Keyboard, built-in standby mode. (spindle turned-off T Hard disk drive is idle within a specified period of FCC part 15, Subpart B for a specified period. Phenomenon T The buzzer beeps T The Sleep indicator ...
Aspire 3000 / 3500 / 5000 Service Guide
Page 43
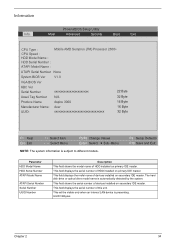
...Number None System BIOS Ver V1.0 VGA BIOS Ver KBC Ver Serial Number Asset Tag Number Produce Name xxxxxxxxxxxxxxxxxxxxxx N/A Aspire 3000 22 Byte 32 Byte 16 Byte Manufacturer Name: Acer UUID: xxxxxxxxxxxxxxxxxxxxxxxxxxxxxxxx 16 Byte 32 Byte F1 Help Esc Exit ↑ ↓ Select Item ← →... Model Name ATAPI Serial Number Serial Number UUID Number Description This field shows the model name of this unit. The hard disk drive or optical drive model name is automatically detected by the system. This field displays the serial number of HDD installed on secondary IDE ...
...Number None System BIOS Ver V1.0 VGA BIOS Ver KBC Ver Serial Number Asset Tag Number Produce Name xxxxxxxxxxxxxxxxxxxxxx N/A Aspire 3000 22 Byte 32 Byte 16 Byte Manufacturer Name: Acer UUID: xxxxxxxxxxxxxxxxxxxxxxxxxxxxxxxx 16 Byte 32 Byte F1 Help Esc Exit ↑ ↓ Select Item ← →... Model Name ATAPI Serial Number Serial Number UUID Number Description This field shows the model name of this unit. The hard disk drive or optical drive model name is automatically detected by the system. This field displays the serial number of HDD installed on secondary IDE ...

Aspire 3000 / 3500 / 5000 Service Guide
Page 45
... is because the user is set to disable or auto. Parameter System Time System Date System Memory Extended Memory VGA Memory Fast Boot Power on hard disc drive to store operation system and restore the system to 640MB This field reports the memory size of the system. shows Summary Screen is enabled...
... is because the user is set to disable or auto. Parameter System Time System Date System Memory Extended Memory VGA Memory Fast Boot Power on hard disc drive to store operation system and restore the system to 640MB This field reports the memory size of the system. shows Summary Screen is enabled...

Aspire 3000 / 3500 / 5000 Service Guide
Page 46
PhoenixBIOS Setup Utility Info. To change , or disable hard drive passwords. F1 Help Esc Exit ↑ ↓ Select Item ← → Select Menu F5/F6 Change Values Enter Select 4 Sub-Menu F9 Setup Defaults F10 ... enter Setup immediately after turning it back on Boot Clear Clear Clear 43883445 [Enter] [Enter] [Enter] [Disabled] Item Specific Help When shown as [Locked], the hard drive password currently can not be changed or disabled. Security The Security screen contains parameters that help safeguard and protect your computer from unauthorized use.
PhoenixBIOS Setup Utility Info. To change , or disable hard drive passwords. F1 Help Esc Exit ↑ ↓ Select Item ← → Select Menu F5/F6 Change Values Enter Select 4 Sub-Menu F9 Setup Defaults F10 ... enter Setup immediately after turning it back on Boot Clear Clear Clear 43883445 [Enter] [Enter] [Enter] [Disabled] Item Specific Help When shown as [Locked], the hard drive password currently can not be changed or disabled. Security The Security screen contains parameters that help safeguard and protect your computer from unauthorized use.

Aspire 3000 / 3500 / 5000 Service Guide
Page 50
... item up and down using only the top device in module bay. Info. PhoenixBIOS Setup Utility Main Advanced Security Boot Exit CD-ROM/DVD Drive Floppy Devices +Hard Drive Network Boot Item Specific Help + and - Boot This menu allows the user to decide the order of boot devices to expand/collapses. Bootable devices...
... item up and down using only the top device in module bay. Info. PhoenixBIOS Setup Utility Main Advanced Security Boot Exit CD-ROM/DVD Drive Floppy Devices +Hard Drive Network Boot Item Specific Help + and - Boot This menu allows the user to decide the order of boot devices to expand/collapses. Bootable devices...

Aspire 3000 / 3500 / 5000 Service Guide
Page 59
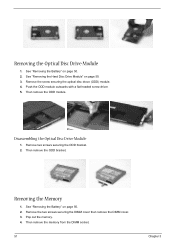
Remove the screw securing the hard disk drive (HDD) cover. 3. Pull the HDD module backwards as shown. 5. Chapter 3 50 Then remove the HDD cover. 4. Take out the HDD from the HDD bracket. Disassembling the Hard Disc Drive Module 1. Unlatch the battery latch then remove the battery. Remove the other two screw on page 50. 2. Removing the Hard Disc Drive Module 1. See "Removing the Battery" on the other side. 3. Remove two screw securing the HDD bracket. 2. Remove the HDD module. Removing the Battery 1.
Remove the screw securing the hard disk drive (HDD) cover. 3. Pull the HDD module backwards as shown. 5. Chapter 3 50 Then remove the HDD cover. 4. Take out the HDD from the HDD bracket. Disassembling the Hard Disc Drive Module 1. Unlatch the battery latch then remove the battery. Remove the other two screw on page 50. 2. Removing the Hard Disc Drive Module 1. See "Removing the Battery" on the other side. 3. Remove two screw securing the HDD bracket. 2. Remove the HDD module. Removing the Battery 1.
Aspire 3000 / 3500 / 5000 Service Guide
Page 60
... the ODD bracket. Push the ODD module outwards with a flat headed screw driver. 5. Disassembling the Optical Disc Drive Module 1. Pop out the memory. 4. See "Removing the Battery" on page 50. 2. Removing the Optical Disc Drive Module 1. See "Removing the Battery" on page 50. 2. Remove the screw securing the optical disc drove (ODD...
... the ODD bracket. Push the ODD module outwards with a flat headed screw driver. 5. Disassembling the Optical Disc Drive Module 1. Pop out the memory. 4. See "Removing the Battery" on page 50. 2. Removing the Optical Disc Drive Module 1. See "Removing the Battery" on page 50. 2. Remove the screw securing the optical disc drove (ODD...

Aspire 3000 / 3500 / 5000 Service Guide
Page 67
... power board cable. 10. See "Removing the Battery" on page 50. 3. Remove the two screws securing the power board. 7. See "Removing the Hard Disc Drive Module" on page 50. 2. See "Removing the Memory" on page 50. 3. Tear off the tape holding the power board cable then remove the ...power board. See "Removing the Hard Disc Drive Module" on page 51. 5. Removing the Power Board 1. Chapter 3 58 Remove the three screws securing the upper case assembly. 8. See "Removing ...
... power board cable. 10. See "Removing the Battery" on page 50. 3. Remove the two screws securing the power board. 7. See "Removing the Hard Disc Drive Module" on page 50. 2. See "Removing the Memory" on page 50. 3. Tear off the tape holding the power board cable then remove the ...power board. See "Removing the Hard Disc Drive Module" on page 51. 5. Removing the Power Board 1. Chapter 3 58 Remove the three screws securing the upper case assembly. 8. See "Removing ...
Aspire 3000 / 3500 / 5000 Service Guide
Page 81
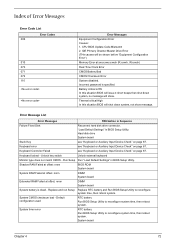
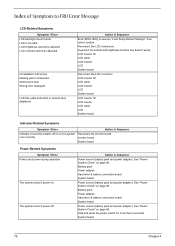
... 010 070 071 072 110 Error Messages Equipment Configuration Error Causes: 1. Battery critical LOW In this situation BIOS will show message. Hard disk drive System board Stuck Key see "Keyboard or Auxiliary Input Device Check" on page 67. Keyboard error see "Keyboard or Auxiliary Input ... Setup Utility to reconfigure system time, then reboot system. "Load Default Settings" in Sequence Failure Fixed Disk Reconnect hard disk drive connector. CPU BIOS Update Code Mismatch 2. Run Setup Run "Load Default Settings" in BIOS Setup Utility. IDE Primary Channel Master...
... 010 070 071 072 110 Error Messages Equipment Configuration Error Causes: 1. Battery critical LOW In this situation BIOS will show message. Hard disk drive System board Stuck Key see "Keyboard or Auxiliary Input Device Check" on page 67. Keyboard error see "Keyboard or Auxiliary Input ... Setup Utility to reconfigure system time, then reboot system. "Load Default Settings" in Sequence Failure Fixed Disk Reconnect hard disk drive connector. CPU BIOS Update Code Mismatch 2. Run Setup Run "Load Default Settings" in BIOS Setup Utility. IDE Primary Channel Master...
Aspire 3000 / 3500 / 5000 Service Guide
Page 88
... Symptom / Error Action in characters Abnormal screen Wrong color displayed LCD has extra horizontal or vertical lines displayed. Battery pack Power adapter Hard drive & battery connection board System board Power source (battery pack and power adapter). See "Power System Check" on . See "Power...-FRU Error Message LCD-Related Symptoms Symptom / Error LCD backlight doesn't work ). Reconnect the LCD connectors. Battery pack Power adapter Hard drive & battery connection board System board Power source (battery pack and power adapter). System board 79 Chapter 4 Action in Sequence Power ...
... Symptom / Error Action in characters Abnormal screen Wrong color displayed LCD has extra horizontal or vertical lines displayed. Battery pack Power adapter Hard drive & battery connection board System board Power source (battery pack and power adapter). See "Power System Check" on . See "Power...-FRU Error Message LCD-Related Symptoms Symptom / Error LCD backlight doesn't work ). Reconnect the LCD connectors. Battery pack Power adapter Hard drive & battery connection board System board Power source (battery pack and power adapter). System board 79 Chapter 4 Action in Sequence Power ...
Aspire 3500 User's Guide
Page 30
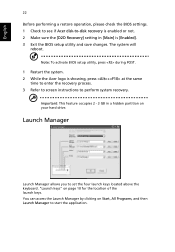
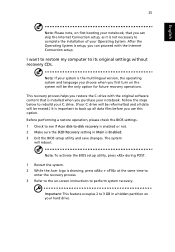
...enabled or not. 2 Make sure the [D2D Recovery] setting in a hidden partition on your hard drive. English 22 Before performing a restore operation, please check the BIOS settings. 1 Check to see if Acer disk-to set the four launch keys located above the keyboard. You can access the Launch Manager... on page 10 for the location of the launch keys. Note: To activate BIOS setup utility, press during POST. 1 Restart the system. 2 While the Acer logo is [Enabled]. 3 Exit the BIOS setup utility and save changes. Important: This feature occupies 2 - 3 GB in [Main] is showing, press ...
...enabled or not. 2 Make sure the [D2D Recovery] setting in a hidden partition on your hard drive. English 22 Before performing a restore operation, please check the BIOS settings. 1 Check to see if Acer disk-to set the four launch keys located above the keyboard. You can access the Launch Manager... on page 10 for the location of the launch keys. Note: To activate BIOS setup utility, press during POST. 1 Restart the system. 2 While the Acer logo is [Enabled]. 3 Exit the BIOS setup utility and save changes. Important: This feature occupies 2 - 3 GB in [Main] is showing, press ...
Aspire 3500 User's Guide
Page 33
... C: drive will be reformatted and all data will reboot. Note: If your Operating System. Follow the steps below to perform system recovery. Before performing a restore operation, please check the BIOS settings. 1 Check to see if Acer disk-to its original settings without recovery CDs. ... or not. 2 Make sure the D2D Recovery setting in a hidden partition on -screen instructions to rebuild your hard drive. Note: To activate the BIOS setup utility, press during POST. 1 Restart the system. 2 While the Acer logo is Enabled. 3 Exit the BIOS setup utility and save changes.
... C: drive will be reformatted and all data will reboot. Note: If your Operating System. Follow the steps below to perform system recovery. Before performing a restore operation, please check the BIOS settings. 1 Check to see if Acer disk-to its original settings without recovery CDs. ... or not. 2 Make sure the D2D Recovery setting in a hidden partition on -screen instructions to rebuild your hard drive. Note: To activate the BIOS setup utility, press during POST. 1 Restart the system. 2 While the Acer logo is Enabled. 3 Exit the BIOS setup utility and save changes.
Aspire 3500 User's Guide
Page 35
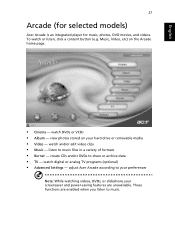
.... English 27 Arcade (for selected models) Acer Arcade is an integrated player for music, photos, DVD movies, and videos. Music, Video, etc) on your screensaver and power-saving features are enabled when you listen to your preferences Note: While watching videos, DVDs, or slideshows your hard drive or removable media • Video - watch...
.... English 27 Arcade (for selected models) Acer Arcade is an integrated player for music, photos, DVD movies, and videos. Music, Video, etc) on your screensaver and power-saving features are enabled when you listen to your preferences Note: While watching videos, DVDs, or slideshows your hard drive or removable media • Video - watch...

Aspire 3500 User's Guide
Page 44
... the song that can even add customized menus to them on your PC or MP3 CD player. store files simply and easily Copy your computer's hard drive files for easy recovery in the content area. Burner NTI CD/DVD-Maker simplifies today's digital lifestyle by most DVD players. backup your CD/DVD... at the bottom of your own greatest hits CDs Create better sounding music in the content area, while the left side has controls for extra hard drives. Even copy your favourite songs to CD so you can listen to Video CDs and Super Video CDs. Copy - Now you can burn and share...
... the song that can even add customized menus to them on your PC or MP3 CD player. store files simply and easily Copy your computer's hard drive files for easy recovery in the content area. Burner NTI CD/DVD-Maker simplifies today's digital lifestyle by most DVD players. backup your CD/DVD... at the bottom of your own greatest hits CDs Create better sounding music in the content area, while the left side has controls for extra hard drives. Even copy your favourite songs to CD so you can listen to Video CDs and Super Video CDs. Copy - Now you can burn and share...
Aspire 3500 User's Guide
Page 64
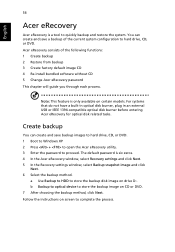
... current system configuration to proceed. Create backup You can create and save backup images to hard drive, CD, or DVD. 1 Boot to Windows XP 2 Press + to open the Acer eRecovery utility. 3 Enter the password to hard drive, CD, or DVD. b Backup to optical device to store the backup disk image... on CD or DVD. 7 After choosing the backup method, click Next. a Use Backup to HDD to store the backup image on drive D:. Note: This feature...
... current system configuration to proceed. Create backup You can create and save backup images to hard drive, CD, or DVD. 1 Boot to Windows XP 2 Press + to open the Acer eRecovery utility. 3 Enter the password to hard drive, CD, or DVD. b Backup to optical device to store the backup disk image... on CD or DVD. 7 After choosing the backup method, click Next. a Use Backup to HDD to store the backup image on drive D:. Note: This feature...

Aspire 3500 User's Guide
Page 65
...CD are not available, you can restore backups previously created (as stated in the Create backup section) from hard drive, CD, or DVD. 1 Boot to Windows XP. 2 Press + to open the Acer eRecovery utility. 3 Enter the password to complete the restore process. Factory default image and click Next. ...7 Follow the instructions on the hard drive (D:\). English 57 Restore from backup You can create them by using this feature. 1 Boot to Windows XP. 2 Press + to open the Acer eRecovery utility. 3 Enter the password to complete the process. Please refer ...
...CD are not available, you can restore backups previously created (as stated in the Create backup section) from hard drive, CD, or DVD. 1 Boot to Windows XP. 2 Press + to open the Acer eRecovery utility. 3 Enter the password to complete the restore process. Factory default image and click Next. ...7 Follow the instructions on the hard drive (D:\). English 57 Restore from backup You can create them by using this feature. 1 Boot to Windows XP. 2 Press + to open the Acer eRecovery utility. 3 Enter the password to complete the process. Please refer ...


