Aspire 2930 / 2930Z / 2430 Service Guide
Page 37
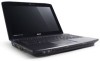
...; IGD DVMT Size • Clock Chip Intialize • Enabled CK SSC • IGD Boot Type • IGD LCD Panel Type • IGD TV • USB Driver Select • EHCI 1 and 2 • UHCI 1 to 5 • Per-Port Control • USB Port 1 to 6 configuration menus. Express Card PCI Express Root Port 1 to 6 Disable...
...; IGD DVMT Size • Clock Chip Intialize • Enabled CK SSC • IGD Boot Type • IGD LCD Panel Type • IGD TV • USB Driver Select • EHCI 1 and 2 • UHCI 1 to 5 • Per-Port Control • USB Port 1 to 6 configuration menus. Express Card PCI Express Root Port 1 to 6 Disable...
Aspire 2930 / 2930Z / 2430 Service Guide
Page 45
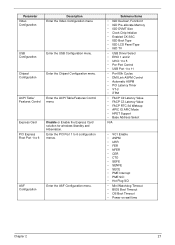
... boot as USB HDD) before you use the AC adaptor power supply when you use the DOS Flash Utility: 1. NOTE: Do not install memory-related drivers (XMS, EMS, DPMI) when you run the Phlash utility.
... boot as USB HDD) before you use the AC adaptor power supply when you use the DOS Flash Utility: 1. NOTE: Do not install memory-related drivers (XMS, EMS, DPMI) when you run the Phlash utility.
Aspire 2930 / 2930Z / 2430 Service Guide
Page 62
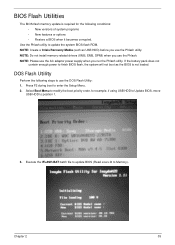
See "Removing the Battery Pack" on page 44. 2. Step ODD Module Size M2.5*8 Quantity 1 Screw Type 4. Using a screw driver, push the ODD module and grasp the front panel to remove the ODD cap. 3. Loosen the screw to remove from the computer. 52 Chapter 3 Remove the single securing screw. Removing the Optical Drive Module 1.
See "Removing the Battery Pack" on page 44. 2. Step ODD Module Size M2.5*8 Quantity 1 Screw Type 4. Using a screw driver, push the ODD module and grasp the front panel to remove the ODD cap. 3. Loosen the screw to remove from the computer. 52 Chapter 3 Remove the single securing screw. Removing the Optical Drive Module 1.
Aspire 2930 / 2930Z / 2430 Service Guide
Page 114
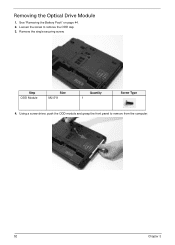
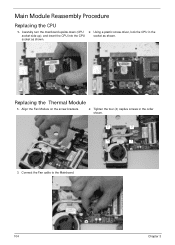
Main Module Reassembly Procedure Replacing the CPU 1. Replacing the Thermal Module 1. socket as shown. Using a plastic screw driver, lock the CPU in the order shown. 2 3 4 1 3. Connect the Fan cable to the Mainboard. 104 Chapter 3 Tighten the four (4) captive screws in the socket side up), and insert the CPU into the CPU socket as shown. Carefully turn the mainboard upside down (CPU 2. Align the Fan Module on the screw brackets. 2.
Main Module Reassembly Procedure Replacing the CPU 1. Replacing the Thermal Module 1. socket as shown. Using a plastic screw driver, lock the CPU in the order shown. 2 3 4 1 3. Connect the Fan cable to the Mainboard. 104 Chapter 3 Tighten the four (4) captive screws in the socket side up), and insert the CPU into the CPU socket as shown. Carefully turn the mainboard upside down (CPU 2. Align the Fan Module on the screw brackets. 2.
Aspire 2930 / 2930Z / 2430 Service Guide
Page 138
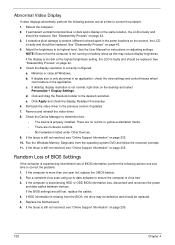
... 5. If display size is listed under Other Devices. 9. Click and drag the Resolution slider to its highest level. Remove and reinstall the video driver. 8. There are no device conflicts. • No hardware is only abnormal in an application, check the view settings and control/mouse wheel zoom... and data cables between devices. If desktop display resolution is virus free. 3. d. Click Apply and check the display. Roll back the video driver to ensure the computer is not normal, right-click on battery alone as this may be defective and should be replaced. 5. If the BIOS...
... 5. If display size is listed under Other Devices. 9. Click and drag the Resolution slider to its highest level. Remove and reinstall the video driver. 8. There are no device conflicts. • No hardware is only abnormal in an application, check the view settings and control/mouse wheel zoom... and data cables between devices. If desktop display resolution is virus free. 3. d. Click Apply and check the display. Roll back the video driver to ensure the computer is not normal, right-click on battery alone as this may be defective and should be replaced. 5. If the BIOS...
Aspire 2930 / 2930Z / 2430 Service Guide
Page 141
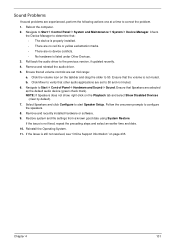
... not fixed, repeat the preceding steps and select an earlier time and date. 10. Remove and reinstall the audio driver. 5. Reinstall the Operating System. 11. Reboot the computer. 2. Roll back the audio driver to 50. Click the volume icon on the Playback tab and select Show Disabled Devices (clear by default). 7. NOTE...
... not fixed, repeat the preceding steps and select an earlier time and date. 10. Remove and reinstall the audio driver. 5. Reinstall the Operating System. 11. Reboot the computer. 2. Roll back the audio driver to 50. Click the volume icon on the Playback tab and select Show Disabled Devices (clear by default). 7. NOTE...
Aspire 2930 / 2930Z / 2430 Service Guide
Page 143
... Support. 9. Run a complete virus scan using System Restore. e. If an issue is virus free. 3. Restore system and file settings from a command prompt. NOTE: Click Load Drivers if controller drives are correct and that CD/DVD drive is not fixed, repeat the preceding steps and select an earlier time and date. 11...
... Support. 9. Run a complete virus scan using System Restore. e. If an issue is virus free. 3. Restore system and file settings from a command prompt. NOTE: Click Load Drivers if controller drives are correct and that CD/DVD drive is not fixed, repeat the preceding steps and select an earlier time and date. 11...
Aspire 2930 / 2930Z / 2430 Service Guide
Page 145
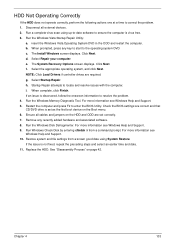
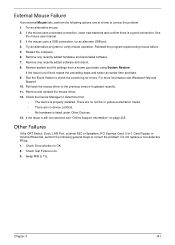
...label on the device and click Enable. c. If a device has an exclamation mark, right-click on the device and uninstall and reinstall the driver. Check that the disc is record enabled: a. Navigate to Start´ Control Panel´ System and Maintenance´ System´ Device Manager.... Maintenance´ System´ Device Manager. If a device has an exclamation mark, right-click on the device and uninstall and reinstall the driver. a. d. Check that system resources are no yellow exclamation marks against the items in the drive tray and that the default drive is correctly...
...label on the device and click Enable. c. If a device has an exclamation mark, right-click on the device and uninstall and reinstall the driver. Check that the disc is record enabled: a. Navigate to Start´ Control Panel´ System and Maintenance´ System´ Device Manager.... Maintenance´ System´ Device Manager. If a device has an exclamation mark, right-click on the device and uninstall and reinstall the driver. a. d. Check that system resources are no yellow exclamation marks against the items in the drive tray and that the default drive is correctly...
Aspire 2930 / 2930Z / 2430 Service Guide
Page 151
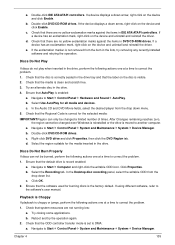
Remove any recently added software and reboot. 8. Remove any recently added hardware and associated software. 7. Remove and reinstall the mouse driver. 12. If the Issue is a good connection. Chapter 4 141 If the mouse uses a wireless connection, insert new batteries and confirm ...perform the following actions one at a time to correct the problem. 1. Run the Event Viewer to verify mouse operation. Roll back the mouse driver to Try. See the mouse user manual. 3. External Mouse Failure If an external Mouse fails, perform the following general steps to correct the ...
Remove any recently added software and reboot. 8. Remove any recently added hardware and associated software. 7. Remove and reinstall the mouse driver. 12. If the Issue is a good connection. Chapter 4 141 If the mouse uses a wireless connection, insert new batteries and confirm ...perform the following actions one at a time to correct the problem. 1. Run the Event Viewer to verify mouse operation. Roll back the mouse driver to Try. See the mouse user manual. 3. External Mouse Failure If an external Mouse fails, perform the following general steps to correct the ...
Aspire 2930 / 2930Z / 2430 Service Guide
Page 153
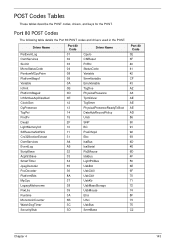
POST Codes Tables These tables describe the POST codes, drivers, and keys for the POST. Driver Name PeiEventLog OemServices SioInit MonoStatusCode PentiumMCpuPeim PlatformStage1 Variable IchInit PlatformStage2 IchSmbusArpDisabled ClockGen OpPresence TcgPei FindFv DxeIpl LightMemoryInit S3ResumeSoftSmi ...13 14 15 2F 10 11 31 A4 A5 32 33 34 35 36 8A 37 38 39 3A 3B 3C 3D Driver Name CpuIo Cf9Reset PcRtc StatusCode Variable SmmVariable EmuVariable TcgDxe PhysicalPresence TpmDriver TcgSmm PhysicalPresenceReadyToBoot DataHubRecordPolicy Undi SNP BC PxeDhcp4 Ebc IsaBus IsaSerial Ps2Mouse...
POST Codes Tables These tables describe the POST codes, drivers, and keys for the POST. Driver Name PeiEventLog OemServices SioInit MonoStatusCode PentiumMCpuPeim PlatformStage1 Variable IchInit PlatformStage2 IchSmbusArpDisabled ClockGen OpPresence TcgPei FindFv DxeIpl LightMemoryInit S3ResumeSoftSmi ...13 14 15 2F 10 11 31 A4 A5 32 33 34 35 36 8A 37 38 39 3A 3B 3C 3D Driver Name CpuIo Cf9Reset PcRtc StatusCode Variable SmmVariable EmuVariable TcgDxe PhysicalPresence TpmDriver TcgSmm PhysicalPresenceReadyToBoot DataHubRecordPolicy Undi SNP BC PxeDhcp4 Ebc IsaBus IsaSerial Ps2Mouse...

Aspire 2930 / 2930Z / 2430 Service Guide
Page 154
Driver Name SmmDisp SmmReloc SmmRuntime SmmThunk OemServices ChipsetInit SmmAccess PciHostBridge PciExpress GmchMbi IchInit IdeController SataController IchSmbusLight SmmControl Ich7MSmmDispatcher IsaAcpiDriver Fwh SmmFwh PciHotPlug BootOptionPolicy SetupUtility ...4A 4B C1 C8 4C 52 CE 54 51 76 55 56 D9 CC D0 f9 D1 D2 57 58 59 AB AC D7 A6 Driver Name HiiDatabase OemSetupBrowser Font(English) Font(French) Font(Chinese) UnicodeCollation ConPlatform ConSplitter GraphicsConsole Terminal VgaClass SaveMemoryConfig AcpiSupport AcpiPlatform DataHub DataHubStdErr GenericMemoryTest DiskIo Fat Partition...
Driver Name SmmDisp SmmReloc SmmRuntime SmmThunk OemServices ChipsetInit SmmAccess PciHostBridge PciExpress GmchMbi IchInit IdeController SataController IchSmbusLight SmmControl Ich7MSmmDispatcher IsaAcpiDriver Fwh SmmFwh PciHotPlug BootOptionPolicy SetupUtility ...4A 4B C1 C8 4C 52 CE 54 51 76 55 56 D9 CC D0 f9 D1 D2 57 58 59 AB AC D7 A6 Driver Name HiiDatabase OemSetupBrowser Font(English) Font(French) Font(Chinese) UnicodeCollation ConPlatform ConSplitter GraphicsConsole Terminal VgaClass SaveMemoryConfig AcpiSupport AcpiPlatform DataHub DataHubStdErr GenericMemoryTest DiskIo Fat Partition...


