
User Manual
Page 17
... RAID configuration utilities MEGARAID SAS 8204ELP configuration Onboard SATA RAID creation Appendix B Rack mount configuration Rack installation information System rack installation Vertical mounting hole pattern Installing the system into the rack Appendix C Acer Smart Console Using Acer Smart Console Software Installation ... the UPnP tool Using the UPnP tool to search for a server Configuring the BMC NIC settings Accessing Acer Smart Console Acer Smart Console user interface System status indicator System Information Server Health Configuration Remote Control Maintenance KVM Remote Console ...
... RAID configuration utilities MEGARAID SAS 8204ELP configuration Onboard SATA RAID creation Appendix B Rack mount configuration Rack installation information System rack installation Vertical mounting hole pattern Installing the system into the rack Appendix C Acer Smart Console Using Acer Smart Console Software Installation ... the UPnP tool Using the UPnP tool to search for a server Configuring the BMC NIC settings Accessing Acer Smart Console Acer Smart Console user interface System status indicator System Information Server Health Configuration Remote Control Maintenance KVM Remote Console ...

User Manual
Page 20
... for RAID 0, 1, 5 or 10. The server board is a single-processor tower server designed to three optical devices and four hot-pluggable SATA/SAS hard disk drives, configurable for easy hardware access and set up to meet the needs of various network environments. The server accepts up in both... 0, 1, 5 or 10 support, onboard Baseboard Management Controller (BMC), iKVM feature, and an integrated VGA with 32 MB memory. 2 1 System tour System notes AT310 F1 server is based on Intel® 2-chip architecture and supports the Intel Core i3, Intel Xeon 3400 series or Pentium processors.
... for RAID 0, 1, 5 or 10. The server board is a single-processor tower server designed to three optical devices and four hot-pluggable SATA/SAS hard disk drives, configurable for easy hardware access and set up to meet the needs of various network environments. The server accepts up in both... 0, 1, 5 or 10 support, onboard Baseboard Management Controller (BMC), iKVM feature, and an integrated VGA with 32 MB memory. 2 1 System tour System notes AT310 F1 server is based on Intel® 2-chip architecture and supports the Intel Core i3, Intel Xeon 3400 series or Pentium processors.

User Manual
Page 21
Allow installation of additional storage devices. Supports four 3.5-inch hot-plug SATA/ SAS hard disk drives. Unlock and open the bezel door to protect the server unit from unauthorized access. 3 External and internal structure Front panel No. Secures the bezel door to power on the server and access the server's hard drives and USB ports. Icon 1 2 3 4 5 Component Optical drive 5.25" drive bays Bezel door Security keylock 3.5-inch hard disk drive (HDD) bay Description Disk drive for reading CD, VCD, and DVD contents.
Allow installation of additional storage devices. Supports four 3.5-inch hot-plug SATA/ SAS hard disk drives. Unlock and open the bezel door to protect the server unit from unauthorized access. 3 External and internal structure Front panel No. Secures the bezel door to power on the server and access the server's hard drives and USB ports. Icon 1 2 3 4 5 Component Optical drive 5.25" drive bays Bezel door Security keylock 3.5-inch hard disk drive (HDD) bay Description Disk drive for reading CD, VCD, and DVD contents.

User Manual
Page 29
... fan 3 cable connector IPMB header (for an IPMI card) Select jumpers NMI button Backplane board system management bus (SMBUS) connector Intel 3420 PCH chipset Mini-SAS port (supports 4 ports, SATA only)
... fan 3 cable connector IPMB header (for an IPMI card) Select jumpers NMI button Backplane board system management bus (SMBUS) connector Intel 3420 PCH chipset Mini-SAS port (supports 4 ports, SATA only)
User Manual
Page 48
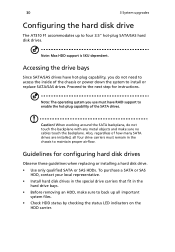
... system files. • Check HDD status by checking the status LED indicators on the HDD carrier. 30 3 System upgrades Configuring the hard disk drive The AT310 F1 accommodates up all four drive carriers must have hot-plug capability, you do not touch the backplane with any metal objects and make sure to... back up to maintain proper airflow. Accessing the drive bays Since SATA/SAS drives have RAID support to enable the hot-plug capability of the chassis or power down the system to access the inside of the SATA...
... system files. • Check HDD status by checking the status LED indicators on the HDD carrier. 30 3 System upgrades Configuring the hard disk drive The AT310 F1 accommodates up all four drive carriers must have hot-plug capability, you do not touch the backplane with any metal objects and make sure to... back up to maintain proper airflow. Accessing the drive bays Since SATA/SAS drives have RAID support to enable the hot-plug capability of the chassis or power down the system to access the inside of the SATA...

User Manual
Page 121
... configuration This section briefly shows how to create a RAID volume with the current array. Entering MegaRAID SAS RAID Configuration Utility To start MegaRAID SAS RAID Configuration Utility for the RAID volume. The screen shows a list of available adapters. 3 Select an adapter and press . An... the current controller. 3 Press the arrow keys to choose specific physical drives and press the space bar to use the default setting for MegaRAID SAS 8204ELP, press + when you see RAID BIOS during POST. Creating RAID Volume 1 Select Configuration from the Management Menu. 2 Select New Configuration...
... configuration This section briefly shows how to create a RAID volume with the current array. Entering MegaRAID SAS RAID Configuration Utility To start MegaRAID SAS RAID Configuration Utility for the RAID volume. The screen shows a list of available adapters. 3 Select an adapter and press . An... the current controller. 3 Press the arrow keys to choose specific physical drives and press the space bar to use the default setting for MegaRAID SAS 8204ELP, press + when you see RAID BIOS during POST. Creating RAID Volume 1 Select Configuration from the Management Menu. 2 Select New Configuration...