
Acer Aspire One AOA150 User's Guide
Page 18
... Expanding through options 23 Connectivity options 23 Built-in network feature 23 Universal Serial Bus (USB) 24 BIOS utility 24 Boot sequence 24 Enable disk-to-disk recovery 24 Password 25 Power management 25 Troubleshooting 26 Troubleshooting tips 26 Error messages 26 Regulations and safety notices 28 FCC notice 28 LCD pixel statement...
... Expanding through options 23 Connectivity options 23 Built-in network feature 23 Universal Serial Bus (USB) 24 BIOS utility 24 Boot sequence 24 Enable disk-to-disk recovery 24 Password 25 Power management 25 Troubleshooting 26 Troubleshooting tips 26 Error messages 26 Regulations and safety notices 28 FCC notice 28 LCD pixel statement...

Acer Aspire One AOA150 User's Guide
Page 29
... a restore operation, please check the BIOS settings. 1 Check to see if Acer disk-to-disk recovery is enabled or not. 2 Make sure the D2D Recovery setting in Main is showing, press + at the same time to enter the recovery process. 3 Refer to the onscreen instructions to the computer's parallel port or ...your system is important to a USB port on the system will reboot. Note: If your notebook. To start the recovery process: 1 Restart the system. 2 While the Acer logo is Enabled. 3 Exit the BIOS utility and save changes. Try attaching an external keyboard to back up all ...
... a restore operation, please check the BIOS settings. 1 Check to see if Acer disk-to-disk recovery is enabled or not. 2 Make sure the D2D Recovery setting in Main is showing, press + at the same time to enter the recovery process. 3 Refer to the onscreen instructions to the computer's parallel port or ...your system is important to a USB port on the system will reboot. Note: If your notebook. To start the recovery process: 1 Restart the system. 2 While the Acer logo is Enabled. 3 Exit the BIOS utility and save changes. Try attaching an external keyboard to back up all ...
Acer Aspire One AOA150 User's Guide
Page 42
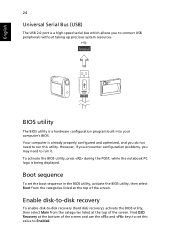
... and optimized, and you do not need to run this value to -disk recovery (hard disk recovery), activate the BIOS utility, then select Main from the categories listed at the top of the screen. Enable disk-to-disk recovery To enable disk-to Enabled. To activate the BIOS utility, press during the POST; while...in the BIOS utility, activate the BIOS utility, then select Boot from the categories listed at the bottom of the screen. Find D2D Recovery at the top of the screen and use the and keys to connect USB peripherals without taking up precious system resources. BIOS utility ...
... and optimized, and you do not need to run this value to -disk recovery (hard disk recovery), activate the BIOS utility, then select Main from the categories listed at the top of the screen. Enable disk-to-disk recovery To enable disk-to Enabled. To activate the BIOS utility, press during the POST; while...in the BIOS utility, activate the BIOS utility, then select Boot from the categories listed at the bottom of the screen. Find D2D Recovery at the top of the screen and use the and keys to connect USB peripherals without taking up precious system resources. BIOS utility ...
Service Guide
Page 9
Table of Contents Clearing Password Check and BIOS Recovery 113 Clearing Password Check 113 BIOS Recovery by Crisis Disk 114 FRU (Field Replaceable Unit) List 115 Aspire one Exploded Diagram 116 Aspire one FRU List 118 Screw List 126 Model Definition and Configuration 128 Aspire one Series 128 Aspire one Blue 128 Aspire one White 142 Test Compatible Components 155 Linux Environment Test 156 Aspire one Blue Testing Information 156 Aspire one White Testing Information 158 Online Support Information 161 Index 163 IX
Table of Contents Clearing Password Check and BIOS Recovery 113 Clearing Password Check 113 BIOS Recovery by Crisis Disk 114 FRU (Field Replaceable Unit) List 115 Aspire one Exploded Diagram 116 Aspire one FRU List 118 Screw List 126 Model Definition and Configuration 128 Aspire one Series 128 Aspire one Blue 128 Aspire one White 142 Test Compatible Components 155 Linux Environment Test 156 Aspire one Blue Testing Information 156 Aspire one White Testing Information 158 Online Support Information 161 Index 163 IX
Service Guide
Page 98
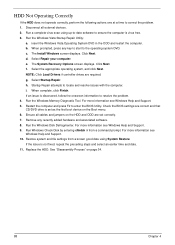
... and associated software. 8. d. Select Startup Repair. h. g. Remove any key to start to enter the BIOS Utility. Run Windows Check Disk by entering chkdsk /r from a known good date using up-to-date software to resolve the problem. 4. For more information see Windows ...Help and Support. 5. Restart the computer and press F2 to the operating system DVD. b. The System Recovery Options screen displays. Select Repair your computer. Replace the HDD. e. f. i. When complete, click Finish. For more information see Windows Help...
... and associated software. 8. d. Select Startup Repair. h. g. Remove any key to start to enter the BIOS Utility. Run Windows Check Disk by entering chkdsk /r from a known good date using up-to-date software to resolve the problem. 4. For more information see Windows ...Help and Support. 5. Restart the computer and press F2 to the operating system DVD. b. The System Recovery Options screen displays. Select Repair your computer. Replace the HDD. e. f. i. When complete, click Finish. For more information see Windows Help...
Service Guide
Page 124
... of USB storage. 2. Update the latest version BIOS for BIOS Recovery from USB Storage: Before doing this machine by regular BIOS flashing process. 114 Chapter 5 The Crisis USB key could be made by executing the Crisis Disk program in AC. Save ROM file (file name: JAL90x64.fd)...steps below: 1. Users can enable this function, it is complete, the system auto restarts with a workable BIOS. 5. BIOS Recovery by Crisis Disk BIOS Recovery Boot Block: BIOS Recovery Boot Block is powered on during BIOS POST. Plug USB storage into USB port. 3. Steps for this , prepare the Crisis...
... of USB storage. 2. Update the latest version BIOS for BIOS Recovery from USB Storage: Before doing this machine by regular BIOS flashing process. 114 Chapter 5 The Crisis USB key could be made by executing the Crisis Disk program in AC. Save ROM file (file name: JAL90x64.fd)...steps below: 1. Users can enable this function, it is complete, the system auto restarts with a workable BIOS. 5. BIOS Recovery by Crisis Disk BIOS Recovery Boot Block: BIOS Recovery Boot Block is powered on during BIOS POST. Plug USB storage into USB port. 3. Steps for this , prepare the Crisis...

