
User Manual
Page 13
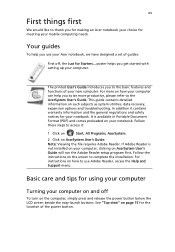
... the AcerSystem User's Guide. In addition it : 1 Click on Start, All Programs, AcerSystem. 2 Click on such subjects as system utilities, data recovery, expansion options and troubleshooting. For instructions on the screen to be more on AcerSystem User's Guide will run the Adobe Reader setup program first. Basic... care and tips for using your computer Turning your computer on and off To turn on your Acer notebook, we have designed a set of guides: First off, the Just for your computer can help you to complete the installation. Your...
... the AcerSystem User's Guide. In addition it : 1 Click on Start, All Programs, AcerSystem. 2 Click on such subjects as system utilities, data recovery, expansion options and troubleshooting. For instructions on the screen to be more on AcerSystem User's Guide will run the Adobe Reader setup program first. Basic... care and tips for using your computer Turning your computer on and off To turn on your Acer notebook, we have designed a set of guides: First off, the Just for your computer can help you to complete the installation. Your...
User Manual
Page 19
... models) 76 BIOS utility 79 Boot sequence 79 Enable disk-to-disk recovery 79 Password 79 Using software 80 Playing DVD movies 80 Power management 81 Acer eRecovery Management 82 Create backup 82 Burn backup disc 83 Restore and recovery 83 Troubleshooting 84 Troubleshooting tips 84 Error messages 84 Regulations and safety notices...
... models) 76 BIOS utility 79 Boot sequence 79 Enable disk-to-disk recovery 79 Password 79 Using software 80 Playing DVD movies 80 Power management 81 Acer eRecovery Management 82 Create backup 82 Burn backup disc 83 Restore and recovery 83 Troubleshooting 84 Troubleshooting tips 84 Error messages 84 Regulations and safety notices...

User Manual
Page 31
...; Password protection (Empowering Technology password) • Full and incremental backups to the D:\ drive. Empowering Technology 11 Acer eRecovery Management Acer eRecovery Management is a versatile backup utility. By default, user-created backups are stored to hard disk or optical ...disc • Creation of backups: • Factory default image • User backup image • Current system configuration • Application backup • Restore and recovery...
...; Password protection (Empowering Technology password) • Full and incremental backups to the D:\ drive. Empowering Technology 11 Acer eRecovery Management Acer eRecovery Management is a versatile backup utility. By default, user-created backups are stored to hard disk or optical ...disc • Creation of backups: • Factory default image • User backup image • Current system configuration • Application backup • Restore and recovery...
User Manual
Page 32
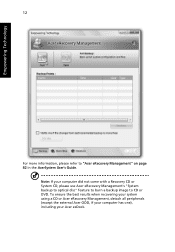
Empowering Technology 12 For more information, please refer to CD or DVD. To ensure the best results when recovering your system using a CD or Acer eRecovery Management, detach all peripherals (except the external Acer ODD, if your computer has one), including your computer did not come with a Recovery CD or System CD, please use Acer eRecovery Management's "System backup to optical disc" feature to burn a backup image to "Acer eRecovery Management" on page 82 in the AcerSystem User's Guide. Note: If your Acer ezDock.
Empowering Technology 12 For more information, please refer to CD or DVD. To ensure the best results when recovering your system using a CD or Acer eRecovery Management, detach all peripherals (except the external Acer ODD, if your computer has one), including your computer did not come with a Recovery CD or System CD, please use Acer eRecovery Management's "System backup to optical disc" feature to burn a backup image to "Acer eRecovery Management" on page 82 in the AcerSystem User's Guide. Note: If your Acer ezDock.
User Manual
Page 62
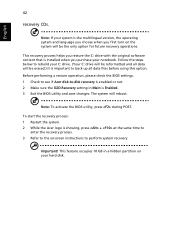
...the BIOS utility and save changes. English 42 recovery CDs. Note: If your hard disk. Before performing a restore operation, please check the BIOS settings. 1 Check to see if Acer disk-to-disk recovery is enabled or not. 2 Make sure the D2D Recovery setting in a hidden partition on the system will... be erased.) It is important to perform system recovery. To start the recovery process: 1 Restart the system. 2 While the Acer logo is installed when you...
...the BIOS utility and save changes. English 42 recovery CDs. Note: If your hard disk. Before performing a restore operation, please check the BIOS settings. 1 Check to see if Acer disk-to-disk recovery is enabled or not. 2 Make sure the D2D Recovery setting in a hidden partition on the system will... be erased.) It is important to perform system recovery. To start the recovery process: 1 Restart the system. 2 While the Acer logo is installed when you...
User Manual
Page 99
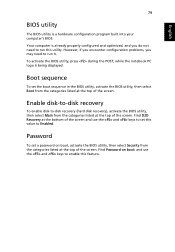
Enable disk-to-disk recovery To enable disk-to-disk recovery (hard disk recovery), activate the BIOS utility, then select Main from the categories listed at the top of the screen. while the notebook PC logo is a hardware configuration ... the categories listed at the top of the screen. Password To set this feature. To activate the BIOS utility, press during the POST; Find D2D Recovery at the top of the screen. English 79 BIOS utility The BIOS utility is being displayed. Boot sequence To set the boot sequence in the...
Enable disk-to-disk recovery To enable disk-to-disk recovery (hard disk recovery), activate the BIOS utility, then select Main from the categories listed at the top of the screen. while the notebook PC logo is a hardware configuration ... the categories listed at the top of the screen. Password To set this feature. To activate the BIOS utility, press during the POST; Find D2D Recovery at the top of the screen. English 79 BIOS utility The BIOS utility is being displayed. Boot sequence To set the boot sequence in the...

User Manual
Page 102
You can create and save a backup of the following functions: 1 Create backup 2 Burn backup disc 3 Restore and recovery This chapter will guide you may be prompted to enter the Empowering Technology password to create using Full or Fast. 3 Follow the instructions on...can easily create full and fast (incremental) backup images of your system configuration to hard disk from the Empowering Technology toolbar to start Acer eRecovery Management. 2 In the Acer eRecovery Management window, select the type of backup you want to proceed. You can also backup/restore the factory default image, and ...
You can create and save a backup of the following functions: 1 Create backup 2 Burn backup disc 3 Restore and recovery This chapter will guide you may be prompted to enter the Empowering Technology password to create using Full or Fast. 3 Follow the instructions on...can easily create full and fast (incremental) backup images of your system configuration to hard disk from the Empowering Technology toolbar to start Acer eRecovery Management. 2 In the Acer eRecovery Management window, select the type of backup you want to proceed. You can also backup/restore the factory default image, and ...

User Manual
Page 103
... from a factory default image, from a user created image, or from the Empowering Technology toolbar to start Acer eRecovery Management. 2 Switch to the restore and recovery page by selecting the Burn Disc button. 3 Select the type of Acer eRecovery Management, you can burn the factory default image, a user backup image, the current system configuration...
... from a factory default image, from a user created image, or from the Empowering Technology toolbar to start Acer eRecovery Management. 2 Switch to the restore and recovery page by selecting the Burn Disc button. 3 Select the type of Acer eRecovery Management, you can burn the factory default image, a user backup image, the current system configuration...
Service Guide
Page 9
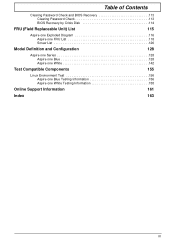
Table of Contents Clearing Password Check and BIOS Recovery 113 Clearing Password Check 113 BIOS Recovery by Crisis Disk 114 FRU (Field Replaceable Unit) List 115 Aspire one Exploded Diagram 116 Aspire one FRU List 118 Screw List 126 Model Definition and Configuration 128 Aspire one Series 128 Aspire one Blue 128 Aspire one White 142 Test Compatible Components 155 Linux Environment Test 156 Aspire one Blue Testing Information 156 Aspire one White Testing Information 158 Online Support Information 161 Index 163 IX
Table of Contents Clearing Password Check and BIOS Recovery 113 Clearing Password Check 113 BIOS Recovery by Crisis Disk 114 FRU (Field Replaceable Unit) List 115 Aspire one Exploded Diagram 116 Aspire one FRU List 118 Screw List 126 Model Definition and Configuration 128 Aspire one Series 128 Aspire one Blue 128 Aspire one White 142 Test Compatible Components 155 Linux Environment Test 156 Aspire one Blue Testing Information 156 Aspire one White Testing Information 158 Online Support Information 161 Index 163 IX
Service Guide
Page 31
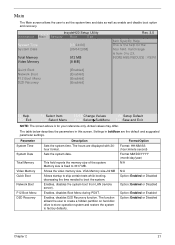
...system date. VGA Memory size=32 MB Allows startup to skip certain tests while booting, decreasing the time needed to factory defaults. Enables, disables D2D Recovery function. Shows the video memory size. Parameter System Time System Date Total Memory Video Memory Quick Boot Network Boot F12 Boot Menu D2D... Recovery Description Sets the system time. Valid range is fixed to 23. Memory size is from LAN (remote server). Main The Main screen allows the ...
...system date. VGA Memory size=32 MB Allows startup to skip certain tests while booting, decreasing the time needed to factory defaults. Enables, disables D2D Recovery function. Shows the video memory size. Parameter System Time System Date Total Memory Video Memory Quick Boot Network Boot F12 Boot Menu D2D... Recovery Description Sets the system time. Valid range is fixed to 23. Memory size is from LAN (remote server). Main The Main screen allows the ...
Service Guide
Page 37
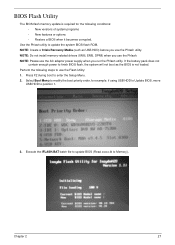
... following conditions: • New versions of system programs • New features or options • Restore a BIOS when it becomes corrupted. Chapter 2 27 NOTE: Create a Crisis Recovery Media (such as the BIOS is required for example, if using USB HDD to Update BIOS, move USB HDD to enter the Setup Menu. 2. Press...
... following conditions: • New versions of system programs • New features or options • Restore a BIOS when it becomes corrupted. Chapter 2 27 NOTE: Create a Crisis Recovery Media (such as the BIOS is required for example, if using USB HDD to Update BIOS, move USB HDD to enter the Setup Menu. 2. Press...
Service Guide
Page 98
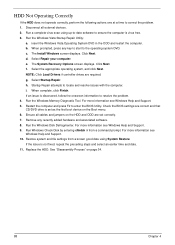
... a known good date using up-to-date software to the operating system DVD. Replace the HDD. Run a complete virus scan using System Restore. The System Recovery Options screen displays. For more information see Windows Help and Support. 9. Remove any key to start to ensure the computer is set correctly. 7. Run the...
... a known good date using up-to-date software to the operating system DVD. Replace the HDD. Run a complete virus scan using System Restore. The System Recovery Options screen displays. For more information see Windows Help and Support. 9. Remove any key to start to ensure the computer is set correctly. 7. Run the...
Service Guide
Page 103
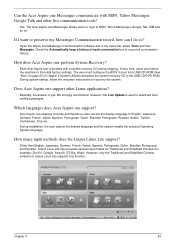
...any time, users can restore the machine to boot from USB CD-ROM (See "Boot" on . Which languages does Acer Aspire one perform System Recovery? During installation, the user selects the desired language and the system installs the selected Operating System language. We strongly recommend,...Russian, Arabic, Turkish, Vietnamese, Thai etc. However, only the Traditional and Simplified Chinese versions of each conversation box to recovery the system. Chapter 4 93 Yes. Acer Aspire one employs Unicode and therefore users can I want to MSN, Yahoo Messenger, Google Talk, AIM and so on ...
...any time, users can restore the machine to boot from USB CD-ROM (See "Boot" on . Which languages does Acer Aspire one perform System Recovery? During installation, the user selects the desired language and the system installs the selected Operating System language. We strongly recommend,...Russian, Arabic, Turkish, Vietnamese, Thai etc. However, only the Traditional and Simplified Chinese versions of each conversation box to recovery the system. Chapter 4 93 Yes. Acer Aspire one employs Unicode and therefore users can I want to MSN, Yahoo Messenger, Google Talk, AIM and so on ...
Service Guide
Page 123
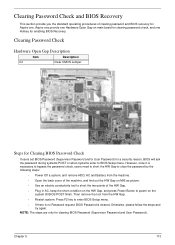
... Password is necessary to bypass the password check, users need to short the HW Gap to short the two points of clearing password and BIOS recovery for Aspire one Hotkey for clearing password check, and one . Then remove the tool from the machine. • Open the back cover of the... machine, and find out the HW Gap on main board for enabling BIOS Recovery. Clearing Password Check Hardware Open Gap Description Item G1 Description Clear CMOS Jumper Steps for Clearing BIOS Password Check If users set BIOS Password (Supervisor...
... Password is necessary to bypass the password check, users need to short the HW Gap to short the two points of clearing password and BIOS recovery for Aspire one Hotkey for clearing password check, and one . Then remove the tool from the machine. • Open the back cover of the... machine, and find out the HW Gap on main board for enabling BIOS Recovery. Clearing Password Check Hardware Open Gap Description Item G1 Description Clear CMOS Jumper Steps for Clearing BIOS Password Check If users set BIOS Password (Supervisor...
Service Guide
Page 124
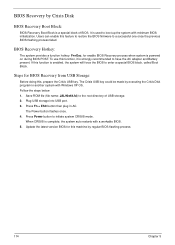
...fd) to the root directory of BIOS. Update the latest version BIOS for this , prepare the Crisis USB key. Steps for enable BIOS Recovery process when system is strongly recommended to have the AC adapter and Battery present. Press Fn + ESC button then plug in another system with... Windows XP OS. BIOS Recovery Hotkey: The system provides a function hotkey: Fn+Esc, for BIOS Recovery from USB Storage: Before doing this machine by regular BIOS flashing process. 114 Chapter 5 Plug USB storage into...
...fd) to the root directory of BIOS. Update the latest version BIOS for this , prepare the Crisis USB key. Steps for enable BIOS Recovery process when system is strongly recommended to have the AC adapter and Battery present. Press Fn + ESC button then plug in another system with... Windows XP OS. BIOS Recovery Hotkey: The system provides a function hotkey: Fn+Esc, for BIOS Recovery from USB Storage: Before doing this machine by regular BIOS flashing process. 114 Chapter 5 Plug USB storage into...

