
User Manual
Page 2
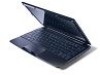
... only and belong to your unit should include the serial number, model number and purchase information. Aspire 7520/7220 Series Notebook PC Model number Serial number Date of purchase Place of Acer Incorporated. Acer Incorporated. Other companies' product names or trademarks are used herein for a particular purpose. Copyright © 2007. All Rights Reserved...
... only and belong to your unit should include the serial number, model number and purchase information. Aspire 7520/7220 Series Notebook PC Model number Serial number Date of purchase Place of Acer Incorporated. Acer Incorporated. Other companies' product names or trademarks are used herein for a particular purpose. Copyright © 2007. All Rights Reserved...
User Manual
Page 5
... damage. The full performance of the battery, charging will often require extensive work by other controls may expose you need for safe battery usage This notebook uses a Lithium-ion battery.
... damage. The full performance of the battery, charging will often require extensive work by other controls may expose you need for safe battery usage This notebook uses a Lithium-ion battery.
User Manual
Page 6
...properly. Potentially explosive atmospheres include areas where you carry a spare battery in your device in fire. Replacing the battery pack The notebook uses lithium batteries. Batteries may also explode if damaged. Switch off your pocket or purse. Keep them in any charger or battery...hundreds of times, but not always, marked. When the operation time becomes noticeably shorter than normal, buy a new battery. Use only Acer approved batteries, and recharge your product. The capacity and lifetime of batteries in hot or cold places, such as grain, dust or metal...
...properly. Potentially explosive atmospheres include areas where you carry a spare battery in your device in fire. Replacing the battery pack The notebook uses lithium batteries. Batteries may also explode if damaged. Switch off your pocket or purse. Keep them in any charger or battery...hundreds of times, but not always, marked. When the operation time becomes noticeably shorter than normal, buy a new battery. Use only Acer approved batteries, and recharge your product. The capacity and lifetime of batteries in hot or cold places, such as grain, dust or metal...
User Manual
Page 13
... information on page 15 for the location of the power button. xv First things first We would like to thank you for making an Acer notebook your choice for meeting your new computer. The printed User's Guide introduces you to the basic features and functions of guides: First off ...To help you use Adobe Reader, access the Help and Support menu. Follow the instructions on AcerSystem User's Guide. For more on how your Acer notebook, we have designed a set of your mobile computing needs. For instructions on the computer, simply press and release the power button below the LCD...
... information on page 15 for the location of the power button. xv First things first We would like to thank you for making an Acer notebook your choice for meeting your new computer. The printed User's Guide introduces you to the basic features and functions of guides: First off ...To help you use Adobe Reader, access the Help and Support menu. Follow the instructions on AcerSystem User's Guide. For more on how your Acer notebook, we have designed a set of your mobile computing needs. For instructions on the computer, simply press and release the power button below the LCD...
User Manual
Page 16
... Taking care of your battery pack xvii Cleaning and servicing xvii Acer Empowering Technology 1 Empowering Technology password 1 Acer eNet Management 2 Acer ePower Management 4 Acer eAudio Management 6 Acer ePresentation Management 7 Acer eDataSecurity Management 8 Acer eLock Management 9 Acer eRecovery Management 11 Acer eSettings Management 13 Windows Mobility Center 14 Your Acer notebook tour 15 Top view 15 Closed front view 17 Left view...
... Taking care of your battery pack xvii Cleaning and servicing xvii Acer Empowering Technology 1 Empowering Technology password 1 Acer eNet Management 2 Acer ePower Management 4 Acer eAudio Management 6 Acer ePresentation Management 7 Acer eDataSecurity Management 8 Acer eLock Management 9 Acer eRecovery Management 11 Acer eSettings Management 13 Windows Mobility Center 14 Your Acer notebook tour 15 Top view 15 Closed front view 17 Left view...
User Manual
Page 18
...57 Program guide 57 Find program 57 TV settings 57 Using TeleText functions 58 Acer Arcade Deluxe (for selected models) 60 60 Remote control (for selected models) 61 Remote functions 62 Starting Acer Arcade Deluxe 63 VideoMagician 63 TV Joy (selected models only) 63 SportsCap (...selected models only) 63 DV Wizard 64 DVDivine 64 Taking your notebook PC with you 65 Disconnecting from the desktop 65 Moving around...
...57 Program guide 57 Find program 57 TV settings 57 Using TeleText functions 58 Acer Arcade Deluxe (for selected models) 60 60 Remote control (for selected models) 61 Remote functions 62 Starting Acer Arcade Deluxe 63 VideoMagician 63 TV Joy (selected models only) 63 SportsCap (...selected models only) 63 DV Wizard 64 DVDivine 64 Taking your notebook PC with you 65 Disconnecting from the desktop 65 Moving around...
User Manual
Page 35
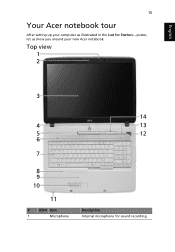
poster, let us show you around your computer as illustrated in the Just for sound recording. Top view 1 2 3 14 4 13 5 12 6 6 7 8 9 10 11 # ICON Item 1 Microphone Description Internal microphone for Starters... English 15 Your Acer notebook tour After setting up your new Acer notebook.
poster, let us show you around your computer as illustrated in the Just for sound recording. Top view 1 2 3 14 4 13 5 12 6 6 7 8 9 10 11 # ICON Item 1 Microphone Description Internal microphone for Starters... English 15 Your Acer notebook tour After setting up your new Acer notebook.

User Manual
Page 53
Insert a paper clip to the emergency eject hole to eject the optical drive tray when the computer is on. Insert the lock into the notch and turn the key to secure the lock. Some keyless models are also available. Using a computer security lock The notebook comes with a Kensington-compatible security slot for a security lock. Wrap the computer security lock cable around an immovable object such as a table or handle of a locked drawer. English 33 Ejecting the optical (CD or DVD) drive tray Press the drive eject button to eject the optical drive tray when the computer is off.
Insert a paper clip to the emergency eject hole to eject the optical drive tray when the computer is on. Insert the lock into the notch and turn the key to secure the lock. Some keyless models are also available. Using a computer security lock The notebook comes with a Kensington-compatible security slot for a security lock. Wrap the computer security lock cable around an immovable object such as a table or handle of a locked drawer. English 33 Ejecting the optical (CD or DVD) drive tray Press the drive eject button to eject the optical drive tray when the computer is off.
User Manual
Page 55
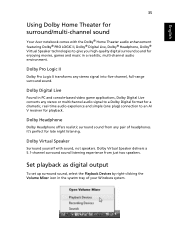
..., Dolby® Headphone, Dolby® Virtual Speaker technologies to an A/ V receiver for playback. English 35 Using Dolby Home Theater for surround/multi-channel sound Your Acer notebook comes with sound, not speakers. Dolby Digital Live Found in PC and console-based video game applications, Dolby Digital Live converts any pair of your...
..., Dolby® Headphone, Dolby® Virtual Speaker technologies to an A/ V receiver for playback. English 35 Using Dolby Home Theater for surround/multi-channel sound Your Acer notebook comes with sound, not speakers. Dolby Digital Live Found in PC and console-based video game applications, Dolby Digital Live converts any pair of your...

User Manual
Page 57
...function, please go to complete the process. You may choose any one of your notebook, first ensure that offers four pre-defined display settings so you can view multiple windows on certain models. Acer GridVista is simple to be partitioned independently. To enable the dual display feature of...the four display settings indicated below: 12 2 13 1 3 2 13 2 4 Double (vertical), Triple (primary at left), Triple (primary at right), or Quad Acer Gridvista is dual-display compatible, allowing two displays to set up: To access this monitor. English 37 Using the system utilities...
...function, please go to complete the process. You may choose any one of your notebook, first ensure that offers four pre-defined display settings so you can view multiple windows on certain models. Acer GridVista is simple to be partitioned independently. To enable the dual display feature of...the four display settings indicated below: 12 2 13 1 3 2 13 2 4 Double (vertical), Triple (primary at left), Triple (primary at right), or Quad Acer Gridvista is dual-display compatible, allowing two displays to set up: To access this monitor. English 37 Using the system utilities...
User Manual
Page 61
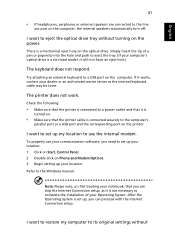
...: • Make sure that the printer is connected to eject the tray. (If your computer's optical drive is a slot-load model, it works, contact your notebook, that you can skip the Internet Connection setup, as the internal keyboard cable may be loose. English 41 • If headphones, earphones or external speakers...
...: • Make sure that the printer is connected to eject the tray. (If your computer's optical drive is a slot-load model, it works, contact your notebook, that you can skip the Internet Connection setup, as the internal keyboard cable may be loose. English 41 • If headphones, earphones or external speakers...
User Manual
Page 62
... and language you choose when you purchase your hard disk. Before performing a restore operation, please check the BIOS settings. 1 Check to see if Acer disk-to rebuild your C: drive. (Your C: drive will be reformatted and all data files before using this option. Important! Note: If your .... 3 Exit the BIOS utility and save changes. To start the recovery process: 1 Restart the system. 2 While the Acer logo is installed when you first turn on your notebook. This recovery process helps you restore the C: drive with the original software content that is showing, press + at the same...
... and language you choose when you purchase your hard disk. Before performing a restore operation, please check the BIOS settings. 1 Check to see if Acer disk-to rebuild your C: drive. (Your C: drive will be reformatted and all data files before using this option. Important! Note: If your .... 3 Exit the BIOS utility and save changes. To start the recovery process: 1 Restart the system. 2 While the Acer logo is installed when you first turn on your notebook. This recovery process helps you restore the C: drive with the original software content that is showing, press + at the same...
User Manual
Page 85
... latch the display. To bring the computer out of Sleep mode, open the display; then press and release the power button. English 65 Taking your notebook PC with your office desk to secure the computer. then press and release the power button. When you are taking the computer to a client's office...
... latch the display. To bring the computer out of Sleep mode, open the display; then press and release the power button. English 65 Taking your notebook PC with your office desk to secure the computer. then press and release the power button. When you are taking the computer to a client's office...
User Manual
Page 89
... - Insert the lock into the BIOS utility. Setting these passwords creates several different levels of your computer. Combine the use . Using a computer security lock The notebook comes with password checkpoints on boot-up and resume from Hibernation for maximum security. Once set, you forget your password, please get in touch with...
... - Insert the lock into the BIOS utility. Setting these passwords creates several different levels of your computer. Combine the use . Using a computer security lock The notebook comes with password checkpoints on boot-up and resume from Hibernation for maximum security. Once set, you forget your password, please get in touch with...
User Manual
Page 91
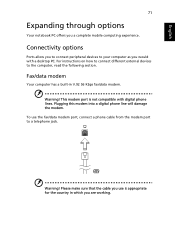
English 71 Expanding through options Your notebook PC offers you would with digital phone lines. Fax/data modem Your computer has a built-in which you are working. Warning! Plugging this modem into a ...
English 71 Expanding through options Your notebook PC offers you would with digital phone lines. Fax/data modem Your computer has a built-in which you are working. Warning! Plugging this modem into a ...

User Manual
Page 96
Acer DVB-T digital antenna To connect the antenna: Plug the antenna cable into your notebook's RF-in jack. 2 Connect the other end to your TV antenna cable, using the NTSC converter if necessary. Notebook RF Note: All diagrams are for your region before attempting to connect the antenna cable. Actual equipment ...may differ in appearance. PAL/SECAM and NTSC systems 1 Plug the PAL/SECAM cable's RF plug into the RF-in jack of your Acer notebook. English 76 Connecting your TV and AV-in cables (for selected models) Follow the instructions below to set up the TV function of your...
Acer DVB-T digital antenna To connect the antenna: Plug the antenna cable into your notebook's RF-in jack. 2 Connect the other end to your TV antenna cable, using the NTSC converter if necessary. Notebook RF Note: All diagrams are for your region before attempting to connect the antenna cable. Actual equipment ...may differ in appearance. PAL/SECAM and NTSC systems 1 Plug the PAL/SECAM cable's RF plug into the RF-in jack of your Acer notebook. English 76 Connecting your TV and AV-in cables (for selected models) Follow the instructions below to set up the TV function of your...

User Manual
Page 97
... the bottom section pops out. 2 Pull the bottom up until it is only compatible with DVB-T digital TV systems. A magnet located on top of your notebook display using the special clip, as shown below. 4 Extend the antenna to fix it firmly onto a metal surface for better stability and reception. Doing so...
... the bottom section pops out. 2 Pull the bottom up until it is only compatible with DVB-T digital TV systems. A magnet located on top of your notebook display using the special clip, as shown below. 4 Extend the antenna to fix it firmly onto a metal surface for better stability and reception. Doing so...

User Manual
Page 98
Notebook AV-in AV-in Camcorder VHS Note: Extension cables may not be used to connect your notebook to the help file. For more details on your VHS player, camcorder or other ends to the S-video or composite audio/video jacks on how to capture TV or video clips please refer to a VHS player or camcorder for viewing, capturing and recording video clips. 1 Plug the single end of your notebook. 2 Connect the other compatible device. English S RWY S RWY S RWY Audio Video R L 78 AV-in cable The AV-in port of the cable into the AV-in cable can be necessary.
Notebook AV-in AV-in Camcorder VHS Note: Extension cables may not be used to connect your notebook to the help file. For more details on your VHS player, camcorder or other ends to the S-video or composite audio/video jacks on how to capture TV or video clips please refer to a VHS player or camcorder for viewing, capturing and recording video clips. 1 Plug the single end of your notebook. 2 Connect the other compatible device. English S RWY S RWY S RWY Audio Video R L 78 AV-in cable The AV-in port of the cable into the AV-in cable can be necessary.
User Manual
Page 99
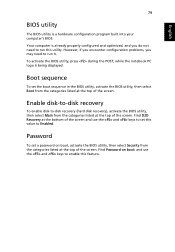
... the screen. Find Password on boot, activate the BIOS utility, then select Security from the categories listed at the top of the screen. while the notebook PC logo is a hardware configuration program built into your computer's BIOS. Password To set a password on boot: and use the and keys to set the...
... the screen. Find Password on boot, activate the BIOS utility, then select Security from the categories listed at the top of the screen. while the notebook PC logo is a hardware configuration program built into your computer's BIOS. Password To set a password on boot: and use the and keys to set the...
User Manual
Page 104
Troubleshooting tips This notebook PC incorporates an advanced design that delivers onscreen error message reports to deal with the recommended course of action. See "Requesting service" on page 43. ...
Troubleshooting tips This notebook PC incorporates an advanced design that delivers onscreen error message reports to deal with the recommended course of action. See "Requesting service" on page 43. ...


