
User Manual
Page 19
... memory 75 Connecting your TV and AV-in cables (for selected models) 76 BIOS utility 79 Boot sequence 79 Enable disk-to-disk recovery 79 Password 79 Using software 80 Playing DVD movies 80 Power management 81 Acer eRecovery Management 82 Create backup 82 Burn backup disc 83 Restore and recovery 83...
... memory 75 Connecting your TV and AV-in cables (for selected models) 76 BIOS utility 79 Boot sequence 79 Enable disk-to-disk recovery 79 Password 79 Using software 80 Playing DVD movies 80 Power management 81 Acer eRecovery Management 82 Create backup 82 Burn backup disc 83 Restore and recovery 83...

User Manual
Page 33
Acer eSettings Management also: • Provides a simple graphical user interface for navigation. • Prints and saves hardware specifications. • Lets you to inspect hardware specifications, set an asset tag for your system. Empowering Technology 13 Acer eSettings Management Acer eSettings Management allows you set BIOS passwords and modify boot options.
Acer eSettings Management also: • Provides a simple graphical user interface for navigation. • Prints and saves hardware specifications. • Lets you to inspect hardware specifications, set an asset tag for your system. Empowering Technology 13 Acer eSettings Management Acer eSettings Management allows you set BIOS passwords and modify boot options.
User Manual
Page 51
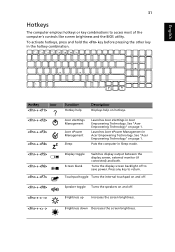
...the screen brightness. To activate hotkeys, press and hold the key before pressing the other key in Acer Empowering Technology. Puts the computer in Acer Empowering Technology. English 31 Hotkeys The computer employs hotkeys or key combinations to access most of the ...computer's controls like screen brightness and the BIOS utility. Acer eSettings Management Acer ePower Management Sleep Launches Acer eSettings in Sleep mode. + + + + Display toggle Screen blank Switches display output between the display ...
...the screen brightness. To activate hotkeys, press and hold the key before pressing the other key in Acer Empowering Technology. Puts the computer in Acer Empowering Technology. English 31 Hotkeys The computer employs hotkeys or key combinations to access most of the ...computer's controls like screen brightness and the BIOS utility. Acer eSettings Management Acer ePower Management Sleep Launches Acer eSettings in Sleep mode. + + + + Display toggle Screen blank Switches display output between the display ...
User Manual
Page 62
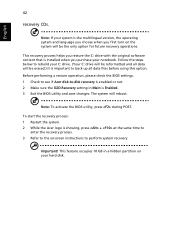
... 42 recovery CDs. Before performing a restore operation, please check the BIOS settings. 1 Check to see if Acer disk-to-disk recovery is enabled or not. 2 Make sure the... perform system recovery. To start the recovery process: 1 Restart the system. 2 While the Acer logo is Enabled. 3 Exit the BIOS utility and save changes. The system will be the only option for future recovery operations. Note: ...To activate the BIOS utility, press during POST. Follow the steps below to back up all data will reboot...
... 42 recovery CDs. Before performing a restore operation, please check the BIOS settings. 1 Check to see if Acer disk-to-disk recovery is enabled or not. 2 Make sure the... perform system recovery. To start the recovery process: 1 Restart the system. 2 While the Acer logo is Enabled. 3 Exit the BIOS utility and save changes. The system will be the only option for future recovery operations. Note: ...To activate the BIOS utility, press during POST. Follow the steps below to back up all data will reboot...
User Manual
Page 89
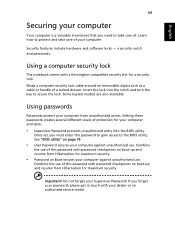
...Security features include hardware and software locks - Combine the use . Do not forget your Supervisor Password! Insert the lock into the BIOS utility. Setting these passwords creates several different levels of . Some keyless models are also available. a security notch and passwords. Using ...lock The notebook comes with password checkpoints on Boot secures your computer against unauthorized use of this password to gain access to the BIOS utility. Once set, you must enter this password with a Kensington-compatible security slot for a security lock. English 69 Securing...
...Security features include hardware and software locks - Combine the use . Do not forget your Supervisor Password! Insert the lock into the BIOS utility. Setting these passwords creates several different levels of . Some keyless models are also available. a security notch and passwords. Using ...lock The notebook comes with password checkpoints on Boot secures your computer against unauthorized use of this password to gain access to the BIOS utility. Once set, you must enter this password with a Kensington-compatible security slot for a security lock. English 69 Securing...

User Manual
Page 90
... the password correctly after three tries, the system halts. Then turn on boot parameter is set passwords using the BIOS utility. Important! If you press to enter the BIOS utility at boot-up . • Type the Supervisor Password and press to shut down the computer. Press and... hold the power button for four seconds to access the BIOS utility. If you enter the password incorrectly, a warning message appears. Try again and press . If you enter the password incorrectly, a warning message...
... the password correctly after three tries, the system halts. Then turn on boot parameter is set passwords using the BIOS utility. Important! If you press to enter the BIOS utility at boot-up . • Type the Supervisor Password and press to shut down the computer. Press and... hold the power button for four seconds to access the BIOS utility. If you enter the password incorrectly, a warning message appears. Try again and press . If you enter the password incorrectly, a warning message...
User Manual
Page 99
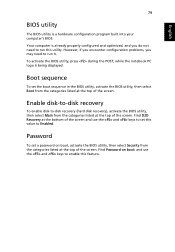
...this value to Enabled. Password To set a password on boot: and use the and keys to -disk recovery (hard disk recovery), activate the BIOS utility, then select Main from the categories listed at the top of the screen. while the notebook PC logo is a hardware configuration program built..., then select Security from the categories listed at the top of the screen. Boot sequence To set this utility. English 79 BIOS utility The BIOS utility is being displayed. Your computer is already properly configured and optimized, and you may need to enable this feature. Find D2D...
...this value to Enabled. Password To set a password on boot: and use the and keys to -disk recovery (hard disk recovery), activate the BIOS utility, then select Main from the categories listed at the top of the screen. while the notebook PC logo is a hardware configuration program built..., then select Security from the categories listed at the top of the screen. Boot sequence To set this utility. English 79 BIOS utility The BIOS utility is being displayed. Your computer is already properly configured and optimized, and you may need to enable this feature. Find D2D...
User Manual
Page 104
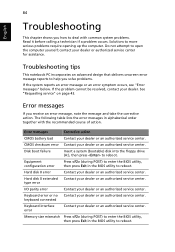
... CMOS battery bad Contact your dealer or an authorized service center. Equipment configuration error Press (during POST) to enter the BIOS utility, then press Exit in the BIOS utility to deal with the recommended course of action. The following table lists the error messages in the... BIOS utility to enter the BIOS utility, then press Exit in alphabetical order together with common system problems. Read it before calling a technician if a problem occurs. Disk...
... CMOS battery bad Contact your dealer or an authorized service center. Equipment configuration error Press (during POST) to enter the BIOS utility, then press Exit in the BIOS utility to deal with the recommended course of action. The following table lists the error messages in the... BIOS utility to enter the BIOS utility, then press Exit in alphabetical order together with common system problems. Read it before calling a technician if a problem occurs. Disk...

User Manual
Page 105
Some problems may be solved using the BIOS utility. 85 If you still encounter problems after going through the corrective measures, please contact your dealer or an authorized service center for assistance. English English
Some problems may be solved using the BIOS utility. 85 If you still encounter problems after going through the corrective measures, please contact your dealer or an authorized service center for assistance. English English

User Manual
Page 118
... characteristics 44 charging 46 checking charge level 46 installing 45 low conditions 47 maximizing life 44 optimizing 46 removing 46 using the first time 44 BIOS utility 79 brightness hotkeys 31 C caps lock 29 on indicator 25 care AC adapter xvi battery pack xvii computer xvi CD-ROM ejecting manually 41...
... characteristics 44 charging 46 checking charge level 46 installing 45 low conditions 47 maximizing life 44 optimizing 46 removing 46 using the first time 44 BIOS utility 79 brightness hotkeys 31 C caps lock 29 on indicator 25 care AC adapter xvi battery pack xvii computer xvi CD-ROM ejecting manually 41...
Service Guide
Page 7
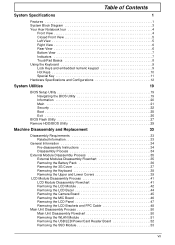
...Acer Notebook tour 4 Front View 4 Closed Front View 5 Left View 5 Right View 6 Rear View 6 Bottom View 7 Indicators 7 TouchPad Basics 8 Using the Keyboard 9 Lock Keys and embedded numeric keypad 9 Hot Keys 10 Special Key 11 Hardware Specifications and Configurations 12 System Utilities 19 BIOS... Setup Utility 19 Navigating the BIOS Utility 19 Information 20 Main 21 Security 22 Boot 25 Exit 26 BIOS Flash Utility 27 Remove HDD/BIOS Utility 29 Machine Disassembly and Replacement 33 Disassembly ...
...Acer Notebook tour 4 Front View 4 Closed Front View 5 Left View 5 Right View 6 Rear View 6 Bottom View 7 Indicators 7 TouchPad Basics 8 Using the Keyboard 9 Lock Keys and embedded numeric keypad 9 Hot Keys 10 Special Key 11 Hardware Specifications and Configurations 12 System Utilities 19 BIOS... Setup Utility 19 Navigating the BIOS Utility 19 Information 20 Main 21 Security 22 Boot 25 Exit 26 BIOS Flash Utility 27 Remove HDD/BIOS Utility 29 Machine Disassembly and Replacement 33 Disassembly ...
Service Guide
Page 8
... Replacing the 3G cover 77 Replacing the Battery 77 Troubleshooting 79 Common Problems 79 Power On Issue 80 No Display Issue 81 Random Loss of BIOS Settings 83 LCD Failure 84 Built-In Keyboard Failure 84 TouchPad Failure 85 Internal Speaker Failure 85 Internal Microphone Failure 87 HDD Not Operating Correctly...
... Replacing the 3G cover 77 Replacing the Battery 77 Troubleshooting 79 Common Problems 79 Power On Issue 80 No Display Issue 81 Random Loss of BIOS Settings 83 LCD Failure 84 Built-In Keyboard Failure 84 TouchPad Failure 85 Internal Speaker Failure 85 Internal Microphone Failure 87 HDD Not Operating Correctly...
Service Guide
Page 9
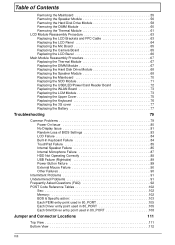
Table of Contents Clearing Password Check and BIOS Recovery 113 Clearing Password Check 113 BIOS Recovery by Crisis Disk 114 FRU (Field Replaceable Unit) List 115 Aspire one Exploded Diagram 116 Aspire one FRU List 118 Screw List 126 Model Definition and Configuration 128 Aspire one Series 128 Aspire one Blue 128 Aspire one White 142 Test Compatible Components 155 Linux Environment Test 156 Aspire one Blue Testing Information 156 Aspire one White Testing Information 158 Online Support Information 161 Index 163 IX
Table of Contents Clearing Password Check and BIOS Recovery 113 Clearing Password Check 113 BIOS Recovery by Crisis Disk 114 FRU (Field Replaceable Unit) List 115 Aspire one Exploded Diagram 116 Aspire one FRU List 118 Screw List 126 Model Definition and Configuration 128 Aspire one Series 128 Aspire one Blue 128 Aspire one White 142 Test Compatible Components 155 Linux Environment Test 156 Aspire one Blue Testing Information 156 Aspire one White Testing Information 158 Online Support Information 161 Index 163 IX

Service Guide
Page 11
... upgrade the Aspire one memory. • One DDRII SO-DIMM slots support 512MB to 1024MB system memory • 512MB on board memory • 1MB Flash BIOS Display and graphics • 8.9" Wide Screen LCD (1024x600) • LED backlight LCD Storage subsystem • 8GB SSD module PATA interface • Fixed type for 80GB...
... upgrade the Aspire one memory. • One DDRII SO-DIMM slots support 512MB to 1024MB system memory • 512MB on board memory • 1MB Flash BIOS Display and graphics • 8.9" Wide Screen LCD (1024x600) • LED backlight LCD Storage subsystem • 8GB SSD module PATA interface • Fixed type for 80GB...
Service Guide
Page 12
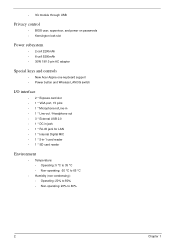
• 3G module through USB Privacy control • BIOS user, supervisor, and power on passwords • Kensington lock slot Power subsystem • 2-cell 2200mAh • 6-cell 5200mAh • 30W 19V 3-pin AC adapter Special keys and controls • New Acer Aspire one keyboard support • Power button and Wireless LAN/3G switch I/O interface...
• 3G module through USB Privacy control • BIOS user, supervisor, and power on passwords • Kensington lock slot Power subsystem • 2-cell 2200mAh • 6-cell 5200mAh • 30W 19V 3-pin AC adapter Special keys and controls • New Acer Aspire one keyboard support • Power button and Wireless LAN/3G switch I/O interface...
Service Guide
Page 24
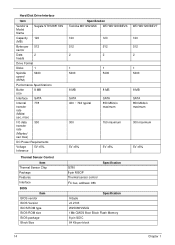
... SATA 850 Mbits/s maximum 300 150 maximum 5V ±5% 5V ±5% Thermal Sensor Control Item Thermal Sensor Chip Package Features Interface BIOS Item BIOS vendor BIOS Version BIOS ROM type BIOS ROM size BIOS package Block Size G780 8-pin MSOP Thermal sensor control I2C bus, address: 98h Specification Specification InSyde v0.2103 W25X80VSSIG 1Mb CMOS Boot...
... SATA 850 Mbits/s maximum 300 150 maximum 5V ±5% 5V ±5% Thermal Sensor Control Item Thermal Sensor Chip Package Features Interface BIOS Item BIOS vendor BIOS Version BIOS ROM type BIOS ROM size BIOS package Block Size G780 8-pin MSOP Thermal sensor control I2C bus, address: 98h Specification Specification InSyde v0.2103 W25X80VSSIG 1Mb CMOS Boot...
Service Guide
Page 26
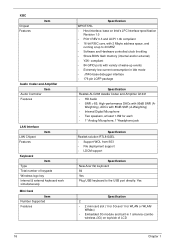
... solution RTL8102EL • Support WOL from S53 • File deployment support • LDCM support Specification New Acer flat keyboard 84 Yes Plug USB keyboard to 20 MHZ • Software and Hardware controlled clock throttling • Share BIOS flash memory (internal and/or external) • Y2K- compliant • 84 GPIO ports with variety...
... solution RTL8102EL • Support WOL from S53 • File deployment support • LDCM support Specification New Acer flat keyboard 84 Yes Plug USB keyboard to 20 MHZ • Software and Hardware controlled clock throttling • Share BIOS flash memory (internal and/or external) • Y2K- compliant • 84 GPIO ports with variety...
Service Guide
Page 29
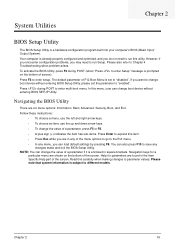
...disabled". Press F2 to parameter values. Chapter 2 19 Read this item. • Press Esc while you want to change boot device without entering BIOS SETUP Utility. Please note that system information is prompted on the bottom of a parameter, press F5 or F6. • A plus sign (+) ...indicates the item has sub-items. Press Enter to expand this carefully when making changes to enter setup. System Utilities Chapter 2 BIOS Setup Utility The BIOS Setup Utility is set the parameter to enter multi-boot menu. The default parameter of the screen. Your computer is already properly ...
...disabled". Press F2 to parameter values. Chapter 2 19 Read this item. • Press Esc while you want to change boot device without entering BIOS SETUP Utility. Please note that system information is prompted on the bottom of a parameter, press F5 or F6. • A plus sign (+) ...indicates the item has sub-items. Press Enter to expand this carefully when making changes to enter setup. System Utilities Chapter 2 BIOS Setup Utility The BIOS Setup Utility is set the parameter to enter multi-boot menu. The default parameter of the screen. Your computer is already properly ...
Service Guide
Page 30
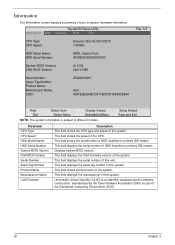
...N270 1.60GHz HDD Model Name: HDD Serial Number: INTEL Castle Point 00008030320000000000 System BIOS Version: VGA BIOS Version: v0.2103 Intel V1585 Serial Number: Asset Tag Number: Product Name: Manufacturer Name: UUID: ZG008160067 Acer 405FE2E9A4E1D4118251001E684CE894 Rev. 3.5 F1 Help ESC Exit ↑↓ Select Item ←→... F9 Setup Default F10 Save and Exit Parameter CPU Type CPU Speed HDD Model Name HDD Serial Number System BIOS Version VGA BIOS Version Serial Number Asset Tag Number Product Name Manufacturer Name UUID Number Description This field shows the CPU type and...
...N270 1.60GHz HDD Model Name: HDD Serial Number: INTEL Castle Point 00008030320000000000 System BIOS Version: VGA BIOS Version: v0.2103 Intel V1585 Serial Number: Asset Tag Number: Product Name: Manufacturer Name: UUID: ZG008160067 Acer 405FE2E9A4E1D4118251001E684CE894 Rev. 3.5 F1 Help ESC Exit ↑↓ Select Item ←→... F9 Setup Default F10 Save and Exit Parameter CPU Type CPU Speed HDD Model Name HDD Serial Number System BIOS Version VGA BIOS Version Serial Number Asset Tag Number Product Name Manufacturer Name UUID Number Description This field shows the CPU type and...
Service Guide
Page 32
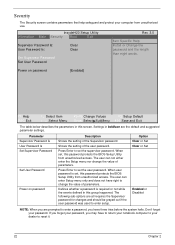
.../F6 Change Values F9 Setup Default Enter SelectXSubMenu F10 Save and Exit The table below describes the parameters in this password protects the BIOS Setup Utility from unauthorized access. The user can enter Setup menu only and does not have right to enter a password, you ... a password is set , this group happened. When user password is required or not while the events defined in this password protects the BIOS Setup Utility from unauthorized use. The following sub-options are the default and suggested parameter settings. If you forget your password, you have ...
.../F6 Change Values F9 Setup Default Enter SelectXSubMenu F10 Save and Exit The table below describes the parameters in this password protects the BIOS Setup Utility from unauthorized access. The user can enter Setup menu only and does not have right to enter a password, you ... a password is set , this group happened. When user password is required or not while the events defined in this password protects the BIOS Setup Utility from unauthorized use. The following sub-options are the default and suggested parameter settings. If you forget your password, you have ...


