

AF715 User's Guide
Page 1
Operating Instructions 5 - Technical Support (FAQ 10 - Factory Preset Timing Table 13 - 1 Appendix A - Precautions 2 Installation Instructions 3 Swivel Base 3 Power cord 3 Video cable 4 - How to adjust a setting 6 - Front panel control 6 - Before operating the monitor please read this manual thoroughly. Specifications 11-12 Appendix B - General Instructions 5 - Adjusting the picture 6-8 Plug and play 9 - This manual should be retained for future reference. Contents Packing list 1 -
Operating Instructions 5 - Technical Support (FAQ 10 - Factory Preset Timing Table 13 - 1 Appendix A - Precautions 2 Installation Instructions 3 Swivel Base 3 Power cord 3 Video cable 4 - How to adjust a setting 6 - Front panel control 6 - Before operating the monitor please read this manual thoroughly. Specifications 11-12 Appendix B - General Instructions 5 - Adjusting the picture 6-8 Plug and play 9 - This manual should be retained for future reference. Contents Packing list 1 -

AF715 User's Guide
Page 2
Power Cord 1. Swivel Base 2 Owner's Manual 3. Pure Flat Color Monitor 2. PACKING LIST The product package should include the following items: 1.
Power Cord 1. Swivel Base 2 Owner's Manual 3. Pure Flat Color Monitor 2. PACKING LIST The product package should include the following items: 1.

AF715 User's Guide
Page 3
...strips and extension cords. z Never push any object into a grounded power outlet as a safety feature. opening or removing covers can expose you mount the monitor on the label. z The wall socket shall be installed near or over a radiator or heat register. If you to dangerous voltages and other hazards. ...Do not place the monitor near the equipment and shall be operated only from damage due to protect it will fit only into the slot on an unstable cart, stand...
...strips and extension cords. z Never push any object into a grounded power outlet as a safety feature. opening or removing covers can expose you mount the monitor on the label. z The wall socket shall be installed near or over a radiator or heat register. If you to dangerous voltages and other hazards. ...Do not place the monitor near the equipment and shall be operated only from damage due to protect it will fit only into the slot on an unstable cart, stand...

AF715 User's Guide
Page 4
...; Insert the pegs on the type of the swivel base, then push it out. Make sure the power cord is required. ) 3. This monitor has a universal power supply that required in your PC, depending on the swivel base into a 3-pin AC power outlet. Video cable 4 INSTALLATION INSTRUCTIONS Swivel Base ... swivel base forward until the swivel base locks in place. • To remove the swivel base, hold the bottom of power cord supplied with your monitor's power input socket, and then plug the other end into these cavities. Connect the power cord into your...
...; Insert the pegs on the type of the swivel base, then push it out. Make sure the power cord is required. ) 3. This monitor has a universal power supply that required in your PC, depending on the swivel base into a 3-pin AC power outlet. Video cable 4 INSTALLATION INSTRUCTIONS Swivel Base ... swivel base forward until the swivel base locks in place. • To remove the swivel base, hold the bottom of power cord supplied with your monitor's power input socket, and then plug the other end into these cavities. Connect the power cord into your...

AF715 User's Guide
Page 5
... 2) Caution:Don't bend the signal cable, otherwise it will break the inner wire. Then plug the power cord into the monitor's AC power jack. Figure 2 Connecting Cables 1. Connecting the Video Cable: the monitor comes with a built-in video cable. Signal Cable 5 Connecting the Power Cord: Plug the power cord into a grounded AC...
... 2) Caution:Don't bend the signal cable, otherwise it will break the inner wire. Then plug the power cord into the monitor's AC power jack. Figure 2 Connecting Cables 1. Connecting the Video Cable: the monitor comes with a built-in video cable. Signal Cable 5 Connecting the Power Cord: Plug the power cord into a grounded AC...

AF715 User's Guide
Page 6
POWER 2. MENU 4. Never use strong solvents such as it was originally packed at the factory. • To keep the monitor looking new, periodically clean it . 6 OPERATING INSTRUCTIONS General Instructions The power switch is switched on or off. Press the power switch ...CONTROLS 1. BRIGHTNESS/ 6. By changing these will come in handy if you ever have to your monitor as thinner, benzene, or abrasive cleaners, since these settings, the picture can be adjusted to ship your monitor. • For maximum protection, repackage your personal preferences. • The power cord should ...
POWER 2. MENU 4. Never use strong solvents such as it was originally packed at the factory. • To keep the monitor looking new, periodically clean it . 6 OPERATING INSTRUCTIONS General Instructions The power switch is switched on or off. Press the power switch ...CONTROLS 1. BRIGHTNESS/ 6. By changing these will come in handy if you ever have to your monitor as thinner, benzene, or abrasive cleaners, since these settings, the picture can be adjusted to ship your monitor. • For maximum protection, repackage your personal preferences. • The power cord should ...

AF715 User's Guide
Page 7
Off mode. Click the "MENU" key to switch ON/OFF of monitor's power. • MENU : Active OSD menu or function adjust confirm. • Contrast / : Adjust contrast or function adjust. • Brightness / : Adjust brightness or function adjust. • ...
Off mode. Click the "MENU" key to switch ON/OFF of monitor's power. • MENU : Active OSD menu or function adjust confirm. • Contrast / : Adjust contrast or function adjust. • Brightness / : Adjust brightness or function adjust. • ...

AF715 User's Guide
Page 8
... distortion. 8 ZOOM : Adjust the picture's horizontal and vertical size simultaneously. 8. CONTRAST : Adjust the picture contrast. 2. BRIGHTNESS : Adjust the picture brightness. 3. How to adjust a setting The monitor controls are accessed by pressing button MENU to enable OSD (On-Screen-Display). The main menu will be saved and the OSD will be displayed...
... distortion. 8 ZOOM : Adjust the picture's horizontal and vertical size simultaneously. 8. CONTRAST : Adjust the picture contrast. 2. BRIGHTNESS : Adjust the picture brightness. 3. How to adjust a setting The monitor controls are accessed by pressing button MENU to enable OSD (On-Screen-Display). The main menu will be saved and the OSD will be displayed...

AF715 User's Guide
Page 9
... white or 6500°K warmer white do not satisfy your optimum whiteness level. 15. DEGAUSS : If color impurity occurs when moving or swiveling the monitor, press MENU Key and degauss to the optimum condition. Please adjust the level to fix the picture condition. 16. PIN-BALANCE : Adjust to factory... settings. 18. B GAIN controls to enter in the moire reduce setting. RECALL : Press RECALL to restore the monitor to compensate the pincushion unbalance. 11. Press the MENU to obtain your desire, properly adjust R .
... white or 6500°K warmer white do not satisfy your optimum whiteness level. 15. DEGAUSS : If color impurity occurs when moving or swiveling the monitor, press MENU Key and degauss to the optimum condition. Please adjust the level to fix the picture condition. 16. PIN-BALANCE : Adjust to factory... settings. 18. B GAIN controls to enter in the moire reduce setting. RECALL : Press RECALL to restore the monitor to compensate the pincushion unbalance. 11. Press the MENU to obtain your desire, properly adjust R .

AF715 User's Guide
Page 10
... to the VESA DDC STANDARD. Plug and play Plug & Play DDC1/2B Feature This monitor is completely off. It allows the monitor to an OFF mode. Green 3. Ground 9. Ground 14. Monitor Ground 15. B-Ground 12. DDC-Serial Data * FOR DDC 10 The DDC2B is ... communicate additional information about its identity and, depending on the I²C protocol. H-sync 6. This reduces the monitor's internal power supply consumption. Red 2. sync / * VCLK 7. THIS MONITOR WILL APPEAR TO BE NON-FUNCTIONAL IF THERE IS NO VIDEO INPUT SIGNAL. Ground 5. IN ORDER FOR THIS...
... to the VESA DDC STANDARD. Plug and play Plug & Play DDC1/2B Feature This monitor is completely off. It allows the monitor to an OFF mode. Green 3. Ground 9. Ground 14. Monitor Ground 15. B-Ground 12. DDC-Serial Data * FOR DDC 10 The DDC2B is ... communicate additional information about its identity and, depending on the I²C protocol. H-sync 6. This reduces the monitor's internal power supply consumption. Red 2. sync / * VCLK 7. THIS MONITOR WILL APPEAR TO BE NON-FUNCTIONAL IF THERE IS NO VIDEO INPUT SIGNAL. Ground 5. IN ORDER FOR THIS...
AF715 User's Guide
Page 11
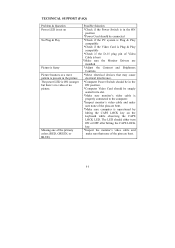
... ON (orange) but there's no video or no picture. The LED should either turn ON or OFF after hitting the CAPS LOCK key. *Inspect the monitor's video cable and make sure none of the pins are bent. *Make sure computer is operational by hitting the CAPS LOCK key on No Plug... fuzzy Picture bounces or a wave pattern is present in its slot. *Make sure monitor's video cable is properly connected to the computer. *Inspect monitor's video cable and make sure that none of Video Cable is bent *Make sure the Monitor Drivers are bent. 11 TECHNICAL SUPPORT (FAQ) Problem & Question Power LED is not...
... ON (orange) but there's no video or no picture. The LED should either turn ON or OFF after hitting the CAPS LOCK key. *Inspect the monitor's video cable and make sure none of the pins are bent. *Make sure computer is operational by hitting the CAPS LOCK key on No Plug... fuzzy Picture bounces or a wave pattern is present in its slot. *Make sure monitor's video cable is properly connected to the computer. *Inspect monitor's video cable and make sure that none of Video Cable is bent *Make sure the Monitor Drivers are bent. 11 TECHNICAL SUPPORT (FAQ) Problem & Question Power LED is not...

AF715 User's Guide
Page 12
Resolution Video Dot Rate Factory Preset Timings : User mode Timings : 30kHz to 98kHz automatically 50Hz to 85% relative, non-condensing Weight 17kg (Net) Dimensions • Monitor 410(W) × 402(H) × 425(D)mm Signal Cable 15 pin mini D-Sub EXTERNAL CONTROLS: SWITCH • POWER ON/OFF SWITCH • MENU KEY • CONTRAST/ ...
Resolution Video Dot Rate Factory Preset Timings : User mode Timings : 30kHz to 98kHz automatically 50Hz to 85% relative, non-condensing Weight 17kg (Net) Dimensions • Monitor 410(W) × 402(H) × 425(D)mm Signal Cable 15 pin mini D-Sub EXTERNAL CONTROLS: SWITCH • POWER ON/OFF SWITCH • MENU KEY • CONTRAST/ ...


