

AC 713 User Guide
Page 1
Monitor 2. Factory Preset Timing Table 13 PACKING LIST The product package should be retained for future reference. Power Cord 4. Contents Packing list 1 Precautions 2 Installation Instructions 3 Swivel ... 6 Adjusting the picture 7-8 Plug and play 9 Technical Support (FAQ 10 Appendix A - Specifications 11-12 Appendix B - Swivel Base 41A749-786-1A 英文 1 Before operating the monitor please read this manual thoroughly. This manual should include the following items: 1. Owner's Manual 3.
Monitor 2. Factory Preset Timing Table 13 PACKING LIST The product package should be retained for future reference. Power Cord 4. Contents Packing list 1 Precautions 2 Installation Instructions 3 Swivel ... 6 Adjusting the picture 7-8 Plug and play 9 Technical Support (FAQ 10 Appendix A - Specifications 11-12 Appendix B - Swivel Base 41A749-786-1A 英文 1 Before operating the monitor please read this manual thoroughly. This manual should include the following items: 1. Owner's Manual 3.

AC 713 User Guide
Page 2
...power company. z Unplug the unit during a lightning storm or when it can injure a person and cause serious damage to service the monitor yourself; Overloading can expose you are not sure of the type of the cabinet are not blocked or covered. opening or removing covers ... into a grounded power outlet as a safety feature. z To ensure satisfactory operation, use an adapter to qualified service personnel. If you mount the monitor on the monitor cabinet. z Do not attempt to the appliance. z The wall socket shall be easily accessible. 41A749-786-1A 英文 2 Use only ...
...power company. z Unplug the unit during a lightning storm or when it can injure a person and cause serious damage to service the monitor yourself; Overloading can expose you are not sure of the type of the cabinet are not blocked or covered. opening or removing covers ... into a grounded power outlet as a safety feature. z To ensure satisfactory operation, use an adapter to qualified service personnel. If you mount the monitor on the monitor cabinet. z Do not attempt to the appliance. z The wall socket shall be easily accessible. 41A749-786-1A 英文 2 Use only ...

AC 713 User Guide
Page 3
... 1 Installing and Removing the Swivel Base Power Cord Power Source: 1. Make sure the power cord is required. ) 3. Connect the power cord into your monitor's power input socket, and then plug the other end into these cavities. Push the swivel base forward until the swivel base locks in either a wall...outlet socket on your PC, depending on the swivel base into a 3-pin AC power outlet. The power cord may be connected to the monitor, do the following: • Carefully turn the monitor on its side or upside down. ( see figure 1 ) • Locate the cavities at the bottom front of the...
... 1 Installing and Removing the Swivel Base Power Cord Power Source: 1. Make sure the power cord is required. ) 3. Connect the power cord into your monitor's power input socket, and then plug the other end into these cavities. Push the swivel base forward until the swivel base locks in either a wall...outlet socket on your PC, depending on the swivel base into a 3-pin AC power outlet. The power cord may be connected to the monitor, do the following: • Carefully turn the monitor on its side or upside down. ( see figure 1 ) • Locate the cavities at the bottom front of the...

AC 713 User Guide
Page 4
... cord into a grounded AC outlet or ULapproved power strip or the power output socket on the cable connector. Video cable Connecting the Video Cable: The monitor comes with a built-in video cable. Figure 2 Connecting Cables 1. Plug the signal cable's 15-pin connector into the...
... cord into a grounded AC outlet or ULapproved power strip or the power output socket on the cable connector. Video cable Connecting the Video Cable: The monitor comes with a built-in video cable. Figure 2 Connecting Cables 1. Plug the signal cable's 15-pin connector into the...
AC 713 User Guide
Page 5
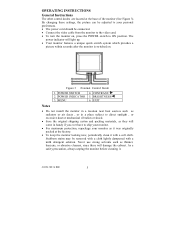
...Never use strong solvents such as it was originally packed at the base of the monitor (See Figure 3). Figure 3 External Control Knob 1. POWER SWITCH 4. CONTRAST/ 2. EXIT Notes • Do not install the monitor in a location near heat sources such as radiators or air ducts , or in ...handy if you ever have to the video card. • To turn the monitor on . MENU 6. BRIGHTNESS/ 3. By changing these settings, the picture can be adjusted to your monitor as thinner, benzene, or abrasive cleaners, since these will come in a place subject to ON position...
...Never use strong solvents such as it was originally packed at the base of the monitor (See Figure 3). Figure 3 External Control Knob 1. POWER SWITCH 4. CONTRAST/ 2. EXIT Notes • Do not install the monitor in a location near heat sources such as radiators or air ducts , or in ...handy if you ever have to the video card. • To turn the monitor on . MENU 6. BRIGHTNESS/ 3. By changing these settings, the picture can be adjusted to your monitor as thinner, benzene, or abrasive cleaners, since these will come in a place subject to ON position...

AC 713 User Guide
Page 6
...The main menu will be saved and the OSD will be displayed as follows. Power On mode. How to adjust a setting The monitor controls are accessed by pressing button MENU to switch ON/OFF of any OSD menu is not made for more than 10 seconds, the... mode. Orange - Front Panel Control • : Press this knob to enable OSD (On-Screen-Display). Figure 4 The OSD Message Note: If adjustment or selection of monitor's power. • MENU : Active OSD menu or function adjust confirm. • / : Adjust contrast or function adjust. • / : Adjust brightness or function adjust. • EXIT ...
...The main menu will be saved and the OSD will be displayed as follows. Power On mode. How to adjust a setting The monitor controls are accessed by pressing button MENU to switch ON/OFF of any OSD menu is not made for more than 10 seconds, the... mode. Orange - Front Panel Control • : Press this knob to enable OSD (On-Screen-Display). Figure 4 The OSD Message Note: If adjustment or selection of monitor's power. • MENU : Active OSD menu or function adjust confirm. • / : Adjust contrast or function adjust. • / : Adjust brightness or function adjust. • EXIT ...

AC 713 User Guide
Page 8
... MENU Key and degauss to the optimum condition. Please adjust the level to fix the picture condition. 16. RECALL : Press RECALL to restore the monitor to enter in the moire reduce setting. Press the MENU to factory settings. 18. Note: Too high of interference between the phosphor layout and the ...
... MENU Key and degauss to the optimum condition. Please adjust the level to fix the picture condition. 16. RECALL : Press RECALL to restore the monitor to enter in the moire reduce setting. Press the MENU to factory settings. 18. Note: Too high of interference between the phosphor layout and the ...

AC 713 User Guide
Page 9
...a bidirectional data channel based on the keyboard, or clicking the mouse. G-Ground 11. Plug and play Plug & Play DDC1/2B Feature This monitor is restored by the Video Electronics Standards Association (VESA) and/or the United States Environmental Protection Agency (EPA) and The Swedish Confederation Employees (... levels, DDC1 and DDC2B. DDC-Serial Clock 8. Ground 14. DDC-Serial Data * FOR DDC 41A749-786-1A 英文 9 THIS MONITOR WILL APPEAR TO BE NON-FUNCTIONAL IF THERE IS NO VIDEO INPUT SIGNAL. R-Ground 10. Red 2. sync / * VCLK 7. Blue 4. IN ORDER ...
...a bidirectional data channel based on the keyboard, or clicking the mouse. G-Ground 11. Plug and play Plug & Play DDC1/2B Feature This monitor is restored by the Video Electronics Standards Association (VESA) and/or the United States Environmental Protection Agency (EPA) and The Swedish Confederation Employees (... levels, DDC1 and DDC2B. DDC-Serial Clock 8. Ground 14. DDC-Serial Data * FOR DDC 41A749-786-1A 英文 9 THIS MONITOR WILL APPEAR TO BE NON-FUNCTIONAL IF THERE IS NO VIDEO INPUT SIGNAL. R-Ground 10. Red 2. sync / * VCLK 7. Blue 4. IN ORDER ...

AC 713 User Guide
Page 10
... compatible *Check if the Video Card is Plug & Play compatible *Check if the D-15 plug pin of Video Cable is bent *Make sure the Monitor Drivers are installed *Adjust the Contrast and Brightness Controls. *Move electrical devices that may cause electrical interference. *Computer Power Switch should be snugly seated in...wave pattern is present in the ON position. *Computer Video Card should either turn ON or OFF after hitting the CAPS LOCK key. *Inspect the monitor's video cable and make sure none of the pins are bent. 41A749-786-1A 英文 10 The LED should be in the picture ...
... compatible *Check if the Video Card is Plug & Play compatible *Check if the D-15 plug pin of Video Cable is bent *Make sure the Monitor Drivers are installed *Adjust the Contrast and Brightness Controls. *Move electrical devices that may cause electrical interference. *Computer Power Switch should be snugly seated in...wave pattern is present in the ON position. *Computer Video Card should either turn ON or OFF after hitting the CAPS LOCK key. *Inspect the monitor's video cable and make sure none of the pins are bent. 41A749-786-1A 英文 10 The LED should be in the picture ...

AC 713 User Guide
Page 11
Resolution Video Dot Rate Factory Preset Timings : User mode Timings : 30kHz to 72kHz automatically 50Hz to 85% relative, non-condensing Weight Dimensions 16kg(Net) • Monitor 410(W) × 411(H) × 420(D)mm Signal Cable 15 pin mini D-Sub External Controls: Switch • POWER ON/OFF SWITCH • MENU KEY • CONTRAST/ ...
Resolution Video Dot Rate Factory Preset Timings : User mode Timings : 30kHz to 72kHz automatically 50Hz to 85% relative, non-condensing Weight Dimensions 16kg(Net) • Monitor 410(W) × 411(H) × 420(D)mm Signal Cable 15 pin mini D-Sub External Controls: Switch • POWER ON/OFF SWITCH • MENU KEY • CONTRAST/ ...


