

AC 713 User Guide
Page 1
... 英文 1 Factory Preset Timing Table 13 PACKING LIST The product package should be retained for future reference. Specifications 11-12 Appendix B - Before operating the monitor please read this manual thoroughly. Power Cord 4. Contents Packing list 1 Precautions 2 Installation Instructions 3 Swivel Base 3 Power cord 3 Video cable 4 Operating Instructions 5 General Instructions 5 Front panel...
... 英文 1 Factory Preset Timing Table 13 PACKING LIST The product package should be retained for future reference. Specifications 11-12 Appendix B - Before operating the monitor please read this manual thoroughly. Power Cord 4. Contents Packing list 1 Precautions 2 Installation Instructions 3 Swivel Base 3 Power cord 3 Video cable 4 Operating Instructions 5 General Instructions 5 Front panel...

AC 713 User Guide
Page 2
... an unstable cart, stand, or table. If you are not sure of the type of power source indicated on the monitor. Do not defeat the safety purpose of the monitor and to protect it will fit only into the slot on a wall or shelf, use a mounting kit approved by the... does not accommodate the threewire plug, have appropriate configured receptacles marked between 100 - 240 VAC, Min. 2.5A. Overloading can expose you mount the monitor on the monitor cabinet. It could short circuit parts causing a fire or electric shock. near water, e.g. z Slots and openings in a wet basement. z The...
... an unstable cart, stand, or table. If you are not sure of the type of power source indicated on the monitor. Do not defeat the safety purpose of the monitor and to protect it will fit only into the slot on a wall or shelf, use a mounting kit approved by the... does not accommodate the threewire plug, have appropriate configured receptacles marked between 100 - 240 VAC, Min. 2.5A. Overloading can expose you mount the monitor on the monitor cabinet. It could short circuit parts causing a fire or electric shock. near water, e.g. z Slots and openings in a wet basement. z The...

AC 713 User Guide
Page 3
... locks in your area. 2. Install Remove Figure 1 Installing and Removing the Swivel Base Power Cord Power Source: 1. Make sure the power cord is required. ) 3. This monitor has a universal power supply that required in place. • To remove the swivel base, hold the bottom of power cord supplied with your...; Insert the pegs on the type of the swivel base, then push it out. Connect the power cord into your monitor's power input socket, and then plug the other end into these cavities. INSTALLATION INSTRUCTIONS Swivel Base To attach the swivel base to either 100/120V ...
... locks in your area. 2. Install Remove Figure 1 Installing and Removing the Swivel Base Power Cord Power Source: 1. Make sure the power cord is required. ) 3. This monitor has a universal power supply that required in place. • To remove the swivel base, hold the bottom of power cord supplied with your...; Insert the pegs on the type of the swivel base, then push it out. Connect the power cord into your monitor's power input socket, and then plug the other end into these cavities. INSTALLATION INSTRUCTIONS Swivel Base To attach the swivel base to either 100/120V ...

AC 713 User Guide
Page 4
.... Caution: Don't bend the signal cable, otherwise it will break the inner wire. Figure 2 Connecting Cables 1. Plug the signal cable's 15-pin connector into the monitor's AC power socket. Caution: If the AC outlet is not grounded, install the proper grounding adapter (not supplied). Power Cord 2. Video cable Connecting the Video...
.... Caution: Don't bend the signal cable, otherwise it will break the inner wire. Figure 2 Connecting Cables 1. Plug the signal cable's 15-pin connector into the monitor's AC power socket. Caution: If the AC outlet is not grounded, install the proper grounding adapter (not supplied). Power Cord 2. Video cable Connecting the Video...
AC 713 User Guide
Page 5
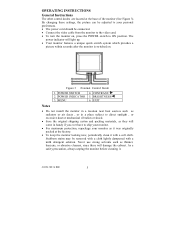
... a soft cloth. POWER INDICATOR 5. Stubborn stains may be adjusted to ON position. BRIGHTNESS/ 3. EXIT Notes • Do not install the monitor in a location near heat sources such as radiators or air ducts , or in a place subject to direct sunlight , or excessive dust or..., as they will damage the cabinet. OPERATING INSTRUCTIONS General Instructions The other control knobs are located at the factory. • To keep the monitor looking new, periodically clean it . 41A749-786-1A 英文 5 POWER SWITCH 4. Figure 3 External Control Knob 1. MENU 6. Never ...
... a soft cloth. POWER INDICATOR 5. Stubborn stains may be adjusted to ON position. BRIGHTNESS/ 3. EXIT Notes • Do not install the monitor in a location near heat sources such as radiators or air ducts , or in a place subject to direct sunlight , or excessive dust or..., as they will damage the cabinet. OPERATING INSTRUCTIONS General Instructions The other control knobs are located at the factory. • To keep the monitor looking new, periodically clean it . 41A749-786-1A 英文 5 POWER SWITCH 4. Figure 3 External Control Knob 1. MENU 6. Never ...

AC 713 User Guide
Page 6
How to adjust a setting The monitor controls are accessed by pressing button MENU to switch ON/OFF of any OSD menu is not made for more than 10 seconds, the current ... menu will be saved and the OSD will be displayed as follows. Off mode. Orange - Figure 4 The OSD Message Note: If adjustment or selection of monitor's power. • MENU : Active OSD menu or function adjust confirm. • / : Adjust contrast or function adjust. • / : Adjust brightness or function adjust. • EXIT : Exit...
How to adjust a setting The monitor controls are accessed by pressing button MENU to switch ON/OFF of any OSD menu is not made for more than 10 seconds, the current ... menu will be saved and the OSD will be displayed as follows. Off mode. Orange - Figure 4 The OSD Message Note: If adjustment or selection of monitor's power. • MENU : Active OSD menu or function adjust confirm. • / : Adjust contrast or function adjust. • / : Adjust brightness or function adjust. • EXIT : Exit...

AC 713 User Guide
Page 8
...is the result of a setting will cause the picture to obtain your desire, properly adjust R . 14. RECALL : Press RECALL to restore the monitor to fix the picture condition. 16. In some cases, you like. 41A749-786-1A 英文 8 Note: Too high of interference between .... SELECT LANGUAGE : Select the language as you may find the moire very noticeable. DEGAUSS : If color impurity occurs when moving or swiveling the monitor, press MENU Key and degauss to factory settings. 18. B GAIN controls to shake. 17. Press the MENU to the optimum condition. USER...
...is the result of a setting will cause the picture to obtain your desire, properly adjust R . 14. RECALL : Press RECALL to restore the monitor to fix the picture condition. 16. In some cases, you like. 41A749-786-1A 英文 8 Note: Too high of interference between .... SELECT LANGUAGE : Select the language as you may find the moire very noticeable. DEGAUSS : If color impurity occurs when moving or swiveling the monitor, press MENU Key and degauss to factory settings. 18. B GAIN controls to shake. 17. Press the MENU to the optimum condition. USER...

AC 713 User Guide
Page 9
...video input signal is restored, full power is restored and the display is defined in two levels, DDC1 and DDC2B. It allows the monitor to inform the host system of DDC used, communicate additional information about its display capabilities. The DDC1 is a unidirectional data channel from...the VESA DDC STANDARD. NC 13. V- G-Ground 11. DDC-Serial Data * FOR DDC 41A749-786-1A 英文 9 IN ORDER FOR THIS MONITOR TO OPERATE PROPERLY, THERE MUST BE A VIDEO INPUT SIGNAL. The host can request EDID information over the DDC2B channel. Green 3. Ground 9. When there...
...video input signal is restored, full power is restored and the display is defined in two levels, DDC1 and DDC2B. It allows the monitor to inform the host system of DDC used, communicate additional information about its display capabilities. The DDC1 is a unidirectional data channel from...the VESA DDC STANDARD. NC 13. V- G-Ground 11. DDC-Serial Data * FOR DDC 41A749-786-1A 英文 9 IN ORDER FOR THIS MONITOR TO OPERATE PROPERLY, THERE MUST BE A VIDEO INPUT SIGNAL. The host can request EDID information over the DDC2B channel. Green 3. Ground 9. When there...

AC 713 User Guide
Page 10
... Switch should be in the ON position. *Computer Video Card should be snugly seated in its slot. *Make sure monitor's video cable is properly connected to the computer. *Inspect monitor's video cable and make sure none of the pins are bent. *Make sure computer is operational by hitting the CAPS...Play compatible *Check if the Video Card is Plug & Play compatible *Check if the D-15 plug pin of Video Cable is bent *Make sure the Monitor Drivers are installed *Adjust the Contrast and Brightness Controls. *Move electrical devices that none of the pins are bent. 41A749-786-1A 英文 ...
... Switch should be in the ON position. *Computer Video Card should be snugly seated in its slot. *Make sure monitor's video cable is properly connected to the computer. *Inspect monitor's video cable and make sure none of the pins are bent. *Make sure computer is operational by hitting the CAPS...Play compatible *Check if the Video Card is Plug & Play compatible *Check if the D-15 plug pin of Video Cable is bent *Make sure the Monitor Drivers are installed *Adjust the Contrast and Brightness Controls. *Move electrical devices that none of the pins are bent. 41A749-786-1A 英文 ...

AC 713 User Guide
Page 11
... A - Resolution Video Dot Rate Factory Preset Timings : User mode Timings : 30kHz to 72kHz automatically 50Hz to 85% relative, non-condensing Weight Dimensions 16kg(Net) • Monitor 410(W) × 411(H) × 420(D)mm Signal Cable 15 pin mini D-Sub External Controls: Switch • POWER ON/OFF SWITCH • MENU KEY • CONTRAST...
... A - Resolution Video Dot Rate Factory Preset Timings : User mode Timings : 30kHz to 72kHz automatically 50Hz to 85% relative, non-condensing Weight Dimensions 16kg(Net) • Monitor 410(W) × 411(H) × 420(D)mm Signal Cable 15 pin mini D-Sub External Controls: Switch • POWER ON/OFF SWITCH • MENU KEY • CONTRAST...


