Acer Aspire One 751H Netbook Series User Guide
Page 19
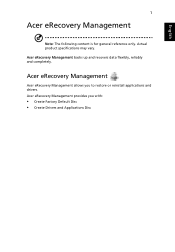
Acer eRecovery Management Acer eRecovery Management allows you with: • Create Factory Default Disc • Create Drivers and Applications Disc Acer eRecovery Management provides you to restore or reinstall applications and drivers. Actual product specifications may vary. Acer eRecovery Management backs up and recovers data flexibly, reliably and completely. English 1 Acer eRecovery Management Note: The following content is for general reference only.
Acer eRecovery Management Acer eRecovery Management allows you with: • Create Factory Default Disc • Create Drivers and Applications Disc Acer eRecovery Management provides you to restore or reinstall applications and drivers. Actual product specifications may vary. Acer eRecovery Management backs up and recovers data flexibly, reliably and completely. English 1 Acer eRecovery Management Note: The following content is for general reference only.
Acer Aspire One 751H Netbook Series User Guide
Page 20
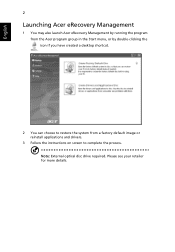
Note: External optical disc drive required. English 2 Launching Acer eRecovery Management 1 You may also launch Acer eRecovery Management by running the program from the Acer program group in the Start menu, or by double-clicking the icon if you have created a desktop shortcut. 2 You can choose to restore the system from a factory default image or reinstall applications and drivers. 3 Follow the instructions on screen to complete the process. Please see your retailer for more details.
Note: External optical disc drive required. English 2 Launching Acer eRecovery Management 1 You may also launch Acer eRecovery Management by running the program from the Acer program group in the Start menu, or by double-clicking the icon if you have created a desktop shortcut. 2 You can choose to restore the system from a factory default image or reinstall applications and drivers. 3 Follow the instructions on screen to complete the process. Please see your retailer for more details.
Acer Aspire One 751H Netbook Series User Guide
Page 37
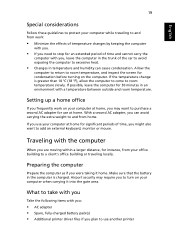
...temperature change is charged. Preparing the computer Prepare the computer as if you were taking it into the gate area. Make sure that the battery in the computer is greater than 10 °C (18 °F), allow the computer to come to and from home. Traveling with you... the computer to excessive heat. • Changes in an environment with you: • AC adapter • Spare, fully-charged battery pack(s) • Additional printer driver files if you plan to use another printer If you use your office building to a client's office building or traveling locally. Airport...
...temperature change is charged. Preparing the computer Prepare the computer as if you were taking it into the gate area. Make sure that the battery in the computer is greater than 10 °C (18 °F), allow the computer to come to and from home. Traveling with you... the computer to excessive heat. • Changes in an environment with you: • AC adapter • Spare, fully-charged battery pack(s) • Additional printer driver files if you plan to use another printer If you use your office building to a client's office building or traveling locally. Airport...

Acer Aspire One 751H Netbook Series User Guide
Page 38
... through a metal detector. • Avoid exposing floppy disks to hand-held metal detectors. Airport security X-ray machines are traveling • Spare, fully-charged battery packs • Additional printer driver files if you need to protect your computer while traveling: • Always take the computer as when traveling with the computer. What to...
... through a metal detector. • Avoid exposing floppy disks to hand-held metal detectors. Airport security X-ray machines are traveling • Spare, fully-charged battery packs • Additional printer driver files if you need to protect your computer while traveling: • Always take the computer as when traveling with the computer. What to...
Service Guide
Page 8
... Module 68 Replacing the Speaker Module 68 Replacing the Mainboard 70 Replacing the SDD Module 71 Replacing the USB/LED/Power/Card Reader Board 72 Replacing the WLAN Board 73 Replacing the LCM Module 73 Replacing the Upper Cover 75 Replacing the Keyboard 76 Replacing the 3G cover 77 Replacing the Battery 77 Troubleshooting... Code Reference Tables 102 Sec 102 Memory 102 BDS & Specific action 103 Each PEIM entry point used in 80_PORT 105 Each Driver entry point used in 80_PORT 105 Each SmmDriver entry point used in 80_PORT 108 Jumper and Connector Locations 111 Top View 111 ...
... Module 68 Replacing the Speaker Module 68 Replacing the Mainboard 70 Replacing the SDD Module 71 Replacing the USB/LED/Power/Card Reader Board 72 Replacing the WLAN Board 73 Replacing the LCM Module 73 Replacing the Upper Cover 75 Replacing the Keyboard 76 Replacing the 3G cover 77 Replacing the Battery 77 Troubleshooting... Code Reference Tables 102 Sec 102 Memory 102 BDS & Specific action 103 Each PEIM entry point used in 80_PORT 105 Each Driver entry point used in 80_PORT 105 Each SmmDriver entry point used in 80_PORT 108 Jumper and Connector Locations 111 Top View 111 ...
Service Guide
Page 37
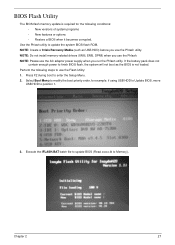
NOTE: Do not install memory-related drivers (XMS, EMS, DPMI) when you run the Phlash utility. Chapter 2 27 NOTE: Create a Crisis Recovery Media (such as the BIOS is required for example, if ... Setup Menu. 2. Select Boot Menu to modify the boot priority order, for the following steps to Memory). Press F2 during boot to position 1. 3. If the battery pack does not contain enough power to update the system BIOS flash ROM. Use the Phlash utility to finish BIOS flash, the system will not...
NOTE: Do not install memory-related drivers (XMS, EMS, DPMI) when you run the Phlash utility. Chapter 2 27 NOTE: Create a Crisis Recovery Media (such as the BIOS is required for example, if ... Setup Menu. 2. Select Boot Menu to modify the boot priority order, for the following steps to Memory). Press F2 during boot to position 1. 3. If the battery pack does not contain enough power to update the system BIOS flash ROM. Use the Phlash utility to finish BIOS flash, the system will not...
Service Guide
Page 93
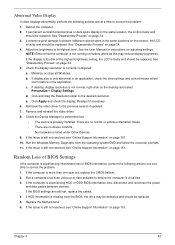
... Apply and check the display. See the User Manual for instructions on page 34. 3. If display size is more than one year old, replace the CMOS battery. 2. Click and drag the Resolution slider to its highest level. Readjust if necessary. 6. Reboot the computer. 2. If extensive pixel ...power and data cables between devices. Minimize or close all Windows. e. Roll back the video driver to ensure the computer is not running on page 161. Remove and reinstall the video driver. 8. Check the Device Manager to determine that the computer is virus free. 3. Run the...
... Apply and check the display. See the User Manual for instructions on page 34. 3. If display size is more than one year old, replace the CMOS battery. 2. Click and drag the Resolution slider to its highest level. Readjust if necessary. 6. Reboot the computer. 2. If extensive pixel ...power and data cables between devices. Minimize or close all Windows. e. Roll back the video driver to ensure the computer is not running on page 161. Remove and reinstall the video driver. 8. Check the Device Manager to determine that the computer is virus free. 3. Run the...
Service Guide
Page 96
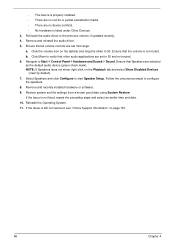
Remove and reinstall the audio driver. 5. Ensure that Speakers are selected as the default audio device (green check mark). Click the volume icon on page 161. 86 Chapter 4 Ensure that all ... no device conflicts. • No hardware is not fixed, repeat the preceding steps and select an earlier time and date. 10. Roll back the audio driver to configure the speakers. 8. Click Mixer to 50. Navigate to start Speaker Setup. NOTE: If Speakers does not show, right-click on the Playback tab...
Remove and reinstall the audio driver. 5. Ensure that Speakers are selected as the default audio device (green check mark). Click the volume icon on page 161. 86 Chapter 4 Ensure that all ... no device conflicts. • No hardware is not fixed, repeat the preceding steps and select an earlier time and date. 10. Roll back the audio driver to configure the speakers. 8. Click Mixer to 50. Navigate to start Speaker Setup. NOTE: If Speakers does not show, right-click on the Playback tab...

Service Guide
Page 98
...entering chkdsk /r from a known good date using up-to-date software to correct the problem. 1. Replace the HDD. Disconnect all cables and jumpers on the Boot menu. 6. Run the Windows Vista Startup Repair..." on page 34. 88 Chapter 4 Startup Repair attempts to enter the BIOS Utility. NOTE: Click Load Drivers if controller drives are set correctly. 7. Select Repair your computer. For more information see Windows Help and Support... correctly, perform the following actions one at a time to ensure the computer is virus free. 3. Run the Windows Memory Diagnostic Tool.
...entering chkdsk /r from a known good date using up-to-date software to correct the problem. 1. Replace the HDD. Disconnect all cables and jumpers on the Boot menu. 6. Run the Windows Vista Startup Repair..." on page 34. 88 Chapter 4 Startup Repair attempts to enter the BIOS Utility. NOTE: Click Load Drivers if controller drives are set correctly. 7. Select Repair your computer. For more information see Windows Help and Support... correctly, perform the following actions one at a time to ensure the computer is virus free. 3. Run the Windows Memory Diagnostic Tool.
Service Guide
Page 100
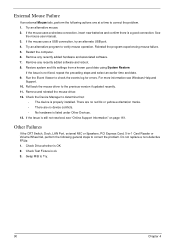
... following actions one at a time to check the events log for errors. Do not replace a non-defective FRUs: 1. Remove any recently added hardware and associated software. 7. Restore system and file settings from a known good date using System Restore. Roll back the mouse driver to correct ...2. Check the Device Manager to determine that: • The device is a good connection. If the mouse uses a wireless connection, insert new batteries and confirm there is properly installed. Swap M/B to verify mouse operation. If the Issue is still not resolved, see Windows Help and Support....
... following actions one at a time to check the events log for errors. Do not replace a non-defective FRUs: 1. Remove any recently added hardware and associated software. 7. Restore system and file settings from a known good date using System Restore. Roll back the mouse driver to correct ...2. Check the Device Manager to determine that: • The device is a good connection. If the mouse uses a wireless connection, insert new batteries and confirm there is properly installed. Swap M/B to verify mouse operation. If the Issue is still not resolved, see Windows Help and Support....
Service Guide
Page 113
... memory range do the hard ware ECC init Report status code of every memory range Get the root bridge handle Notify pci bus driver starts to program the resource Reset the host controller IdeBus begin initialization Simple Text Output Protocol Functions (VGA class reset) Report that VGA... Class driver is being disabled Report that VGA Class driver is being enabled Terminal Console In reset and Console Out reset Report that the remote terminal is being disabled Report ...
... memory range do the hard ware ECC init Report status code of every memory range Get the root bridge handle Notify pci bus driver starts to program the resource Reset the host controller IdeBus begin initialization Simple Text Output Protocol Functions (VGA class reset) Report that VGA... Class driver is being disabled Report that VGA Class driver is being enabled Terminal Console In reset and Console Out reset Report that the remote terminal is being disabled Report ...

Service Guide
Page 114
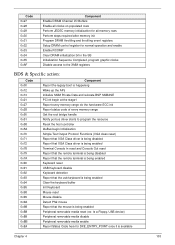
Code 0xF8 0xF9 Component Report that ExitBootServices() has been called Runtime driver set virtual address map 104 Chapter 4
Code 0xF8 0xF9 Component Report that ExitBootServices() has been called Runtime driver set virtual address map 104 Chapter 4