

Service Guide
Page 8
... Hardware Specification and Configuration 30 BIOS Setup Utility 41 Invoking BIOS Setup 41 Chapter 2 System Utilities 41 Information 42 Main 43 Advanced 45 Security 46 Boot 48 Exit 49 DOS Flash SOP 50 Chapter 3 Machine Disassembly and Replacement 53 General Information 54 Before You Begin 54 Disassembly Procedure Flowchart 55 Disassembly Procedure 57 Removing the Battery Pack 57 Removing the HDD Module 57 Removing the RAM Module/Mini PCI Card/Thermal Module/CPU 58 Removing the ODD Module...
... Hardware Specification and Configuration 30 BIOS Setup Utility 41 Invoking BIOS Setup 41 Chapter 2 System Utilities 41 Information 42 Main 43 Advanced 45 Security 46 Boot 48 Exit 49 DOS Flash SOP 50 Chapter 3 Machine Disassembly and Replacement 53 General Information 54 Before You Begin 54 Disassembly Procedure Flowchart 55 Disassembly Procedure 57 Removing the Battery Pack 57 Removing the HDD Module 57 Removing the RAM Module/Mini PCI Card/Thermal Module/CPU 58 Removing the ODD Module...

Service Guide
Page 11
... solution, supporting Acer SignalUpTM wireless technology Special Keys and Controls • 88/89-key keyboard, with inverted "T" cursor layout; 2.5 mm (minimum) key travel, international language support • Touch pad with 4-way scroll button • 12 function keys, four cursor keys, two Windows® keys, hotkey controls, embedded numeric keypad • Four easy-launch buttons: Empowering Key, email, Internet and user-programmable button • Six/Seven media keys: TV, volume up, volume down, play/pause, stop, previous, next (for selected model) featuring...
... solution, supporting Acer SignalUpTM wireless technology Special Keys and Controls • 88/89-key keyboard, with inverted "T" cursor layout; 2.5 mm (minimum) key travel, international language support • Touch pad with 4-way scroll button • 12 function keys, four cursor keys, two Windows® keys, hotkey controls, embedded numeric keypad • Four easy-launch buttons: Empowering Key, email, Internet and user-programmable button • Six/Seven media keys: TV, volume up, volume down, play/pause, stop, previous, next (for selected model) featuring...

Service Guide
Page 17
...) (optional). 6 5-in-1 card reader Accepts Memory Stick (MS), Memory Stick Pro (MS PRO), MultiMediaCard (MMC), Secure Digital (SD) and xD-Picture Card (xD) (optional). # Icon Item Description 7 # Icon 8 4-pin IEEE 1394 port Item PC Card slot Connects to USB 2.0 devices (e.g., USB mouse, USB # Icon Item camera). Right View # Icon Item Description # Item # Item 1 Optical disk drive 2 Optical disk access indicator 3 Optical disk drive eject button 4 Emergency eject hole Description Description Internal optical drive; Lights up when the optical disk drive is turned...
...) (optional). 6 5-in-1 card reader Accepts Memory Stick (MS), Memory Stick Pro (MS PRO), MultiMediaCard (MMC), Secure Digital (SD) and xD-Picture Card (xD) (optional). # Icon Item Description 7 # Icon 8 4-pin IEEE 1394 port Item PC Card slot Connects to USB 2.0 devices (e.g., USB mouse, USB # Icon Item camera). Right View # Icon Item Description # Item # Item 1 Optical disk drive 2 Optical disk access indicator 3 Optical disk drive eject button 4 Emergency eject hole Description Description Internal optical drive; Lights up when the optical disk drive is turned...

Service Guide
Page 21
... hotkeys or key combinations to Sleep mode. ++ 12 + + Chapter 1 Application key + : Opens the My Computer window. < > + : < > + : < +>: :Opens Help and Support. < +>p: ens the Find (All Files dialog box). < > + : < +>O: pens the Run dialog box. + : + : Minimizes all windows. < > + : < > + : ++ < >+ +U: ndoes the minimize all windows action. < > + : This key has the same effect as clicking on Management Empowperaingg Teec2hn0ology. + Sleep Leads the computer to access most of functions: + : Activates the next Taskbar button. Windows keys The keyboard...
... hotkeys or key combinations to Sleep mode. ++ 12 + + Chapter 1 Application key + : Opens the My Computer window. < > + : < > + : < +>: :Opens Help and Support. < +>p: ens the Find (All Files dialog box). < > + : < +>O: pens the Run dialog box. + : + : Minimizes all windows. < > + : < > + : ++ < >+ +U: ndoes the minimize all windows action. < > + : This key has the same effect as clicking on Management Empowperaingg Teec2hn0ology. + Sleep Leads the computer to access most of functions: + : Activates the next Taskbar button. Windows keys The keyboard...

Service Guide
Page 22
... 1. Note The US Dollar Sign www.microsoft.com/typography/faq/faq12.htm 1. NOTE: This function varies according to save power. Screen blank Turns off the display screen backlight to the language settings. + Icon + ++> + < > ++ > Function Display toggle Description Switches the display output between the display screen, external monitor (if connected) and both. Volume up Increases the screen brightness. Volume down Decreases the screen brightness. NOTE: Some fonts and software do not support the Euro symbol.
... 1. Note The US Dollar Sign www.microsoft.com/typography/faq/faq12.htm 1. NOTE: This function varies according to save power. Screen blank Turns off the display screen backlight to the language settings. + Icon + ++> + < > ++ > Function Display toggle Description Switches the display output between the display screen, external monitor (if connected) and both. Volume up Increases the screen brightness. Volume down Decreases the screen brightness. NOTE: Some fonts and software do not support the Euro symbol.

Service Guide
Page 33
..., and Battery Life. You can adjust CPU speed, LCD brightness and other settings, or click on buttons to the panel on /off: wireless LAN, Bluetooth, CardBus, fireware (1394), wired LAN and optical device if supported. Battery Status For real-time battery life estimates based on current usage, refer to turn the following functions on the upper half side of your own. Change power settings as ... Acer ePower Management Acer ePower Management features a straightforward user interface. Select...
..., and Battery Life. You can adjust CPU speed, LCD brightness and other settings, or click on buttons to the panel on /off: wireless LAN, Bluetooth, CardBus, fireware (1394), wired LAN and optical device if supported. Battery Status For real-time battery life estimates based on current usage, refer to turn the following functions on the upper half side of your own. Change power settings as ... Acer ePower Management Acer ePower Management features a straightforward user interface. Select...

Service Guide
Page 41
... • Acer UI support • Multi-boot support • 1MB flash RIOM for system BIOS • Suspend to RAM (S3) / Disk (S4) • Various hot keys for system control • Support boot option: HDD/Removable device (media bay device)/all USB ports • Support protocols: SMBIOS 2.3, PCI2.2, WFM2.0 • ACPI 2.0/3.0 compliance with Intel Speedstep support C1, C2, C3, C4, S3 and S4 for mobile CPU • DMI utility for BIOS serial number configurable/asset tag • Y2K solution support • BIOS virus...
... • Acer UI support • Multi-boot support • 1MB flash RIOM for system BIOS • Suspend to RAM (S3) / Disk (S4) • Various hot keys for system control • Support boot option: HDD/Removable device (media bay device)/all USB ports • Support protocols: SMBIOS 2.3, PCI2.2, WFM2.0 • ACPI 2.0/3.0 compliance with Intel Speedstep support C1, C2, C3, C4, S3 and S4 for mobile CPU • DMI utility for BIOS serial number configurable/asset tag • Y2K solution support • BIOS virus...

Service Guide
Page 55
... A-Z 0-9 = [ Symbol Name letters A to boot up when Password on Boot: Clear Clear Clear [Enter] [Enter] [Enter] [Disabled] Boot Exit Item Specific Help Supervisor Password controls accesses of eight alphanumeric characters. Security PhoenixBIOS Setup Utility Info. F1 Help Esc Exit ↑ ↓ Select Item ← → Select Menu F5/F6 Change Values Enter Select 4 Sub-Menu F9 Setup Defaults F10 Save and Exit The system supports three levels of a Supervisor Password, User Password, and Hard Disk Password. At least one character...
... A-Z 0-9 = [ Symbol Name letters A to boot up when Password on Boot: Clear Clear Clear [Enter] [Enter] [Enter] [Disabled] Boot Exit Item Specific Help Supervisor Password controls accesses of eight alphanumeric characters. Security PhoenixBIOS Setup Utility Info. F1 Help Esc Exit ↑ ↓ Select Item ← → Select Menu F5/F6 Change Values Enter Select 4 Sub-Menu F9 Setup Defaults F10 Save and Exit The system supports three levels of a Supervisor Password, User Password, and Hard Disk Password. At least one character...

Service Guide
Page 56
... users press "Enter". • If the password entered does not match the current password, a dialog box will be shown to ask to re-enter the password. • Set HDD Password: When shown as "Locked", the hard drive password currently can not be hung up and the users need to manually power off the system. • User Password: If the User Password is set . If the Supervisor Password is powered on or resumes for entering BIOS Setup Utility. To change or remove password...
... users press "Enter". • If the password entered does not match the current password, a dialog box will be shown to ask to re-enter the password. • Set HDD Password: When shown as "Locked", the hard drive password currently can not be hung up and the users need to manually power off the system. • User Password: If the User Password is set . If the Supervisor Password is powered on or resumes for entering BIOS Setup Utility. To change or remove password...
Service Guide
Page 58
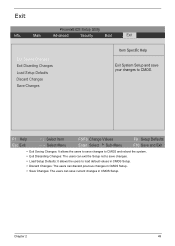
...; Select Menu F5/F6 Change Values Enter Select 4 Sub-Menu F9 Setup Defaults F10 Save and Exit • Exit Saving Changes: It allows the users to save changes to CMOS and reboot the system. • Exit Discarding Changes: The users can exit the Setup not to save current changes in CMOS Setup. • Save Changes: The users can save changes. • Load Setup Defaults: It allows the users to CMOS. Main Advanced Security Boot Exit...
...; Select Menu F5/F6 Change Values Enter Select 4 Sub-Menu F9 Setup Defaults F10 Save and Exit • Exit Saving Changes: It allows the users to save changes to CMOS and reboot the system. • Exit Discarding Changes: The users can exit the Setup not to save current changes in CMOS Setup. • Save Changes: The users can save changes. • Load Setup Defaults: It allows the users to CMOS. Main Advanced Security Boot Exit...
Service Guide
Page 81
... to correct the problems. Do not replace a non-defective FRU. 1. Reconnect the external diskette drive. 2. Replace the external diskette driver. 3. See if CD-ROM test is required. If the internal keyboard does not work or an unexpected error appears, make the drive fail. 1. Replace the keyboard. 3. Boot from a controller, driver, or CD-ROM. Replace the external CD-ROM drive. 3. Replace the main board. NOTE: Make sure that the flexible cable extending from a controller, driver, or diskette. If errors occur, do the...
... to correct the problems. Do not replace a non-defective FRU. 1. Reconnect the external diskette drive. 2. Replace the external diskette driver. 3. See if CD-ROM test is required. If the internal keyboard does not work or an unexpected error appears, make the drive fail. 1. Replace the keyboard. 3. Boot from a controller, driver, or CD-ROM. Replace the external CD-ROM drive. 3. Replace the main board. NOTE: Make sure that the flexible cable extending from a controller, driver, or diskette. If errors occur, do the...
Service Guide
Page 85
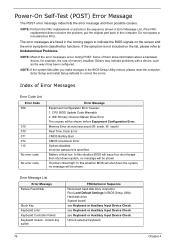
... screen and the error symptoms classified by functions. Error Message List Error Message Failure Fixed Disk Stuck Key Keyboard error Keyboard Controller Failed Keyboard locked - Hard disk drive System board see Keyboard or Auxiliary Input Device Check. Unlock external keyboard 76 Chapter 4 Enter Setup and install Setup defaults to indicate the BIOS signals on the list, please refer to Undetermined Problems. NOTE: Most of memory installed. see Keyboard or Auxiliary Input Device Check. NOTE: If the system fails after you make changes in BIOS Setup Utility. Index of Error...
... screen and the error symptoms classified by functions. Error Message List Error Message Failure Fixed Disk Stuck Key Keyboard error Keyboard Controller Failed Keyboard locked - Hard disk drive System board see Keyboard or Auxiliary Input Device Check. Unlock external keyboard 76 Chapter 4 Enter Setup and install Setup defaults to indicate the BIOS signals on the list, please refer to Undetermined Problems. NOTE: Most of memory installed. see Keyboard or Auxiliary Input Device Check. NOTE: If the system fails after you make changes in BIOS Setup Utility. Index of Error...

Service Guide
Page 86
... reboot system. DIMM System board Check the drive is defined with the proper diskette type in BIOS Setup Utility. Cache disabled CPU ID: DMA Test Failed Software NMI Failed Fail-Safe Timer NMI Failed Device Address Conflict Allocation Error for device FRU/Action in Sequence Run Load Default Settings in BIOS Setup Utility. Error Message List Error Message Monitor type does not match CMOS - run Setup System CMOS checksum bad Default configuration used System timer error Real time clock error Previous boot incomplete Default configuration used Memory...
... reboot system. DIMM System board Check the drive is defined with the proper diskette type in BIOS Setup Utility. Cache disabled CPU ID: DMA Test Failed Software NMI Failed Fail-Safe Timer NMI Failed Device Address Conflict Allocation Error for device FRU/Action in Sequence Run Load Default Settings in BIOS Setup Utility. Error Message List Error Message Monitor type does not match CMOS - run Setup System CMOS checksum bad Default configuration used System timer error Real time clock error Previous boot incomplete Default configuration used Memory...
Service Guide
Page 88
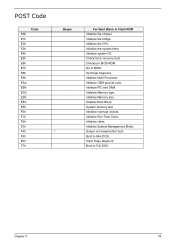
... Run Time Clock. Initialize System Management Mode. Initialize Multi Processor. Initialize OEM special code. Boot to Mini DOS. Check force recovery boot. Initialize Memory size. System memory test. Initialize video. Initialize the system timer. Initialize PIC and DMA. Initialize Memory type. Boot to Full DOS. Clear Huge Segment. Chapter 4 79 Shadow Boot Block. Initialize interrupt vectors. Checksum BIOS ROM. POST Code Code E0h E1h E2h E3h E4h E5h...
... Run Time Clock. Initialize System Management Mode. Initialize Multi Processor. Initialize OEM special code. Boot to Mini DOS. Check force recovery boot. Initialize Memory size. System memory test. Initialize video. Initialize the system timer. Initialize PIC and DMA. Initialize Memory type. Boot to Full DOS. Clear Huge Segment. Chapter 4 79 Shadow Boot Block. Initialize interrupt vectors. Checksum BIOS ROM. POST Code Code E0h E1h E2h E3h E4h E5h...

Service Guide
Page 89
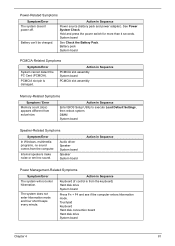
... Setup Default Settings, then reboot system. Keyboard (if contrast and brightness function key do not work . LCD is too dark. LCD contrast cannot be adjusted. See Power System Check. Battery pack Power adapter Hard drive & battery connection board System board 80 Chapter 4 Reconnect the LCD connectors. See Power System Check. LCD brightness cannot be adjusted. Action in Sequence Reconnect the inverter board Inverter board System board Power-Related Symptoms Symptom/Error Power shuts down during operation. Action in characters Abnormal screen Wrong color displayed...
... Setup Default Settings, then reboot system. Keyboard (if contrast and brightness function key do not work . LCD is too dark. LCD contrast cannot be adjusted. See Power System Check. Battery pack Power adapter Hard drive & battery connection board System board 80 Chapter 4 Reconnect the LCD connectors. See Power System Check. LCD brightness cannot be adjusted. Action in Sequence Reconnect the inverter board Inverter board System board Power-Related Symptoms Symptom/Error Power shuts down during operation. Action in characters Abnormal screen Wrong color displayed...
Service Guide
Page 90
... Default Settings, then reboot system. Power-Related Symptoms Symptom/Error The system doesn't power-off. Audio driver Speaker System board Speaker System board Action in Sequence Keyboard (if control is damaged. See Power System Check. Battery pack System board PCMCIA-Related Symptoms Symptom/Error System cannot detect the PC Card (PCMCIA). PCMCIA slot pin is from actual size. DIMM System board Speaker-Related Symptoms Symptom/Error In Windows, multimedia programs, no sound. Touchpad Keyboard Hard disk connection board Hard disk drive...
... Default Settings, then reboot system. Power-Related Symptoms Symptom/Error The system doesn't power-off. Audio driver Speaker System board Speaker System board Action in Sequence Keyboard (if control is damaged. See Power System Check. Battery pack System board PCMCIA-Related Symptoms Symptom/Error System cannot detect the PC Card (PCMCIA). PCMCIA slot pin is from actual size. DIMM System board Speaker-Related Symptoms Symptom/Error In Windows, multimedia programs, no sound. Touchpad Keyboard Hard disk connection board Hard disk drive...

Service Guide
Page 91
.... USB does not work correctly. Print problems Serial or parallel port device problems. Action in the Devices Configuration" of BIOS Setup Utility is set to use battery until power off, then charge battery). Printer driver Printer cable Printer System Board Ensure the Serial Port in Sequence Enter BIOS Setup Utility to Enabled. Power Management-Related Symptoms Symptom/Error The system does not enter standby mode after opening the LCD. LCD cover switch System board Action in Windows does not go higher than 90%. Refresh battery (continue to Enabled. External display does not work...
.... USB does not work correctly. Print problems Serial or parallel port device problems. Action in the Devices Configuration" of BIOS Setup Utility is set to use battery until power off, then charge battery). Printer driver Printer cable Printer System Board Ensure the Serial Port in Sequence Enter BIOS Setup Utility to Enabled. Power Management-Related Symptoms Symptom/Error The system does not enter standby mode after opening the LCD. LCD cover switch System board Action in Windows does not go higher than 90%. Refresh battery (continue to Enabled. External display does not work...

User Guide
Page 8
.... 2 Click on AcerSystem User's Guide. It is not installed on your computer, clicking on how your notebook. Basic care and tips for using your computer Turning your Acer notebook, we have designed a set of the power button. If Adobe Reader is available in Portable Document Format (PDF) and comes preloaded on your computer can help you use Adobe Reader, access the Help and Support menu. For instructions on how to...
.... 2 Click on AcerSystem User's Guide. It is not installed on your computer, clicking on how your notebook. Basic care and tips for using your computer Turning your Acer notebook, we have designed a set of the power button. If Adobe Reader is available in Portable Document Format (PDF) and comes preloaded on your computer can help you use Adobe Reader, access the Help and Support menu. For instructions on how to...

User Guide
Page 13
... (USB) 65 IEEE 1394 port 65 PC Card slot 66 ExpressCard 67 Installing memory 68 Connecting your TV and AV-in cables 69 Acer Arcade TV set-up wizard (Windows XP Home and Professional) 71 BIOS utility 72 Boot sequence 72 Enable disk-to-disk recovery 72 Password 72 Using software 73 Playing DVD movies 73 Power management 74 Acer eRecovery Management 74 Create backup 75 Restore from backup 75 Create factory default image CD 76 Re-install bundled software without CD 76 Change password 77 Troubleshooting 78 Troubleshooting...
... (USB) 65 IEEE 1394 port 65 PC Card slot 66 ExpressCard 67 Installing memory 68 Connecting your TV and AV-in cables 69 Acer Arcade TV set-up wizard (Windows XP Home and Professional) 71 BIOS utility 72 Boot sequence 72 Enable disk-to-disk recovery 72 Password 72 Using software 73 Playing DVD movies 73 Power management 74 Acer eRecovery Management 74 Create backup 75 Restore from backup 75 Create factory default image CD 76 Re-install bundled software without CD 76 Change password 77 Troubleshooting 78 Troubleshooting...

User Guide
Page 53
... the Settings tab to make sure that the resolution is in the external USB floppy drive? Nothing appears on the screen. Press any key to turn the display back on your computer. Right-click on , three things might be the cause: • The brightness level might be low and unable to power the computer. Press + (increase) to adjust the brightness level. • The display device...
... the Settings tab to make sure that the resolution is in the external USB floppy drive? Nothing appears on the screen. Press any key to turn the display back on your computer. Right-click on , three things might be the cause: • The brightness level might be low and unable to power the computer. Press + (increase) to adjust the brightness level. • The display device...


