User Guide
Page 6
... Using Games and Applications 37 NTSC/PAL Support for the RADEON™ X800 37 38 Introduction 38 Using Your ATI HDTV Video Cable 40 Capturing Video 41 Connecting your media device for video capture 42 Setting the Windows® Volume Control 42 Troubleshooting 45 Uninstalling Old Graphics Card Software 45 Windows® New Hardware Found 45 Installing...
... Using Games and Applications 37 NTSC/PAL Support for the RADEON™ X800 37 38 Introduction 38 Using Your ATI HDTV Video Cable 40 Capturing Video 41 Connecting your media device for video capture 42 Setting the Windows® Volume Control 42 Troubleshooting 45 Uninstalling Old Graphics Card Software 45 Windows® New Hardware Found 45 Installing...
User Guide
Page 9
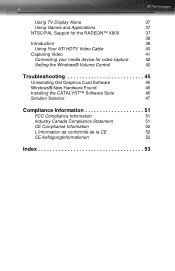
Z DVI-I connection. Y DVI-I-to -VGA adapter into the DVI-I connector, then plug your desktop by using the S-Video out. To connect a VGA monitor to the DVI-I connector, plug the supplied DVI-I -to expand your monitor cable into the DVI-I Backplate Connection. Connections and ... panel, plug the monitors DVI-I connector into the adapter. A TV can also be used to -VGA adapter. 3 CHAPTER 2: Using Multiple Displays Connecting Your Monitors Your RADEON™ X800 provides hardware support for the RADEON™ X800 Card X Standard VGA Monitor Connector.
Z DVI-I connection. Y DVI-I-to -VGA adapter into the DVI-I connector, then plug your desktop by using the S-Video out. To connect a VGA monitor to the DVI-I connector, plug the supplied DVI-I -to expand your monitor cable into the DVI-I Backplate Connection. Connections and ... panel, plug the monitors DVI-I connector into the adapter. A TV can also be used to -VGA adapter. 3 CHAPTER 2: Using Multiple Displays Connecting Your Monitors Your RADEON™ X800 provides hardware support for the RADEON™ X800 Card X Standard VGA Monitor Connector.
User Guide
Page 11
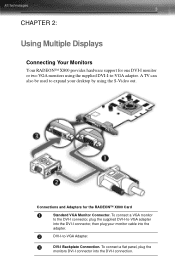
... connector OR DVI-I connector with DVI-I-to-VGA adapter The S-Video out can connect displays to -VGA adapter HDTV - Display Configurations 5 Display Configurations Your RADEON™ X800 graphics card provides dual display functionality and TV Out. The following table lists... the different ways you can also support a composite connection via the DVI-I -to your card. High Definition Television UNSUPPORTED ...
... connector OR DVI-I connector with DVI-I-to-VGA adapter The S-Video out can connect displays to -VGA adapter HDTV - Display Configurations 5 Display Configurations Your RADEON™ X800 graphics card provides dual display functionality and TV Out. The following table lists... the different ways you can also support a composite connection via the DVI-I -to your card. High Definition Television UNSUPPORTED ...
User Guide
Page 31
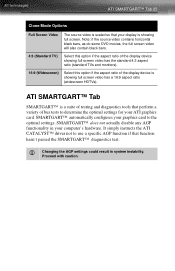
... tools that perform a variety of the display device is showing full screen video has a 16:9 aspect ratio (widescreen HDTVs). SMARTGART™ automatically configures your ATI graphics card. SMARTGART™ does not actually disable any AGP functionality in system instability. It simply instructs the ATI CATALYST™ driver not to the optimal settings. Proceed with caution...
... tools that perform a variety of the display device is showing full screen video has a 16:9 aspect ratio (widescreen HDTVs). SMARTGART™ automatically configures your ATI graphics card. SMARTGART™ does not actually disable any AGP functionality in system instability. It simply instructs the ATI CATALYST™ driver not to the optimal settings. Proceed with caution...

User Guide
Page 39
.... Using an S- Refer to the illustration. 4 Power on a TV You can attach your graphics card to 50 Hz. CHAPTER 4: Using TV Out 33 Using TV Display and Capture Features Using TV Out Your RADEON™ X800 has TV Out capability. Some monitors may not support this refresh rate and could... be used simultaneously with your monitor to a TV, use an S-Video cable. To connect S-Video Out 1 Power off your TV as a display. Video cable, attach one end of your RADEON™ X800 card to see if your monitor supports a refresh rate of your PC, locate your TV. ...
.... Using an S- Refer to the illustration. 4 Power on a TV You can attach your graphics card to 50 Hz. CHAPTER 4: Using TV Out 33 Using TV Display and Capture Features Using TV Out Your RADEON™ X800 has TV Out capability. Some monitors may not support this refresh rate and could... be used simultaneously with your monitor to a TV, use an S-Video cable. To connect S-Video Out 1 Power off your TV as a display. Video cable, attach one end of your RADEON™ X800 card to see if your monitor supports a refresh rate of your PC, locate your TV. ...

User Guide
Page 40
This process takes only a few seconds. 34 Using TV Out Connecting Your S-Video Out to a TV or VCR X S-Video Connection on graphics card Y TV Z S-Video Cable [ Computer Starting Windows® with TV Display Enabled The TV screen may become scrambled during which your screen will be restored within a few seconds and programs the TV display. During start up, your RADEON™ X800 will remain blank. This distortion is only a temporary effect, and your TV display will go through a sequence of mode settings, during the initial Windows® logo display.
This process takes only a few seconds. 34 Using TV Out Connecting Your S-Video Out to a TV or VCR X S-Video Connection on graphics card Y TV Z S-Video Cable [ Computer Starting Windows® with TV Display Enabled The TV screen may become scrambled during which your screen will be restored within a few seconds and programs the TV display. During start up, your RADEON™ X800 will remain blank. This distortion is only a temporary effect, and your TV display will go through a sequence of mode settings, during the initial Windows® logo display.
User Guide
Page 45
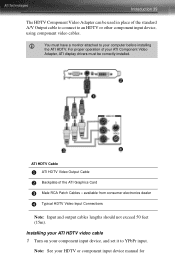
... it to YPbPr input. Installing your ATI HDTV video cable 1 Turn on your ATI Component Video Adapter, ATI display drivers must have a monitor attached to an HDTV or other component input device, using component video cables. ATI HDTV Cable X ATI HDTV Video Output Cable Y Backplate of the standard... The HDTV Component Video Adapter can be correctly installed. available from consumer electronics dealer [ Typical HDTV Video Input Connections Note: Input and output cables lengths should not exceed 50 feet (15m). L You must be used in place of the ATI Graphics Card Z Male RCA ...
... it to YPbPr input. Installing your ATI HDTV video cable 1 Turn on your ATI Component Video Adapter, ATI display drivers must have a monitor attached to an HDTV or other component input device, using component video cables. ATI HDTV Cable X ATI HDTV Video Output Cable Y Backplate of the standard... The HDTV Component Video Adapter can be correctly installed. available from consumer electronics dealer [ Typical HDTV Video Input Connections Note: Input and output cables lengths should not exceed 50 feet (15m). L You must be used in place of the ATI Graphics Card Z Male RCA ...
User Guide
Page 47
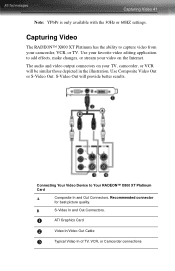
.... Use Composite Video Out or S-Video Out. X ATI Graphics Card Y Video In/Video Out Cable Z Typical Video In of TV, VCR, or Camcorder connections The audio and video output connectors on the Internet. Connecting Your Video Device to add effects, make changes, or stream your video on your camcorder, VCR, or TV. Use your favorite video editing application to Your RADEON™ X800...
.... Use Composite Video Out or S-Video Out. X ATI Graphics Card Y Video In/Video Out Cable Z Typical Video In of TV, VCR, or Camcorder connections The audio and video output connectors on the Internet. Connecting Your Video Device to add effects, make changes, or stream your video on your camcorder, VCR, or TV. Use your favorite video editing application to Your RADEON™ X800...

User Guide
Page 48
...software. 4 Power on your TV or hit Play on the ATI Graphics Adapter. 2 Connect the Video In of the ATI Video In\Video Out cable to a TV, VCR, or Camcorder. Setting the Windows® Volume Control For correct audio performance, your sound card's Line Input must connect the Line Out of your media ... of your sound card. If the volume icon is not in the taskbar. 2 Click Open Volume Controls. 3 If the Line-In volume slider is not visible, click Options, then click Properties. To capture video to your computer 1 Connect the ATI Video In/Video Out cable to the Video In/Video Out connector on...
...software. 4 Power on your TV or hit Play on the ATI Graphics Adapter. 2 Connect the Video In of the ATI Video In\Video Out cable to a TV, VCR, or Camcorder. Setting the Windows® Volume Control For correct audio performance, your sound card's Line Input must connect the Line Out of your media ... of your sound card. If the volume icon is not in the taskbar. 2 Click Open Volume Controls. 3 If the Line-In volume slider is not visible, click Options, then click Properties. To capture video to your computer 1 Connect the ATI Video In/Video Out cable to the Video In/Video Out connector on...
User Guide
Page 54
... this option is correctly loaded corresponding to your operating system and applications. • Re-install the ATI drivers for recommended resolutions and refresh rates. • Try adjusting the brightness, sharpness, contrast, and...RADEON™ X800 card. Off-Center Screen Image, Odd Colors or No Picture Operating System Warns that the connections between the Component Video Adapter and your monitor's documentation for the appropriate cable and connector to plug into the DVI-I connector on the graphics card. • Check the driver installation and make sure that both video card...
... this option is correctly loaded corresponding to your operating system and applications. • Re-install the ATI drivers for recommended resolutions and refresh rates. • Try adjusting the brightness, sharpness, contrast, and...RADEON™ X800 card. Off-Center Screen Image, Odd Colors or No Picture Operating System Warns that the connections between the Component Video Adapter and your monitor's documentation for the appropriate cable and connector to plug into the DVI-I connector on the graphics card. • Check the driver installation and make sure that both video card...
User Guide
Page 59
53 Index Numerics 3D custom settings 28 full-screen 11 performance 28 profiles 28 quality 28 3D applications settings 15 A adjusting overlays 22 AGP 25 AGP bus speed setting 26 application profiles creating 27 ATI Overlay tab 22 ATI taskbar applications disabling 18 enabling 18 B brightness 13, 14 color settings 11 video overlay 22 C capture video 41, 42 card specification information 18 Catalyst version number 18 CATALYST Software installing 46 Clone Mode overlay settings 23 settings 23 clone mode primary display 23 secondary displays 23 color hotkeys 14 profiles 13 color contrast, contrast
53 Index Numerics 3D custom settings 28 full-screen 11 performance 28 profiles 28 quality 28 3D applications settings 15 A adjusting overlays 22 AGP 25 AGP bus speed setting 26 application profiles creating 27 ATI Overlay tab 22 ATI taskbar applications disabling 18 enabling 18 B brightness 13, 14 color settings 11 video overlay 22 C capture video 41, 42 card specification information 18 Catalyst version number 18 CATALYST Software installing 46 Clone Mode overlay settings 23 settings 23 clone mode primary display 23 secondary displays 23 color hotkeys 14 profiles 13 color contrast, contrast
User Guide
Page 61
... performance, performance gaming 7 gamma 13, 14 color settings 11 video overlay 22 gamma correction 13 graphics card resetting through VPU Recover 31 H HDTV 38, 40 troubleshooting 48 HDTV adapter troubleshooting 48 HDTV Component Video Adapter 39 High Definition Television 38 horizontal size TV display 36 ...Hotkeys color settings 14 hue video overlay 22 I Input and output...
... performance, performance gaming 7 gamma 13, 14 color settings 11 video overlay 22 gamma correction 13 graphics card resetting through VPU Recover 31 H HDTV 38, 40 troubleshooting 48 HDTV adapter troubleshooting 48 HDTV Component Video Adapter 39 High Definition Television 38 horizontal size TV display 36 ...Hotkeys color settings 14 hue video overlay 22 I Input and output...
User Guide
Page 62
... 3D 28 color 13 color settings 13 Q quality 3D 28 R Recording PC output on videotape 41 resetting graphics card 31 rotate multiple displays 21 single display 21 Rotation HotKeys 21 S safety instructions iii saturation video overlay 22 secondary display 8 secondary displays clone mode 23 settings 3D applications 15 Clone Mode 23 single display...
... 3D 28 color 13 color settings 13 Q quality 3D 28 R Recording PC output on videotape 41 resetting graphics card 31 rotate multiple displays 21 single display 21 Rotation HotKeys 21 S safety instructions iii saturation video overlay 22 secondary display 8 secondary displays clone mode 23 settings 3D applications 15 Clone Mode 23 single display...
User Guide
Page 63
57 U uninstall old graphics drivers 45 Uninstalling old graphics card software 45 V VGA 23 video capture 41 Video overlay definition 22 video overlay 22 brightness 22 contrast 22 gamma 22 hue 22 saturation 22 Volume control 42 VPU Recover 31 W Windows volume control 42 Y YPbPr 41, 49 YPbPr connector 38 Z Z-Buffer depth explicitly setting 30
57 U uninstall old graphics drivers 45 Uninstalling old graphics card software 45 V VGA 23 video capture 41 Video overlay definition 22 video overlay 22 brightness 22 contrast 22 gamma 22 hue 22 saturation 22 Volume control 42 VPU Recover 31 W Windows volume control 42 Y YPbPr 41, 49 YPbPr connector 38 Z Z-Buffer depth explicitly setting 30


