
Intel Rapid Storage Guide
Page 12
...test begins. 2. Select the appropriate number of hard drives and press Space to select the drive. Click F2 or Delete to save the BIOS settings and exit the BIOS Setup program. Switch the SATA Operation Mode option to select the physical disks. 6. Select 1: Create RAID Volume and press Enter. 3. ...by using the up or down arrow keys to select the strip size and press Enter. 5. Press Enter to RAID. 5. Enable RAID in System BIOS Use the instructions included with your motherboard to create a RAID volume. 1. When finished press Enter. 12 How to install an operating system onto a...
...test begins. 2. Select the appropriate number of hard drives and press Space to select the drive. Click F2 or Delete to save the BIOS settings and exit the BIOS Setup program. Switch the SATA Operation Mode option to select the physical disks. 6. Select 1: Create RAID Volume and press Enter. 3. ...by using the up or down arrow keys to select the strip size and press Enter. 5. Press Enter to RAID. 5. Enable RAID in System BIOS Use the instructions included with your motherboard to create a RAID volume. 1. When finished press Enter. 12 How to install an operating system onto a...
RAID Installation Guide
Page 1
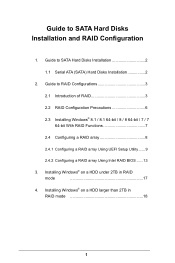
...; 8.1 / 8.1 64-bit / 8 / 8 64-bit / 7 / 7 64-bit With RAID Functions 7 2.4 Configuring a RAID array 8 2.4.1 Configuring a RAID array Using UEFI Setup Utility....... 9 2.4.2 Configuring a RAID array Using Intel RAID BIOS....... 13 3. Guide to SATA Hard Disks Installation 2 1.1 Serial ATA (SATA) Hard Disks Installation 2 2.
...; 8.1 / 8.1 64-bit / 8 / 8 64-bit / 7 / 7 64-bit With RAID Functions 7 2.4 Configuring a RAID array 8 2.4.1 Configuring a RAID array Using UEFI Setup Utility....... 9 2.4.2 Configuring a RAID array Using Intel RAID BIOS....... 13 3. Guide to SATA Hard Disks Installation 2 1.1 Serial ATA (SATA) Hard Disks Installation 2 2.
RAID Installation Guide
Page 7
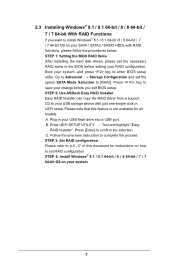
... document for all models A. Plug in UEFI setup. Enter UEFI SETUP UTILITY Tool and highlight "Easy RAID Installer". STEP 1: Setting the BIOS RAID Items After installing the hard disk drives, please set the option SATA Mode Selection to set RAID configuration. Boot your RAID configuration. STEP... 2: Use ASRock Easy RAID Installer Easy RAID Installer can copy the RAID driver from a support CD to p.8 -17 of this feature is not available...
... document for all models A. Plug in UEFI setup. Enter UEFI SETUP UTILITY Tool and highlight "Easy RAID Installer". STEP 1: Setting the BIOS RAID Items After installing the hard disk drives, please set the option SATA Mode Selection to set RAID configuration. Boot your RAID configuration. STEP... 2: Use ASRock Easy RAID Installer Easy RAID Installer can copy the RAID driver from a support CD to p.8 -17 of this feature is not available...
RAID Installation Guide
Page 8
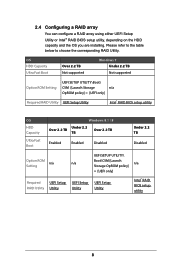
... ROM Setting UEFI SETUP UTILITY\Boot\ CSM [Launch Storage n/a OpROM policy] = [UEFI only] Required RAID Utility UEFI Setup Utility Intel® RAID BIOS setup utility OS HDD Capacity Ultra Fast Boot Windows 8.1 / 8 Under 2.2 Over 2.2 TB TB Over 2.2 TB Enabled Enabled Disabled Under 2.2 TB Disabled... Setting Storage OpROM policy] = [UEFI only] Required UEFI Setup UEFI Setup UEFI Setup RAID Utility Utility Utility Utility Intel® RAID BIOS setup utility 8 2.4 Configuring a RAID array You can configure a RAID array using either UEFI Setup Utility or Intel® RAID...
... ROM Setting UEFI SETUP UTILITY\Boot\ CSM [Launch Storage n/a OpROM policy] = [UEFI only] Required RAID Utility UEFI Setup Utility Intel® RAID BIOS setup utility OS HDD Capacity Ultra Fast Boot Windows 8.1 / 8 Under 2.2 Over 2.2 TB TB Over 2.2 TB Enabled Enabled Disabled Under 2.2 TB Disabled... Setting Storage OpROM policy] = [UEFI only] Required UEFI Setup UEFI Setup UEFI Setup RAID Utility Utility Utility Utility Intel® RAID BIOS setup utility 8 2.4 Configuring a RAID array You can configure a RAID array using either UEFI Setup Utility or Intel® RAID...
RAID Installation Guide
Page 13
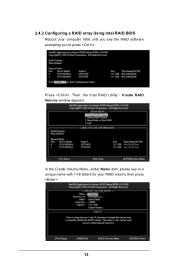
Create RAID Volume window appears. Volume0 13 Press . In the Create Volume Menu, under Name item, please key-in a unique name with 1-16 letters for your computer. Wait until you see the RAID software prompting you to press . Then, the Intel RAID Utility - 2.4.2 Configuring a RAID array Using Intel RAID BIOS Reboot your RAID volume then press .
Create RAID Volume window appears. Volume0 13 Press . In the Create Volume Menu, under Name item, please key-in a unique name with 1-16 letters for your computer. Wait until you see the RAID software prompting you to press . Then, the Intel RAID Utility - 2.4.2 Configuring a RAID array Using Intel RAID BIOS Reboot your RAID volume then press .
RAID Installation Guide
Page 16
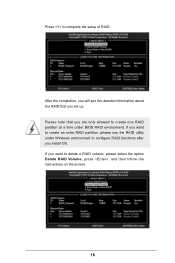
If you want to configure RAID functions after you want to create an extra RAID partition, please use the RAID utility under BIOS RAID environment. If you install OS. Please note that you are only allowed to complete the setup of RAID. Press to create one RAID partition at a time under Windows environment to delete a RAID volume, please select the option Delete RAID Volume, press , and then follow the instructions on the screen. 16 After the completion, you will see the detailed information about the RAID that you set up.
If you want to configure RAID functions after you want to create an extra RAID partition, please use the RAID utility under BIOS RAID environment. If you install OS. Please note that you are only allowed to complete the setup of RAID. Press to create one RAID partition at a time under Windows environment to delete a RAID volume, please select the option Delete RAID Volume, press , and then follow the instructions on the screen. 16 After the completion, you will see the detailed information about the RAID that you set up.
RAID Installation Guide
Page 17
3. Installing Windows® on a HDD under 2TB in RAID mode After the UEFI and RAID BIOS setup you may start installing Windows® 8.1 / 8.1 64-bit / 8 / 8 64-bit / 7 / 7 64-bit OS as usual. 17
3. Installing Windows® on a HDD under 2TB in RAID mode After the UEFI and RAID BIOS setup you may start installing Windows® 8.1 / 8.1 64-bit / 8 / 8 64-bit / 7 / 7 64-bit OS as usual. 17
RAID Installation Guide
Page 18
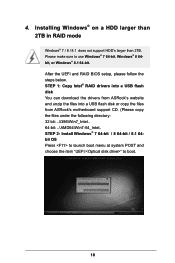
After the UEFI and RAID BIOS setup, please follow the steps below. STEP 1: Copy Intel® RAID drivers into a USB flash disk You can download the drivers from ASRock's website and unzip the files into a USB flash disk or copy the files from ASRock's motherboard support CD. (Please copy the files under the following...
After the UEFI and RAID BIOS setup, please follow the steps below. STEP 1: Copy Intel® RAID drivers into a USB flash disk You can download the drivers from ASRock's website and unzip the files into a USB flash disk or copy the files from ASRock's motherboard support CD. (Please copy the files under the following...

User Manual
Page 5
3.6 ASRock APP Shop 58 3.6.1 UI Overview 58 3.6.2 Apps 59 3.6.3 BIOS & Drivers 62 3.6.4 Setting 63 3.7 Start8 64 Chapter 4 UEFI SETUP UTILITY 67 4.1 Introduction 67 4.1.1 UEFI Menu Bar 67 4.1.2 Navigation Keys 68 4.2 Main Screen 69 4.3 OC Tweaker ...
3.6 ASRock APP Shop 58 3.6.1 UI Overview 58 3.6.2 Apps 59 3.6.3 BIOS & Drivers 62 3.6.4 Setting 63 3.7 Start8 64 Chapter 4 UEFI SETUP UTILITY 67 4.1 Introduction 67 4.1.1 UEFI Menu Bar 67 4.1.2 Navigation Keys 68 4.2 Main Screen 69 4.3 OC Tweaker ...

User Manual
Page 7
... updated, the content of the BIOS setup. You may find the latest VGA cards and CPU support list on ASRock's website without notice. Chapter 3 contains the operation guide of the motherboard and step-by-step installation guides. If you require technical support related to quality and endurance. Z97M Pro4 Chapter 1 Introduction Thank you are...
... updated, the content of the BIOS setup. You may find the latest VGA cards and CPU support list on ASRock's website without notice. Chapter 3 contains the operation guide of the motherboard and step-by-step installation guides. If you require technical support related to quality and endurance. Z97M Pro4 Chapter 1 Introduction Thank you are...

User Manual
Page 11
...memory that there is required) * For detailed product information, please visit our website: http://www.asrock.com Please realize that Windows® cannot use ASRock XFast RAM to the components and devices of your own risk and expense. Overclocking may be done .... Windows® 64-bit operating systems do not have such limitations. Z97M Pro4 BIOS Feature Support CD Hardware Monitor OS Certifications • 64Mb AMI UEFI Legal BIOS with overclocking, including adjusting the setting in the BIOS, applying Untied Overclocking Technology, or using thirdparty overclocking tools.
...memory that there is required) * For detailed product information, please visit our website: http://www.asrock.com Please realize that Windows® cannot use ASRock XFast RAM to the components and devices of your own risk and expense. Overclocking may be done .... Windows® 64-bit operating systems do not have such limitations. Z97M Pro4 BIOS Feature Support CD Hardware Monitor OS Certifications • 64Mb AMI UEFI Legal BIOS with overclocking, including adjusting the setting in the BIOS, applying Untied Overclocking Technology, or using thirdparty overclocking tools.

User Manual
Page 13
Z97M Pro4 ASRock APP Charger Simply by clicking the asterisk icon at the upper right hand corner of Adobe Photoshop 5 times faster. ASRock APP Charger allows you can lower the latency in F-Stream. And it also boosts the speed of the screen. You can... in games. RealTime Analysis of accessing your application's priority ideally and add new programs to extend their BIOS. ASRock Restart to UEFI allows users to use and setup. ASRock XFast LAN ASRock XFast LAN provides faster internet access, which data streams you restart. LAN Application Prioritization: You can watch...
Z97M Pro4 ASRock APP Charger Simply by clicking the asterisk icon at the upper right hand corner of Adobe Photoshop 5 times faster. ASRock APP Charger allows you can lower the latency in F-Stream. And it also boosts the speed of the screen. You can... in games. RealTime Analysis of accessing your application's priority ideally and add new programs to extend their BIOS. ASRock Restart to UEFI allows users to use and setup. ASRock XFast LAN ASRock XFast LAN provides faster internet access, which data streams you restart. LAN Application Prioritization: You can watch...
User Manual
Page 14
... other users. Just select "UEFI Guide"! ASRock Instant Flash ASRock Instant Flash is a BIOS flash utility embedded in a few clicks without fear of your USB storage and launch this feature. This convenient BIOS update tool allows you without permission to update the system BIOS in Flash ROM. ASRock Crashless BIOS ASRock Crashless BIOS allows users to establish an internet...
... other users. Just select "UEFI Guide"! ASRock Instant Flash ASRock Instant Flash is a BIOS flash utility embedded in a few clicks without fear of your USB storage and launch this feature. This convenient BIOS update tool allows you without permission to update the system BIOS in Flash ROM. ASRock Crashless BIOS ASRock Crashless BIOS allows users to establish an internet...

User Manual
Page 16
... SPK FRONT Top: Center: 1 HD_AUDIO1 Audio CODEC CHA_FAN2 CLRCMOS1 1 CMOS Battery PCI Express 3.0 PCIE1 Z97M Pro4 PCI1 Super I/O COM1 1 1 PCI2 LPT1 RoHS PCIE2 1 CI1 TPMS1 USB6_7 1 1 USB8_9 1 Intel Z97 TB1 CHA_FAN1 PLED PWRBTN 1 HDLED RESET PANEL1 64Mb BIOS SPEAKER1 1 Bottom: Optical SPDIF Bottom: MIC IN USB10_11 1 Front USB 3.0 SATA_4_5 SATA_2_3 SATA_0_1 English 10
... SPK FRONT Top: Center: 1 HD_AUDIO1 Audio CODEC CHA_FAN2 CLRCMOS1 1 CMOS Battery PCI Express 3.0 PCIE1 Z97M Pro4 PCI1 Super I/O COM1 1 1 PCI2 LPT1 RoHS PCIE2 1 CI1 TPMS1 USB6_7 1 1 USB8_9 1 Intel Z97 TB1 CHA_FAN1 PLED PWRBTN 1 HDLED RESET PANEL1 64Mb BIOS SPEAKER1 1 Bottom: Optical SPDIF Bottom: MIC IN USB10_11 1 Front USB 3.0 SATA_4_5 SATA_2_3 SATA_0_1 English 10

User Manual
Page 28
Please adjust the BIOS option "Clear Status" to default setup, please turn off the computer and unplug the power cord ... p.10, No. 27) Default Clear CMOS CLRCMOS1 allows you to short pin2 and pin3 on these 2 pins. If you update the BIOS. When the jumper cap is placed on the pins, the jumper is "Short". Please be noted that the password, date, time, ... 3-pin jumper whose pin1 and pin2 are setup. If you need to clear the CMOS when you just finish updating the BIOS, you must boot up the system first, and then shut it down before you do not clear the CMOS right after ...
Please adjust the BIOS option "Clear Status" to default setup, please turn off the computer and unplug the power cord ... p.10, No. 27) Default Clear CMOS CLRCMOS1 allows you to short pin2 and pin3 on these 2 pins. If you update the BIOS. When the jumper cap is placed on the pins, the jumper is "Short". Please be noted that the password, date, time, ... 3-pin jumper whose pin1 and pin2 are setup. If you need to clear the CMOS when you just finish updating the BIOS, you must boot up the system first, and then shut it down before you do not clear the CMOS right after ...

User Manual
Page 42
Live Update Check for newer versions of the problem. 36 English Please leave your contact information along with your computer. Tech Service Contact Tech Service if you have problems with details of BIOS or drivers.
Live Update Check for newer versions of the problem. 36 English Please leave your contact information along with your computer. Tech Service Contact Tech Service if you have problems with details of BIOS or drivers.

User Manual
Page 45
... install AHCI drivers automatically. 3.3.2 Setup Guide Configuring Rapid Start Step 1 Run ASRock Rapid Start utility from Start -> All Programs -> ASRock Utility. If there are SSD's installed into your hidden partition and click on the SSD. 39 English Z97M Pro4 3. Press F2 to enter BIOS, then go to Advanced ‐> Storage Configuration and change SATA Mode...
... install AHCI drivers automatically. 3.3.2 Setup Guide Configuring Rapid Start Step 1 Run ASRock Rapid Start utility from Start -> All Programs -> ASRock Utility. If there are SSD's installed into your hidden partition and click on the SSD. 39 English Z97M Pro4 3. Press F2 to enter BIOS, then go to Advanced ‐> Storage Configuration and change SATA Mode...

User Manual
Page 68
Please update them all soon. Click on Step 2 to see a list of recommended or critical updates for the BIOS or drivers. 3.6.3 BIOS & Drivers Installing BIOS or Drivers When the "BIOS & Drivers" tab is selected, you want to update. Step 1 Please check the item information before update. Click to start the update process. 62 English Step 3 Click Update to select one or more items you will see more details.
Please update them all soon. Click on Step 2 to see a list of recommended or critical updates for the BIOS or drivers. 3.6.3 BIOS & Drivers Installing BIOS or Drivers When the "BIOS & Drivers" tab is selected, you want to update. Step 1 Please check the item information before update. Click to start the update process. 62 English Step 3 Click Update to select one or more items you will see more details.

User Manual
Page 75
...items. Active Page on Entry Select the default page when entering the UEFI setup utility. Full HD UEFI When [Auto] is a quick tutorial for ASRock's UEFI setup Utility. You may abort the tutorial by pressing "ESC". 69 English UEFI Guide UEFI Guide is selected, the resolution will be set... to add/remove your collection of BIOS items. Press F5 to 1024 x 768 directly. If the monitor does not support Full HD resolution, then the resolution will appear and display the system overview. Z97M Pro4 4.2 Main Screen When you enter the UEFI SETUP UTILITY, the ...
...items. Active Page on Entry Select the default page when entering the UEFI setup utility. Full HD UEFI When [Auto] is a quick tutorial for ASRock's UEFI setup Utility. You may abort the tutorial by pressing "ESC". 69 English UEFI Guide UEFI Guide is selected, the resolution will be set... to add/remove your collection of BIOS items. Press F5 to 1024 x 768 directly. If the monitor does not support Full HD resolution, then the resolution will appear and display the system overview. Z97M Pro4 4.2 Main Screen When you enter the UEFI SETUP UTILITY, the ...

User Manual
Page 98
.... Legacy USB Support Enable or disable Legacy OS Support for USB 3.0 devices. If you encounter USB compatibility issues it is disabled in BIOS). If you encounter USB compatibility issues it is recommended to automatically enable the USB 3.0 driver after rebooting (USB 3.0 is enabled in... BIOS). Set [Auto] to disable legacy USB support. Select UEFI Setup Only to disable the USB 3.0 ports. 4.4.9 USB Configuration USB Controller Enable or...
.... Legacy USB Support Enable or disable Legacy OS Support for USB 3.0 devices. If you encounter USB compatibility issues it is disabled in BIOS). If you encounter USB compatibility issues it is recommended to automatically enable the USB 3.0 driver after rebooting (USB 3.0 is enabled in... BIOS). Set [Auto] to disable legacy USB support. Select UEFI Setup Only to disable the USB 3.0 ports. 4.4.9 USB Configuration USB Controller Enable or...


