
User Manual
Page 1
All rights reserved. 1 Z77 Pro4 User Manual Version 1.0 Published November 2011 Copyright©2011 ASRock INC.
All rights reserved. 1 Z77 Pro4 User Manual Version 1.0 Published November 2011 Copyright©2011 ASRock INC.

User Manual
Page 2
... to the owners' benefit, without intent to infringe. Disclaimer: Specifications and information contained in the manual or product. With respect to the contents of this motherboard contains Perchlorate, a toxic substance controlled in this manual. ASRock assumes no event shall ASRock, its directors, officers, employees, or agents be constructed as a commitment by any errors or...
... to the owners' benefit, without intent to infringe. Disclaimer: Specifications and information contained in the manual or product. With respect to the contents of this motherboard contains Perchlorate, a toxic substance controlled in this manual. ASRock assumes no event shall ASRock, its directors, officers, employees, or agents be constructed as a commitment by any errors or...

User Manual
Page 5
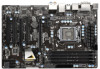
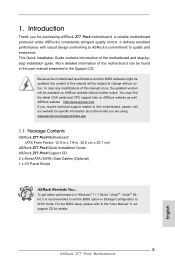
... 64bit, it is recommended to set the BIOS option in Storage Configuration to the "User Manual" in , 30.5 cm x 20.1 cm) ASRock Z77 Pro4 Quick Installation Guide ASRock Z77 Pro4 Support CD 2 x Serial ATA (SATA) Data Cables (Optional) 1 x I/O Panel Shield ASRock Reminds You... In this manual will be available on ASRock website as well. Chapter 1: Introduction Thank you are using.
... 64bit, it is recommended to set the BIOS option in Storage Configuration to the "User Manual" in , 30.5 cm x 20.1 cm) ASRock Z77 Pro4 Quick Installation Guide ASRock Z77 Pro4 Support CD 2 x Serial ATA (SATA) Data Cables (Optional) 1 x I/O Panel Shield ASRock Reminds You... In this manual will be available on ASRock website as well. Chapter 1: Introduction Thank you are using.

User Manual
Page 19
... the heatsink to dissipate heat. Please be secured on the motherboard. Before you install the heatsink, you press down on side closest to the instruction manuals of the heatsink for Socket LGA 1155/1156 CPU fan. 19 No.4). Step 1. Ensure that this motherboard supports Combo Cooler Option (C.C.O.), which provides flexible options...
... the heatsink to dissipate heat. Please be secured on the motherboard. Before you install the heatsink, you press down on side closest to the instruction manuals of the heatsink for Socket LGA 1155/1156 CPU fan. 19 No.4). Step 1. Ensure that this motherboard supports Combo Cooler Option (C.C.O.), which provides flexible options...

User Manual
Page 23
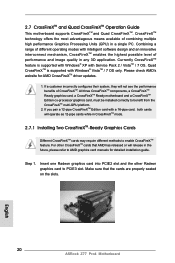
... three CrossFireXTM components, a CrossFireXTM Ready graphics card, a CrossFireXTM Ready motherboard and a CrossFireXTM Edition co-processor graphics card, must be installed correctly to AMD graphics card manuals for AMD CrossFireXTM driver updates. 1. Combining a range of combining multiple high performance Graphics Processing Units (GPU) in any 3D application. Currently CrossFireXTM feature is supported...
... three CrossFireXTM components, a CrossFireXTM Ready graphics card, a CrossFireXTM Ready motherboard and a CrossFireXTM Edition co-processor graphics card, must be installed correctly to AMD graphics card manuals for AMD CrossFireXTM driver updates. 1. Combining a range of combining multiple high performance Graphics Processing Units (GPU) in any 3D application. Currently CrossFireXTM feature is supported...

User Manual
Page 34
... front panel. B. D. The LED is operating. The LED is off when the system is in the Realtek Control panel. Please follow the instruction in our manual and chassis manual to the "FrontMic" Tab in S1/S3 sleep state.
... front panel. B. D. The LED is operating. The LED is off when the system is in the Realtek Control panel. Please follow the instruction in our manual and chassis manual to the "FrontMic" Tab in S1/S3 sleep state.

User Manual
Page 40
...cannot be processed. 2. Below operation procedure is designed only for SATA / SATA2 / SATA3 HDD in the product spec on our support website: www.asrock.com 4. A. 7-pin SATA data cable B. SATA power cable SATA 7-pin connector The SATA 15-pin power connector (Black) connect to SATA ... power connector interfaces, the IDE 1x4-pin conventional power connector interface is installed into system properly. Make sure your dealer or HDD user manual. Points of attention, before you process the SATA / SATA2 / SATA3 HDD Hot Plug, please check below cable accessories from your SATA...
...cannot be processed. 2. Below operation procedure is designed only for SATA / SATA2 / SATA3 HDD in the product spec on our support website: www.asrock.com 4. A. 7-pin SATA data cable B. SATA power cable SATA 7-pin connector The SATA 15-pin power connector (Black) connect to SATA ... power connector interfaces, the IDE 1x4-pin conventional power connector interface is installed into system properly. Make sure your dealer or HDD user manual. Points of attention, before you process the SATA / SATA2 / SATA3 HDD Hot Plug, please check below cable accessories from your SATA...

User Manual
Page 49
...]. DRAM tRFC Use this item to change RAS# Active Time (tRAS) Auto/Manual setting. The default is [Auto]. The default is [Auto]. DRAM tRAS Use this item to change Refresh Cyle Time (tRFC) Auto/Manual setting. The default is [Auto]. 49 DRAM tRCD Use this item to change... Write Recovery Time (tWR) Auto/Manual setting. The default is [Auto]. The default is [Auto]. DRAM tWR Use this item...
...]. DRAM tRFC Use this item to change RAS# Active Time (tRAS) Auto/Manual setting. The default is [Auto]. The default is [Auto]. DRAM tRAS Use this item to change Refresh Cyle Time (tRFC) Auto/Manual setting. The default is [Auto]. 49 DRAM tRCD Use this item to change... Write Recovery Time (tWR) Auto/Manual setting. The default is [Auto]. The default is [Auto]. DRAM tWR Use this item...

User Manual
Page 50
... select IGPU Voltage. The default is [Auto]. The default value is [Auto]. DRAM tRTP Use this item to change Four Activate Window (tFAW) Auto/Manual setting. DRAM tFAW Use this item to change ODT NOM (CH B) setting. The default is [Auto]. The default is [Auto]. ODT NOM (CH... B) Use this to Precharge (tRTP) Auto/Manual setting. The default is [Auto]. Voltage Configuration CPU Core Voltage Use this item to change Read to select CPU Core Voltage. CPU Load-Line Calibration...
... select IGPU Voltage. The default is [Auto]. The default value is [Auto]. DRAM tRTP Use this item to change Four Activate Window (tFAW) Auto/Manual setting. DRAM tFAW Use this item to change ODT NOM (CH B) setting. The default is [Auto]. The default is [Auto]. ODT NOM (CH... B) Use this to Precharge (tRTP) Auto/Manual setting. The default is [Auto]. Voltage Configuration CPU Core Voltage Use this item to change Read to select CPU Core Voltage. CPU Load-Line Calibration...

User Manual
Page 64
Configuration options: [Full On] and [Automatic Mode]. Configuration options: [Full On] and [Manual]. Over Temperature Protection Use this section, it allows you to set chassis fan 2's speed. CPU Fan 1 & 2 Setting This allows you to set chassis fan 1's speed... or disable Over Temperature Protection. The default value is [Full On]. The default value is [Full On]. Configuration options: [Full On], [Automatic Mode] and [Manual]. The default value is [Enabled]. 64 The default value is [Full On]. Chassis Fan 1 Setting This allows you to monitor the status of the hardware...
Configuration options: [Full On] and [Automatic Mode]. Configuration options: [Full On] and [Manual]. Over Temperature Protection Use this section, it allows you to set chassis fan 2's speed. CPU Fan 1 & 2 Setting This allows you to set chassis fan 1's speed... or disable Over Temperature Protection. The default value is [Full On]. The default value is [Full On]. Configuration options: [Full On], [Automatic Mode] and [Manual]. The default value is [Enabled]. 64 The default value is [Full On]. Chassis Fan 1 Setting This allows you to monitor the status of the hardware...
Quick Installation Guide
Page 5
... Thank you for specific information about the model you require technical support related to the "User Manual" in , 30.5 cm x 20.1 cm) ASRock Z77 Pro4 Quick Installation Guide ASRock Z77 Pro4 Support CD 2 x Serial ATA (SATA) Data Cables (Optional) 1 x I/O Panel Shield ASRock Reminds You... Because the motherboard specifications and the BIOS software might be updated, the content of...
... Thank you for specific information about the model you require technical support related to the "User Manual" in , 30.5 cm x 20.1 cm) ASRock Z77 Pro4 Quick Installation Guide ASRock Z77 Pro4 Support CD 2 x Serial ATA (SATA) Data Cables (Optional) 1 x I/O Panel Shield ASRock Reminds You... Because the motherboard specifications and the BIOS software might be updated, the content of...
Quick Installation Guide
Page 10
...HDMI adapter, the DVI-D port can save your OC settings as the HDMIport. 7. Besides, with the DVI-to update system BIOS 10 ASRock Z77 Pro4 Motherboard English Please check the table on page 17 for optimal system performance. Your friends then can use . 4. This motherboard supports Dual...CPU cores are only supported under Windows® 7 64-bit / 7. ASRock website: http://www.asrock.com 10. You can load the OC profile to their own system to read the installation guide of the "User Manual" in a user-friendly interface, which includes Hardware Monitor, Fan Control, ...
...HDMI adapter, the DVI-D port can save your OC settings as the HDMIport. 7. Besides, with the DVI-to update system BIOS 10 ASRock Z77 Pro4 Motherboard English Please check the table on page 17 for optimal system performance. Your friends then can use . 4. This motherboard supports Dual...CPU cores are only supported under Windows® 7 64-bit / 7. ASRock website: http://www.asrock.com 10. You can load the OC profile to their own system to read the installation guide of the "User Manual" in a user-friendly interface, which includes Hardware Monitor, Fan Control, ...

Quick Installation Guide
Page 16
... Place the heatsink onto the socket. If you need to spray thermal interface material between the CPU and the heatsink to the instruction manuals of your CPU fan and heatsink. Before you install the heatsink, you press down on the motherboard. For proper installation, please kindly...Step 3. Repeat with the motherboard throughholes. Step 4. Please adopt the type of the heatsink for Socket LGA 1155/1156 CPU fan. 16 ASRock Z77 Pro4 Motherboard English Then connect the CPU fan to dissipate heat. Ensure that the CPU and the heatsink are oriented on side closest to the...
... Place the heatsink onto the socket. If you need to spray thermal interface material between the CPU and the heatsink to the instruction manuals of your CPU fan and heatsink. Before you install the heatsink, you press down on the motherboard. For proper installation, please kindly...Step 3. Repeat with the motherboard throughholes. Step 4. Please adopt the type of the heatsink for Socket LGA 1155/1156 CPU fan. 16 ASRock Z77 Pro4 Motherboard English Then connect the CPU fan to dissipate heat. Ensure that the CPU and the heatsink are oriented on side closest to the...
Quick Installation Guide
Page 20
... Ready motherboard and a CrossFireXTM Edition co-processor graphics card, must be installed correctly to AMD graphics card manuals for AMD CrossFireXTM driver updates. 1. For other Radeon graphics card to enable CrossFireXTM feature. English 20 ASRock Z77 Pro4 Motherboard CrossFireXTM technology offers the most advantageous means available of combining multiple high performance Graphics Processing Units...
... Ready motherboard and a CrossFireXTM Edition co-processor graphics card, must be installed correctly to AMD graphics card manuals for AMD CrossFireXTM driver updates. 1. For other Radeon graphics card to enable CrossFireXTM feature. English 20 ASRock Z77 Pro4 Motherboard CrossFireXTM technology offers the most advantageous means available of combining multiple high performance Graphics Processing Units...

Quick Installation Guide
Page 31
... . Connect Ground (GND) to the "FrontMic" Tab in our manual and chassis manual to function correctly. For Windows® 7 / 7 64-bit / VistaTM / VistaTM 64-bit OS: Go to Ground (GND). The LED is on when the system is reading or writing data. 31 ASRock Z77 Pro4 Motherboard English Note the positive and negative pins before...
... . Connect Ground (GND) to the "FrontMic" Tab in our manual and chassis manual to function correctly. For Windows® 7 / 7 64-bit / VistaTM / VistaTM 64-bit OS: Go to Ground (GND). The LED is on when the system is reading or writing data. 31 ASRock Z77 Pro4 Motherboard English Note the positive and negative pins before...
Quick Installation Guide
Page 37
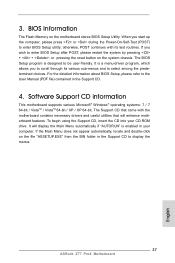
...not appear automatically, locate and double-click on the file "ASSETUP.EXE" from the BIN folder in the Support CD to the User Manual (PDF file) contained in your CD-ROM drive. 3. otherwise, POST continues with the motherboard contains necessary drivers and useful utilities that ...Support CD, insert the CD into your computer. For the detailed information about BIOS Setup, please refer to display the menus. 37 ASRock Z77 Pro4 Motherboard English When you wish to be user-friendly. It will enhance motherboard features. BIOS Information The Flash Memory on the system chassis....
...not appear automatically, locate and double-click on the file "ASSETUP.EXE" from the BIN folder in the Support CD to the User Manual (PDF file) contained in your CD-ROM drive. 3. otherwise, POST continues with the motherboard contains necessary drivers and useful utilities that ...Support CD, insert the CD into your computer. For the detailed information about BIOS Setup, please refer to display the menus. 37 ASRock Z77 Pro4 Motherboard English When you wish to be user-friendly. It will enhance motherboard features. BIOS Information The Flash Memory on the system chassis....

Quick Installation Guide
Page 171
1 Z77 Pro4 BIOS CPU http://www.asrock.com www.asrock.com/support/index.asp 1.1 華擎 Z77 Pro4 主板 (ATX 規格 : 12.0 英吋 X 7.9 英吋 , 30.5 厘米 X 20.1 厘米 ) 華擎 Z77 Pro4 Z77 Pro4 Serial ATA(SATA I/O 擋板 ASRock 為了在 Windows® 7 / 7 64-bit / VistaTM / VistaTM 64-bit BIOS中將Storage Configuration AHCI BIOS User Manual 171 ASRock Z77 Pro4 Motherboard 簡體中文
1 Z77 Pro4 BIOS CPU http://www.asrock.com www.asrock.com/support/index.asp 1.1 華擎 Z77 Pro4 主板 (ATX 規格 : 12.0 英吋 X 7.9 英吋 , 30.5 厘米 X 20.1 厘米 ) 華擎 Z77 Pro4 Z77 Pro4 Serial ATA(SATA I/O 擋板 ASRock 為了在 Windows® 7 / 7 64-bit / VistaTM / VistaTM 64-bit BIOS中將Storage Configuration AHCI BIOS User Manual 171 ASRock Z77 Pro4 Motherboard 簡體中文

Quick Installation Guide
Page 190
...190 警告! 1、 關於"Hyper-Threading Technology CD User Manual"第 53 頁。 2 17 3 Windows® 7 / VistaTM / XP 4GB。對於 Windows 64 位元 CPU ASRock XFast RAM 來利用 Windows 4、 僅 PCIE2 Gen 3 Gen... HDMI DVI-D HDMI 7、 只有 Windows® 7 64 位元 /7 可支持 xvYCC 與 Deep Color ASRock Z77 Pro4 Motherboard CPU CPU 度) - - CPU - CPU 12V, +5V, +3.3V 操作系統 -
...190 警告! 1、 關於"Hyper-Threading Technology CD User Manual"第 53 頁。 2 17 3 Windows® 7 / VistaTM / XP 4GB。對於 Windows 64 位元 CPU ASRock XFast RAM 來利用 Windows 4、 僅 PCIE2 Gen 3 Gen... HDMI DVI-D HDMI 7、 只有 Windows® 7 64 位元 /7 可支持 xvYCC 與 Deep Color ASRock Z77 Pro4 Motherboard CPU CPU 度) - - CPU - CPU 12V, +5V, +3.3V 操作系統 -

RAID Installation Guide
Page 2
... SATA installation guide, please refer to create RAID on this guide carefully according to SATA Hard Disks Installation 1.1 Serial ATA (SATA) Hard Disks Installation Intel Z77 chipset supports Serial ATA (SATA) hard disks with RAID functions, including RAID 0, RAID 1, RAID 5, RAID 10 and Intel Rapid Storage. This section will ...guide you how to Serial ATA (SATA) Hard Disks Installation of "User Manual" in this motherboard for internal storage devices. 1. You may install SATA hard disks on SATA ports. 2
... SATA installation guide, please refer to create RAID on this guide carefully according to SATA Hard Disks Installation 1.1 Serial ATA (SATA) Hard Disks Installation Intel Z77 chipset supports Serial ATA (SATA) hard disks with RAID functions, including RAID 0, RAID 1, RAID 5, RAID 10 and Intel Rapid Storage. This section will ...guide you how to Serial ATA (SATA) Hard Disks Installation of "User Manual" in this motherboard for internal storage devices. 1. You may install SATA hard disks on SATA ports. 2
Lucid Virtu Installation Guide
Page 4
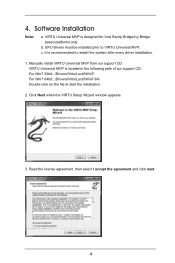
... prior to restart the system after every driver installation. 1. Click Next when the VIRTU Setup Wizard window appears. 3. c. It is recommended to VIRTU Universal MVP. Manually install VIRTU Universal MVP from our support CD. 4. Read the license agreement, then select I accept the agreement and click next. 4
... prior to restart the system after every driver installation. 1. Click Next when the VIRTU Setup Wizard window appears. 3. c. It is recommended to VIRTU Universal MVP. Manually install VIRTU Universal MVP from our support CD. 4. Read the license agreement, then select I accept the agreement and click next. 4
