
User Manual
Page 28
... Realtek Control panel and adjust "Recording Volume". E. To activate the front mic, go to MIC2_L. Connect Mic_IN (MIC) to the "FrontMic" Tab in our manual and chassis manual to function correctly. USB 3.1 Gen1 Headers (19-pin USB3_3_4) (see p.7, No. 7) (19-pin USB3_5_6) (see p.7, No. 18) Vbus IntA_PA_SSRXIntA_PA_SSRX+ GND IntA_PA_SSTXIntA_PA_SSTX+ GND IntA_PA_DIntA_PA_D+ Vbus...
... Realtek Control panel and adjust "Recording Volume". E. To activate the front mic, go to MIC2_L. Connect Mic_IN (MIC) to the "FrontMic" Tab in our manual and chassis manual to function correctly. USB 3.1 Gen1 Headers (19-pin USB3_3_4) (see p.7, No. 7) (19-pin USB3_5_6) (see p.7, No. 18) Vbus IntA_PA_SSRXIntA_PA_SSRX+ GND IntA_PA_SSTXIntA_PA_SSTX+ GND IntA_PA_DIntA_PA_D+ Vbus...
User Manual
Page 31
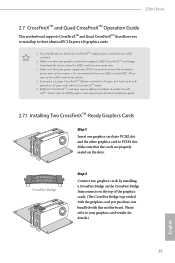
... three identical PCI Express x16 graphics cards. 1. Make sure that the cards are AMD certified. 2. Please refer to AMD graphics card manuals for details. 4. Please refer to the AMD's website for detailed installation guide. 2.7.1 Installing Two CrossFireXTM-Ready Graphics Cards Step 1 Insert...you purchase, not bundled with a 16-pipe card, both cards will operate as 12-pipe cards while in CrossFireXTM mode. 5. Z390 Pro4 2.7 CrossFireXTM and Quad CrossFireXTM Operation Guide This motherboard supports CrossFireXTM and Quad CrossFireXTM that are properly seated on the top of the graphics...
... three identical PCI Express x16 graphics cards. 1. Make sure that the cards are AMD certified. 2. Please refer to AMD graphics card manuals for details. 4. Please refer to the AMD's website for detailed installation guide. 2.7.1 Installing Two CrossFireXTM-Ready Graphics Cards Step 1 Insert...you purchase, not bundled with a 16-pipe card, both cards will operate as 12-pipe cards while in CrossFireXTM mode. 5. Z390 Pro4 2.7 CrossFireXTM and Quad CrossFireXTM Operation Guide This motherboard supports CrossFireXTM and Quad CrossFireXTM that are properly seated on the top of the graphics...

User Manual
Page 67
... the memory on die termination resistors' WR. The default is [Auto]. Z390 Pro4 61 English ODT WR (B1) Configure the memory on die termination resistors' WR. The default is [Auto]. ODT NOM (B1) Use this to change ODT Auto/Manual settings. IOL (CH B) Configure IO latency for Channel A. IOL Offset ... IO latency offset for Channel B. RFR Delay (CH B) Configure RFR Delay for channel B. ODT NOM (A2) Use this to change ODT Auto/Manual settings. ODT Setting ODT WR (A1) Configure the memory on die termination resistors' WR. ODT NOM (A1) Use this to change ODT Auto...
... the memory on die termination resistors' WR. The default is [Auto]. Z390 Pro4 61 English ODT WR (B1) Configure the memory on die termination resistors' WR. The default is [Auto]. ODT NOM (B1) Use this to change ODT Auto/Manual settings. IOL (CH B) Configure IO latency for Channel A. IOL Offset ... IO latency offset for Channel B. RFR Delay (CH B) Configure RFR Delay for channel B. ODT NOM (A2) Use this to change ODT Auto/Manual settings. ODT Setting ODT WR (A1) Configure the memory on die termination resistors' WR. ODT NOM (A1) Use this to change ODT Auto...

Quick Installation Guide
Page 24
... follow the instructions in the Realtek Control panel and adjust "Recording Volume". To activate the front mic, go to the "FrontMic" Tab in our manual and chassis manual to install your system. 2. USB 3.1 Gen1 Headers (19-pin USB3_3_4) (see p.1, No. 7) (19-pin USB3_5_6) (see p.1, No. 18) Vbus IntA_PA_SSRXIntA_PA_SSRX+ GND IntA_PA_SSTXIntA_PA_SSTX+ GND IntA_PA_DIntA_PA_D...
... follow the instructions in the Realtek Control panel and adjust "Recording Volume". To activate the front mic, go to the "FrontMic" Tab in our manual and chassis manual to install your system. 2. USB 3.1 Gen1 Headers (19-pin USB3_3_4) (see p.1, No. 7) (19-pin USB3_5_6) (see p.1, No. 18) Vbus IntA_PA_SSRXIntA_PA_SSRX+ GND IntA_PA_SSTXIntA_PA_SSTX+ GND IntA_PA_DIntA_PA_D...
