
User Manual
Page 4
... Specifications 2 1.3 Motherboard Layout 7 1.4 I/O Panel 9 1.5 WiFi-802.11ac Module and ASRock WiFi 2.4/5 GHz Antenna 11 Chapter 2 Installation 13 2.1 Installing the CPU 14 2.2 Installing the CPU Fan and Heatsink 17 2.3 Installing Memory Modules (DIMM) 18 2.4 Expansion Slot (PCI Express Slot) 20 2.5 Jumpers Setup 21 2.6 Onboard Headers and Connectors 22 2.7 M.2_SSD (NGFF) Module Installation Guide 26 Chapter 3 Software and Utilities Operation 29 3.1 Installing Drivers 29 3.2 A-Tuning 30 3.2.1 Installing A-Tuning 30 3.2.2 Using A-Tuning 30 3.3 ASRock Live Update...
... Specifications 2 1.3 Motherboard Layout 7 1.4 I/O Panel 9 1.5 WiFi-802.11ac Module and ASRock WiFi 2.4/5 GHz Antenna 11 Chapter 2 Installation 13 2.1 Installing the CPU 14 2.2 Installing the CPU Fan and Heatsink 17 2.3 Installing Memory Modules (DIMM) 18 2.4 Expansion Slot (PCI Express Slot) 20 2.5 Jumpers Setup 21 2.6 Onboard Headers and Connectors 22 2.7 M.2_SSD (NGFF) Module Installation Guide 26 Chapter 3 Software and Utilities Operation 29 3.1 Installing Drivers 29 3.2 A-Tuning 30 3.2.1 Installing A-Tuning 30 3.2.2 Using A-Tuning 30 3.3 ASRock Live Update...

User Manual
Page 5
... BIOS & Drivers 37 3.3.4 Setting 38 3.4 Enabling USB Ports for Windows® 7 Installation 39 Chapter 4 UEFI SETUP UTILITY 42 4.1 Introduction 42 4.2 EZ Mode 43 4.3 Advanced Mode 44 4.3.1 UEFI Menu Bar 44 4.3.2 Navigation Keys 45 4.4 Main Screen 46 4.5 OC Tweaker Screen 47 4.6 Advanced Screen 55 4.6.1 CPU Configuration 56 4.6.2 Chipset Configuration 58 4.6.3 Storage Configuration 61 4.6.4 Super IO Configuration 62 4.6.5 ACPI Configuration 63 4.6.6 USB Configuration 64 4.6.7 Trusted Computing 65 4.7 Tools 66 4.8 Hardware Health Event Monitoring Screen...
... BIOS & Drivers 37 3.3.4 Setting 38 3.4 Enabling USB Ports for Windows® 7 Installation 39 Chapter 4 UEFI SETUP UTILITY 42 4.1 Introduction 42 4.2 EZ Mode 43 4.3 Advanced Mode 44 4.3.1 UEFI Menu Bar 44 4.3.2 Navigation Keys 45 4.4 Main Screen 46 4.5 OC Tweaker Screen 47 4.6 Advanced Screen 55 4.6.1 CPU Configuration 56 4.6.2 Chipset Configuration 58 4.6.3 Storage Configuration 61 4.6.4 Super IO Configuration 62 4.6.5 ACPI Configuration 63 4.6.6 USB Configuration 64 4.6.7 Trusted Computing 65 4.7 Tools 66 4.8 Hardware Health Event Monitoring Screen...
User Manual
Page 6
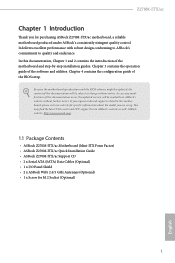
... change without further notice. In case any modifications of this documentation, Chapter 1 and 2 contains the introduction of the software and utilities. Chapter 3 contains the operation guide of the motherboard and step-by-step installation guides. Because the motherboard specifications and the BIOS software might be available on ASRock's website as well. Z270M-ITX/ac Chapter 1 Introduction Thank you for M.2 Socket (Optional) 1 English You may find the latest VGA cards and CPU support list...
... change without further notice. In case any modifications of this documentation, Chapter 1 and 2 contains the introduction of the software and utilities. Chapter 3 contains the operation guide of the motherboard and step-by-step installation guides. Because the motherboard specifications and the BIOS software might be available on ASRock's website as well. Z270M-ITX/ac Chapter 1 Introduction Thank you for M.2 Socket (Optional) 1 English You may find the latest VGA cards and CPU support list...

User Manual
Page 8
Z270M-ITX/ac Graphics Audio * Intel® HD Graphics Built-in Visuals and the VGA outputs can be supported only with processors which are GPU integrated. • Supports Intel® HD Graphics Built-in Visuals : Intel® Quick Sync Video with max. resolution up to 1920x1200 @ 60Hz • Supports Auto Lip Sync, Deep Color (12bpc), xvYCC and HBR (High Bit Rate Audio) with HDMI Port (Compliant HDMI monitor is required to 4K x 2K...
Z270M-ITX/ac Graphics Audio * Intel® HD Graphics Built-in Visuals and the VGA outputs can be supported only with processors which are GPU integrated. • Supports Intel® HD Graphics Built-in Visuals : Intel® Quick Sync Video with max. resolution up to 1920x1200 @ 60Hz • Supports Auto Lip Sync, Deep Color (12bpc), xvYCC and HBR (High Bit Rate Audio) with HDMI Port (Compliant HDMI monitor is required to 4K x 2K...

User Manual
Page 10
... (18W) fan power. • 1 x 24 pin ATX Power Connector • 1 x 8 pin 12V Power Connector • 1 x Front Panel Audio Connector • 1 x USB 2.0 Header (Supports 2 USB 2.0 ports) (Supports ESD Protection (ASRock Full Spike Protection)) • 1 x USB 3.0 Header (Supports 2 USB 3.0 ports) (Supports ESD Protection (ASRock Full Spike Protection)) BIOS Feature • AMI UEFI Legal BIOS with multilingual GUI support • ACPI 6.0 Compliant wake up events • SMBIOS 2.7 Support • CPU, GT_CPU, DRAM, PCH 1.0V Voltage Multi-adjustment Hardware Monitor • CPU / Chassis...
... (18W) fan power. • 1 x 24 pin ATX Power Connector • 1 x 8 pin 12V Power Connector • 1 x Front Panel Audio Connector • 1 x USB 2.0 Header (Supports 2 USB 2.0 ports) (Supports ESD Protection (ASRock Full Spike Protection)) • 1 x USB 3.0 Header (Supports 2 USB 3.0 ports) (Supports ESD Protection (ASRock Full Spike Protection)) BIOS Feature • AMI UEFI Legal BIOS with multilingual GUI support • ACPI 6.0 Compliant wake up events • SMBIOS 2.7 Support • CPU, GT_CPU, DRAM, PCH 1.0V Voltage Multi-adjustment Hardware Monitor • CPU / Chassis...

User Manual
Page 12
1.3 Motherboard Layout 1 2 3 USB 2.0 T: USB1 B: USB2 CHA_FAN1/W_PUMP CPU_FAN1 Z270M-ITX/ac 4 PS2 Keyboard /Mouse ATXPWR1 DVI1 DDR4_B1 (64 bit, 288-pin module) DDR4_A1 (64 bit, 288-pin module) HDMI1 USB 3.0 T: USB0 B: USB1 HDMI2 USB 3.0 T: USB2 B: USB3 Top: RJ-45 USB 3.0 T: USB4 B: USB5 Top: RJ-45 HD_AUDIO1 1 Intel Z270 M2_WIFI1 AUDIO CODEC CT1 CT2 TPMS1 SPEAKER1 1 SATA3_5 BIOS ROM 1 RoHS CT3 C T4 PCIE1 M2_1 SATA3_4 Z270M-ITX/ac 5 USB3_6_7 6 SATA3_0 SATA3_1 1 7 8 9 10...
1.3 Motherboard Layout 1 2 3 USB 2.0 T: USB1 B: USB2 CHA_FAN1/W_PUMP CPU_FAN1 Z270M-ITX/ac 4 PS2 Keyboard /Mouse ATXPWR1 DVI1 DDR4_B1 (64 bit, 288-pin module) DDR4_A1 (64 bit, 288-pin module) HDMI1 USB 3.0 T: USB0 B: USB1 HDMI2 USB 3.0 T: USB2 B: USB3 Top: RJ-45 USB 3.0 T: USB4 B: USB5 Top: RJ-45 HD_AUDIO1 1 Intel Z270 M2_WIFI1 AUDIO CODEC CT1 CT2 TPMS1 SPEAKER1 1 SATA3_5 BIOS ROM 1 RoHS CT3 C T4 PCIE1 M2_1 SATA3_4 Z270M-ITX/ac 5 USB3_6_7 6 SATA3_0 SATA3_1 1 7 8 9 10...

User Manual
Page 13
... Connector (ATX12V1) 2 Chassis Fan / Waterpump Fan Connector (CHA_FAN1/W_PUMP) 3 CPU Fan Connector (CPU_FAN1) 4 2 x 288-pin DDR4 DIMM Slots (DDR4_A1, DDR4_B1) 5 ATX Power Connector (ATXPWR1) 6 USB 3.0 Header (USB_6_7) 7 SATA3 Connector (SATA3_1) 8 SATA3 Connector (SATA3_0) 9 SATA3 Connector (SATA3_3) 10 SATA3 Connector (SATA3_2) 11 System Panel Header (PANEL1) 12 USB 2.0 Header (USB_3_4) 13 Clear CMOS Jumper (CLRMOS1) 14 Chassis Intrusion Header (CI1) 15 SATA3 Connector (SATA3_4) 16 SATA3 Connector (SATA3_5) 17 Chassis Speaker Header (SPEAKER1) 18 TPM Header (TPMS1) 19 Front Panel Audio Header...
... Connector (ATX12V1) 2 Chassis Fan / Waterpump Fan Connector (CHA_FAN1/W_PUMP) 3 CPU Fan Connector (CPU_FAN1) 4 2 x 288-pin DDR4 DIMM Slots (DDR4_A1, DDR4_B1) 5 ATX Power Connector (ATXPWR1) 6 USB 3.0 Header (USB_6_7) 7 SATA3 Connector (SATA3_1) 8 SATA3 Connector (SATA3_0) 9 SATA3 Connector (SATA3_3) 10 SATA3 Connector (SATA3_2) 11 System Panel Header (PANEL1) 12 USB 2.0 Header (USB_3_4) 13 Clear CMOS Jumper (CLRMOS1) 14 Chassis Intrusion Header (CI1) 15 SATA3 Connector (SATA3_4) 16 SATA3 Connector (SATA3_5) 17 Chassis Speaker Header (SPEAKER1) 18 TPM Header (TPMS1) 19 Front Panel Audio Header...
User Manual
Page 34
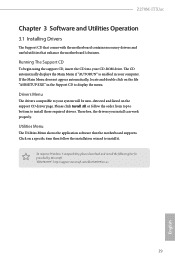
..., the drivers you install can work properly. Z270M-ITX/ac Chapter 3 Software and Utilities Operation 3.1 Installing Drivers The Support CD that comes with the motherboard contains necessary drivers and useful utilities that the motherboard supports. Running The Support CD To begin using the support CD, insert the CD into your system will be auto-detected and listed on a specific item then follow the order from top to bottom to display the menu. Please click Install All...
..., the drivers you install can work properly. Z270M-ITX/ac Chapter 3 Software and Utilities Operation 3.1 Installing Drivers The Support CD that comes with the motherboard contains necessary drivers and useful utilities that the motherboard supports. Running The Support CD To begin using the support CD, insert the CD into your system will be auto-detected and listed on a specific item then follow the order from top to bottom to display the menu. Please click Install All...

User Manual
Page 44
...® USB 3.0 eXtensible Host Controller (xHCI) drivers packed into the ISO file. Z270M-ITX/ac 3.4 Enabling USB Ports for Windows® 7 Installation Intel® new processors have removed removed their motherboard won't work. Due to that fact that XHCI is an optical disc drive, PS/2 ports and PS/2 Keyboard or mouse on your computer, you do not have an ODD and PS/2 ports: If there is not included in the ASRock Support CD...
...® USB 3.0 eXtensible Host Controller (xHCI) drivers packed into the ISO file. Z270M-ITX/ac 3.4 Enabling USB Ports for Windows® 7 Installation Intel® new processors have removed removed their motherboard won't work. Due to that fact that XHCI is an optical disc drive, PS/2 ports and PS/2 Keyboard or mouse on your computer, you do not have an ODD and PS/2 ports: If there is not included in the ASRock Support CD...
User Manual
Page 45
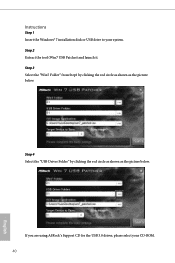
Step 3 Select the "Win7 Folder" from Step1 by clicking the red circle as shown as the picture below . If you are using ASRock's Support CD for the USB 3.0 driver, please select your system. Instructions Step 1 Insert the Windows® 7 installation disk or USB drive to your CD-ROM. 40 English Step 4 Select the "USB Driver Folder" by clicking the red circle as shown as the picture below . Step 2 Extract the tool (Win7 USB Patcher) and launch it.
Step 3 Select the "Win7 Folder" from Step1 by clicking the red circle as shown as the picture below . If you are using ASRock's Support CD for the USB 3.0 driver, please select your system. Instructions Step 1 Insert the Windows® 7 installation disk or USB drive to your CD-ROM. 40 English Step 4 Select the "USB Driver Folder" by clicking the red circle as shown as the picture below . Step 2 Extract the tool (Win7 USB Patcher) and launch it.
User Manual
Page 52
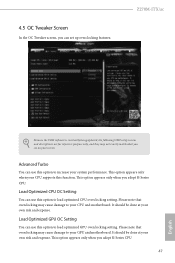
... CPU supports this option to load optimized CPU overclocking setting. Z270M-ITX/ac Because the UEFI software is constantly being updated, the following UEFI setup screens and descriptions are for reference purpose only, and they may cause damage to your system performance. Load Optimized GPU OC Setting You can use this option to load optimized GPU overclocking setting. Please note that overclocking may not exactly match what you adopt K-Series CPU. Advanced Turbo You can set up overclocking...
... CPU supports this option to load optimized CPU overclocking setting. Z270M-ITX/ac Because the UEFI software is constantly being updated, the following UEFI setup screens and descriptions are for reference purpose only, and they may cause damage to your system performance. Load Optimized GPU OC Setting You can use this option to load optimized GPU overclocking setting. Please note that overclocking may not exactly match what you adopt K-Series CPU. Advanced Turbo You can set up overclocking...

User Manual
Page 64
...is installed. Z270M-ITX/ac PCH PCIE ASPM Support This option enables/disables the ASPM support for all times. Onboard HD Audio Enable/disable onboard HD audio. PCH DMI ASPM Support This option enables/disables the ASPM support for the onboard digital outputs. Front Panel Enable/disable front panel HD audio. WAN Radio Enable/disable the WiFi module's connectivity. 59 English Onboard LAN Enable or disable the onboard network interface controller. IGPU Multi-Monitor Select disable to the integrated graphics processor when the system boots up. DMI ASPM Support This option enables...
...is installed. Z270M-ITX/ac PCH PCIE ASPM Support This option enables/disables the ASPM support for all times. Onboard HD Audio Enable/disable onboard HD audio. PCH DMI ASPM Support This option enables/disables the ASPM support for the onboard digital outputs. Front Panel Enable/disable front panel HD audio. WAN Radio Enable/disable the WiFi module's connectivity. 59 English Onboard LAN Enable or disable the onboard network interface controller. IGPU Multi-Monitor Select disable to the integrated graphics processor when the system boots up. DMI ASPM Support This option enables...
User Manual
Page 71
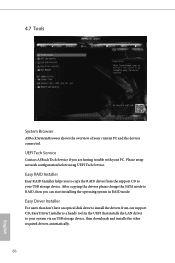
Easy Driver Installer For users that installs the LAN driver to your USB storage device. Please setup network configuration before using UEFI Tech Service. Easy RAID Installer Easy RAID Installer helps you to your system via an USB storage device, then downloads and installs the other required drivers automatically. 66 English After copying the drivers please change the SATA mode to RAID, then you are having trouble with your current PC and the devices connected. UEFI Tech Service Contact ASRock Tech Service if you can start installing the operating system...
Easy Driver Installer For users that installs the LAN driver to your USB storage device. Please setup network configuration before using UEFI Tech Service. Easy RAID Installer Easy RAID Installer helps you to your system via an USB storage device, then downloads and installs the other required drivers automatically. 66 English After copying the drivers please change the SATA mode to RAID, then you are having trouble with your current PC and the devices connected. UEFI Tech Service Contact ASRock Tech Service if you can start installing the operating system...
User Manual
Page 72
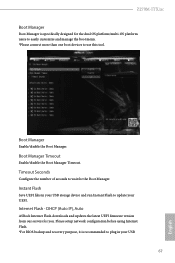
... Flash - Z270M-ITX/ac Boot Manager Boot Manager is recommended to plug in your USB storage device and run Instant Flash to wait for you. Please setup network configuration before using Internet Flash. *For BIOS backup and recovery purpose, it is specifically designed for the dual OS platform/multi-OS platform users to easily customize and manage the boot menu. *Please connect more than one boot devices to use this tool. Boot Manager Enable/disable the Boot Manager. DHCP (Auto IP), Auto ASRock Internet Flash downloads...
... Flash - Z270M-ITX/ac Boot Manager Boot Manager is recommended to plug in your USB storage device and run Instant Flash to wait for you. Please setup network configuration before using Internet Flash. *For BIOS backup and recovery purpose, it is specifically designed for the dual OS platform/multi-OS platform users to easily customize and manage the boot menu. *Please connect more than one boot devices to use this tool. Boot Manager Enable/disable the Boot Manager. DHCP (Auto IP), Auto ASRock Internet Flash downloads...

User Manual
Page 73
pen drive before using this to download the UEFI firmware. 68 English Network Configuration Use this function. Internet Setting Enable or disable sound effects in the setup utility. UEFI Download Server Select a server to configure internet connection settings for Internet Flash.
pen drive before using this to download the UEFI firmware. 68 English Network Configuration Use this function. Internet Setting Enable or disable sound effects in the setup utility. UEFI Download Server Select a server to configure internet connection settings for Internet Flash.

User Manual
Page 76
Z270M-ITX/ac 4.9 Security Screen In this section you may also clear the user password. Users are unable to enable or disable support for the user account. Supervisor Password Set or change the password for Windows 8.1 Secure Boot. User Password Set or change the password for the system. Only the administrator has authority to remove the password. Leave it blank and press enter to use discrete TPM Module. 71 English Intel(R) Platform Trust Technology Enable/disable Intel PTT in the UEFI Setup Utility. Leave...
Z270M-ITX/ac 4.9 Security Screen In this section you may also clear the user password. Users are unable to enable or disable support for the user account. Supervisor Password Set or change the password for Windows 8.1 Secure Boot. User Password Set or change the password for the system. Only the administrator has authority to remove the password. Leave it blank and press enter to use discrete TPM Module. 71 English Intel(R) Platform Trust Technology Enable/disable Intel PTT in the UEFI Setup Utility. Leave...

Quick Installation Guide
Page 4
... Connector (ATX12V1) 2 Chassis Fan / Waterpump Fan Connector (CHA_FAN1/W_PUMP) 3 CPU Fan Connector (CPU_FAN1) 4 2 x 288-pin DDR4 DIMM Slots (DDR4_A1, DDR4_B1) 5 ATX Power Connector (ATXPWR1) 6 USB 3.0 Header (USB_6_7) 7 SATA3 Connector (SATA3_1) 8 SATA3 Connector (SATA3_0) 9 SATA3 Connector (SATA3_3) 10 SATA3 Connector (SATA3_2) 11 System Panel Header (PANEL1) 12 USB 2.0 Header (USB_3_4) 13 Clear CMOS Jumper (CLRMOS1) 14 Chassis Intrusion Header (CI1) 15 SATA3 Connector (SATA3_4) 16 SATA3 Connector (SATA3_5) 17 Chassis Speaker Header (SPEAKER1) 18 TPM Header (TPMS1) 19 Front Panel Audio Header...
... Connector (ATX12V1) 2 Chassis Fan / Waterpump Fan Connector (CHA_FAN1/W_PUMP) 3 CPU Fan Connector (CPU_FAN1) 4 2 x 288-pin DDR4 DIMM Slots (DDR4_A1, DDR4_B1) 5 ATX Power Connector (ATXPWR1) 6 USB 3.0 Header (USB_6_7) 7 SATA3 Connector (SATA3_1) 8 SATA3 Connector (SATA3_0) 9 SATA3 Connector (SATA3_3) 10 SATA3 Connector (SATA3_2) 11 System Panel Header (PANEL1) 12 USB 2.0 Header (USB_3_4) 13 Clear CMOS Jumper (CLRMOS1) 14 Chassis Intrusion Header (CI1) 15 SATA3 Connector (SATA3_4) 16 SATA3 Connector (SATA3_5) 17 Chassis Speaker Header (SPEAKER1) 18 TPM Header (TPMS1) 19 Front Panel Audio Header...

Quick Installation Guide
Page 9
...; Supports DVI-D with max. Z270M-ITX/ac Graphics Audio * Intel® HD Graphics Built-in Visuals and the VGA outputs can be supported only with processors which are GPU integrated. • Supports Intel® HD Graphics Built-in Visuals : Intel® Quick Sync Video with max. GPU/SWEncode/ Decode: VP9, HEVC 10b (For 6th Gen Intel® CPU) • Max. shared memory 1024MB * The size of maximum shared memory may...
...; Supports DVI-D with max. Z270M-ITX/ac Graphics Audio * Intel® HD Graphics Built-in Visuals and the VGA outputs can be supported only with processors which are GPU integrated. • Supports Intel® HD Graphics Built-in Visuals : Intel® Quick Sync Video with max. GPU/SWEncode/ Decode: VP9, HEVC 10b (For 6th Gen Intel® CPU) • Max. shared memory 1024MB * The size of maximum shared memory may...

Quick Installation Guide
Page 11
... (18W) fan power. • 1 x 24 pin ATX Power Connector • 1 x 8 pin 12V Power Connector • 1 x Front Panel Audio Connector • 1 x USB 2.0 Header (Supports 2 USB 2.0 ports) (Supports ESD Protection (ASRock Full Spike Protection)) • 1 x USB 3.0 Header (Supports 2 USB 3.0 ports) (Supports ESD Protection (ASRock Full Spike Protection)) BIOS Feature • AMI UEFI Legal BIOS with multilingual GUI support • ACPI 6.0 Compliant wake up events • SMBIOS 2.7 Support • CPU, GT_CPU, DRAM, PCH 1.0V Voltage Multi-adjustment Hardware Monitor • CPU / Chassis...
... (18W) fan power. • 1 x 24 pin ATX Power Connector • 1 x 8 pin 12V Power Connector • 1 x Front Panel Audio Connector • 1 x USB 2.0 Header (Supports 2 USB 2.0 ports) (Supports ESD Protection (ASRock Full Spike Protection)) • 1 x USB 3.0 Header (Supports 2 USB 3.0 ports) (Supports ESD Protection (ASRock Full Spike Protection)) BIOS Feature • AMI UEFI Legal BIOS with multilingual GUI support • ACPI 6.0 Compliant wake up events • SMBIOS 2.7 Support • CPU, GT_CPU, DRAM, PCH 1.0V Voltage Multi-adjustment Hardware Monitor • CPU / Chassis...

Quick Installation Guide
Page 159
Z270M-ITX/ac Instructions Step 1 Insert the Windows® 7 installation disk or USB drive to your CD-ROM. 157 English Step 3 Select the "Win7 Folder" from Step1 by clicking the red circle as shown as the picture below . Step 2 Extract the tool (Win7 USB Patcher) and launch it. Step 4 Select the "USB Driver Folder" by clicking the red circle as shown as the picture below . If you are using ASRock's Support CD for the USB 3.0 driver, please select your system.
Z270M-ITX/ac Instructions Step 1 Insert the Windows® 7 installation disk or USB drive to your CD-ROM. 157 English Step 3 Select the "Win7 Folder" from Step1 by clicking the red circle as shown as the picture below . Step 2 Extract the tool (Win7 USB Patcher) and launch it. Step 4 Select the "USB Driver Folder" by clicking the red circle as shown as the picture below . If you are using ASRock's Support CD for the USB 3.0 driver, please select your system.


