
Intel Smart Response Installation Guide
Page 1
... Maximized Mode. 6. You can find the UI setup instruction and the step by double-clicking RST Storage icon in system at this point! 3. Intel Smart Response Technology Installation Guide This motherboard supports Intel Smart Response Technology. For all required drivers, including RST storage driver version 10.5 or later. 2. After clicking OK button, SRT will enable automatically, and the RST GUI will update the new version RST driver in RAID ROM. Boot system to use the...
... Maximized Mode. 6. You can find the UI setup instruction and the step by double-clicking RST Storage icon in system at this point! 3. Intel Smart Response Technology Installation Guide This motherboard supports Intel Smart Response Technology. For all required drivers, including RST storage driver version 10.5 or later. 2. After clicking OK button, SRT will enable automatically, and the RST GUI will update the new version RST driver in RAID ROM. Boot system to use the...

Intel Rapid Storage Guide
Page 12
... onto a RAID volume, the RAID option must be enabled in the system BIOS, a RAID volume must be created, and the F6 installation method must be used to enter the option ROM user interface. 2. When the Intel Rapid Storage Technology option ROM status screen appears during POST, press Ctrl and i at the same time to load the Intel® Rapid Storage Technology driver during operating system setup. Select the appropriate number of hard drives and press...
... onto a RAID volume, the RAID option must be enabled in the system BIOS, a RAID volume must be created, and the F6 installation method must be used to enter the option ROM user interface. 2. When the Intel Rapid Storage Technology option ROM status screen appears during POST, press Ctrl and i at the same time to load the Intel® Rapid Storage Technology driver during operating system setup. Select the appropriate number of hard drives and press...

Intel Rapid Storage Guide
Page 13
... or RAID driver. Press S to confirm volume creation. 10. Use the Floppy Configuration Utility to install the Intel Rapid Storage Technology driver during text-mode phase). Install the RAID Driver Using the F6 Installation Method Perform the following files: IAAHCI.INF, IAAHCI.CAT, IASTOR.INF, IASTOR.CAT, IASTOR.SYS, and TXTSETUP.OEM. Nothing will temporarily continue loading drivers. Use the up and down arrow keys to confirm your controller and continue. Press Enter...
... or RAID driver. Press S to confirm volume creation. 10. Use the Floppy Configuration Utility to install the Intel Rapid Storage Technology driver during text-mode phase). Install the RAID Driver Using the F6 Installation Method Perform the following files: IAAHCI.INF, IAAHCI.CAT, IASTOR.INF, IASTOR.CAT, IASTOR.SYS, and TXTSETUP.OEM. Nothing will temporarily continue loading drivers. Use the up and down arrow keys to confirm your controller and continue. Press Enter...

Intel Rapid Storage Guide
Page 16
... the disk labeled Manufacturer-supplied hardware support disk into Drive A:, insert a floppy disk containing the following steps to install the Intel® Rapid Storage Technology driver using F6 when in AHCI/RAID mode In order to install an operating system onto a single Serial ATA hard drive when the system is in RAID mode or AHCI mode, the F6 installation method must be prompted with the necessary files. How to load the driver during OS installation using the F6 installation method...
... the disk labeled Manufacturer-supplied hardware support disk into Drive A:, insert a floppy disk containing the following steps to install the Intel® Rapid Storage Technology driver using F6 when in AHCI/RAID mode In order to install an operating system onto a single Serial ATA hard drive when the system is in RAID mode or AHCI mode, the F6 installation method must be prompted with the necessary files. How to load the driver during OS installation using the F6 installation method...

RAID Installation Guide
Page 7
... Use ASRock Easy RAID Installer Easy RAID Installer can copy the RAID driver from a support CD to your USB storage device with RAID functions, please follow the procedures below. Follow the onscreen instruction to complete the process. Plug in your system, and press key to enter BIOS setup utility. Go to Advanced Storage Configuration and set RAID configuration. Enter UEFI SETUP UTILITY Tool and highlight "Easy RAID Installer". STEP 4: Install Windows® 10 64-bit / 8.1 64-bit / 8 64-bit / 7 / 7 64-bit OS on how to set SATA Mode Selection to [RAID]. 2.3 Installing...
... Use ASRock Easy RAID Installer Easy RAID Installer can copy the RAID driver from a support CD to your USB storage device with RAID functions, please follow the procedures below. Follow the onscreen instruction to complete the process. Plug in your system, and press key to enter BIOS setup utility. Go to Advanced Storage Configuration and set RAID configuration. Enter UEFI SETUP UTILITY Tool and highlight "Easy RAID Installer". STEP 4: Install Windows® 10 64-bit / 8.1 64-bit / 8 64-bit / 7 / 7 64-bit OS on how to set SATA Mode Selection to [RAID]. 2.3 Installing...

RAID Installation Guide
Page 23
... 2: Install Windows® 7 64-bit / 8 64-bit / 8.1 64bit / / 10 64-bit OS Press to launch boot menu at system POST and choose the item "UEFI:" to use Windows® 7 64-bit, Windows® 8 64-bit, Windows® 8.1 64-bit or Windows® 10 64-bit. Please make sure to boot. 23 STEP 1: Copy Intel® RAID drivers into a USB flash disk You can download the drivers from ASRock's website and unzip the files into a USB flash disk or copy the files from ASRock's motherboard support...
... 2: Install Windows® 7 64-bit / 8 64-bit / 8.1 64bit / / 10 64-bit OS Press to launch boot menu at system POST and choose the item "UEFI:" to use Windows® 7 64-bit, Windows® 8 64-bit, Windows® 8.1 64-bit or Windows® 10 64-bit. Please make sure to boot. 23 STEP 1: Copy Intel® RAID drivers into a USB flash disk You can download the drivers from ASRock's website and unzip the files into a USB flash disk or copy the files from ASRock's motherboard support...

User Manual
Page 5
...3 Software and Utilities Operation 41 3.1 Installing Drivers 41 3.2 A-Tuning 42 3.2.1 Installing A-Tuning 42 3.2.2 Using A-Tuning 42 3.3 ASRock Live Update & APP Shop 45 3.3.1 UI Overview 45 3.3.2 Apps 46 3.3.3 BIOS & Drivers 49 3.3.4 Setting 50 3.4 Enabling USB Ports for Windows® 7 Installation 51 3.5 ASRock AURA RGB LED 54 Chapter 4 UEFI SETUP UTILITY 55 4.1 Introduction 55 4.2 EZ Mode 56 4.3 Advanced Mode 57 4.3.1 UEFI Menu Bar 57 4.3.2 Navigation Keys 58 4.4 Main Screen 59 4.5 OC Tweaker Screen 60 4.6 Advanced Screen 70 4.6.1 CPU Configuration...
...3 Software and Utilities Operation 41 3.1 Installing Drivers 41 3.2 A-Tuning 42 3.2.1 Installing A-Tuning 42 3.2.2 Using A-Tuning 42 3.3 ASRock Live Update & APP Shop 45 3.3.1 UI Overview 45 3.3.2 Apps 46 3.3.3 BIOS & Drivers 49 3.3.4 Setting 50 3.4 Enabling USB Ports for Windows® 7 Installation 51 3.5 ASRock AURA RGB LED 54 Chapter 4 UEFI SETUP UTILITY 55 4.1 Introduction 55 4.2 EZ Mode 56 4.3 Advanced Mode 57 4.3.1 UEFI Menu Bar 57 4.3.2 Navigation Keys 58 4.4 Main Screen 59 4.5 OC Tweaker Screen 60 4.6 Advanced Screen 70 4.6.1 CPU Configuration...
User Manual
Page 8
... Guide • ASRock Z270 Taichi Support CD • 4 x Serial ATA (SATA) Data Cables (Optional) • 1 x ASRock SLI_Bridge_2S Card (Optional) • 1 x ASRock SLI_HB_Bridge_2S Card (Optional) • 2 x ASRock WiFi 2.4/5 GHz Antennas (Optional) • 1 x I/O Panel Shield • 3 x Screws for purchasing ASRock Z270 Taichi motherboard, a reliable motherboard produced under ASRock's consistently stringent quality control. In this documentation occur, the updated version will be available on ASRock's website as well. You may find the latest VGA cards and CPU support list...
... Guide • ASRock Z270 Taichi Support CD • 4 x Serial ATA (SATA) Data Cables (Optional) • 1 x ASRock SLI_Bridge_2S Card (Optional) • 1 x ASRock SLI_HB_Bridge_2S Card (Optional) • 2 x ASRock WiFi 2.4/5 GHz Antennas (Optional) • 1 x I/O Panel Shield • 3 x Screws for purchasing ASRock Z270 Taichi motherboard, a reliable motherboard produced under ASRock's consistently stringent quality control. In this documentation occur, the updated version will be available on ASRock's website as well. You may find the latest VGA cards and CPU support list...
User Manual
Page 36
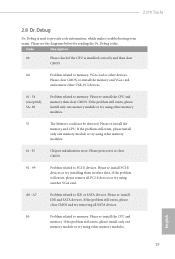
... using other slots. Please re-install the memory and CPU. If the problem still exists, please remove all SATA devices. Please re-install IDE and SATA devices. A7 Problem related to PCI-E devices. English 29 Please press reset or clear CMOS. 92 - 99 Problem related to IDE or SATA devices. A0 - Z270 Taichi 2.8 Dr. Debug Dr. Debug is installed correctly and then clear CMOS. 0d Problem related to memory, VGA card or other devices. Please re-install the CPU and memory. If the problem still exists, please install...
... using other slots. Please re-install the memory and CPU. If the problem still exists, please remove all SATA devices. Please re-install IDE and SATA devices. A7 Problem related to PCI-E devices. English 29 Please press reset or clear CMOS. 92 - 99 Problem related to IDE or SATA devices. A0 - Z270 Taichi 2.8 Dr. Debug Dr. Debug is installed correctly and then clear CMOS. 0d Problem related to memory, VGA card or other devices. Please re-install the CPU and memory. If the problem still exists, please install...

User Manual
Page 41
... Operation Guide This motherboard supports CrossFireXTM, 3-way CrossFireXTM and Quad CrossFireXTM that your graphics card driver supports AMD CrossFireXTM technology. You should only use a AMD certified PSU. Make sure that are properly seated on the top of the graphics cards. (The CrossFire Bridge is recommended to three identical PCI Express x16 graphics cards. 1. Please refer to AMD graphics card manuals for detailed installation guide. 2.10.1 Installing Two CrossFireXTM-Ready Graphics Cards Step 1 Insert one graphics card into PCIE2 slot...
... Operation Guide This motherboard supports CrossFireXTM, 3-way CrossFireXTM and Quad CrossFireXTM that your graphics card driver supports AMD CrossFireXTM technology. You should only use a AMD certified PSU. Make sure that are properly seated on the top of the graphics cards. (The CrossFire Bridge is recommended to three identical PCI Express x16 graphics cards. 1. Please refer to AMD graphics card manuals for detailed installation guide. 2.10.1 Installing Two CrossFireXTM-Ready Graphics Cards Step 1 Insert one graphics card into PCIE2 slot...
User Manual
Page 44
... and boot into OS. Select the GPU number according to uninstall any VGA drivers installed in the Windows® system tray. The Catalyst Uninstaller is an optional download. Then select Enable AMD CrossFireX and click Apply. Step 3 Install the required drivers and CATALYST Control Center then restart your graphics card and click Apply. English 37 Please check AMD's website for details. Z270 Taichi 2.10.3 Driver Installation and Setup Step 1 Power on...
... and boot into OS. Select the GPU number according to uninstall any VGA drivers installed in the Windows® system tray. The Catalyst Uninstaller is an optional download. Then select Enable AMD CrossFireX and click Apply. Step 3 Install the required drivers and CATALYST Control Center then restart your graphics card and click Apply. English 37 Please check AMD's website for details. Z270 Taichi 2.10.3 Driver Installation and Setup Step 1 Power on...
User Manual
Page 48
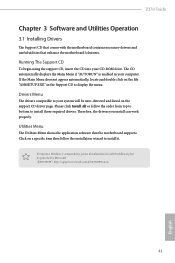
.../2720599/en-us 41 English Z270 Taichi Chapter 3 Software and Utilities Operation 3.1 Installing Drivers The Support CD that comes with the motherboard contains necessary drivers and useful utilities that the motherboard supports. Drivers Menu The drivers compatible to install those required drivers. The CD automatically displays the Main Menu if "AUTORUN" is enabled in the Support CD to install it. If the Main Menu does not appear automatically, locate and double click on a specific item then follow the order...
.../2720599/en-us 41 English Z270 Taichi Chapter 3 Software and Utilities Operation 3.1 Installing Drivers The Support CD that comes with the motherboard contains necessary drivers and useful utilities that the motherboard supports. Drivers Menu The drivers compatible to install those required drivers. The CD automatically displays the Main Menu if "AUTORUN" is enabled in the Support CD to install it. If the Main Menu does not appear automatically, locate and double click on a specific item then follow the order...
User Manual
Page 59
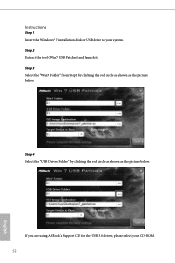
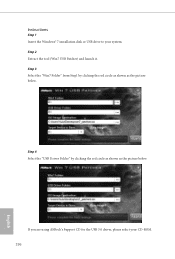
Step 3 Select the "Win7 Folder" from Step1 by clicking the red circle as shown as the picture below . Step 4 Select the "USB Driver Folder" by clicking the red circle as shown as the picture below . If you are using ASRock's Support CD for the USB 3.0 driver, please select your system. Step 2 Extract the tool (Win7 USB Patcher) and launch it. Instructions Step 1 Insert the Windows® 7 installation disk or USB drive to your CD-ROM. 52 English
Step 3 Select the "Win7 Folder" from Step1 by clicking the red circle as shown as the picture below . Step 4 Select the "USB Driver Folder" by clicking the red circle as shown as the picture below . If you are using ASRock's Support CD for the USB 3.0 driver, please select your system. Step 2 Extract the tool (Win7 USB Patcher) and launch it. Instructions Step 1 Insert the Windows® 7 installation disk or USB drive to your CD-ROM. 52 English

User Manual
Page 81
... option enables/disables the ASPM support for all times. PCI Express Native Control Select Enable for PCIE3. Select enable to PIROI-PIROX. Select the link speed for enhanced PCI Express power saving in OS. DMI ASPM Support This option enables/disables the control of ASPM on CPU side of memory that is used to route the interrupts it receives from peripheral buses to disable the integrated graphics when an external graphics card is installed. IGPU Multi-Monitor...
... option enables/disables the ASPM support for all times. PCI Express Native Control Select Enable for PCIE3. Select enable to PIROI-PIROX. Select the link speed for enhanced PCI Express power saving in OS. DMI ASPM Support This option enables/disables the control of ASPM on CPU side of memory that is used to route the interrupts it receives from peripheral buses to disable the integrated graphics when an external graphics card is installed. IGPU Multi-Monitor...
User Manual
Page 90
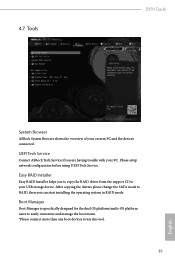
... Easy RAID Installer Easy RAID Installer helps you can start installing the operating system in RAID mode. 4.7 Tools Z270 Taichi System Browser ASRock System Browser shows the overview of your PC. Please setup network configuration before using UEFI Tech Service. Boot Manager Boot Manager is specifically designed for the dual OS platform/multi-OS platform users to easily customize and manage the boot menu. *Please connect more than one boot devices to your USB storage device. UEFI Tech Service Contact ASRock Tech Service if...
... Easy RAID Installer Easy RAID Installer helps you can start installing the operating system in RAID mode. 4.7 Tools Z270 Taichi System Browser ASRock System Browser shows the overview of your PC. Please setup network configuration before using UEFI Tech Service. Boot Manager Boot Manager is specifically designed for the dual OS platform/multi-OS platform users to easily customize and manage the boot menu. *Please connect more than one boot devices to your USB storage device. UEFI Tech Service Contact ASRock Tech Service if...

User Manual
Page 91
... flash ROM and execute Secure Backup UEFI to plug in your UEFI. Please setup network configuration before using Internet Flash. *For BIOS backup and recovery purpose, it is recommended to duplicate the current working ROM 84 English Boot Manager Enable/disable the Boot Manager. Instant Flash Save UEFI files in your USB storage device and run Instant Flash to update your USB pen drive before using this function. Boot Manager Timeout Enable/disable the Boot Manager Timeout. DHCP (Auto IP), Auto ASRock Internet Flash downloads and updates the latest UEFI firmware version...
... flash ROM and execute Secure Backup UEFI to plug in your UEFI. Please setup network configuration before using Internet Flash. *For BIOS backup and recovery purpose, it is recommended to duplicate the current working ROM 84 English Boot Manager Enable/disable the Boot Manager. Instant Flash Save UEFI files in your USB storage device and run Instant Flash to update your USB pen drive before using this function. Boot Manager Timeout Enable/disable the Boot Manager Timeout. DHCP (Auto IP), Auto ASRock Internet Flash downloads and updates the latest UEFI firmware version...

User Manual
Page 92
... failed boot attempts, the backup BIOS will work on the active BIOS. For safety issues, users are not able to configure internet connection settings for Internet Flash. Network Configuration Use this to update the backup BIOS manually. Internet Setting Enable or disable sound effects in the setup utility. Normally, the system will take over. Z270 Taichi image to identify which enhances the safety and stability of the BIOS files to the active BIOS to download the UEFI firmware. 85...
... failed boot attempts, the backup BIOS will work on the active BIOS. For safety issues, users are not able to configure internet connection settings for Internet Flash. Network Configuration Use this to update the backup BIOS manually. Internet Setting Enable or disable sound effects in the setup utility. Normally, the system will take over. Z270 Taichi image to identify which enhances the safety and stability of the BIOS files to the active BIOS to download the UEFI firmware. 85...

User Manual
Page 96
... and press enter to remove the password. Secure Boot Use this section you may also clear the user password. Supervisor Password Set or change the settings in the UEFI Setup Utility. Users are unable to change the settings in ME. Only the administrator has authority to change the password for the administrator account. Z270 Taichi 4.9 Security Screen In this item to enable or disable support for Windows 8.1 Secure Boot. User Password Set or change the supervisor/user password for the user account. Disable this option to use discrete...
... and press enter to remove the password. Secure Boot Use this section you may also clear the user password. Supervisor Password Set or change the settings in the UEFI Setup Utility. Users are unable to change the settings in ME. Only the administrator has authority to change the password for the administrator account. Z270 Taichi 4.9 Security Screen In this item to enable or disable support for Windows 8.1 Secure Boot. User Password Set or change the supervisor/user password for the user account. Disable this option to use discrete...
Quick Installation Guide
Page 31
... CPU is used to provide code information, which makes troubleshooting even easier. Please re-install PCI-E devices or try using other USB, PCI devices. 01 - 54 (except 0d), 5A- 60 Problem related to memory. If the problem still exists, please install only one memory module or try installing them in other memory modules. English 29 Please press reset or clear CMOS. 92 - 99 Problem related to IDE or SATA devices. A0 - Please clear CMOS, re-install the memory and VGA card...
... CPU is used to provide code information, which makes troubleshooting even easier. Please re-install PCI-E devices or try using other USB, PCI devices. 01 - 54 (except 0d), 5A- 60 Problem related to memory. If the problem still exists, please install only one memory module or try installing them in other memory modules. English 29 Please press reset or clear CMOS. 92 - 99 Problem related to IDE or SATA devices. A0 - Please clear CMOS, re-install the memory and VGA card...
Quick Installation Guide
Page 198
Step 4 Select the "USB Driver Folder" by clicking the red circle as shown as the picture below . If you are using ASRock's Support CD for the USB 3.0 driver, please select your system. Step 2 Extract the tool (Win7 USB Patcher) and launch it. Step 3 Select the "Win7 Folder" from Step1 by clicking the red circle as shown as the picture below . Instructions Step 1 Insert the Windows® 7 installation disk or USB drive to your CD-ROM. 196 English
Step 4 Select the "USB Driver Folder" by clicking the red circle as shown as the picture below . If you are using ASRock's Support CD for the USB 3.0 driver, please select your system. Step 2 Extract the tool (Win7 USB Patcher) and launch it. Step 3 Select the "Win7 Folder" from Step1 by clicking the red circle as shown as the picture below . Instructions Step 1 Insert the Windows® 7 installation disk or USB drive to your CD-ROM. 196 English


