Intel Rapid Storage Guide
Page 12
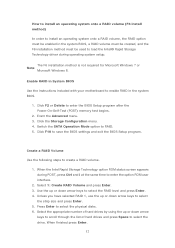
...system BIOS, a RAID volume must be created, and the F6 installation method must be used to load the Intel® Rapid Storage Technology driver during POST, press Ctrl and i at the same time to enter the option ROM user interface. 2. Enetr the Advanced menu. 3. When the Intel Rapid ...to select the physical disks. 6. Click the Storage Configuration menu. 4. Click F10 to enter the BIOS Setup program after the Power-On-Self-Test (POST) memory test begins. 2. Click F2 or Delete to save the BIOS settings and exit the BIOS Setup program. When finished press Enter. 12 Select 1:...
...system BIOS, a RAID volume must be created, and the F6 installation method must be used to load the Intel® Rapid Storage Technology driver during POST, press Ctrl and i at the same time to enter the option ROM user interface. 2. Enetr the Advanced menu. 3. When the Intel Rapid ...to select the physical disks. 6. Click the Storage Configuration menu. 4. Click F10 to enter the BIOS Setup program after the Power-On-Self-Test (POST) memory test begins. 2. Click F2 or Delete to save the BIOS settings and exit the BIOS Setup program. When finished press Enter. 12 Select 1:...
RAID Installation Guide
Page 23
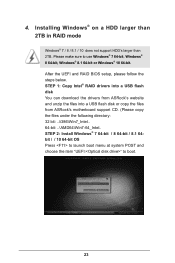
...boot. 23 STEP 1: Copy Intel® RAID drivers into a USB flash disk You can download the drivers from ASRock's website and unzip the files into a USB flash disk or copy the files from ASRock's motherboard support CD. (Please copy the files under the following directory: 32 bit: ..\i386\Win7_Intel.. 64-bit: ... follow the steps below. STEP 2: Install Windows® 7 64-bit / 8 64-bit / 8.1 64bit / / 10 64-bit OS Press to launch boot menu at system POST and choose the item "UEFI:" to use Windows® 7 64-bit, Windows® 8 64-bit, Windows® 8.1 64-bit or Windows® 10 64-bit.
...boot. 23 STEP 1: Copy Intel® RAID drivers into a USB flash disk You can download the drivers from ASRock's website and unzip the files into a USB flash disk or copy the files from ASRock's motherboard support CD. (Please copy the files under the following directory: 32 bit: ..\i386\Win7_Intel.. 64-bit: ... follow the steps below. STEP 2: Install Windows® 7 64-bit / 8 64-bit / 8.1 64bit / / 10 64-bit OS Press to launch boot menu at system POST and choose the item "UEFI:" to use Windows® 7 64-bit, Windows® 8 64-bit, Windows® 8.1 64-bit or Windows® 10 64-bit.
User Manual
Page 57
Z270 Killer SLI/ac / Z270 Killer SLI Chapter 4 UEFI SETUP UTILITY 4.1 Introduction This section explains how to use the UEFI SETUP UTILITY to enter the UEFI SETUP UTILITY after you power on the computer, otherwise, the Power-On-Self-Test (POST) will continue with its test routines. You may run the UEFI SETUP ...UTILITY by pressing or right after POST, restart the system by pressing + + , or by turning the system off and then...
Z270 Killer SLI/ac / Z270 Killer SLI Chapter 4 UEFI SETUP UTILITY 4.1 Introduction This section explains how to use the UEFI SETUP UTILITY to enter the UEFI SETUP UTILITY after you power on the computer, otherwise, the Power-On-Self-Test (POST) will continue with its test routines. You may run the UEFI SETUP ...UTILITY by pressing or right after POST, restart the system by pressing + + , or by turning the system off and then...
User Manual
Page 90
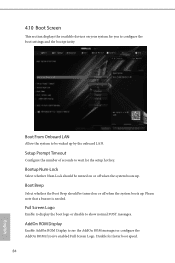
... to display the boot logo or disable to wait for the setup hot key. Setup Prompt Timeout Configure the number of seconds to show normal POST messages. Bootup Num-Lock Select whether Num Lock should be waked up . AddOn ROM Display Enable AddOn ROM Display to see the AddOn ROM messages...
... to display the boot logo or disable to wait for the setup hot key. Setup Prompt Timeout Configure the number of seconds to show normal POST messages. Bootup Num-Lock Select whether Num Lock should be waked up . AddOn ROM Display Enable AddOn ROM Display to see the AddOn ROM messages...


