User Manual
Page 4
... 2.8 Dr. Debug 30 2.9 SLITM , 3-Way SLITMand Quad SLITM Operation Guide 32 2.9.1 Installing Two SLITM-Ready Graphics Cards 32 2.9.2 Installing Three SLITM-Ready Graphics Cards 34 2.9.3 Driver Installation and Setup 36 2.10 CrossFireXTM, 3-Way CrossFireXTM and Quad CrossFireXTM Operation Guide 37 2.10.1 Installing Two CrossFireXTM-Ready Graphics Cards 37 2.10.2 Installing Three...
... 2.8 Dr. Debug 30 2.9 SLITM , 3-Way SLITMand Quad SLITM Operation Guide 32 2.9.1 Installing Two SLITM-Ready Graphics Cards 32 2.9.2 Installing Three SLITM-Ready Graphics Cards 34 2.9.3 Driver Installation and Setup 36 2.10 CrossFireXTM, 3-Way CrossFireXTM and Quad CrossFireXTM Operation Guide 37 2.10.1 Installing Two CrossFireXTM-Ready Graphics Cards 37 2.10.2 Installing Three...
User Manual
Page 5
... M.2_SSD (NGFF) Module Installation Guide 41 Chapter 3 Software and Utilities Operation 45 3.1 Installing Drivers 45 3.2 A-Tuning 46 3.2.1 Installing A-Tuning 46 3.2.2 Using A-Tuning 46 3.3 ASRock Live Update & APP Shop 49 3.3.1 UI Overview 49 3.3.2 Apps 50 3.3.3 BIOS & Drivers 53 3.3.4 Setting 54 3.4 ASRock RGB LED 55 Chapter 4 UEFI SETUP UTILITY 57 4.1 Introduction 57 4.2 EZ Mode 58 4.3 Advanced...
... M.2_SSD (NGFF) Module Installation Guide 41 Chapter 3 Software and Utilities Operation 45 3.1 Installing Drivers 45 3.2 A-Tuning 46 3.2.1 Installing A-Tuning 46 3.2.2 Using A-Tuning 46 3.3 ASRock Live Update & APP Shop 49 3.3.1 UI Overview 49 3.3.2 Apps 50 3.3.3 BIOS & Drivers 53 3.3.4 Setting 54 3.4 ASRock RGB LED 55 Chapter 4 UEFI SETUP UTILITY 57 4.1 Introduction 57 4.2 EZ Mode 58 4.3 Advanced...
User Manual
Page 38
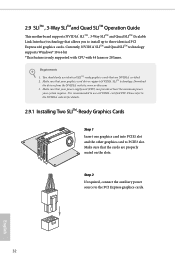
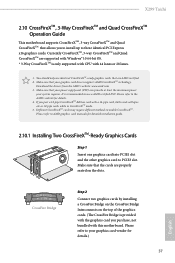
... the PCI Express graphics cards. 32 English Step 2 If required, connect the auxiliary power source to PCIE3 slot. Requirements 1. Download the drivers from the NVIDIA® website: www.nvidia.com 3. Currently, NVIDIA® SLITM and Quad SLITM technology supports Windows® 10 64-bit...up to use identical SLITM-ready graphics cards that your power supply unit (PSU) can provide at least the minimum power your graphics card driver supports NVIDIA® SLITM technology. 2.9 SLITM , 3-Way SLITMand Quad SLITM Operation Guide This motherboard supports NVIDIA® SLITM , 3-Way ...
... the PCI Express graphics cards. 32 English Step 2 If required, connect the auxiliary power source to PCIE3 slot. Requirements 1. Download the drivers from the NVIDIA® website: www.nvidia.com 3. Currently, NVIDIA® SLITM and Quad SLITM technology supports Windows® 10 64-bit...up to use identical SLITM-ready graphics cards that your power supply unit (PSU) can provide at least the minimum power your graphics card driver supports NVIDIA® SLITM technology. 2.9 SLITM , 3-Way SLITMand Quad SLITM Operation Guide This motherboard supports NVIDIA® SLITM , 3-Way ...
User Manual
Page 42
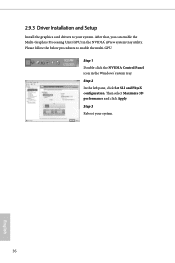
After that, you can enable the Multi-Graphics Processing Unit (GPU) in the Windows® system tray. Then select Maximize 3D performance and click Apply. 2.9.3 Driver Installation and Setup Install the graphics card drivers to enable the multi-GPU. Step 1 Double-click the NVIDIA Control Panel icon in the NVIDIA® nView system tray utility. Step 2 In the left pane, click Set SLI and PhysX configuration. Step 3 Reboot your system. Please follow the below procedures to your system. 36 English
After that, you can enable the Multi-Graphics Processing Unit (GPU) in the Windows® system tray. Then select Maximize 3D performance and click Apply. 2.9.3 Driver Installation and Setup Install the graphics card drivers to enable the multi-GPU. Step 1 Double-click the NVIDIA Control Panel icon in the NVIDIA® nView system tray utility. Step 2 In the left pane, click Set SLI and PhysX configuration. Step 3 Reboot your system. Please follow the below procedures to your system. 36 English
User Manual
Page 43
...cards that are properly seated on the slots. Download the drivers from the AMD's website: www.amd.com 3. It is only supported with CPU with 44 lanes or 28 lanes. 1. Please refer to enable CrossFireXTM. X299 Taichi 2.10 CrossFireXTM, 3-Way CrossFireXTM and Quad CrossFireXTM Operation ...Express x16 graphics cards. Make sure that your power supply unit (PSU) can provide at least the minimum power your graphics card driver supports AMD CrossFireXTM technology. Please refer to AMD graphics card manuals for detailed installation guide. 2.10.1 Installing Two CrossFireXTM-Ready Graphics ...
...cards that are properly seated on the slots. Download the drivers from the AMD's website: www.amd.com 3. It is only supported with CPU with 44 lanes or 28 lanes. 1. Please refer to enable CrossFireXTM. X299 Taichi 2.10 CrossFireXTM, 3-Way CrossFireXTM and Quad CrossFireXTM Operation ...Express x16 graphics cards. Make sure that your power supply unit (PSU) can provide at least the minimum power your graphics card driver supports AMD CrossFireXTM technology. Please refer to AMD graphics card manuals for detailed installation guide. 2.10.1 Installing Two CrossFireXTM-Ready Graphics ...
User Manual
Page 46
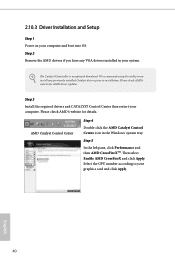
We recommend using this utility to uninstall any VGA drivers installed in the Windows® system tray. Step 3 Install the required drivers and CATALYST Control Center then restart your computer and boot into OS. 2.10.3 Driver Installation and Setup Step 1 Power on your computer. Step 5 ...In the left pane, click Performance and then AMD CrossFireXTM. Please check AMD's website for AMD driver updates. AMD Catalyst Control Center Step 4 Double-click the AMD Catalyst Control Center icon in your graphics card and click Apply. Select...
We recommend using this utility to uninstall any VGA drivers installed in the Windows® system tray. Step 3 Install the required drivers and CATALYST Control Center then restart your computer and boot into OS. 2.10.3 Driver Installation and Setup Step 1 Power on your computer. Step 5 ...In the left pane, click Performance and then AMD CrossFireXTM. Please check AMD's website for AMD driver updates. AMD Catalyst Control Center Step 4 Double-click the AMD Catalyst Control Center icon in your graphics card and click Apply. Select...
User Manual
Page 51
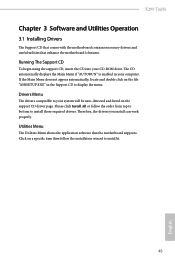
... To begin using the support CD, insert the CD into your computer. Therefore, the drivers you install can work properly. X299 Taichi Chapter 3 Software and Utilities Operation 3.1 Installing Drivers The Support CD that comes with the motherboard contains necessary drivers and useful utilities that the motherboard supports. If the Main Menu does not appear automatically...
... To begin using the support CD, insert the CD into your computer. Therefore, the drivers you install can work properly. X299 Taichi Chapter 3 Software and Utilities Operation 3.1 Installing Drivers The Support CD that comes with the motherboard contains necessary drivers and useful utilities that the motherboard supports. If the Main Menu does not appear automatically...
User Manual
Page 59
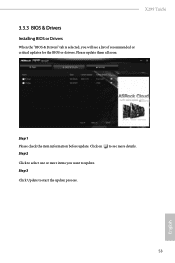
Click on Step 2 to see a list of recommended or critical updates for the BIOS or drivers. Step 1 Please check the item information before update. Please update them all soon. Click to select one or more items you will see more details. Step 3 Click Update to start the update process. 53 English X299 Taichi 3.3.3 BIOS & Drivers Installing BIOS or Drivers When the "BIOS & Drivers" tab is selected, you want to update.
Click on Step 2 to see a list of recommended or critical updates for the BIOS or drivers. Step 1 Please check the item information before update. Please update them all soon. Click to select one or more items you will see more details. Step 3 Click Update to start the update process. 53 English X299 Taichi 3.3.3 BIOS & Drivers Installing BIOS or Drivers When the "BIOS & Drivers" tab is selected, you want to update.
User Manual
Page 94
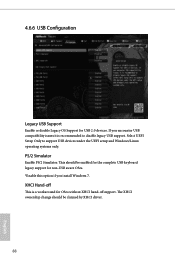
... is recommended to support USB devices under the UEFI setup and Windows/Linux operating systems only. The XHCI ownership change should be claimed by XHCI driver. 88 English Select UEFI Setup Only to disable legacy USB support. 4.6.6 USB Configuration Legacy USB Support Enable or disable Legacy OS Support for OSes without...
... is recommended to support USB devices under the UEFI setup and Windows/Linux operating systems only. The XHCI ownership change should be claimed by XHCI driver. 88 English Select UEFI Setup Only to disable legacy USB support. 4.6.6 USB Configuration Legacy USB Support Enable or disable Legacy OS Support for OSes without...
User Manual
Page 96
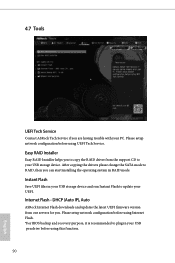
.... Please setup network configuration before using Internet Flash. *For BIOS backup and recovery purpose, it is recommended to copy the RAID driver from our servers for you are having trouble with your UEFI. Internet Flash - Please setup network configuration before using this function. ...90 English DHCP (Auto IP), Auto ASRock Internet Flash downloads and updates the latest UEFI firmware version from the support CD to update your PC. 4.7 Tools UEFI Tech Service Contact ASRock Tech Service if you .
.... Please setup network configuration before using Internet Flash. *For BIOS backup and recovery purpose, it is recommended to copy the RAID driver from our servers for you are having trouble with your UEFI. Internet Flash - Please setup network configuration before using this function. ...90 English DHCP (Auto IP), Auto ASRock Internet Flash downloads and updates the latest UEFI firmware version from the support CD to update your PC. 4.7 Tools UEFI Tech Service Contact ASRock Tech Service if you .

RAID Installation Guide
Page 7
... disk drives, please set the necessary RAID items in your system, and press key to confirm the selection C. STEP 2: Use ASRock Easy RAID Installer Easy RAID Installer can copy the RAID driver from a support CD to [RAID]. STEP 4: Install Windows® 10 64-bit OS on your SATA / SATA2 / SATA3 HDDs with...
... disk drives, please set the necessary RAID items in your system, and press key to confirm the selection C. STEP 2: Use ASRock Easy RAID Installer Easy RAID Installer can copy the RAID driver from a support CD to [RAID]. STEP 4: Install Windows® 10 64-bit OS on your SATA / SATA2 / SATA3 HDDs with...

RAID Installation Guide
Page 23
... a USB flash disk You can download the drivers from ASRock's website and unzip the files into a USB flash disk or copy the files from ASRock's motherboard support CD. (Please copy the files under the following directory: 32 bit: ..\i386\Win7_Intel.. 64-bit: ..\AMD64\Win7-64_Intel.. STEP 2: Install Windows® 10 ...
... a USB flash disk You can download the drivers from ASRock's website and unzip the files into a USB flash disk or copy the files from ASRock's motherboard support CD. (Please copy the files under the following directory: 32 bit: ..\i386\Win7_Intel.. 64-bit: ..\AMD64\Win7-64_Intel.. STEP 2: Install Windows® 10 ...
RAID Installation Guide
Page 24
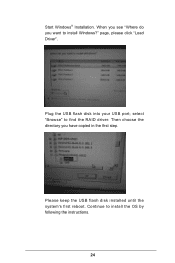
page, please click "Load Driver". Please keep the USB flash disk installed until the system's first reboot. Plug the USB flash disk into your USB port; select "Browse" to install the OS by following the instructions. 24 Start Windows® Installation. When you see "Where do you have copied in the first step. Continue to find the RAID driver. Then choose the directory you want to install Windows?"
page, please click "Load Driver". Please keep the USB flash disk installed until the system's first reboot. Plug the USB flash disk into your USB port; select "Browse" to install the OS by following the instructions. 24 Start Windows® Installation. When you see "Where do you have copied in the first step. Continue to find the RAID driver. Then choose the directory you want to install Windows?"
RAID Installation Guide
Page 25
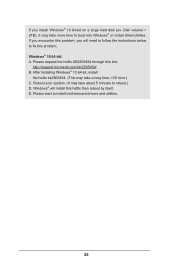
... a long time; >30 mins.) C. Windows® will need to follow the instructions below to install motherboard drivers and utilities. 25 Reboot your system. (It may take about 5 minutes to boot into Windows® or install driver/utilities. Please request the hotfix KB2505454 through this hotfix then reboot by itself. Windows® 10...
... a long time; >30 mins.) C. Windows® will need to follow the instructions below to install motherboard drivers and utilities. 25 Reboot your system. (It may take about 5 minutes to boot into Windows® or install driver/utilities. Please request the hotfix KB2505454 through this hotfix then reboot by itself. Windows® 10...


