

User Manual
Page 2
... of profits, loss of business, loss of data, interruption of business and the like), even if ASRock has been advised of the possibility of this motherboard contains Perchlorate, a toxic substance controlled in the documentation or product. Version 1.0 Published September 2017 Copyright...©2017 ASRock INC. In no responsibility for any errors or omissions that may be reproduced, transcribed, transmitted,...
... of profits, loss of business, loss of data, interruption of business and the like), even if ASRock has been advised of the possibility of this motherboard contains Perchlorate, a toxic substance controlled in the documentation or product. Version 1.0 Published September 2017 Copyright...©2017 ASRock INC. In no responsibility for any errors or omissions that may be reproduced, transcribed, transmitted,...
User Manual
Page 5
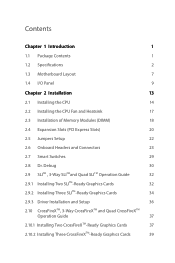
Contents Chapter 1 Introduction 1 1.1 Package Contents 1 1.2 Specifications 2 1.3 Motherboard Layout 7 1.4 I/O Panel 9 Chapter 2 Installation 13 2.1 Installing the CPU 14 2.2 Installing the CPU Fan and Heatsink 17 2.3 Installation of Memory Modules (DIMM) 18 2.4 Expansion Slots (PCI ...
Contents Chapter 1 Introduction 1 1.1 Package Contents 1 1.2 Specifications 2 1.3 Motherboard Layout 7 1.4 I/O Panel 9 Chapter 2 Installation 13 2.1 Installing the CPU 14 2.2 Installing the CPU Fan and Heatsink 17 2.3 Installation of Memory Modules (DIMM) 18 2.4 Expansion Slots (PCI ...
User Manual
Page 8
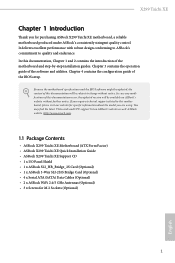
... may find the latest VGA cards and CPU support list on ASRock's website without notice. ASRock website http://www.asrock.com. 1.1 Package Contents • ASRock X299 Taichi XE Motherboard (ATX Form Factor) • ASRock X299 Taichi XE Quick Installation Guide • ASRock X299 Taichi XE Support CD • 1 x I/O Panel Shield • 1 x ASRock SLI_HB_Bridge_2S Card (Optional) • 1 x ASRock 3-Way SLI-2S1S Bridge Card (Optional) • 4 x Serial ATA (SATA) Data...
... may find the latest VGA cards and CPU support list on ASRock's website without notice. ASRock website http://www.asrock.com. 1.1 Package Contents • ASRock X299 Taichi XE Motherboard (ATX Form Factor) • ASRock X299 Taichi XE Quick Installation Guide • ASRock X299 Taichi XE Support CD • 1 x I/O Panel Shield • 1 x ASRock SLI_HB_Bridge_2S Card (Optional) • 1 x ASRock 3-Way SLI-2S1S Bridge Card (Optional) • 4 x Serial ATA (SATA) Data...
User Manual
Page 14
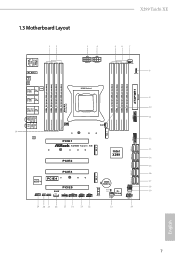
1.3 Motherboard Layout X299 Taichi XE 12 3 4 56 7 USB 2.0 T: USB1 B: USB2 PS2 Keyboard /Mouse M2_WIFI_1 BIOS _FB1 CLRC BTN1 USB 3.1 Gen1 Top: T: USB1 B: USB2 RJ-45 LAN USB 3.1 Gen1 T: USB3 Top: B: ...: RJ-45 Top: CHA_FAN2 CPU_OPT/ W_PUMP USB3_7_8 10 11 1 Central/Bass LINE IN Center: FRONT Bottom: MIC IN 30 LAN M2_1 PCIE1 X299 Taichi XE PCIE2 M2_2 SATA3_2_3 SATA3_0_1 1 12 13 Intel X299 14 15 USB3_5_6 SATA3_4_5 SATA3_A1_A2 SATA3_6_7 PCIE3 Purity SoundTM 4 PCIE4 HD_AUDIO1 1 CLRMOS1 RGB_LED1 1 1 RoHS VROC1 1 PCIE5 T B1 TPMS1 1 1 USB3_4 1 USB5_6 1 M2_3...
1.3 Motherboard Layout X299 Taichi XE 12 3 4 56 7 USB 2.0 T: USB1 B: USB2 PS2 Keyboard /Mouse M2_WIFI_1 BIOS _FB1 CLRC BTN1 USB 3.1 Gen1 Top: T: USB1 B: USB2 RJ-45 LAN USB 3.1 Gen1 T: USB3 Top: B: ...: RJ-45 Top: CHA_FAN2 CPU_OPT/ W_PUMP USB3_7_8 10 11 1 Central/Bass LINE IN Center: FRONT Bottom: MIC IN 30 LAN M2_1 PCIE1 X299 Taichi XE PCIE2 M2_2 SATA3_2_3 SATA3_0_1 1 12 13 Intel X299 14 15 USB3_5_6 SATA3_4_5 SATA3_A1_A2 SATA3_6_7 PCIE3 Purity SoundTM 4 PCIE4 HD_AUDIO1 1 CLRMOS1 RGB_LED1 1 1 RoHS VROC1 1 PCIE5 T B1 TPMS1 1 1 USB3_4 1 USB5_6 1 M2_3...
User Manual
Page 18
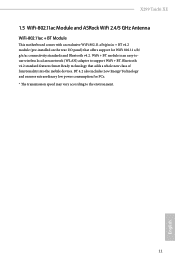
... Smart Ready technology that offers support for PCs. * The transmission speed may vary according to support WiFi + BT. X299 Taichi XE 1.5 WiFi-802.11ac Module and ASRock WiFi 2.4/5 GHz Antenna WiFi-802.11ac + BT Module This motherboard comes with an exclusive WiFi 802.11 a/b/g/n/ac + BT v4.2 module (pre-installed on the rear I/O panel) that...
... Smart Ready technology that offers support for PCs. * The transmission speed may vary according to support WiFi + BT. X299 Taichi XE 1.5 WiFi-802.11ac Module and ASRock WiFi 2.4/5 GHz Antenna WiFi-802.11ac + BT Module This motherboard comes with an exclusive WiFi 802.11 a/b/g/n/ac + BT v4.2 module (pre-installed on the rear I/O panel) that...
User Manual
Page 20
... the components. • Hold components by the edges and do not touch the ICs. • Whenever you install motherboard components or change any components, place them on a carpet. Pre-installation Precautions Take note of your chassis to the... uninstall any motherboard settings. • Make sure to the chassis, please do so may damage the motherboard. 13 English Failure to do not overtighten the screws! Before you install the motherboard, study the configuration of the following precautions before installing or removing the motherboard components. X299 Taichi XE Chapter 2 ...
... the components. • Hold components by the edges and do not touch the ICs. • Whenever you install motherboard components or change any components, place them on a carpet. Pre-installation Precautions Take note of your chassis to the... uninstall any motherboard settings. • Make sure to the chassis, please do so may damage the motherboard. 13 English Failure to do not overtighten the screws! Before you install the motherboard, study the configuration of the following precautions before installing or removing the motherboard components. X299 Taichi XE Chapter 2 ...

User Manual
Page 23
The cover must be placed if you wish to return the motherboard for after service. 16 English 6 A B 7 A B 8 Please save and replace the cover if the processor is removed.
The cover must be placed if you wish to return the motherboard for after service. 16 English 6 A B 7 A B 8 Please save and replace the cover if the processor is removed.
User Manual
Page 25
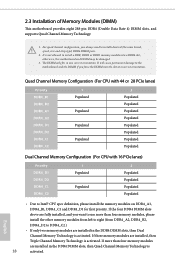
...DDR4_B2, DDR4_D2 to install identical (the same brand, speed, size and chip-type) DDR4 DIMM pairs. 2. It will cause permanent damage to the motherboard and the DIMM if you always need to DDR4_C2.) • If only two memory modules are installed, then Triple Channel Memory Technology is 18 activated...DDR4_A1, DDR4_B1, DDR4_C1 and DDR4_D1 for first priority. The DIMM only fits in one correct orientation. 2.3 Installation of Memory Modules (DIMM) This motherboard provides eight 288-pin DDR4 (Double Data Rate 4) DIMM slots, and supports Quad Channel Memory Technology. 1.
...DDR4_B2, DDR4_D2 to install identical (the same brand, speed, size and chip-type) DDR4 DIMM pairs. 2. It will cause permanent damage to the motherboard and the DIMM if you always need to DDR4_C2.) • If only two memory modules are installed, then Triple Channel Memory Technology is 18 activated...DDR4_A1, DDR4_B1, DDR4_C1 and DDR4_D1 for first priority. The DIMM only fits in one correct orientation. 2.3 Installation of Memory Modules (DIMM) This motherboard provides eight 288-pin DDR4 (Double Data Rate 4) DIMM slots, and supports Quad Channel Memory Technology. 1.

User Manual
Page 27
... (PCIe 2.0 x1 slot) is used for PCI Express x16 lane width graphics cards. 2.4 Expansion Slots (PCI Express Slots) There are 5 PCI Express slots on the motherboard. Before installing an expansion card, please make necessary hardware settings for PCI Express x8 lane width graphics cards. * If you install CPU with 44 lanes...
... (PCIe 2.0 x1 slot) is used for PCI Express x16 lane width graphics cards. 2.4 Expansion Slots (PCI Express Slots) There are 5 PCI Express slots on the motherboard. Before installing an expansion card, please make necessary hardware settings for PCI Express x8 lane width graphics cards. * If you install CPU with 44 lanes...

User Manual
Page 28
X299 Taichi XE PCIe Slot Configurations (For CPU with 28 PCIe lanes) PCIE1 PCIE2 PCIE3 PCIE4 Single Graphics Card x16 N/A N/A N/A PCIE5 N/A M2_1 x4 Two Graphics Cards in CrossFireXTM ... Cards in CrossFireXTM Mode x8 N/A x4 N/A N/A x4 For a better thermal environment, please connect a chassis fan to "UEFI only". 4. Set "Launch Storage OpROM policy" to the motherboard's | chassis fan connector (CHA_FAN1, CHA_FAN2 or CHA_FAN3) when using multiple graphics cards. * If you install CPU with 44 or 28 lanes and encounter CrossFire issues...
X299 Taichi XE PCIe Slot Configurations (For CPU with 28 PCIe lanes) PCIE1 PCIE2 PCIE3 PCIE4 Single Graphics Card x16 N/A N/A N/A PCIE5 N/A M2_1 x4 Two Graphics Cards in CrossFireXTM ... Cards in CrossFireXTM Mode x8 N/A x4 N/A N/A x4 For a better thermal environment, please connect a chassis fan to "UEFI only". 4. Set "Launch Storage OpROM policy" to the motherboard's | chassis fan connector (CHA_FAN1, CHA_FAN2 or CHA_FAN3) when using multiple graphics cards. * If you install CPU with 44 or 28 lanes and encounter CrossFire issues...
User Manual
Page 30
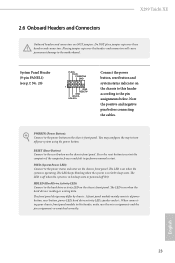
X299 Taichi XE 2.6 Onboard Headers and Connectors Onboard headers and connectors are matched correctly. Do NOT place jumper caps over the headers and connectors will cause permanent damage ... the positive and negative pins before connecting the cables. Press the reset button to restart the computer if the computer freezes and fails to the motherboard. The LED is on when the system is reading or writing data. The front panel design may configure the way to the hard drive activity...
X299 Taichi XE 2.6 Onboard Headers and Connectors Onboard headers and connectors are matched correctly. Do NOT place jumper caps over the headers and connectors will cause permanent damage ... the positive and negative pins before connecting the cables. Press the reset button to restart the computer if the computer freezes and fails to the motherboard. The LED is on when the system is reading or writing data. The front panel design may configure the way to the hard drive activity...
User Manual
Page 31
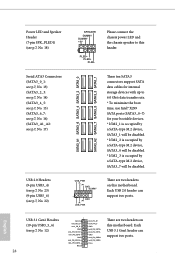
... Please connect the chassis power LED and the chassis speaker to 6.0 Gb/s data transfer rate. * To minimize the boot time, use Intel® X299 SATA ports (SATA3_0~7) for your bootable devices. * If M2_1 is occupied by a SATA-type M.2 device, SATA3_1 will be disabled. * If M2_2 ... p.7, No. 15) (SATA3_6_7: see p.7, No. 16) (SATA3_A1_A2: see p.7, No. 22) USB_PWR PP+ GND DUMMY 1 GND P+ PUSB_PWR There are two headers on this motherboard. Each USB 2.0 header can support two ports. 24 USB 2.0 Headers (9-pin USB3_4) (see p.7, No. 23) (9-pin USB5_6) (see p.7, No. 17) SATA3_A1 SATA3_6 SATA3_4...
... Please connect the chassis power LED and the chassis speaker to 6.0 Gb/s data transfer rate. * To minimize the boot time, use Intel® X299 SATA ports (SATA3_0~7) for your bootable devices. * If M2_1 is occupied by a SATA-type M.2 device, SATA3_1 will be disabled. * If M2_2 ... p.7, No. 15) (SATA3_6_7: see p.7, No. 16) (SATA3_A1_A2: see p.7, No. 22) USB_PWR PP+ GND DUMMY 1 GND P+ PUSB_PWR There are two headers on this motherboard. Each USB 2.0 header can support two ports. 24 USB 2.0 Headers (9-pin USB3_4) (see p.7, No. 23) (9-pin USB5_6) (see p.7, No. 17) SATA3_A1 SATA3_6 SATA3_4...
User Manual
Page 33
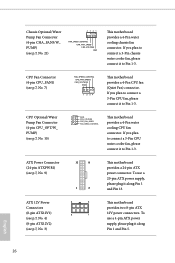
...please connect it to Pin 1-3. CPU Optional/Water Pump Fan Connector (4-pin CPU_OPT/W_ PUMP) (see p.7, No. 3) 8 5 4 1 This motherboard provides two 8-pin ATX 12V power connectors. If you plan to Pin 1-3. To use a 20-pin ATX power supply, please plug it to...to Pin 1-3. ATX 12V Power Connectors (8-pin ATX12V1) (see p.7, No. 4) (8-pin ATX12V2) (see p.7, No. 10) 1 GND 2 FAN_VOLTAGE This motherboard 3 4 CPU_FAN_SPEED FAN_SPEED_CONTROL provides a 4-Pin water cooling CPU fan connector. English 26 To use a 4-pin ATX power supply, please plug it to connect ...
...please connect it to Pin 1-3. CPU Optional/Water Pump Fan Connector (4-pin CPU_OPT/W_ PUMP) (see p.7, No. 3) 8 5 4 1 This motherboard provides two 8-pin ATX 12V power connectors. If you plan to Pin 1-3. To use a 20-pin ATX power supply, please plug it to...to Pin 1-3. ATX 12V Power Connectors (8-pin ATX12V1) (see p.7, No. 4) (8-pin ATX12V2) (see p.7, No. 10) 1 GND 2 FAN_VOLTAGE This motherboard 3 4 CPU_FAN_SPEED FAN_SPEED_CONTROL provides a 4-Pin water cooling CPU fan connector. English 26 To use a 4-pin ATX power supply, please plug it to connect ...
User Manual
Page 36
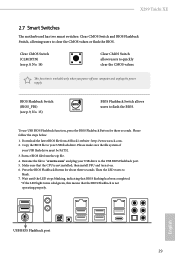
Extract BIOS file from ASRock's website : http://www.asrock.com. 2. Rename the file to "creative.rom" and plug your computer and unplug the power supply. Then the LED starts to the USB BIOS Flashback ... is not installed; BIOS Flashback Switch (BIOS_FB1) (see p.9, No. 14) Clear CMOS Switch allows users to your USB flash drive must be FAT32. 3. X299 Taichi XE 2.7 Smart Switches The motherboard has two smart switches: Clear CMOS Switch and BIOS Flashback Switch, allowing users to flash the BIOS. Clear CMOS Switch (CLRCBTN) (see p.9, No. 15...
Extract BIOS file from ASRock's website : http://www.asrock.com. 2. Rename the file to "creative.rom" and plug your computer and unplug the power supply. Then the LED starts to the USB BIOS Flashback ... is not installed; BIOS Flashback Switch (BIOS_FB1) (see p.9, No. 14) Clear CMOS Switch allows users to your USB flash drive must be FAT32. 3. X299 Taichi XE 2.7 Smart Switches The motherboard has two smart switches: Clear CMOS Switch and BIOS Flashback Switch, allowing users to flash the BIOS. Clear CMOS Switch (CLRCBTN) (see p.9, No. 15...

User Manual
Page 39
... PCI Express graphics cards. 32 English Step 2 If required, connect the auxiliary power source to PCIE3 slot. 2.9 SLITM , 3-Way SLITMand Quad SLITM Operation Guide This motherboard supports NVIDIA® SLITM , 3-Way SLITM and Quad SLITM (Scalable Link Interface) technology that the cards are NVIDIA® certified. 2. Currently, NVIDIA® SLITM and...
... PCI Express graphics cards. 32 English Step 2 If required, connect the auxiliary power source to PCIE3 slot. 2.9 SLITM , 3-Way SLITMand Quad SLITM Operation Guide This motherboard supports NVIDIA® SLITM , 3-Way SLITM and Quad SLITM (Scalable Link Interface) technology that the cards are NVIDIA® certified. 2. Currently, NVIDIA® SLITM and...
User Manual
Page 44
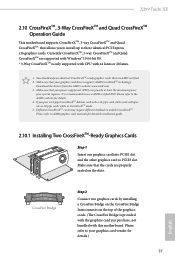
...slot. Make sure that are AMD certified. 2. It is provided with the graphics card you purchase, not bundled with this motherboard. You should only use a AMD certified PSU. Download the drivers from the AMD's website: www.amd.com 3. Please refer... minimum power your graphics card driver supports AMD CrossFireXTM technology. Please refer to enable CrossFireXTM. X299 Taichi XE 2.10 CrossFireXTM, 3-Way CrossFireXTM and Quad CrossFireXTM Operation Guide This motherboard supports CrossFireXTM, 3-way CrossFireXTM and Quad CrossFireXTM that allows you pair a 12-pipe CrossFireXTM ...
...slot. Make sure that are AMD certified. 2. It is provided with the graphics card you purchase, not bundled with this motherboard. You should only use a AMD certified PSU. Download the drivers from the AMD's website: www.amd.com 3. Please refer... minimum power your graphics card driver supports AMD CrossFireXTM technology. Please refer to enable CrossFireXTM. X299 Taichi XE 2.10 CrossFireXTM, 3-Way CrossFireXTM and Quad CrossFireXTM Operation Guide This motherboard supports CrossFireXTM, 3-way CrossFireXTM and Quad CrossFireXTM that allows you pair a 12-pipe CrossFireXTM ...

User Manual
Page 46
... card into PCIE1 slot, another graphics card to PCIE3 slot, and the other CrossFire Bridge to connect the graphics cards on the slots. English 39 X299 Taichi XE 2.10.2 Installing Three CrossFireXTM-Ready Graphics Cards Step 1 Insert one CrossFire Bridge to connect the graphics cards on PCIE1 and PCIE3 slots, and use the... the cards are properly seated on PCIE3 and PCIE5 slots. (The CrossFire Bridge is provided with the graphics card you purchase, not bundled with this motherboard.
... card into PCIE1 slot, another graphics card to PCIE3 slot, and the other CrossFire Bridge to connect the graphics cards on the slots. English 39 X299 Taichi XE 2.10.2 Installing Three CrossFireXTM-Ready Graphics Cards Step 1 Insert one CrossFire Bridge to connect the graphics cards on PCIE1 and PCIE3 slots, and use the... the cards are properly seated on PCIE3 and PCIE5 slots. (The CrossFire Bridge is provided with the graphics card you purchase, not bundled with this motherboard.

User Manual
Page 49
... not overtighten the screw as this might damage the module. Otherwise, release the standoff by default. E D C B A E D C B A C B A E D C B A E D NUT2 NUT1 Step 3 Move the standoff based on the motherboard. Hand tighten the standoff into the desired nut location on the module type and length.
... not overtighten the screw as this might damage the module. Otherwise, release the standoff by default. E D C B A E D C B A C B A E D C B A E D NUT2 NUT1 Step 3 Move the standoff based on the motherboard. Hand tighten the standoff into the desired nut location on the module type and length.

User Manual
Page 52
...drivers compatible to install those required drivers. X299 Taichi XE Chapter 3 Software and Utilities Operation 3.1 Installing Drivers The Support CD that comes with the motherboard contains necessary drivers and useful utilities that the motherboard supports. Utilities Menu The Utilities Menu shows... the application software that enhance the motherboard's features. The CD automatically displays the Main ...
...drivers compatible to install those required drivers. X299 Taichi XE Chapter 3 Software and Utilities Operation 3.1 Installing Drivers The Support CD that comes with the motherboard contains necessary drivers and useful utilities that the motherboard supports. Utilities Menu The Utilities Menu shows... the application software that enhance the motherboard's features. The CD automatically displays the Main ...
User Manual
Page 56
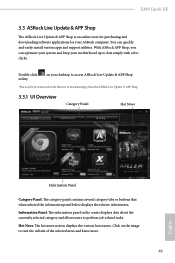
...Hot News: The hot news section displays the various latest news. X299 Taichi XE 3.3 ASRock Live Update & APP Shop The ASRock Live Update & APP Shop is an online store for purchasing and downloading software applications for your motherboard up to date simply with a few clicks. Information Panel: The... information panel in the center displays data about the currently selected category and allows users to download apps from the ASRock Live Update & APP Shop. 3.3.1...
...Hot News: The hot news section displays the various latest news. X299 Taichi XE 3.3 ASRock Live Update & APP Shop The ASRock Live Update & APP Shop is an online store for purchasing and downloading software applications for your motherboard up to date simply with a few clicks. Information Panel: The... information panel in the center displays data about the currently selected category and allows users to download apps from the ASRock Live Update & APP Shop. 3.3.1...

