
User Manual
Page 2
...October 2019 Copyright©2019 ASRock INC. In no responsibility for any kind, either expressed or implied, including but not limited to change without intent to the following two conditions: (1) this device may not cause harmful interference, and (2) this motherboard contains Perchlorate, a toxic... appear in this documentation may be liable for any means, except duplication of the FCC Rules. All rights reserved. ASRock assumes no event shall ASRock, its directors, officers, employees, or agents be reproduced, transcribed, transmitted, or translated in any language, in Perchlorate...
...October 2019 Copyright©2019 ASRock INC. In no responsibility for any kind, either expressed or implied, including but not limited to change without intent to the following two conditions: (1) this device may not cause harmful interference, and (2) this motherboard contains Perchlorate, a toxic... appear in this documentation may be liable for any means, except duplication of the FCC Rules. All rights reserved. ASRock assumes no event shall ASRock, its directors, officers, employees, or agents be reproduced, transcribed, transmitted, or translated in any language, in Perchlorate...

User Manual
Page 4
Contents Chapter 1 Introduction 1 1.1 Package Contents 1 1.2 Specifications 2 1.3 Motherboard Layout 8 1.4 I/O Panel 11 1.5 WiFi-802.11ax Module and ASRock WiFi 2.4/5 GHz Antenna 13 1.6 USB 3.2 Gen2 x2 Module 14 Chapter 2 Installation 15 2.1 Installing the CPU 16 2.2 Installing the CPU Fan and Heatsink 19 2.3 Installation of ...
Contents Chapter 1 Introduction 1 1.1 Package Contents 1 1.2 Specifications 2 1.3 Motherboard Layout 8 1.4 I/O Panel 11 1.5 WiFi-802.11ax Module and ASRock WiFi 2.4/5 GHz Antenna 13 1.6 USB 3.2 Gen2 x2 Module 14 Chapter 2 Installation 15 2.1 Installing the CPU 16 2.2 Installing the CPU Fan and Heatsink 19 2.3 Installation of ...

User Manual
Page 5
...) Module Installation Guide (M2_1 and M2_2) 48 2.12 M.2_SSD (NGFF) Module Installation Guide (M2_3) 51 Chapter 3 Software and Utilities Operation 54 3.1 Installing Drivers 54 3.2 ASRock Motherboard Utility (A-Tuning) 55 3.2.1 Installing ASRock Motherboard Utility (A-Tuning) 55 3.2.2 Using ASRock Motherboard Utility (A-Tuning) 55 3.3 ASRock Live Update & APP Shop 58 3.3.1 UI Overview 58 3.3.2 Apps 59 3.3.3 BIOS & Drivers 62 3.3.4 Setting 63...
...) Module Installation Guide (M2_1 and M2_2) 48 2.12 M.2_SSD (NGFF) Module Installation Guide (M2_3) 51 Chapter 3 Software and Utilities Operation 54 3.1 Installing Drivers 54 3.2 ASRock Motherboard Utility (A-Tuning) 55 3.2.1 Installing ASRock Motherboard Utility (A-Tuning) 55 3.2.2 Using ASRock Motherboard Utility (A-Tuning) 55 3.3 ASRock Live Update & APP Shop 58 3.3.1 UI Overview 58 3.3.2 Apps 59 3.3.3 BIOS & Drivers 62 3.3.4 Setting 63...
User Manual
Page 7
...website http://www.asrock.com. 1.1 Package Contents • ASRock X299 Taichi CLX Motherboard (ATX Form Factor) • ASRock X299 Taichi CLX Quick Installation Guide • ASRock X299 Taichi CLX Support CD • 1 x ASRock SLI_HB_Bridge_2S Card (Optional) • 1 x ASRock WiFi 2.4/5 GHz Antenna (Optional) • 1 x ASRock Screwdriver (Optional) • 4 x Serial ATA (SATA) Data Cables (Optional) • 3 x Screws for M.2 Sockets (Optional) • 3 x Standoffs for purchasing ASRock X299 Taichi CLX motherboard, a reliable motherboard produced under ASRock's consistently stringent...
...website http://www.asrock.com. 1.1 Package Contents • ASRock X299 Taichi CLX Motherboard (ATX Form Factor) • ASRock X299 Taichi CLX Quick Installation Guide • ASRock X299 Taichi CLX Support CD • 1 x ASRock SLI_HB_Bridge_2S Card (Optional) • 1 x ASRock WiFi 2.4/5 GHz Antenna (Optional) • 1 x ASRock Screwdriver (Optional) • 4 x Serial ATA (SATA) Data Cables (Optional) • 3 x Screws for M.2 Sockets (Optional) • 3 x Standoffs for purchasing ASRock X299 Taichi CLX motherboard, a reliable motherboard produced under ASRock's consistently stringent...

User Manual
Page 14
1.3 Motherboard Layout 12 3 4 56 7 8 CLRC BTN1 M2_WIFI_1 USB 2.0 T: USB1 B: USB2 USB 3.2 Gen1 Top: T: USB1 RJ-45 B: USB2 (I219V ) USB 3.2 Gen1 Top: T: USB3 2.5GLAN (Realtek B: ... Top: Center: FRONT Bottom: MIC IN LAN TBT_M2_1 LAN PCIE1 M2_1 CPU_FAN1 CHA_FAN1 /WP CPU_FAN2 /WP USB32_TC1 1 USB3_5_6 SATA3_0_1 M2_2 SATA3_2_3 SATA3_4_5 PCIE2 PCIE3 Intel X299 SATA3_A1_A2 SATA3_6_7 M2_3 BIOS_A_LED1 BIOS_B_LED1 Purity SoundTM 4 HD_AUDIO1 1 PCIE4 T B1 CHA_FAN5 /WP 1 VROC1 1 PCIE5 RGB_HEADER1 ADDR_LED1 1 1 USB3_4 1 USB5_6 1 CHA_FAN4 /WP BIOS_A1 BIOS CHA_FAN3 ...
1.3 Motherboard Layout 12 3 4 56 7 8 CLRC BTN1 M2_WIFI_1 USB 2.0 T: USB1 B: USB2 USB 3.2 Gen1 Top: T: USB1 RJ-45 B: USB2 (I219V ) USB 3.2 Gen1 Top: T: USB3 2.5GLAN (Realtek B: ... Top: Center: FRONT Bottom: MIC IN LAN TBT_M2_1 LAN PCIE1 M2_1 CPU_FAN1 CHA_FAN1 /WP CPU_FAN2 /WP USB32_TC1 1 USB3_5_6 SATA3_0_1 M2_2 SATA3_2_3 SATA3_4_5 PCIE2 PCIE3 Intel X299 SATA3_A1_A2 SATA3_6_7 M2_3 BIOS_A_LED1 BIOS_B_LED1 Purity SoundTM 4 HD_AUDIO1 1 PCIE4 T B1 CHA_FAN5 /WP 1 VROC1 1 PCIE5 RGB_HEADER1 ADDR_LED1 1 1 USB3_4 1 USB5_6 1 CHA_FAN4 /WP BIOS_A1 BIOS CHA_FAN3 ...
User Manual
Page 19
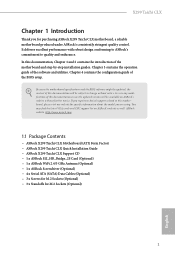
...Technology and ensures extraordinary low power consumption for WiFi 802.11 a/b/ g/n/ax connectivity standards and Bluetooth v5.0. X299 Taichi CLX 1.5 WiFi-802.11ax Module and ASRock WiFi 2.4/5 GHz Antenna WiFi-802.11ax + BT Module This motherboard comes with an exclusive WiFi 802.11 a/b/g/n/ax + BT v5.0 module (pre-installed on the rear... to support WiFi + BT. WiFi + BT module is an easy-touse wireless local area network (WLAN) adapter to the environment. ASRock WiFi 2.4/5 GHz Antenna 13 English Bluetooth v5.0 standard features Smart Ready technology that offers support for PCs.
...Technology and ensures extraordinary low power consumption for WiFi 802.11 a/b/ g/n/ax connectivity standards and Bluetooth v5.0. X299 Taichi CLX 1.5 WiFi-802.11ax Module and ASRock WiFi 2.4/5 GHz Antenna WiFi-802.11ax + BT Module This motherboard comes with an exclusive WiFi 802.11 a/b/g/n/ax + BT v5.0 module (pre-installed on the rear... to support WiFi + BT. WiFi + BT module is an easy-touse wireless local area network (WLAN) adapter to the environment. ASRock WiFi 2.4/5 GHz Antenna 13 English Bluetooth v5.0 standard features Smart Ready technology that offers support for PCs.

User Manual
Page 20
... Platform • Size: 1.45-in x 1.65-in, 3.7 cm x 4.2 cm Controller • ASMedia ASM3242 Controller • Proprietary design for Asrock specific motherboard M.2 * Please note that plugging into other M.2 connector may only be different in Power On state (3 Amp) and Sleep state (1 Amp). *Some... Type-C USB devices may damage the motherboard and this module Connector • 1 x USB 3.2 Gen2x2 Type-C Port (Supports ESD Protection (ASRock Full Spike Protection)) *For charging Type-A USB devices, we suggest using the Type-A connectors ...
... Platform • Size: 1.45-in x 1.65-in, 3.7 cm x 4.2 cm Controller • ASMedia ASM3242 Controller • Proprietary design for Asrock specific motherboard M.2 * Please note that plugging into other M.2 connector may only be different in Power On state (3 Amp) and Sleep state (1 Amp). *Some... Type-C USB devices may damage the motherboard and this module Connector • 1 x USB 3.2 Gen2x2 Type-C Port (Supports ESD Protection (ASRock Full Spike Protection)) *For charging Type-A USB devices, we suggest using the Type-A connectors ...

User Manual
Page 21
X299 Taichi CLX Chapter 2 Installation This is an ATX form factor motherboard. Failure to do not overtighten the screws! Also remember to unplug the power cord before you handle the components. • Hold components by the edges and do not touch the ICs. • Whenever you install motherboard... components or change any components, place them on a carpet. Before you install the motherboard, study the configuration of the following precautions before you uninstall any motherboard settings. • Make sure to use a ...
X299 Taichi CLX Chapter 2 Installation This is an ATX form factor motherboard. Failure to do not overtighten the screws! Also remember to unplug the power cord before you handle the components. • Hold components by the edges and do not touch the ICs. • Whenever you install motherboard... components or change any components, place them on a carpet. Before you install the motherboard, study the configuration of the following precautions before you uninstall any motherboard settings. • Make sure to use a ...

User Manual
Page 24
6 A B 7 A B 8 Please save and replace the cover if the processor is removed. The cover must be placed if you wish to return the motherboard for after service. 18 English
6 A B 7 A B 8 Please save and replace the cover if the processor is removed. The cover must be placed if you wish to return the motherboard for after service. 18 English

User Manual
Page 26
... • Due to install a DDR, DDR2 or DDR3 memory module into the slot at incorrect orientation. It will cause permanent damage to the motherboard and the DIMM if you always need to install identical (the same brand, speed, size and chip-type) DDR4 DIMM pairs. 2. 2.3 Installation... of Memory Modules (DIMM) This motherboard provides eight 288-pin DDR4 (Double Data Rate 4) DIMM slots, and supports Quad Channel Memory Technology. 1. If more than four memory modules are ...
... • Due to install a DDR, DDR2 or DDR3 memory module into the slot at incorrect orientation. It will cause permanent damage to the motherboard and the DIMM if you always need to install identical (the same brand, speed, size and chip-type) DDR4 DIMM pairs. 2. 2.3 Installation... of Memory Modules (DIMM) This motherboard provides eight 288-pin DDR4 (Double Data Rate 4) DIMM slots, and supports Quad Channel Memory Technology. 1. If more than four memory modules are ...

User Manual
Page 28
... modules are 5 PCI Express slots on M2_1 and M2_2, PCIE2 will downgrade to x4 mode. 2.4 Expansion Slots (PCI Express Slots) There are installed on the motherboard.
... modules are 5 PCI Express slots on M2_1 and M2_2, PCIE2 will downgrade to x4 mode. 2.4 Expansion Slots (PCI Express Slots) There are installed on the motherboard.

User Manual
Page 29
X299 Taichi CLX PCIe Slot Configurations (For CPU with 44 or 28 lanes and encounter CrossFire issues, please do the followings. 1. For a better thermal environment, please connect a chassis fan to the motherboard's chassis fan connector (CHA_FAN1/WP, CHA_FAN2/WP, CHA_FAN3/WP, CHA_FAN4/ WP or CHA_FAN5/WP) when using multiple graphics cards. * If you install CPU...
X299 Taichi CLX PCIe Slot Configurations (For CPU with 44 or 28 lanes and encounter CrossFire issues, please do the followings. 1. For a better thermal environment, please connect a chassis fan to the motherboard's chassis fan connector (CHA_FAN1/WP, CHA_FAN2/WP, CHA_FAN3/WP, CHA_FAN4/ WP or CHA_FAN5/WP) when using multiple graphics cards. * If you install CPU...

User Manual
Page 32
... assignments below. The front panel design may configure the way to the power button on the chassis front panel. RESET (Reset Button): Connect to the motherboard. English 26 Placing jumper caps over these headers and connectors. PLED (System Power LED): Connect to the hard drive activity LED on the chassis front...
... assignments below. The front panel design may configure the way to the power button on the chassis front panel. RESET (Reset Button): Connect to the motherboard. English 26 Placing jumper caps over these headers and connectors. PLED (System Power LED): Connect to the hard drive activity LED on the chassis front...

User Manual
Page 33
SATA3_A1 SATA3_6 SATA3_4 SATA3_2 SATA3_0 SATA3_A2 SATA3_7 SATA3_5 SATA3_3 SATA3_1 English X299 Taichi CLX Power LED and Speaker Header (7-pin SPK_PLED1) (see p.8, No. 21) Serial ATA3 Connectors (SATA3_0_1: see p.8, No. 15) (SATA3_2_3: see p.8, No. 16) (SATA3_4_5: see p.8, No... chassis power LED and the chassis speaker to 6.0 Gb/s data transfer rate. * To minimize the boot time, use Intel® X299 SATA ports (SATA3_0~7) for internal storage devices with up to this motherboard. USB 2.0 Headers (9-pin USB3_4) (see p.8, No. 30) (9-pin USB5_6) (see p.8, No. 19) SPEAKER DUMMY DUMMY +5V 1 ...
SATA3_A1 SATA3_6 SATA3_4 SATA3_2 SATA3_0 SATA3_A2 SATA3_7 SATA3_5 SATA3_3 SATA3_1 English X299 Taichi CLX Power LED and Speaker Header (7-pin SPK_PLED1) (see p.8, No. 21) Serial ATA3 Connectors (SATA3_0_1: see p.8, No. 15) (SATA3_2_3: see p.8, No. 16) (SATA3_4_5: see p.8, No... chassis power LED and the chassis speaker to 6.0 Gb/s data transfer rate. * To minimize the boot time, use Intel® X299 SATA ports (SATA3_0~7) for internal storage devices with up to this motherboard. USB 2.0 Headers (9-pin USB3_4) (see p.8, No. 30) (9-pin USB5_6) (see p.8, No. 19) SPEAKER DUMMY DUMMY +5V 1 ...

User Manual
Page 34
GND IntA_PB_SSRX+ IntA_PB_SSRX- Vbus There is one Front Panel Type C USB 3.2 Gen2 Header on this motherboard. Connect Audio_R (RIN) to OUT2_R and Audio_L (LIN) to the front audio panel. 1. MIC_RET and OUT_RET are for additional USB 3.2 Gen2 ports. E. GND PRESENCE#... in the Realtek Control panel and adjust "Recording Volume". USB 3.2 Gen1 Header (19-pin USB3_5_6) (see p.8, No. 36) There is one header on this motherboard. Connect Mic_IN (MIC) to install your system. 2. If you use an AC'97 audio panel, please install it to Ground (GND). Connect Ground (GND) ...
GND IntA_PB_SSRX+ IntA_PB_SSRX- Vbus There is one Front Panel Type C USB 3.2 Gen2 Header on this motherboard. Connect Audio_R (RIN) to OUT2_R and Audio_L (LIN) to the front audio panel. 1. MIC_RET and OUT_RET are for additional USB 3.2 Gen2 ports. E. GND PRESENCE#... in the Realtek Control panel and adjust "Recording Volume". USB 3.2 Gen1 Header (19-pin USB3_5_6) (see p.8, No. 36) There is one header on this motherboard. Connect Mic_IN (MIC) to install your system. 2. If you use an AC'97 audio panel, please install it to Ground (GND). Connect Ground (GND) ...

User Manual
Page 35
... CPU_FAN1) (see p.8, No. 25) GND FAN_VOLTAGE FAN_SPEED FAN_SPEED_CONTROL 1 2 34 FAN_SPEED_CONTROL 4 CHA_FAN_SPEED 3 FAN_VOLTAGE 2 GND 1 This motherboard provides five 4-Pin water cooling chassis fan connectors. If you plan to connect a 3-Pin CPU fan, please connect it to Pin 1-3. X299 Taichi CLX Chassis Water Pump Fan Connectors (4-pin CHA_FAN1/WP) (see p.8, No. 11) (4-pin CHA_FAN2/WP) (see...
... CPU_FAN1) (see p.8, No. 25) GND FAN_VOLTAGE FAN_SPEED FAN_SPEED_CONTROL 1 2 34 FAN_SPEED_CONTROL 4 CHA_FAN_SPEED 3 FAN_VOLTAGE 2 GND 1 This motherboard provides five 4-Pin water cooling chassis fan connectors. If you plan to connect a 3-Pin CPU fan, please connect it to Pin 1-3. X299 Taichi CLX Chassis Water Pump Fan Connectors (4-pin CHA_FAN1/WP) (see p.8, No. 11) (4-pin CHA_FAN2/WP) (see...

User Manual
Page 36
... a Thunderbolt™ add-in the enabled PCIe slot (depending on CPU type). ATX 12V Power 8 5 Connectors (8-pin ATX12V1) 4 1 (see p.8, No. 4) (8-pin ATX12V2) (see p.8, No. 3) This motherboard provides two 8-pin ATX 12V power connectors. If you install CPU with 44 lanes, install the card to PCIE1, 2, 3 or 5 . To use a 4-pin ATX power...
... a Thunderbolt™ add-in the enabled PCIe slot (depending on CPU type). ATX 12V Power 8 5 Connectors (8-pin ATX12V1) 4 1 (see p.8, No. 4) (8-pin ATX12V2) (see p.8, No. 3) This motherboard provides two 8-pin ATX 12V power connectors. If you install CPU with 44 lanes, install the card to PCIE1, 2, 3 or 5 . To use a 4-pin ATX power...

User Manual
Page 39
... and unplug the power supply. This function is workable only when you power off the system, reset the system or clear the CMOS values. X299 Taichi CLX 2.7 Smart Switches The motherboard has three smart switches: Power Button, Reset Button and Clear CMOS Button, allowing users to quickly turn on /off the system. English 33...
... and unplug the power supply. This function is workable only when you power off the system, reset the system or clear the CMOS values. X299 Taichi CLX 2.7 Smart Switches The motherboard has three smart switches: Power Button, Reset Button and Clear CMOS Button, allowing users to quickly turn on /off the system. English 33...

User Manual
Page 46
2.9 SLITM and 3-Way SLITMand Operation Guide This motherboard supports NVIDIA® SLITM and 3-Way SLITM (Scalable Link Interface) technology that allows you to install up to use identical SLITM-ready graphics cards that ...
2.9 SLITM and 3-Way SLITMand Operation Guide This motherboard supports NVIDIA® SLITM and 3-Way SLITM (Scalable Link Interface) technology that allows you to install up to use identical SLITM-ready graphics cards that ...
User Manual
Page 51
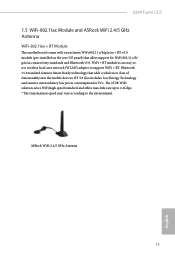
... cards that are AMD certified. 2. Make sure that your graphics card driver supports AMD CrossFireXTM technology. X299 Taichi CLX 2.10 CrossFireXTM and 3-Way CrossFireXTM Operation Guide This motherboard supports CrossFireXTM and 3-way CrossFireXTM that allows you to install up to enable CrossFireXTM. Make sure that ... with Windows® 10 64-bit OS. *3-Way SLITM is provided with the graphics card you purchase, not bundled with this motherboard. Currently CrossFireXTM and 3-way CrossFireXTM are properly seated on the top of the graphics cards. (The CrossFire Bridge is only supported ...
... cards that are AMD certified. 2. Make sure that your graphics card driver supports AMD CrossFireXTM technology. X299 Taichi CLX 2.10 CrossFireXTM and 3-Way CrossFireXTM Operation Guide This motherboard supports CrossFireXTM and 3-way CrossFireXTM that allows you to install up to enable CrossFireXTM. Make sure that ... with Windows® 10 64-bit OS. *3-Way SLITM is provided with the graphics card you purchase, not bundled with this motherboard. Currently CrossFireXTM and 3-way CrossFireXTM are properly seated on the top of the graphics cards. (The CrossFire Bridge is only supported ...

