
Intel Smart Response Installation Guide
Page 1
... both the HDD you intend to accelerate AND the SSD in RAID ROM. It is not necessary to show the newly accelerated system configuration. * Intel® will update the new version RST driver in Icon tray, lower right-hand corner of the screen. 4. For the new version RST driver..., please check our website for the latest information: http://www.asrock.com * Before you use Enhanced or Maximized Mode. 6. UI setup instruction: 1. Once open RST GUI from either Start Menu or by step instructions below...
... both the HDD you intend to accelerate AND the SSD in RAID ROM. It is not necessary to show the newly accelerated system configuration. * Intel® will update the new version RST driver in Icon tray, lower right-hand corner of the screen. 4. For the new version RST driver..., please check our website for the latest information: http://www.asrock.com * Before you use Enhanced or Maximized Mode. 6. UI setup instruction: 1. Once open RST GUI from either Start Menu or by step instructions below...
Intel Smart Response Installation Guide
Page 2
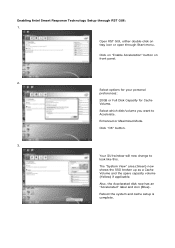
..., either double-click on front panel. 2. Your GUI window will now change to Accelerate. Select which disk/volume you want to look like this. Enabling Intel Smart Response Technology Setup through Start menu. The "System View" area (Green) now shows the SSD broken up as a Cache Volume and the spare capacity...
..., either double-click on front panel. 2. Your GUI window will now change to Accelerate. Select which disk/volume you want to look like this. Enabling Intel Smart Response Technology Setup through Start menu. The "System View" area (Green) now shows the SSD broken up as a Cache Volume and the spare capacity...

Intel Smart Response Installation Guide
Page 3
This could take a few seconds or even a few minutes depending on the "Accelerate" tab. Disabling Intel Smart Response Technology Setup through RST GUI: 1. Smart Response Technology is now DISABLED and all data is now DISABLED. Open RST GUI and click on how much modified data there was. Click on the "Disable Acceleration" button. 2. A pop-up window will appear, click "Yes" RST Cache is guaranteed to be written to the HDD.
This could take a few seconds or even a few minutes depending on the "Accelerate" tab. Disabling Intel Smart Response Technology Setup through RST GUI: 1. Smart Response Technology is now DISABLED and all data is now DISABLED. Open RST GUI and click on how much modified data there was. Click on the "Disable Acceleration" button. 2. A pop-up window will appear, click "Yes" RST Cache is guaranteed to be written to the HDD.
Intel Small Business Advantage Installation Guide
Page 1
Small Business Advantage Applications 5 3.1 Energy Saver 5 3.2 PC Health Center 6 3.3 Software Monitor 7 3.4 USB Blocker 8 3.5 Data Backup & Restore 9 1 Introduction of Small Business Advantage 2 2. Installing Small Business Advantage 3 3. Guide to Intel® Small Business Advantage Installation and Applications 1.
Small Business Advantage Applications 5 3.1 Energy Saver 5 3.2 PC Health Center 6 3.3 Software Monitor 7 3.4 USB Blocker 8 3.5 Data Backup & Restore 9 1 Introduction of Small Business Advantage 2 2. Installing Small Business Advantage 3 3. Guide to Intel® Small Business Advantage Installation and Applications 1.

Intel Small Business Advantage Installation Guide
Page 2
There are applications including Software Monitor, PC Health Center, Data Backup & Restore, Energy Saver and USB Blocker. 2 Introduction of Small Business Advantage Intel® Small Business Advantage is a customizable platform integrated with IT tools, which helps maximize employee productivity, PC performance, and data security. 1.
There are applications including Software Monitor, PC Health Center, Data Backup & Restore, Energy Saver and USB Blocker. 2 Introduction of Small Business Advantage Intel® Small Business Advantage is a customizable platform integrated with IT tools, which helps maximize employee productivity, PC performance, and data security. 1.
Intel Small Business Advantage Installation Guide
Page 9
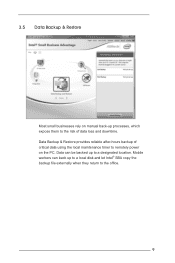
Data can back up to the risk of data loss and downtime. Mobile workers can be backed up to a local disk and let Intel® SBA copy the backup file externally when they return to the office. 9 Data Backup & Restore provides reliable after-hours backup of critical data using the local maintenance timer to remotely power on manual back-up processes, which expose them to a designated location. 3.5 Data Backup & Restore Most small businesses rely on the PC.
Data can back up to the risk of data loss and downtime. Mobile workers can be backed up to a local disk and let Intel® SBA copy the backup file externally when they return to the office. 9 Data Backup & Restore provides reliable after-hours backup of critical data using the local maintenance timer to remotely power on manual back-up processes, which expose them to a designated location. 3.5 Data Backup & Restore Most small businesses rely on the PC.
RAID Installation Guide
Page 1
...-bit / 7 / 7 64-bit With RAID Functions 7 2.4 Setting the BIOS RAID Items 8 2.5 Configuring a RAID array 8 2.5.1 Configuring a RAID array Using UEFI Setup Utility....... 8 2.5.2 Configuring a RAID array Using Intel RAID BIOS....... 13 3. Installing Windows® on a HDD larger than 2TB in RAID mode 17 4. Guide to SATA Hard Disks Installation 2 1.1 Serial ATA (SATA) Hard...
...-bit / 7 / 7 64-bit With RAID Functions 7 2.4 Setting the BIOS RAID Items 8 2.5 Configuring a RAID array 8 2.5.1 Configuring a RAID array Using UEFI Setup Utility....... 8 2.5.2 Configuring a RAID array Using Intel RAID BIOS....... 13 3. Installing Windows® on a HDD larger than 2TB in RAID mode 17 4. Guide to SATA Hard Disks Installation 2 1.1 Serial ATA (SATA) Hard...
RAID Installation Guide
Page 2
1. You may install SATA hard disks on SATA ports. 2 Please read the RAID configurations in this guide carefully according to create RAID on this motherboard for internal storage devices. This section will guide you how to the Intel southbridge chipset that your motherboard adopts. Guide to SATA Hard Disks Installation 1.1 Serial ATA (SATA) Hard Disks Installation Intel chipset supports Serial ATA (SATA) hard disks with RAID functions, including RAID 0, RAID 1, RAID 5, RAID 10 and Intel Rapid Storage.
1. You may install SATA hard disks on SATA ports. 2 Please read the RAID configurations in this guide carefully according to create RAID on this motherboard for internal storage devices. This section will guide you how to the Intel southbridge chipset that your motherboard adopts. Guide to SATA Hard Disks Installation 1.1 Serial ATA (SATA) Hard Disks Installation Intel chipset supports Serial ATA (SATA) hard disks with RAID functions, including RAID 0, RAID 1, RAID 5, RAID 10 and Intel Rapid Storage.
RAID Installation Guide
Page 3
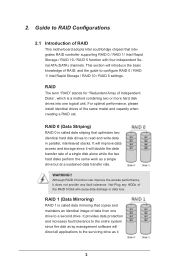
... Array of Independent Disks", which is a method combining two or more hard disk drives into one drive to configure RAID 0 / RAID 1/ Intel Rapid Storage / RAID 10 / RAID 5 settings. RAID 0 (Data Striping) RAID 0 is called data striping that copies and maintains an ...identical image of RAID This motherboard adopts Intel southbridge chipset that integrates RAID controller supporting RAID 0 / RAID 1/ Intel Rapid Storage / RAID 10 / RAID 5 function with four independent Serial ATA (SATA) channels. Although RAID ...
... Array of Independent Disks", which is a method combining two or more hard disk drives into one drive to configure RAID 0 / RAID 1/ Intel Rapid Storage / RAID 10 / RAID 5 settings. RAID 0 (Data Striping) RAID 0 is called data striping that copies and maintains an ...identical image of RAID This motherboard adopts Intel southbridge chipset that integrates RAID controller supporting RAID 0 / RAID 1/ Intel Rapid Storage / RAID 10 / RAID 5 function with four independent Serial ATA (SATA) channels. Although RAID ...
RAID Installation Guide
Page 4
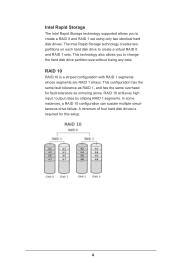
This configuration has the same fault tolerance as RAID 1, and has the same overhead for this setup. 4 The Intel Rapid Storage technology creates two partitions on each hard disk drive to change the hard disk drive partition size without losing any data...10 achieves high input / output rates by striping RAID 1 segments. In some instances, a RAID 10 configuration can sustain multiple simultaneous drive failure. Intel Rapid Storage The Intel Rapid Storage technology supported allows you to create a virtual RAID 0 and RAID 1 sets. RAID 10 RAID 10 is required for fault-tolerance as...
This configuration has the same fault tolerance as RAID 1, and has the same overhead for this setup. 4 The Intel Rapid Storage technology creates two partitions on each hard disk drive to change the hard disk drive partition size without losing any data...10 achieves high input / output rates by striping RAID 1 segments. In some instances, a RAID 10 configuration can sustain multiple simultaneous drive failure. Intel Rapid Storage The Intel Rapid Storage technology supported allows you to create a virtual RAID 0 and RAID 1 sets. RAID 10 RAID 10 is required for fault-tolerance as...
RAID Installation Guide
Page 7
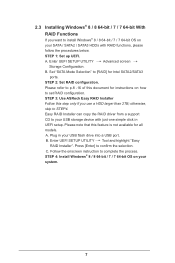
... Selection" to install Windows® 8 / 8 64-bit / 7 / 7 64-bit OS on your USB flash drive into a USB port B. STEP 3: Use ASRock Easy RAID Installer Follow this feature is not available for Intel SATA2/SATA3 ports. Easy RAID Installer can copy the RAID driver from a support CD to your SATA / SATA2 / SATA3 HDDs...
... Selection" to install Windows® 8 / 8 64-bit / 7 / 7 64-bit OS on your USB flash drive into a USB port B. STEP 3: Use ASRock Easy RAID Installer Follow this feature is not available for Intel SATA2/SATA3 ports. Easy RAID Installer can copy the RAID driver from a support CD to your SATA / SATA2 / SATA3 HDDs...

RAID Installation Guide
Page 8
... the BIOS before setting your change before you exit BIOS setup. 2.5 Configuring a RAID array You can configure a RAID array using either UEFI Setup Utility or Intel® RAID BIOS setup utility. 2.5.1 Configuring a RAID array Using UEFI Setup Utility STEP 1: For Windows® 8: Go to UEFI SETUP UTILITY Boot to set "Fast...
... the BIOS before setting your change before you exit BIOS setup. 2.5 Configuring a RAID array You can configure a RAID array using either UEFI Setup Utility or Intel® RAID BIOS setup utility. 2.5.1 Configuring a RAID array Using UEFI Setup Utility STEP 1: For Windows® 8: Go to UEFI SETUP UTILITY Boot to set "Fast...

RAID Installation Guide
Page 9
STEP 2: Enter Intel(R) Rapid Storage Technology in Advanced page. STEP 3: Select the option Create RAID Volume and press . 9
STEP 2: Enter Intel(R) Rapid Storage Technology in Advanced page. STEP 3: Select the option Create RAID Volume and press . 9
RAID Installation Guide
Page 13
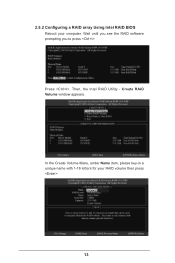
Create RAID Volume window appears. Wait until you see the RAID software prompting you to press . Then, the Intel RAID Utility - Volume0 13 Press . 2.5.2 Configuring a RAID array Using Intel RAID BIOS Reboot your RAID volume then press . In the Create Volume Menu, under Name item, please key-in a unique name with 1-16 letters for your computer.
Create RAID Volume window appears. Wait until you see the RAID software prompting you to press . Then, the Intel RAID Utility - Volume0 13 Press . 2.5.2 Configuring a RAID array Using Intel RAID BIOS Reboot your RAID volume then press . In the Create Volume Menu, under Name item, please key-in a unique name with 1-16 letters for your computer.
RAID Installation Guide
Page 18
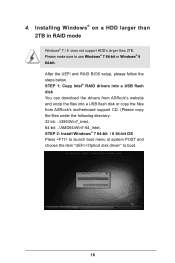
STEP 1: Copy Intel® RAID drivers into a USB flash disk You can download the drivers from ASRock's website and unzip the files into a USB flash disk or copy the files from ASRock's motherboard support CD. (Please copy the files under the following directory: 32 bit: ..\i386\Win7_Intel.. 64-bit: ..\AMD64\Win7-64_Intel.. STEP 2: Install...
STEP 1: Copy Intel® RAID drivers into a USB flash disk You can download the drivers from ASRock's website and unzip the files into a USB flash disk or copy the files from ASRock's motherboard support CD. (Please copy the files under the following directory: 32 bit: ..\i386\Win7_Intel.. 64-bit: ..\AMD64\Win7-64_Intel.. STEP 2: Install...
Intel Rapid Storage Guide
Page 1
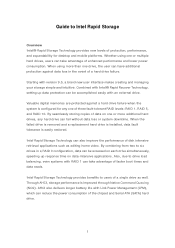
...drives, any hard drive can also improve the performance of disk intensive retrieval applications such as well. Intel Rapid Storage Technology provides benefits to Intel Rapid Storage Overview Intel® Rapid Storage Technology provides new levels of protection, performance, and expandability for any one or ...By seamlessly storing copies of data on data-intensive applications. AHCI also delivers longer battery life with an external drive. Intel Rapid Storage Technology can fail without data loss or system downtime. Guide to users of a single drive as editing home video. ...
...drives, any hard drive can also improve the performance of disk intensive retrieval applications such as well. Intel Rapid Storage Technology provides benefits to Intel Rapid Storage Overview Intel® Rapid Storage Technology provides new levels of protection, performance, and expandability for any one or ...By seamlessly storing copies of data on data-intensive applications. AHCI also delivers longer battery life with an external drive. Intel Rapid Storage Technology can fail without data loss or system downtime. Guide to users of a single drive as editing home video. ...
Intel Rapid Storage Guide
Page 2
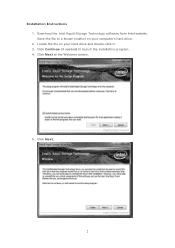
Locate the file on your hard drive and double-click it. 3. Click Continue (if needed) to a known location on your computer's hard drive. 2. Click Next. 2 Click Next at the Welcome screen. 5. Installation Instructions 1. Save the file to launch the installation program. 4. Download the Intel Rapid Storage Technology software from Intel website.
Locate the file on your hard drive and double-click it. 3. Click Continue (if needed) to a known location on your computer's hard drive. 2. Click Next. 2 Click Next at the Welcome screen. 5. Installation Instructions 1. Save the file to launch the installation program. 4. Download the Intel Rapid Storage Technology software from Intel website.

Intel Rapid Storage Guide
Page 5
Restart your system. You will find the "Intel Rapid Storage Technology" icon on the Windows task bar. 5 10.
Restart your system. You will find the "Intel Rapid Storage Technology" icon on the Windows task bar. 5 10.
Intel Rapid Storage Guide
Page 6
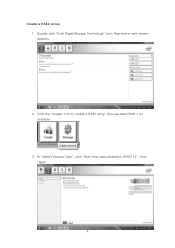
Click the "Create" icon to create a RAID array. In "Select Volume Type", click "Real-time data protection (RAID 1)". Here we take RAID 1 for example. 3. Double-click "Intel Rapid Storage Technology" icon, then below main screen appears. 2. Create a RAID Array 1. Click "Next". 6
Click the "Create" icon to create a RAID array. In "Select Volume Type", click "Real-time data protection (RAID 1)". Here we take RAID 1 for example. 3. Double-click "Intel Rapid Storage Technology" icon, then below main screen appears. 2. Create a RAID Array 1. Click "Next". 6

Intel Rapid Storage Guide
Page 12
...Enable RAID in System BIOS Use the instructions included with your motherboard to save the BIOS settings and exit the BIOS Setup program. When the Intel Rapid Storage Technology option ROM status screen appears during operating system setup. Create a RAID Volume Use the following steps to select the RAID level ...RAID option must be enabled in the system BIOS, a RAID volume must be created, and the F6 installation method must be used to load the Intel® Rapid Storage Technology driver during POST, press Ctrl and i at the same time to enter the option ROM user interface. 2. Click the ...
...Enable RAID in System BIOS Use the instructions included with your motherboard to save the BIOS settings and exit the BIOS Setup program. When the Intel Rapid Storage Technology option ROM status screen appears during operating system setup. Create a RAID Volume Use the following steps to select the RAID level ...RAID option must be enabled in the system BIOS, a RAID volume must be created, and the F6 installation method must be used to load the Intel® Rapid Storage Technology driver during POST, press Ctrl and i at the same time to enter the option ROM user interface. 2. Click the ...


