Intel Rapid Storage Guide
Page 6
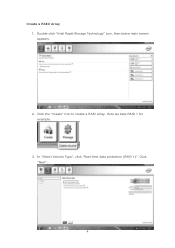
In "Select Volume Type", click "Real-time data protection (RAID 1)". Here we take RAID 1 for example. 3. Click "Next". 6 Click the "Create" icon to create a RAID array. Double-click "Intel Rapid Storage Technology" icon, then below main screen appears. 2. Create a RAID Array 1.
In "Select Volume Type", click "Real-time data protection (RAID 1)". Here we take RAID 1 for example. 3. Click "Next". 6 Click the "Create" icon to create a RAID array. Double-click "Intel Rapid Storage Technology" icon, then below main screen appears. 2. Create a RAID Array 1.

User Manual
Page 4
... Windows® 7 / 7 64-bit / VistaTM / VistaTM 64-bit Without RAID Functions 43 3 UEFI SETUP UTILITY 44 3.1 Introduction 44 3.1.1 UEFI Menu Bar 44 3.1.2 Navigation Keys 45 3.2 Main Screen 45 3.3 Advanced Screen 46 3.3.1 CPU Configuration 47 3.3.2 Integrated Clock Chip Configuration 49 3.3.3 DRAM Configuration 50 3.3.4 North Bridge Con...
... Windows® 7 / 7 64-bit / VistaTM / VistaTM 64-bit Without RAID Functions 43 3 UEFI SETUP UTILITY 44 3.1 Introduction 44 3.1.1 UEFI Menu Bar 44 3.1.2 Navigation Keys 45 3.2 Main Screen 45 3.3 Advanced Screen 46 3.3.1 CPU Configuration 47 3.3.2 Integrated Clock Chip Configuration 49 3.3.3 DRAM Configuration 50 3.3.4 North Bridge Con...

User Manual
Page 26
... to the connector and match the black wire to the CPU fan connector on when the system is operating. Though this header. A front panel module mainly consists of power switch, reset switch, power LED, hard drive activity LED, speaker and etc. The LED is off ).
... to the connector and match the black wire to the CPU fan connector on when the system is operating. Though this header. A front panel module mainly consists of power switch, reset switch, power LED, hard drive activity LED, speaker and etc. The LED is off ).

User Manual
Page 44
... may not exactly match what you see on your screen. 3.1.1 UEFI Menu Bar The top of the screen has a menu bar with the following selections: Main To set up the system time/date information Advanced To set up the advanced UEFI features H/W Monitor To display current hardware status Boot To set...
... may not exactly match what you see on your screen. 3.1.1 UEFI Menu Bar The top of the screen has a menu bar with the following selections: Main To set up the system time/date information Advanced To set up the advanced UEFI features H/W Monitor To display current hardware status Boot To set...

User Manual
Page 45
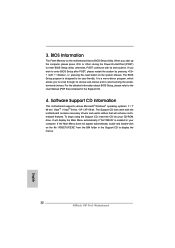
To change option for the selected items To bring up or down to the Exit Screen or exit the current screen 3.2 Main Screen When you enter the UEFI SETUP UTILITY, the Main screen will appear and display the system overview. 45 3.1.2 Navigation Keys Please check the following table for all the settings To...
To change option for the selected items To bring up or down to the Exit Screen or exit the current screen 3.2 Main Screen When you enter the UEFI SETUP UTILITY, the Main screen will appear and display the system overview. 45 3.1.2 Navigation Keys Please check the following table for all the settings To...
User Manual
Page 63
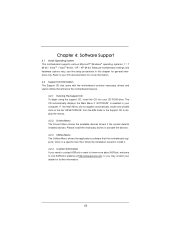
...documentation for general reference only. Please install the necessary drivers to visit ASRock's website at http://www.asrock.com; The CD automatically displays the Main Menu if "AUTORUN" is enabled in this chapter for more about ASRock, welcome to activate the devices. 4.2.3 Utilities Menu The Utilities Menu ... CD To begin using the support CD, insert the CD into your dealer for further information. 63 or you need to contact ASRock or want to your computer. Refer to know more information. 4.2 Support CD Information The Support CD that came with the motherboard contains...
...documentation for general reference only. Please install the necessary drivers to visit ASRock's website at http://www.asrock.com; The CD automatically displays the Main Menu if "AUTORUN" is enabled in this chapter for more about ASRock, welcome to activate the devices. 4.2.3 Utilities Menu The Utilities Menu ... CD To begin using the support CD, insert the CD into your dealer for further information. 63 or you need to contact ASRock or want to your computer. Refer to know more information. 4.2 Support CD Information The Support CD that came with the motherboard contains...

Quick Installation Guide
Page 22
.... The LED is on this header, make sure the wire assignments and the pin assign-ments are matched correctly. Pin 1-3 Connected 3-Pin Fan Installation 22 ASRock P67 Pro3 Motherboard Power LED Header (3-pin PLED1) (see p.2 No. 11) 1 PLEDPLED+ PLED+ Chassis and Power Fan Connectors (4-pin CHA_FAN1) (see p.2 No. 27) FAN_SPEED_CONTROL GND +12V...4-Pin CPU fan (Quiet Fan) support, the 3-Pin CPU fan still can work successfully even without the fan speed control function. A front panel module mainly consists of power switch, reset switch, power LED, hard drive activity LED, speaker and etc.
.... The LED is on this header, make sure the wire assignments and the pin assign-ments are matched correctly. Pin 1-3 Connected 3-Pin Fan Installation 22 ASRock P67 Pro3 Motherboard Power LED Header (3-pin PLED1) (see p.2 No. 11) 1 PLEDPLED+ PLED+ Chassis and Power Fan Connectors (4-pin CHA_FAN1) (see p.2 No. 27) FAN_SPEED_CONTROL GND +12V...4-Pin CPU fan (Quiet Fan) support, the 3-Pin CPU fan still can work successfully even without the fan speed control function. A front panel module mainly consists of power switch, reset switch, power LED, hard drive activity LED, speaker and etc.
Quick Installation Guide
Page 32
...that will display the Main Menu automatically if "AUTORUN" is enabled in your CD-ROM drive. To begin using the Support CD, insert the CD into your computer. It will enhance motherboard features. It is designed to display the menus. 32 ASRock P67 Pro3 Motherboard English For the ...bit. BIOS Information The Flash Memory on the file "ASSETUP.EXE" from the BIN folder in the Support CD. 4. If the Main Menu does not appear automatically, locate and double-click on the motherboard stores BIOS Setup Utility. otherwise, POST continues with the motherboard contains ...
...that will display the Main Menu automatically if "AUTORUN" is enabled in your CD-ROM drive. To begin using the Support CD, insert the CD into your computer. It will enhance motherboard features. It is designed to display the menus. 32 ASRock P67 Pro3 Motherboard English For the ...bit. BIOS Information The Flash Memory on the file "ASSETUP.EXE" from the BIN folder in the Support CD. 4. If the Main Menu does not appear automatically, locate and double-click on the motherboard stores BIOS Setup Utility. otherwise, POST continues with the motherboard contains ...

RAID Installation Guide
Page 11
... BIOS setup. 2.5 Configuring the Intel RAID BIOS Reboot your computer. Select the option Create RAID Volume and press . 11 Highlight Advanced and press , then the main interface of BIOS setup utility will appear.
... BIOS setup. 2.5 Configuring the Intel RAID BIOS Reboot your computer. Select the option Create RAID Volume and press . 11 Highlight Advanced and press , then the main interface of BIOS setup utility will appear.