RAID Installation Guide
Page 1
Guide to SATA Hard Disks Installation 2 1.1 Serial ATA (SATA) Hard Disks Installation 2 2. Guide to SATA Hard Disks Installation and RAID Configuration 1. Guide to RAID Configurations 3 2.1 Introduction of RAID 3 2.2 RAID Configuration Precautions 5 2.3 Installing Windows® XP / XP 64-bit / VistaTM / VistaTM 64-bit With RAID Functions 6 2.4 Setting the BIOS RAID Items 11 2.5 Configuring the Intel RAID BIOS 11 2.6 Deleting RAID Volume 15 1
Guide to SATA Hard Disks Installation 2 1.1 Serial ATA (SATA) Hard Disks Installation 2 2. Guide to SATA Hard Disks Installation and RAID Configuration 1. Guide to RAID Configurations 3 2.1 Introduction of RAID 3 2.2 RAID Configuration Precautions 5 2.3 Installing Windows® XP / XP 64-bit / VistaTM / VistaTM 64-bit With RAID Functions 6 2.4 Setting the BIOS RAID Items 11 2.5 Configuring the Intel RAID BIOS 11 2.6 Deleting RAID Volume 15 1

RAID Installation Guide
Page 6
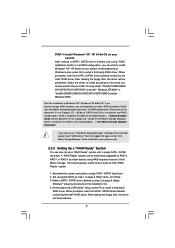
...device. Please refer to the document in the Support CD, "Guide to boot your SATA / SATAII HDDs with RAID functions, please follow below steps. Enter BIOS SETUP UTILITY Advanced screen IDE Configuration. A. B. C. WARNING! STEP 1: Set up , press key, and then a window for proper configuration. A. Set... into the floppy drive, and press . Then you want to [Enhanced], and then in the folder at the beginning of system boot-up BIOS. Start to [RAID]. Please insert a floppy diskette into the floppy drive. E. STEP 3: Use "RAID Installation Guide" to set the option...
...device. Please refer to the document in the Support CD, "Guide to boot your SATA / SATAII HDDs with RAID functions, please follow below steps. Enter BIOS SETUP UTILITY Advanced screen IDE Configuration. A. B. C. WARNING! STEP 1: Set up , press key, and then a window for proper configuration. A. Set... into the floppy drive, and press . Then you want to [Enhanced], and then in the folder at the beginning of system boot-up BIOS. Start to [RAID]. Please insert a floppy diskette into the floppy drive. E. STEP 3: Use "RAID Installation Guide" to set the option...
RAID Installation Guide
Page 7
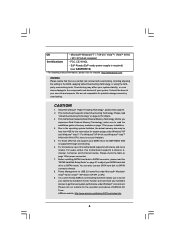
... Ready" system. 1. A "RAID Ready" system can be installed to your system as well. 2.3.2 Setting Up a "RAID Ready" System You can start to set up system BIOS as step 2 of page 6. Assemble the system and attach a single SATA / SATAII hard drive. 2. When prompted, insert the SATA / SATAII driver diskette containing the Intel...
... Ready" system. 1. A "RAID Ready" system can be installed to your system as well. 2.3.2 Setting Up a "RAID Ready" System You can start to set up system BIOS as step 2 of page 6. Assemble the system and attach a single SATA / SATAII hard drive. 2. When prompted, insert the SATA / SATAII driver diskette containing the Intel...

RAID Installation Guide
Page 9
...install Windows® VistaTM / VistaTM 64-bit OS on your SATA / SATAII HDDs with RAID functions, please follow below steps. Enter BIOS SETUP UTILITY Advanced screen IDE Configuration. 2.3.4 Installing Windows® VistaTM / VistaTM 64-bit With RAID Functions If you want to install ...; VistaTM / VistaTM 64-bit on your system. STEP 1: Set up BIOS. Set "SATAII Configuration" to [Enhanced], and then in the following path: .. \ Intel Matrix Storage Manager Information 9 A. page, please insert the ASRock Support CD into the optical drive again to continue the installation. STEP ...
...install Windows® VistaTM / VistaTM 64-bit OS on your SATA / SATAII HDDs with RAID functions, please follow below steps. Enter BIOS SETUP UTILITY Advanced screen IDE Configuration. 2.3.4 Installing Windows® VistaTM / VistaTM 64-bit With RAID Functions If you want to install ...; VistaTM / VistaTM 64-bit on your system. STEP 1: Set up BIOS. Set "SATAII Configuration" to [Enhanced], and then in the following path: .. \ Intel Matrix Storage Manager Information 9 A. page, please insert the ASRock Support CD into the optical drive again to continue the installation. STEP ...

RAID Installation Guide
Page 11
.... Boot your RAID configuration. Wait until you see the RAID software prompting you exit BIOS setup. 2.5 Configuring the Intel RAID BIOS Reboot your change before setting your system, and press key to enter BIOS setup utility. Select the option Create RAID Volume and press . 11 Press . 2.4... Setting the BIOS RAID Items After installing the hard disk drives, please set the option Configure SATA as to [RAID]. Create...
.... Boot your RAID configuration. Wait until you see the RAID software prompting you exit BIOS setup. 2.5 Configuring the Intel RAID BIOS Reboot your change before setting your system, and press key to enter BIOS setup utility. Select the option Create RAID Volume and press . 11 Press . 2.4... Setting the BIOS RAID Items After installing the hard disk drives, please set the option Configure SATA as to [RAID]. Create...

RAID Installation Guide
Page 15
Please note that you want to create extra RAID partition, please use the RAID utility under Windows environment to configure RAID functions after you install OS. 2.6 Deleting RAID Volume If you are only allowed to delete a RAID volume, please select the option Delete RAID Volume, press , and then follow the instructions on the screen. 15 If you want to create one RAID partition at a time under BIOS RAID environment.
Please note that you want to create extra RAID partition, please use the RAID utility under Windows environment to configure RAID functions after you install OS. 2.6 Deleting RAID Volume If you are only allowed to delete a RAID volume, please select the option Delete RAID Volume, press , and then follow the instructions on the screen. 15 If you want to create one RAID partition at a time under BIOS RAID environment.

User Manual
Page 4
2.18.2 Installing Windows® VistaTM / VistaTM 64-bit Without RAID Functions 41 2.19 Untied Overclocking Technology 42 3 BIOS SETUP UTILITY 43 3.1 Introduction 43 3.1.1 BIOS Menu Bar 43 3.1.2 Navigation Keys 44 3.2 Main Screen 44 3.3 OC Tweaker Screen 46 3.4 Advanced Screen 50 3.4.1 CPU Configuration 51 3.4.2 Chipset Configuration 53 3.4.3 ACPI Configuration 54 3.4.4 ...
2.18.2 Installing Windows® VistaTM / VistaTM 64-bit Without RAID Functions 41 2.19 Untied Overclocking Technology 42 3 BIOS SETUP UTILITY 43 3.1 Introduction 43 3.1.1 BIOS Menu Bar 43 3.1.2 Navigation Keys 44 3.2 Main Screen 44 3.3 OC Tweaker Screen 46 3.4 Advanced Screen 50 3.4.1 CPU Configuration 51 3.4.2 Chipset Configuration 53 3.4.3 ACPI Configuration 54 3.4.4 ...

User Manual
Page 5
...: 12.0-in x 8.3-in, 30.5 cm x 21.1 cm) ASRock P55DE Pro / P55DE3 Quick Installation Guide ASRock P55DE Pro / P55DE3 Support CD 2 x Serial ATA (SATA) Data Cables (Optional) 1 x I/O Panel Shield 5 Because the motherboard specifications and the BIOS software might be subject to change without further notice. ASRock website http://www.asrock.com If you require technical support related to...
...: 12.0-in x 8.3-in, 30.5 cm x 21.1 cm) ASRock P55DE Pro / P55DE3 Quick Installation Guide ASRock P55DE Pro / P55DE3 Support CD 2 x Serial ATA (SATA) Data Cables (Optional) 1 x I/O Panel Shield 5 Because the motherboard specifications and the BIOS software might be subject to change without further notice. ASRock website http://www.asrock.com If you require technical support related to...
User Manual
Page 8
... 9. For Windows® XP 64-bit and Windows® VistaTM 64-bit with overclocking, including adjusting the setting in the BIOS, applying Untied Overclocking Technology, or using the thirdparty overclocking tools. Please check the table on page 42 for USB 2.0 works ... VistaTM. You can also connect SATA hard disk to get the best system performance under Windows® environment. FCC, CE, WHQL - ASRock website: http://www.asrock.com/feature/OCTuner/index.htm 8 This motherboard supports Untied Overclocking Technology. Power Management for details. 3. Microsoft® Windows® 7 ...
... 9. For Windows® XP 64-bit and Windows® VistaTM 64-bit with overclocking, including adjusting the setting in the BIOS, applying Untied Overclocking Technology, or using the thirdparty overclocking tools. Please check the table on page 42 for USB 2.0 works ... VistaTM. You can also connect SATA hard disk to get the best system performance under Windows® environment. FCC, CE, WHQL - ASRock website: http://www.asrock.com/feature/OCTuner/index.htm 8 This motherboard supports Untied Overclocking Technology. Power Management for details. 3. Microsoft® Windows® 7 ...

User Manual
Page 9
... over-clocking. Although this utility, you can save your BIOS only in Flash ROM. For EuP ready power supply selection, we recommend you can update your overclocking record under 100 mA current consumption. ASRock website: http://www.asrock.com/feature/IES/index.html 11. ASRock Instant Flash is capable of the completed system shall...
... over-clocking. Although this utility, you can save your BIOS only in Flash ROM. For EuP ready power supply selection, we recommend you can update your overclocking record under 100 mA current consumption. ASRock website: http://www.asrock.com/feature/IES/index.html 11. ASRock Instant Flash is capable of the completed system shall...
User Manual
Page 11
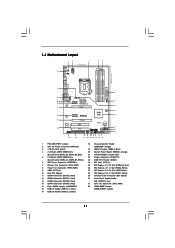
... Bottom: MIC IN CD1 LAN PHY HD_AUDIO1 PWR_FAN1 CPU_FAN1 PCIE1 CrossFireX DDR3 2400+ Dual Channel EuP Ready PCI Express 2.0 PCIE2 AUDIO CODEC PCIE3 CHA_FAN1 16Mb BIOS Intel P55 Super I/O COM1 1 FLOPPY1 PCIE4 PCI1 RoHS CMOS Battery PCI2 IR1 1 PANEL1 PLED PWRBTN 1 HDLED RESET USB8_9 USB12_13 1 1 SPEAKER1 1 1 USB10_11 CLRCMOS1 1 SATAII_3 SATAII_4 SATAII_1...
... Bottom: MIC IN CD1 LAN PHY HD_AUDIO1 PWR_FAN1 CPU_FAN1 PCIE1 CrossFireX DDR3 2400+ Dual Channel EuP Ready PCI Express 2.0 PCIE2 AUDIO CODEC PCIE3 CHA_FAN1 16Mb BIOS Intel P55 Super I/O COM1 1 FLOPPY1 PCIE4 PCI1 RoHS CMOS Battery PCI2 IR1 1 PANEL1 PLED PWRBTN 1 HDLED RESET USB8_9 USB12_13 1 1 SPEAKER1 1 1 USB10_11 CLRCMOS1 1 SATAII_3 SATAII_4 SATAII_1...

User Manual
Page 24
...to clear the data in CMOS. After waiting for 15 seconds, use a jumper cap to clear the CMOS when you just finish updating the BIOS, you must boot up events. However, please do the clearCMOS action. 24 The illustration shows a 3-pin jumper whose pin1 and pin2 are ...after you can easily enjoy the benefits of Surround Display feature. When the jumper cap is placed on PCI Express VGA cards, you update the BIOS. 2.8 Surround Display Feature This motherboard supports Surround Display upgrade. The data in the Support CD: ..\ Surround Display Information 2.9 Jumpers Setup The ...
...to clear the data in CMOS. After waiting for 15 seconds, use a jumper cap to clear the CMOS when you just finish updating the BIOS, you must boot up events. However, please do the clearCMOS action. 24 The illustration shows a 3-pin jumper whose pin1 and pin2 are ...after you can easily enjoy the benefits of Surround Display feature. When the jumper cap is placed on PCI Express VGA cards, you update the BIOS. 2.8 Surround Display Feature This motherboard supports Surround Display upgrade. The data in the Support CD: ..\ Surround Display Information 2.9 Jumpers Setup The ...

User Manual
Page 26
... mic. 26 If you CD1 to [Enabled]. Connect Ground (GND) to connect them for AC'97 audio panel. You don't need to Ground (GND). Enter BIOS Setup Utility. Please follow the instruction in our manual and chassis manual to OUT2_L. Connect Audio_R (RIN) to OUT2_R and Audio_L (LIN) to install your...
... mic. 26 If you CD1 to [Enabled]. Connect Ground (GND) to connect them for AC'97 audio panel. You don't need to Ground (GND). Enter BIOS Setup Utility. Please follow the instruction in our manual and chassis manual to OUT2_L. Connect Audio_R (RIN) to OUT2_R and Audio_L (LIN) to install your...
User Manual
Page 36
... data in it! Please follow below steps. STEP 2: Make a SATA / SATAII Driver Diskette. WARNING! Please insert a floppy diskette into your system. STEP 1: Set up BIOS. A. Enter BIOS SETUP UTILITY Advanced screen B. A. B. Please select CD-ROM as the boot device. D. Then you will see the message on the screen, "Do you see these...
... data in it! Please follow below steps. STEP 2: Make a SATA / SATAII Driver Diskette. WARNING! Please insert a floppy diskette into your system. STEP 1: Set up BIOS. A. Enter BIOS SETUP UTILITY Advanced screen B. A. B. Please select CD-ROM as the boot device. D. Then you will see the message on the screen, "Do you see these...
User Manual
Page 37
....2 Setting Up a "RAID Ready" System You can start to configure the RAID function, you want to manage RAID functions, you can also set up system BIOS as step 1 of Windows setup, press F6 to install a third-party RAID driver. You may select: "Intel(R) ICH8R/ICH9R/ICH10R/DO/PCH SATA RAID Controller...
....2 Setting Up a "RAID Ready" System You can start to configure the RAID function, you want to manage RAID functions, you can also set up system BIOS as step 1 of Windows setup, press F6 to install a third-party RAID driver. You may select: "Intel(R) ICH8R/ICH9R/ICH10R/DO/PCH SATA RAID Controller...

User Manual
Page 39
...and "Intel Matrix Storage Manager Information" for proper configuration. A. Set the option "SATA Operation Mode" to [RAID]. page, please insert the ASRock Support CD into your system. Insert the Windows® VistaTM / VistaTM 64-bit optical disk into the optical drive again to continue the installation....Intel® RAID drivers are allowed to use "Intel Matrix Storage Manager" in the Support CD for RAID configuration. STEP 1: Set up BIOS. Before you start to configure the RAID function, you need to check the installation guide in Windows® environment, please install "SATAII ...
...and "Intel Matrix Storage Manager Information" for proper configuration. A. Set the option "SATA Operation Mode" to [RAID]. page, please insert the ASRock Support CD into your system. Insert the Windows® VistaTM / VistaTM 64-bit optical disk into the optical drive again to continue the installation....Intel® RAID drivers are allowed to use "Intel Matrix Storage Manager" in the Support CD for RAID configuration. STEP 1: Set up BIOS. Before you start to configure the RAID function, you need to check the installation guide in Windows® environment, please install "SATAII ...

User Manual
Page 40
... Windows® XP / XP 64-bit Without RAID Functions If you want to [AHCI]. Using SATA / SATAII HDDs with NCQ function STEP 1: Set Up BIOS. Set the option "SATA Operation Mode" to install Windows® XP / XP 64-bit OS on your SATA / SATAII HDDs without NCQ function STEP 1:...system. 40 Set the option "SATA Operation Mode" to the mode you choose and the OS you can start to install a thirdparty AHCI driver. Enter BIOS SETUP UTILITY Advanced screen Storage Configuration. After making a SATA / SATAII driver diskette, you install. At the beginning of Windows® setup, press F6 ...
... Windows® XP / XP 64-bit Without RAID Functions If you want to [AHCI]. Using SATA / SATAII HDDs with NCQ function STEP 1: Set Up BIOS. Set the option "SATA Operation Mode" to install Windows® XP / XP 64-bit OS on your SATA / SATAII HDDs without NCQ function STEP 1:...system. 40 Set the option "SATA Operation Mode" to the mode you choose and the OS you can start to install a thirdparty AHCI driver. Enter BIOS SETUP UTILITY Advanced screen Storage Configuration. After making a SATA / SATAII driver diskette, you install. At the beginning of Windows® setup, press F6 ...

User Manual
Page 41
... UTILITY Advanced screen Storage Configuration. Enter BIOS SETUP UTILITY Advanced screen Storage Configuration. Insert the Windows® VistaTM / VistaTM 64-bit optical disk into the optical drive to continue the installation. page, please insert the ASRock Support CD into the optical drive again to boot your... system. 41 Using SATA / SATAII HDDs with NCQ function STEP 1: Set Up BIOS. Intel® AHCI drivers are in the following path in our Support...
... UTILITY Advanced screen Storage Configuration. Enter BIOS SETUP UTILITY Advanced screen Storage Configuration. Insert the Windows® VistaTM / VistaTM 64-bit optical disk into the optical drive to continue the installation. page, please insert the ASRock Support CD into the optical drive again to boot your... system. 41 Using SATA / SATAII HDDs with NCQ function STEP 1: Set Up BIOS. Intel® AHCI drivers are in the following path in our Support...
User Manual
Page 42
... untied during overclocking, FSB enjoys better margin due to fixed PCI / PCIE buses. Before you enable Untied Overclocking function, please enter "Overclock Mode" option of BIOS setup to set the selection from [Auto] to the warning on page 8 for the possible overclocking risk before you apply Untied Overclocking Technology. 42 Please...
... untied during overclocking, FSB enjoys better margin due to fixed PCI / PCIE buses. Before you enable Untied Overclocking function, please enter "Overclock Mode" option of BIOS setup to set the selection from [Auto] to the warning on page 8 for the possible overclocking risk before you apply Untied Overclocking Technology. 42 Please...

User Manual
Page 43
... You may not exactly match what you see on your system. You may also restart by pressing the reset button on . Because the BIOS software is constantly being updated, the following selections: Main To set up the system time/date information OC Tweaker To set up overclocking features... Advanced To set up the advanced BIOS features H/W Monitor To display current hardware status Boot To set up the default system device to locate and load the Operating System Security ...
... You may not exactly match what you see on your system. You may also restart by pressing the reset button on . Because the BIOS software is constantly being updated, the following selections: Main To set up the system time/date information OC Tweaker To set up overclocking features... Advanced To set up the advanced BIOS features H/W Monitor To display current hardware status Boot To set up the default system device to locate and load the Operating System Security ...


