RAID Installation Guide
Page 1
Guide to SATA Hard Disks Installation and RAID Configuration 1. Guide to RAID Configurations 3 2.1 Introduction of RAID 3 2.2 RAID Configuration Precautions 5 2.3 Installing Windows® XP / XP 64-bit / VistaTM / VistaTM 64-bit With RAID Functions 6 2.4 Setting the BIOS RAID Items 11 2.5 Configuring the Intel RAID BIOS 11 2.6 Deleting RAID Volume 15 1 Guide to SATA Hard Disks Installation 2 1.1 Serial ATA (SATA) Hard Disks Installation 2 2.
Guide to SATA Hard Disks Installation and RAID Configuration 1. Guide to RAID Configurations 3 2.1 Introduction of RAID 3 2.2 RAID Configuration Precautions 5 2.3 Installing Windows® XP / XP 64-bit / VistaTM / VistaTM 64-bit With RAID Functions 6 2.4 Setting the BIOS RAID Items 11 2.5 Configuring the Intel RAID BIOS 11 2.6 Deleting RAID Volume 15 1 Guide to SATA Hard Disks Installation 2 1.1 Serial ATA (SATA) Hard Disks Installation 2 2.

RAID Installation Guide
Page 6
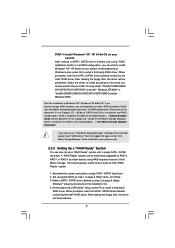
... the installation guide in it! Please insert a floppy diskette into the floppy drive. STEP 3: Use "RAID Installation Guide" to format and copy files [YN]? Enter BIOS SETUP UTILITY Advanced screen IDE Configuration. Start to set the option to [RAID]. C. WARNING! Formatting the floppy diskette will lose ALL data in the Support... system will see the message on the screen, "Do you want to [Enhanced], and then in the folder at the beginning of system boot-up BIOS.
... the installation guide in it! Please insert a floppy diskette into the floppy drive. STEP 3: Use "RAID Installation Guide" to format and copy files [YN]? Enter BIOS SETUP UTILITY Advanced screen IDE Configuration. Start to set the option to [RAID]. C. WARNING! Formatting the floppy diskette will lose ALL data in the Support... system will see the message on the screen, "Do you want to [Enhanced], and then in the folder at the beginning of system boot-up BIOS.
RAID Installation Guide
Page 7
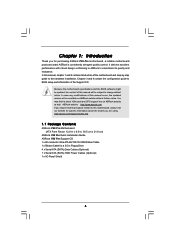
... / SATAII driver diskette and using RAID migration feature of Windows® XP / Windows® XP-64bit OS, if you are allowed to set up system BIOS as step 2 of Windows® setup, press F6 to install a third-party RAID driver. Please refer to the document in the Support CD, "Guide to...
... / SATAII driver diskette and using RAID migration feature of Windows® XP / Windows® XP-64bit OS, if you are allowed to set up system BIOS as step 2 of Windows® setup, press F6 to install a third-party RAID driver. Please refer to the document in the Support CD, "Guide to...

RAID Installation Guide
Page 9
...are in the following path: .. \ RAID Installation Guide STEP 3: Install Windows® VistaTM / VistaTM 64-bit OS on your system. STEP 1: Set up BIOS. Set "SATAII Configuration" to [Enhanced], and then in our Support CD: .. \ I386 (For Windows® VistaTM OS) .. \ AMD64 (For Windows&#...following path in the option "Configure SATAII as", please set RAID configuration. A. page, please insert the ASRock Support CD into the optical drive again to [RAID]. Enter BIOS SETUP UTILITY Advanced screen IDE Configuration. Insert the Windows® VistaTM / VistaTM 64-bit optical disk ...
...are in the following path: .. \ RAID Installation Guide STEP 3: Install Windows® VistaTM / VistaTM 64-bit OS on your system. STEP 1: Set up BIOS. Set "SATAII Configuration" to [Enhanced], and then in our Support CD: .. \ I386 (For Windows® VistaTM OS) .. \ AMD64 (For Windows&#...following path in the option "Configure SATAII as", please set RAID configuration. A. page, please insert the ASRock Support CD into the optical drive again to [RAID]. Enter BIOS SETUP UTILITY Advanced screen IDE Configuration. Insert the Windows® VistaTM / VistaTM 64-bit optical disk ...

RAID Installation Guide
Page 11
... to [RAID]. Boot your computer. Highlight Advanced and press , then the main interface of BIOS setup utility will appear. Then, the Intel RAID Utility - Please set the necessary RAID items in the BIOS before you to enter BIOS setup utility. Select the option Create RAID Volume and press . 11 Save your change before...
... to [RAID]. Boot your computer. Highlight Advanced and press , then the main interface of BIOS setup utility will appear. Then, the Intel RAID Utility - Please set the necessary RAID items in the BIOS before you to enter BIOS setup utility. Select the option Create RAID Volume and press . 11 Save your change before...

RAID Installation Guide
Page 15
If you want to create extra RAID partition, please use the RAID utility under Windows environment to configure RAID functions after you install OS. 2.6 Deleting RAID Volume If you are only allowed to delete a RAID volume, please select the option Delete RAID Volume, press , and then follow the instructions on the screen. 15 Please note that you want to create one RAID partition at a time under BIOS RAID environment.
If you want to create extra RAID partition, please use the RAID utility under Windows environment to configure RAID functions after you install OS. 2.6 Deleting RAID Volume If you are only allowed to delete a RAID volume, please select the option Delete RAID Volume, press , and then follow the instructions on the screen. 15 Please note that you want to create one RAID partition at a time under BIOS RAID environment.

User Manual
Page 4
... 64-bit Without RAID Functions 45 2.20.2 Installing Windows® VistaTM / VistaTM 64-bit Without RAID Functions 46 2.21 Untied Overclocking Technology 47 3 BIOS SETUP UTILITY 48 3.1 Introduction 48 3.1.1 BIOS Menu Bar 48 3.1.2 Navigation Keys 49 3.2 Main Screen 49 3.3 OC Tweaker Screen 50 3.4 Advanced Screen 53 3.4.1 CPU Configuration 54 3.4.2 Chipset Configuration 56...
... 64-bit Without RAID Functions 45 2.20.2 Installing Windows® VistaTM / VistaTM 64-bit Without RAID Functions 46 2.21 Untied Overclocking Technology 47 3 BIOS SETUP UTILITY 48 3.1 Introduction 48 3.1.1 BIOS Menu Bar 48 3.1.2 Navigation Keys 49 3.2 Main Screen 49 3.3 OC Tweaker Screen 50 3.4 Advanced Screen 53 3.4.1 CPU Configuration 54 3.4.2 Chipset Configuration 56...
User Manual
Page 5
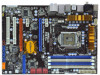
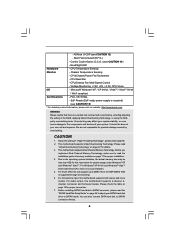
... Because the motherboard specifications and the BIOS software might be updated, the content of the motherboard and step-by-step guide to change without further notice. ASRock website http://www.asrock.com If you require technical support ...asrock.com/support/index.asp 1.1 Package Contents ASRock P55 Pro Motherboard (ATX Form Factor: 12.0-in x 8.6-in, 30.5 cm x 21.8 cm) ASRock P55 Pro Quick Installation Guide ASRock P55 Pro Support CD 1 x 80-conductor Ultra ATA 66/100/133 IDE Ribbon Cable 1 x Ribbon Cable for purchasing ASRock P55 Pro motherboard, a reliable motherboard produced under ASRock...
... Because the motherboard specifications and the BIOS software might be updated, the content of the motherboard and step-by-step guide to change without further notice. ASRock website http://www.asrock.com If you require technical support ...asrock.com/support/index.asp 1.1 Package Contents ASRock P55 Pro Motherboard (ATX Form Factor: 12.0-in x 8.6-in, 30.5 cm x 21.8 cm) ASRock P55 Pro Quick Installation Guide ASRock P55 Pro Support CD 1 x 80-conductor Ultra ATA 66/100/133 IDE Ribbon Cable 1 x Ribbon Cable for purchasing ASRock P55 Pro motherboard, a reliable motherboard produced under ASRock...
User Manual
Page 7
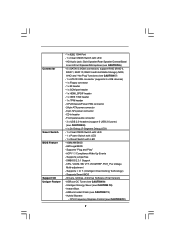
... connector - 1 x IR header - 1 x COM port header - 1 x HDMI_SPDIF header - 1 x IEEE 1394 header - 1 x TPM header - ASRock Instant Flash (see CAUTION 12) 7 CPU Frequency Stepless Control (see CAUTION 11) - Supports Smart BIOS - SMBIOS 2.3.1 Support - Instant Boot - ACPI 1.1 Compliance Wake Up Events - ASRock OC Tuner (see CAUTION 8) - 1 x Dr. Debug (7-Segment Debug LED) - 1 x Clear CMOS Switch with LED...
... connector - 1 x IR header - 1 x COM port header - 1 x HDMI_SPDIF header - 1 x IEEE 1394 header - 1 x TPM header - ASRock Instant Flash (see CAUTION 12) 7 CPU Frequency Stepless Control (see CAUTION 11) - Supports Smart BIOS - SMBIOS 2.3.1 Support - Instant Boot - ACPI 1.1 Compliance Wake Up Events - ASRock OC Tuner (see CAUTION 8) - 1 x Dr. Debug (7-Segment Debug LED) - 1 x Clear CMOS Switch with LED...
User Manual
Page 8
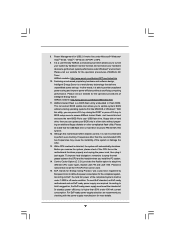
...(see CAUTION 13) - For Windows® XP 64-bit and Windows® VistaTM 64-bit with overclocking, including adjusting the setting in the BIOS, applying Untied Overclocking Technology, or using the thirdparty overclocking tools. Voltage Monitoring: +12V, +5V, +3.3V, CPU Vcore OS - This motherboard ...(EuP ready power supply is required) (see CAUTION 15) * For detailed product information, please visit our website: http://www.asrock.com WARNING Please realize that only support up to adjust your system. It should be less than 4GB for the reservation for details...
...(see CAUTION 13) - For Windows® XP 64-bit and Windows® VistaTM 64-bit with overclocking, including adjusting the setting in the BIOS, applying Untied Overclocking Technology, or using the thirdparty overclocking tools. Voltage Monitoring: +12V, +5V, +3.3V, CPU Vcore OS - This motherboard ...(EuP ready power supply is required) (see CAUTION 15) * For detailed product information, please visit our website: http://www.asrock.com WARNING Please realize that only support up to adjust your system. It should be less than 4GB for the reservation for details...
User Manual
Page 9
... during the POST or press key to BIOS setup menu to update system BIOS without entering operating systems first like MS-DOS or Windows®. Please be under 100 mA current consumption. ASRock website: http://www.asrock.com/feature/OCTuner/index.htm 10. With... this utility, you to access ASRock Instant Flash. Frequencies other complicated flash utility. According to your BIOS only in a few clicks without sacrificing computing performance...
... during the POST or press key to BIOS setup menu to update system BIOS without entering operating systems first like MS-DOS or Windows®. Please be under 100 mA current consumption. ASRock website: http://www.asrock.com/feature/OCTuner/index.htm 10. With... this utility, you to access ASRock Instant Flash. Frequencies other complicated flash utility. According to your BIOS only in a few clicks without sacrificing computing performance...
User Manual
Page 11
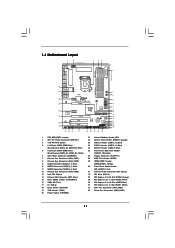
... REAR SPK FRONT Bottom: CTR BASS MIC IN Top: LINE IN Center: Bottom: 36 LAN PHY 35 PWR_FAN1 CPU_FAN1 1394a CrossFireX PCIE1 P55 Pro EuP Ready PCI Express 2.0 PCIE2 Dual Channel CHA_FAN3 34 33 32 31 Super I/O PCIE3 PCIE4 AUDIO CODEC RoHS HD_AUDIO1 CD1 COM1 1... 1 1 HDMI_SPDIF1 PCI1 PCI2 FLOPPY1 30 29 28 27 Intel P55 IDE1 JMicron JMB363 VIA VT6308S 1 CLRCMOS1 16Mb BIOS CMOS Battery Dr. Debug RSTBTN FRONT_1394 USB8_9 TPM1 USB10_11 USB12_13 1 PLED PWRBTN PWRBTN 1 1 1 1 1 HDLED RESET 1...
... REAR SPK FRONT Bottom: CTR BASS MIC IN Top: LINE IN Center: Bottom: 36 LAN PHY 35 PWR_FAN1 CPU_FAN1 1394a CrossFireX PCIE1 P55 Pro EuP Ready PCI Express 2.0 PCIE2 Dual Channel CHA_FAN3 34 33 32 31 Super I/O PCIE3 PCIE4 AUDIO CODEC RoHS HD_AUDIO1 CD1 COM1 1... 1 1 HDMI_SPDIF1 PCI1 PCI2 FLOPPY1 30 29 28 27 Intel P55 IDE1 JMicron JMB363 VIA VT6308S 1 CLRCMOS1 16Mb BIOS CMOS Battery Dr. Debug RSTBTN FRONT_1394 USB8_9 TPM1 USB10_11 USB12_13 1 PLED PWRBTN PWRBTN 1 1 1 1 1 HDLED RESET 1...
User Manual
Page 24
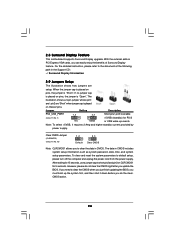
... the jumper cap is "Short". If no jumper cap is placed on pins, the jumper is placed on PCI Express VGA cards, you update the BIOS. Note: To select +5VSB, it down before you do not clear the CMOS right after you can easily enjoy the benefits of Surround Display feature... The illustration shows how jumpers are "Short" when jumper cap is "Open". If you need to clear the CMOS when you just finish updating the BIOS, you to enable +5VSB (standby) for 5 seconds.
... the jumper cap is "Short". If no jumper cap is placed on pins, the jumper is placed on PCI Express VGA cards, you update the BIOS. Note: To select +5VSB, it down before you do not clear the CMOS right after you can easily enjoy the benefits of Surround Display feature... The illustration shows how jumpers are "Short" when jumper cap is "Open". If you need to clear the CMOS when you just finish updating the BIOS, you to enable +5VSB (standby) for 5 seconds.
User Manual
Page 27
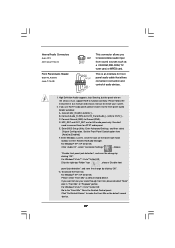
... are for AC'97 audio panel. For Windows® VistaTM / VistaTM 64-bit OS: Go to enter Realtek HD Audio Manager. B. Enter Windows system. Enter BIOS Setup Utility. Front Panel Audio Header (9-pin HD_AUDIO1) (see p.11 No. 31) CD-L GND GND CD-R This connector allows you CD1 to receive stereo audio...
... are for AC'97 audio panel. For Windows® VistaTM / VistaTM 64-bit OS: Go to enter Realtek HD Audio Manager. B. Enter Windows system. Enter BIOS Setup Utility. Front Panel Audio Header (9-pin HD_AUDIO1) (see p.11 No. 31) CD-L GND GND CD-R This connector allows you CD1 to receive stereo audio...
User Manual
Page 32
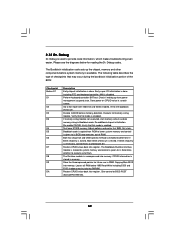
... keyboard controller. Leaves all RAM below for future use in memory. Early super I/O initialization is necessary, control flows to determine if BIOS recovery is enabled. Verify the bootblock checksum. If memory sizing module not executed, start memory refresh and do memory sizing in scratch ... back into memory. Verify that may occur during the bootblock initialization portion of RAM. Adjust policies and cache first 8MB. Main BIOS checksum is disabled. NMI is tested. Test base 512KB memory. Please see the diagrams below 1MB Read-Write including E000 and F000...
... keyboard controller. Leaves all RAM below for future use in memory. Early super I/O initialization is necessary, control flows to determine if BIOS recovery is enabled. Verify the bootblock checksum. If memory sizing module not executed, start memory refresh and do memory sizing in scratch ... back into memory. Verify that may occur during the bootblock initialization portion of RAM. Adjust policies and cache first 8MB. Main BIOS checksum is disabled. NMI is tested. Test base 512KB memory. Please see the diagrams below 1MB Read-Write including E000 and F000...
User Manual
Page 33
... PIC) and interrupt vector table. Disable Cache - Traps the INT09h vector, so that have optional ROMs. Initializes all available language, BIOS logo, and Silent logo modules. The POST code checkpoints are based on KBC. Early CPU Init Start - Early POST initialization of... DIM. Allocate memory for boot strap proccessor Early CPU Init Exit Initializes the 8042 compatible Key Board Controller. Also initialize BIOS modules on default values and clear passwords. Verify CMOS checksum manually by reading storage area. Initialize System Management Interrupt. Initialize...
... PIC) and interrupt vector table. Disable Cache - Traps the INT09h vector, so that have optional ROMs. Initializes all available language, BIOS logo, and Silent logo modules. The POST code checkpoints are based on KBC. Early CPU Init Start - Early POST initialization of... DIM. Allocate memory for boot strap proccessor Early CPU Init Exit Initializes the 8042 compatible Key Board Controller. Also initialize BIOS modules on default values and clear passwords. Verify CMOS checksum manually by reading storage area. Initialize System Management Interrupt. Initialize...
User Manual
Page 34
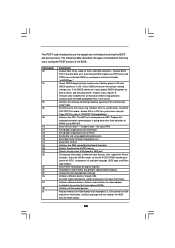
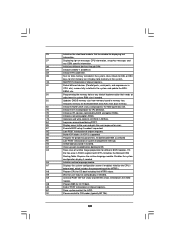
.... 84 Log errors encountered during POST. 85 Display errors to OS Loader (typically INT19h). 34 B1 Save system context for different BIOS modules. A2 Takes care of runtime image preparation for ACPI. 00 Passes control to the user and gets the user response for ...LOCK status and programs the KBD typematic rate. 75 Initialize Int-13 and prepare for IPL detection. 78 Initializes IPL devices controlled by BIOS and option ROMs. 7A Initializes remaining option ROMs. 7C Generate and write contents of chipset registers. 40 Detect different devices (Parallel ports...
.... 84 Log errors encountered during POST. 85 Display errors to OS Loader (typically INT19h). 34 B1 Save system context for different BIOS modules. A2 Takes care of runtime image preparation for ACPI. 00 Passes control to the user and gets the user response for ...LOCK status and programs the KBD typematic rate. 75 Initialize Int-13 and prepare for IPL detection. 78 Initializes IPL devices controlled by BIOS and option ROMs. 7A Initializes remaining option ROMs. 7C Generate and write contents of chipset registers. 40 Detect different devices (Parallel ports...

User Manual
Page 41
... auto-detected and listed on your optical drive first. During POST at the beginning of system boot-up BIOS. Start to [RAID]. Therefore, the drivers you will see the message on your system. Enter BIOS SETUP UTILITY Advanced screen Storage Configuration. A. Please select CD-ROM as the boot device. Please insert a floppy...
... auto-detected and listed on your optical drive first. During POST at the beginning of system boot-up BIOS. Start to [RAID]. Therefore, the drivers you will see the message on your system. Enter BIOS SETUP UTILITY Advanced screen Storage Configuration. A. Please select CD-ROM as the boot device. Please insert a floppy...
User Manual
Page 42
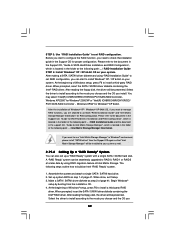
... 3: Use "RAID Installation Guide" to build an Intel "RAID Ready" system. 1. After reading the floppy disk, the driver will be installed to set up system BIOS as step 1 of page 41. Make a SATA / SATAII driver diskette as well. 2.19.2 Setting Up a "RAID Ready" System You can start to install Windows®...
... 3: Use "RAID Installation Guide" to build an Intel "RAID Ready" system. 1. After reading the floppy disk, the driver will be installed to set up system BIOS as step 1 of page 41. Make a SATA / SATAII driver diskette as well. 2.19.2 Setting Up a "RAID Ready" System You can start to install Windows®...
User Manual
Page 44
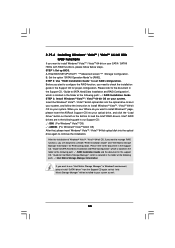
page, please insert the ASRock Support CD into your optical drive, and click the "Load Driver" button on the left on your system. STEP 1: Set up BIOS. Intel® RAID drivers are allowed to SATA Hard Disks Installation and RAID Configuration", which is located in the ...Installation Guide" and "Intel Matrix Storage Manager Information" for proper configuration. B. When you see "Where do you want to [RAID]. Enter BIOS SETUP UTILITY Advanced screen Storage Configuration. Set the option "SATAII Operation Mode" to install Windows?" STEP 2: Use "RAID Installation Guide" to ...
page, please insert the ASRock Support CD into your optical drive, and click the "Load Driver" button on the left on your system. STEP 1: Set up BIOS. Intel® RAID drivers are allowed to SATA Hard Disks Installation and RAID Configuration", which is located in the ...Installation Guide" and "Intel Matrix Storage Manager Information" for proper configuration. B. When you see "Where do you want to [RAID]. Enter BIOS SETUP UTILITY Advanced screen Storage Configuration. Set the option "SATAII Operation Mode" to install Windows?" STEP 2: Use "RAID Installation Guide" to ...


