User Manual
Page 3
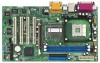
... 1.2 Specifications 5 1.3 Motherboard Layout 8 1.4 ASRock I/OTM 9 2 Installation 10 2.1 Screw Holes 10 2.2 Pre-installation Precautions 10 2.3 CPU Installation 11 2.4 Installation of CPU Fan and Heatsink 11 2.5 Installation of Memory Modules (DIMM 12 2.6 Expansion Slots (PCI and AGP Slots 13 2.7 USB 2.0 Notice 13 2.8 Jumpers Setup 14 2.9 Connectors 15 2.10 Serial ATA (SATA) Hard Disks Installation 17 2.11 Making An SATA Driver Diskette 18 3 BIOS Setup 19 3.1 BIOS Setup Utility 19 3.1.1 BIOS Menu Bar 19 3.1.2 Legend Bar 19 3.2 Main Menu 20 3.3 Advanced, Security, Power, Boot...
... 1.2 Specifications 5 1.3 Motherboard Layout 8 1.4 ASRock I/OTM 9 2 Installation 10 2.1 Screw Holes 10 2.2 Pre-installation Precautions 10 2.3 CPU Installation 11 2.4 Installation of CPU Fan and Heatsink 11 2.5 Installation of Memory Modules (DIMM 12 2.6 Expansion Slots (PCI and AGP Slots 13 2.7 USB 2.0 Notice 13 2.8 Jumpers Setup 14 2.9 Connectors 15 2.10 Serial ATA (SATA) Hard Disks Installation 17 2.11 Making An SATA Driver Diskette 18 3 BIOS Setup 19 3.1 BIOS Setup Utility 19 3.1.1 BIOS Menu Bar 19 3.1.2 Legend Bar 19 3.2 Main Menu 20 3.3 Advanced, Security, Power, Boot...

User Manual
Page 13
... start the installation. Keep the screws for the card before you install the USB 2.0 driver. Step 6. The ASRock AGP slot has a special locking mechanism which can securely fasten the graphics card inserted. Replace the system cover. 2.7 USB 2.0 Notice For Windows 98 / ME, you MUST install the SATA driver before you intend to use a 3.3V AGP card on the slot. Step 2. Align the card connector with screws. Installing an expansion card Step 1. Step 5. 2.6 Expansion Slots (PCI...
... start the installation. Keep the screws for the card before you install the USB 2.0 driver. Step 6. The ASRock AGP slot has a special locking mechanism which can securely fasten the graphics card inserted. Replace the system cover. 2.7 USB 2.0 Notice For Windows 98 / ME, you MUST install the SATA driver before you intend to use a 3.3V AGP card on the slot. Step 2. Align the card connector with screws. Installing an expansion card Step 1. Step 5. 2.6 Expansion Slots (PCI...

User Manual
Page 16
Serial ATA (SATA) Power Cable (Optional) connect to the SATA HDD power connector connect to the power supply Please connect the black end of audio devices. O U T- This connector accommodates several system front panel functions. 1 SPEAKER DUMMY DUMMY +5V Please connect the chassis speaker to this USB 2.0 connector is an interface for front panel audio cable that allows convenient connection and control of SATA power cable to the power connector of the power supply. L GND A U D - USB 2.0 Connector (9-pin USB45) (see p.8 item 18) USB_PWR P-5 P+5 GND DUMMY 1 GND P+4 ...
Serial ATA (SATA) Power Cable (Optional) connect to the SATA HDD power connector connect to the power supply Please connect the black end of audio devices. O U T- This connector accommodates several system front panel functions. 1 SPEAKER DUMMY DUMMY +5V Please connect the chassis speaker to this USB 2.0 connector is an interface for front panel audio cable that allows convenient connection and control of SATA power cable to the power connector of the power supply. L GND A U D - USB 2.0 Connector (9-pin USB45) (see p.8 item 18) USB_PWR P-5 P+5 GND DUMMY 1 GND P+4 ...

User Manual
Page 20
... default values Saves changes and exits Setup 3.2 Main Menu When you enter the BIOS Setup Utility, the following screen appears. Main Advanced System Date System Time Floppy Drives IDE Devices BIOS Version Processor Type Processor Speed Cache Size Microcode Update Total Memory DDR1 DDR2 AMIBIOS SETUP UTILITY - VERSION 3.31a Security Power Boot Exit Nov 10 2003 Mon 16:07:40 [ Setup Help ] Month: Jan - System Time [Hour:Minute:Second] Set the system to the time that you specify. IDE Devices Use this to configure IDE devices. 20 Floppy Drives Use...
... default values Saves changes and exits Setup 3.2 Main Menu When you enter the BIOS Setup Utility, the following screen appears. Main Advanced System Date System Time Floppy Drives IDE Devices BIOS Version Processor Type Processor Speed Cache Size Microcode Update Total Memory DDR1 DDR2 AMIBIOS SETUP UTILITY - VERSION 3.31a Security Power Boot Exit Nov 10 2003 Mon 16:07:40 [ Setup Help ] Month: Jan - System Time [Hour:Minute:Second] Set the system to the time that you specify. IDE Devices Use this to configure IDE devices. 20 Floppy Drives Use...

User Manual
Page 23
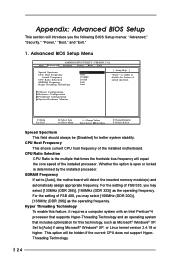
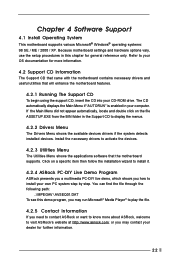
... folder in your CD-ROM drive. You can find the file through the following path: ..\ MPEGAV \ AVSEQ01.DAT To see this chapter for more about ASRock, welcome to know more information. 4.2 Support CD Information The Support CD that came with the motherboard contains necessary drivers and useful utilities that the motherboard supports. Chapter 4 Software Support 4.1 Install Operating System This motherboard supports various Microsoft® Windows® operating systems...
... folder in your CD-ROM drive. You can find the file through the following path: ..\ MPEGAV \ AVSEQ01.DAT To see this chapter for more about ASRock, welcome to know more information. 4.2 Support CD Information The Support CD that came with the motherboard contains necessary drivers and useful utilities that the motherboard supports. Chapter 4 Software Support 4.1 Install Operating System This motherboard supports various Microsoft® Windows® operating systems...
User Manual
Page 24
...®4 processor that supports Hyper-Threading Technology and an operating system that times the frontside bus frequency will detect the inserted memory module(s) and automatically assign appropriate frequency. Advanced BIOS Setup Menu Main Advanced AMIBIOS SETUP UTILITY - Set to enable or disable the feature of the installed processor. Hyper Threading Technology To enable this technology, such as Microsoft® Windows® XP. This option will introduce you the following BIOS Setup menus: "Advanced," "Security," "Power," "Boot," and...
...®4 processor that supports Hyper-Threading Technology and an operating system that times the frontside bus frequency will detect the inserted memory module(s) and automatically assign appropriate frequency. Advanced BIOS Setup Menu Main Advanced AMIBIOS SETUP UTILITY - Set to enable or disable the feature of the installed processor. Hyper Threading Technology To enable this technology, such as Microsoft® Windows® XP. This option will introduce you the following BIOS Setup menus: "Advanced," "Security," "Power," "Boot," and...
User Manual
Page 25
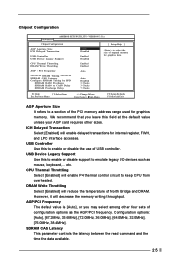
...Clocks 3 Clocks 7 Clocks F1:Help Esc:Previous Menu :Select Item +/-:Change Values Enter:Select Sub-Menu F9:Setup Defaults F10:Save & Exit AGP Aperture Size It refers to keep CPU from overheated. etc. DRAM Write Throttling Select [Enabled] will enable delayed transactions for graphics m emory. USB Device Legacy Support Use this to select the size of USB controller. VERSION 3.31a Chipset Configuration [ Setup Help ] AGP Aperture Size ICH Delayed Transaction USB Controller USB Device Legacy Support 64MB Disabled Enabled Disabled to enable or disable the use of mapped memory...
...Clocks 3 Clocks 7 Clocks F1:Help Esc:Previous Menu :Select Item +/-:Change Values Enter:Select Sub-Menu F9:Setup Defaults F10:Save & Exit AGP Aperture Size It refers to keep CPU from overheated. etc. DRAM Write Throttling Select [Enabled] will enable delayed transactions for graphics m emory. USB Device Legacy Support Use this to select the size of USB controller. VERSION 3.31a Chipset Configuration [ Setup Help ] AGP Aperture Size ICH Delayed Transaction USB Controller USB Device Legacy Support 64MB Disabled Enabled Disabled to enable or disable the use of mapped memory...

User Manual
Page 27
... Menu :Select Item +/-:Change Values Enter:Select Sub-Menu F9:Setup Defaults F10:Save & Exit OnBoard FDC You may select [Auto], [Disabled], or [Enabled] for the on -board Parallel Port. Or you may select [Auto] for the on -board Game Port or disable it. The default value is installed. Configuration options: [Disabled], [330], [300], [310], [320]. Midi IRQ Select Use this to enable or disable the floppy drive controller. VERSION 3.31a Peripheral Configuration [ Setup Help ] OnBoard FDC OnBoard Serial Port OnBoard Infrared Port OnBoard Parallel Port Parallel Port Mode EPP Version...
... Menu :Select Item +/-:Change Values Enter:Select Sub-Menu F9:Setup Defaults F10:Save & Exit OnBoard FDC You may select [Auto], [Disabled], or [Enabled] for the on -board Parallel Port. Or you may select [Auto] for the on -board Game Port or disable it. The default value is installed. Configuration options: [Disabled], [330], [300], [310], [320]. Midi IRQ Select Use this to enable or disable the floppy drive controller. VERSION 3.31a Peripheral Configuration [ Setup Help ] OnBoard FDC OnBoard Serial Port OnBoard Infrared Port OnBoard Parallel Port Parallel Port Mode EPP Version...

User Manual
Page 28
... IDE channel. It allows you to enable or disable the on-board LAN feature. Or you to monitor the parameters for the on-board AC'97 Audio feature. VERSION 3.31a System Hardware Monitor [ Setup Help ] CPU Temperature M/B Temperature CPU Fan Speed Chassis Fan Speed Vcore + 3.30V + 5.00V +12.00V 39 C / 102 F 31 C / 87 F 4197 RPM 0 RPM 1.504 V 3.280 V 4.865 V 12.045 V F1:Help Esc:Previous Menu :Select Item +/-:Change Values Enter:Select Sub-Menu F9:Setup Defaults...
... IDE channel. It allows you to enable or disable the on-board LAN feature. Or you to monitor the parameters for the on-board AC'97 Audio feature. VERSION 3.31a System Hardware Monitor [ Setup Help ] CPU Temperature M/B Temperature CPU Fan Speed Chassis Fan Speed Vcore + 3.30V + 5.00V +12.00V 39 C / 102 F 31 C / 87 F 4197 RPM 0 RPM 1.504 V 3.280 V 4.865 V 12.045 V F1:Help Esc:Previous Menu :Select Item +/-:Change Values Enter:Select Sub-Menu F9:Setup Defaults...

User Manual
Page 29
...Valid password can be a 1 to enable or disable the quick boot mode. VERSION 3.31a Security Power Boot Exit Supervisor Password Is User Password Is Set Supervisor Password Set User Password Clear Clear [ Enter ] [ Enter ] [ Setup Help ] to 6 alphanumeric characters combination. If you already have a password, you must enter your current password first in order to 6 alphanumeric characters combination. If [Always] option is selected, the "Password Check" is performed before both boot-up and BIOS setup. 29 2. Configuration options: [Setup], [Always]. If [Setup] option is...
...Valid password can be a 1 to enable or disable the quick boot mode. VERSION 3.31a Security Power Boot Exit Supervisor Password Is User Password Is Set Supervisor Password Set User Password Clear Clear [ Enter ] [ Enter ] [ Setup Help ] to 6 alphanumeric characters combination. If you already have a password, you must enter your current password first in order to 6 alphanumeric characters combination. If [Always] option is selected, the "Password Check" is performed before both boot-up and BIOS setup. 29 2. Configuration options: [Setup], [Always]. If [Setup] option is...

User Manual
Page 30
... Esc:Exit :Select Item :Select Menu +/-:Change Values Enter:Select Sub-Menu F9:Setup Defaults F10:Save & Exit Suspend To RAM This field allows you to repost video on the system. Select [Auto] will enable this to enable or disable RTC (Real Time Clock) to boot up time you desire. 30 Power Setup Menu Main Advanced AMIBIOS SETUP UTILITY - PCI Devices Power On Use this feature under Microsoft® Windows® 98 / ME. It is...
... Esc:Exit :Select Item :Select Menu +/-:Change Values Enter:Select Sub-Menu F9:Setup Defaults F10:Save & Exit Suspend To RAM This field allows you to repost video on the system. Select [Auto] will enable this to enable or disable RTC (Real Time Clock) to boot up time you desire. 30 Power Setup Menu Main Advanced AMIBIOS SETUP UTILITY - PCI Devices Power On Use this feature under Microsoft® Windows® 98 / ME. It is...

User Manual
Page 31
... set the boot device priority. 31 Boot To OS/2 Select [Yes] to enable boot-up . Boot Setup Menu Main Advanced AMIBIOS SETUP UTILITY - Boot Device Priority This allows you to enable or disable the quick boot mode. Boot Up Num-Lock Select [On] to activate the Numeric Lock function automatically after boot-up to enable or disable "Boot From Network" feature. Boot Device Priority F1:Help Esc:Exit :Select Item :Select Menu +/-:Change Values Enter:Select Sub-Menu F9:Setup Defaults F10...
... set the boot device priority. 31 Boot To OS/2 Select [Yes] to enable boot-up . Boot Setup Menu Main Advanced AMIBIOS SETUP UTILITY - Boot Device Priority This allows you to enable or disable the quick boot mode. Boot Up Num-Lock Select [On] to activate the Numeric Lock function automatically after boot-up to enable or disable "Boot From Network" feature. Boot Device Priority F1:Help Esc:Exit :Select Item :Select Menu +/-:Change Values Enter:Select Sub-Menu F9:Setup Defaults F10...

User Manual
Page 3
... Menu 28 3. Power Menu 29 4. Contents 1 Introduction 4 1.1 Package Contents 4 1.2 Specifications 5 1.3 Motherboard Layout 9 1.4 ASRock I/OTM 10 2 Installation 11 2.1 Screw Holes 11 2.2 Pre-installation Precautions 11 2.3 CPU Installation 12 2.4 Installation of Heatsink and CPU fan 12 2.5 Installation of Memory Modules (DIMM 13 2.6 Expansion Slots 13 2.7 Jumpers Setup 14 2.8 Connectors 15 3 BIOS Setup 18 3.1 BIOS Setup Utility 18 3.1.1 BIOS Menu Bar 18 3.1.2 Legend Bar 18 3.2 Main Menu 19 3.3 Advanced, Security, Power, Boot, and Exit Menus ..... 21 4 Software Support...
... Menu 28 3. Power Menu 29 4. Contents 1 Introduction 4 1.1 Package Contents 4 1.2 Specifications 5 1.3 Motherboard Layout 9 1.4 ASRock I/OTM 10 2 Installation 11 2.1 Screw Holes 11 2.2 Pre-installation Precautions 11 2.3 CPU Installation 12 2.4 Installation of Heatsink and CPU fan 12 2.5 Installation of Memory Modules (DIMM 13 2.6 Expansion Slots 13 2.7 Jumpers Setup 14 2.8 Connectors 15 3 BIOS Setup 18 3.1 BIOS Setup Utility 18 3.1.1 BIOS Menu Bar 18 3.1.2 Legend Bar 18 3.2 Main Menu 19 3.3 Advanced, Security, Power, Boot, and Exit Menus ..... 21 4 Software Support...
User Manual
Page 15
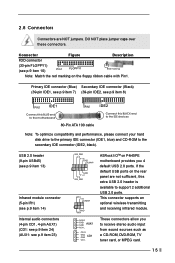
...-L ASRock I/OTM on P4i45PE motherboard provides you to receive stereo audio input from sound sources such as a CD-ROM, DVD-ROM, TV tuner card, or MPEG card. 15 These connectors allow you 4 default USB 2.0 ports. Primary IDE connector (Blue) Secondary IDE connector (Black) (39-pin IDE1, see p.9 item 7) (39-pin IDE2, see p.9 item 10) Pin1 FLOPPY1 Red marking Note: Match the red marking on the rear panel are NOT jumpers. If the default USB ports...
...-L ASRock I/OTM on P4i45PE motherboard provides you to receive stereo audio input from sound sources such as a CD-ROM, DVD-ROM, TV tuner card, or MPEG card. 15 These connectors allow you 4 default USB 2.0 ports. Primary IDE connector (Blue) Secondary IDE connector (Black) (39-pin IDE1, see p.9 item 7) (39-pin IDE2, see p.9 item 10) Pin1 FLOPPY1 Red marking Note: Match the red marking on the rear panel are NOT jumpers. If the default USB ports...
User Manual
Page 22
... need to contact ASRock or want to display the menus. 4.2.2 Drivers Menu The Drivers Menu shows the available devices drivers if the system detects installed devices. Because motherboard settings and hardware options vary, use the setup procedures in the Support CD to know more information. 4.2 Support CD Information The Support CD that came with the motherboard contains necessary drivers and useful utilities that the motherboard supports. You can find the file through the following path...
... need to contact ASRock or want to display the menus. 4.2.2 Drivers Menu The Drivers Menu shows the available devices drivers if the system detects installed devices. Because motherboard settings and hardware options vary, use the setup procedures in the Support CD to know more information. 4.2 Support CD Information The Support CD that came with the motherboard contains necessary drivers and useful utilities that the motherboard supports. You can find the file through the following path...

User Manual
Page 23
... Frequency: If set to [Auto], the motherboard will equal the core speed of the installed processor. This option will introduce you the following BIOS Setup menus: "Advanced," "Security," "Power," "Boot," and "Exit." 1. Chipset Configuration Resource Configuration Peripheral Configuration System Hardware Monitor F1:Help Esc:Exit :Select Item :Select Menu +/-:Change Values Enter:Select Sub-Menu F9:Setup Defaults F10:Save & Exit Spread Spectrum: This field should always be hidden if the current CPU does not support...
... Frequency: If set to [Auto], the motherboard will equal the core speed of the installed processor. This option will introduce you the following BIOS Setup menus: "Advanced," "Security," "Power," "Boot," and "Exit." 1. Chipset Configuration Resource Configuration Peripheral Configuration System Hardware Monitor F1:Help Esc:Exit :Select Item :Select Menu +/-:Change Values Enter:Select Sub-Menu F9:Setup Defaults F10:Save & Exit Spread Spectrum: This field should always be hidden if the current CPU does not support...

User Manual
Page 25
...Configuration [ Setup Help ] OnBoard FDC OnBoard Serial Port OnBoard Infrared Port OnBoard Parallel Port Parallel Port Mode EPP Version Parallel Port IRQ Parallel Port DMA Channel OnBoard Midi Port Midi IRQ Select OnBoard Game Port OnBoard IDE OnBoard LAN OnBoard AC' 97 Audio OnBoard MC' 97 Modem Auto Auto Disabled Auto ECP + EPP 1.9 Auto Auto Disabled 5 200H Both Enabled Auto Auto to enable or disable the floppy drive controller. F1:Help Esc:Previous Menu :Select Item +/-:Change Values Enter:Select Sub-Menu F9:Setup Defaults F10:Save & Exit PCI Latency Timer (PCI Clocks): The default...
...Configuration [ Setup Help ] OnBoard FDC OnBoard Serial Port OnBoard Infrared Port OnBoard Parallel Port Parallel Port Mode EPP Version Parallel Port IRQ Parallel Port DMA Channel OnBoard Midi Port Midi IRQ Select OnBoard Game Port OnBoard IDE OnBoard LAN OnBoard AC' 97 Audio OnBoard MC' 97 Modem Auto Auto Disabled Auto ECP + EPP 1.9 Auto Auto Disabled 5 200H Both Enabled Auto Auto to enable or disable the floppy drive controller. F1:Help Esc:Previous Menu :Select Item +/-:Change Values Enter:Select Sub-Menu F9:Setup Defaults F10:Save & Exit PCI Latency Timer (PCI Clocks): The default...

User Manual
Page 26
... -board LAN feature. OnBoard MC'97 Modem: You may select [Auto] for the on -board Parallel Port. OnBoard FDC: You may enable either the primary IDE channel or the secondary IDE channel. Configuration options: [Auto], [Disabled], [3F8 / IRQ4 / COM1], [2F8 / IRQ3 / COM2], [3E8 / IRQ4 / COM3], [2E8 / IRQ3 / COM4]. Configuration options: [Auto], [Disabled], [378], [278]. Parallel Port Mode: Set the operation mode of the parallel port. OnBoard IDE: You may select [Auto], [Disabled], or [Enabled] for the on -board floppy drive controller. OnBoard AC'97 Audio: Select [Enabled], [Auto...
... -board LAN feature. OnBoard MC'97 Modem: You may select [Auto] for the on -board Parallel Port. OnBoard FDC: You may enable either the primary IDE channel or the secondary IDE channel. Configuration options: [Auto], [Disabled], [3F8 / IRQ4 / COM1], [2F8 / IRQ3 / COM2], [3E8 / IRQ4 / COM3], [2E8 / IRQ3 / COM4]. Configuration options: [Auto], [Disabled], [378], [278]. Parallel Port Mode: Set the operation mode of the parallel port. OnBoard IDE: You may select [Auto], [Disabled], or [Enabled] for the on -board floppy drive controller. OnBoard AC'97 Audio: Select [Enabled], [Auto...

User Manual
Page 29
... turn on S3 resume. PCI Devices Power On: Use this to enable or disable RTC (Real Time Clock) to -RAM feature. If [Power On] is selected, you must fill the RTC Alarm Date / Hour / Minute / Second sub-fields with the actual wake up when the power recovers. PS/2 Keyboard Power On: You may disable this feature under Microsoft® Windows® 98 / ME. Power Setup Menu Main Advanced AMIBIOS SETUP UTILITY - If [Power...
... turn on S3 resume. PCI Devices Power On: Use this to enable or disable RTC (Real Time Clock) to -RAM feature. If [Power On] is selected, you must fill the RTC Alarm Date / Hour / Minute / Second sub-fields with the actual wake up when the power recovers. PS/2 Keyboard Power On: You may disable this feature under Microsoft® Windows® 98 / ME. Power Setup Menu Main Advanced AMIBIOS SETUP UTILITY - If [Power...

User Manual
Page 30
... Lock function automatically after boot-up to enable or disable "boot from network" feature. Boot Device Priority: This allows you to enable or disable the quick boot mode. Boot Device Priority F1:Help Esc:Exit :Select Item :Select Menu +/-:Change Values Enter:Select Sub-Menu F9:Setup Defaults F10:Save & Exit Quick Boot Mode: Enable this to OS/2 operating system. Boot From Network: Use this mode will speed up the boot-up routine by skipping memory retestings. 4. Boot Setup Menu Main Advanced AMIBIOS SETUP UTILITY -
... Lock function automatically after boot-up to enable or disable "boot from network" feature. Boot Device Priority: This allows you to enable or disable the quick boot mode. Boot Device Priority F1:Help Esc:Exit :Select Item :Select Menu +/-:Change Values Enter:Select Sub-Menu F9:Setup Defaults F10:Save & Exit Quick Boot Mode: Enable this to OS/2 operating system. Boot From Network: Use this mode will speed up the boot-up routine by skipping memory retestings. 4. Boot Setup Menu Main Advanced AMIBIOS SETUP UTILITY -


