User Manual
Page 4
...® VistaTM / VistaTM 64-bit Without RAID Functions 49 2.20 DTS Operation Guide (For P45XE-WiFiN Only 50 2.21 Teaming Function Operation Guide (For P45XE-WiFiN / P45XE-R Only 52 2.22 Untied Overclocking Technology 55 3 BIOS SETUP UTILITY 56 3.1 Introduction 56 3.1.1 BIOS Menu Bar 56 3.1.2 Navigation Keys 57 3.2 Main Screen 57 3.3 Smart Screen 59 3.4 Advanced Screen...
...® VistaTM / VistaTM 64-bit Without RAID Functions 49 2.20 DTS Operation Guide (For P45XE-WiFiN Only 50 2.21 Teaming Function Operation Guide (For P45XE-WiFiN / P45XE-R Only 52 2.22 Untied Overclocking Technology 55 3 BIOS SETUP UTILITY 56 3.1 Introduction 56 3.1.1 BIOS Menu Bar 56 3.1.2 Navigation Keys 57 3.2 Main Screen 57 3.3 Smart Screen 59 3.4 Advanced Screen...
User Manual
Page 5
... the configuration guide to change without further notice. ASRock website http://www.asrock.com If you are using. Because the motherboard specifications and the BIOS software might be updated, the content of this motherboard, please visit our website for purchasing ASRock P45XE-WiFiN / P45XE-R / P45XE motherboard, a reliable motherboard produced under ASRock's consistently stringent quality control. You may find...
... the configuration guide to change without further notice. ASRock website http://www.asrock.com If you are using. Because the motherboard specifications and the BIOS software might be updated, the content of this motherboard, please visit our website for purchasing ASRock P45XE-WiFiN / P45XE-R / P45XE motherboard, a reliable motherboard produced under ASRock's consistently stringent quality control. You may find...
User Manual
Page 8
... 1 x IR header - 1 x COM port header - 1 x HDMI_SPDIF header - 1 x IEEE 1394 header (P45XE-WiFiN / P45XE-R) - CD in header - T. (Intelligent Overclocking Technology) - ASRock OC Tuner (see CAUTION 16) - CPU/Chassis FAN connector - 24 pin ATX power connector - 8 pin 12V power... WHQL * For detailed product information, please visit our website: http://www.asrock.com 8 O. CPU Frequency Stepless Control (see CAUTION 12) BIOS Feature - 8Mb AMI BIOS - Supports Jumperfree Overclocking - Supports Smart BIOS Support CD - CPU Fan Tachometer - CPU Quiet Fan - Front panel ...
... 1 x IR header - 1 x COM port header - 1 x HDMI_SPDIF header - 1 x IEEE 1394 header (P45XE-WiFiN / P45XE-R) - CD in header - T. (Intelligent Overclocking Technology) - ASRock OC Tuner (see CAUTION 16) - CPU/Chassis FAN connector - 24 pin ATX power connector - 8 pin 12V power... WHQL * For detailed product information, please visit our website: http://www.asrock.com 8 O. CPU Frequency Stepless Control (see CAUTION 12) BIOS Feature - 8Mb AMI BIOS - Supports Jumperfree Overclocking - Supports Smart BIOS Support CD - CPU Fan Tachometer - CPU Quiet Fan - Front panel ...
User Manual
Page 9
..." on page 21 for details. 8. For Windows® XP 64-bit and Windows® VistaTM 64-bit with overclocking, including adjusting the setting in the BIOS, applying Untied Overclocking Technology, or using the thirdparty overclocking tools. DTS (Digital Theater Systems) is no such limitation. 7. channel, 6-channel, and 8-channel modes. CAUTION! 1. About...
..." on page 21 for details. 8. For Windows® XP 64-bit and Windows® VistaTM 64-bit with overclocking, including adjusting the setting in the BIOS, applying Untied Overclocking Technology, or using the thirdparty overclocking tools. DTS (Digital Theater Systems) is no such limitation. 7. channel, 6-channel, and 8-channel modes. CAUTION! 1. About...

User Manual
Page 12
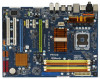
...PCIE2, Green) 36 PCI Express x1 Slot (PCIE1) 37 ATX 12V Connector (ATX12V1) 38 eSATAII Connector (eSATAII_TOP (Port 4), Orange) 12 1.4 Motherboard Layout (P45XE) 1 2 3 45 6 7 22.4cm (8.8 in) eSATAII_TOP (Port 4) eSATAII_BOTTOM (Port 5) PS2 Mouse PS2 Keyboard SPDIF Coaxial SPDIF Optical CPU_FAN1 1 ...IN Center: FRONT Bottom: MIC IN PCIE1 RoHS PCI Express 2.0 AUDIO CODEC CD1 HD_AUDIO1 1 PCIE2 PCIE3 PCIE4 1 USB/WIFI PCIE5 8Mb BIOS Intel ICH10 Super I/O PCI1 HDMI_SPDIF1 1 COM1 1 IR1 1 FLOPPY1 PCI2 CMOS Battery USB8_9 1 PLED PWRBTN USB6_7 1 HDLED PANEL1 1 RESET ...
...PCIE2, Green) 36 PCI Express x1 Slot (PCIE1) 37 ATX 12V Connector (ATX12V1) 38 eSATAII Connector (eSATAII_TOP (Port 4), Orange) 12 1.4 Motherboard Layout (P45XE) 1 2 3 45 6 7 22.4cm (8.8 in) eSATAII_TOP (Port 4) eSATAII_BOTTOM (Port 5) PS2 Mouse PS2 Keyboard SPDIF Coaxial SPDIF Optical CPU_FAN1 1 ...IN Center: FRONT Bottom: MIC IN PCIE1 RoHS PCI Express 2.0 AUDIO CODEC CD1 HD_AUDIO1 1 PCIE2 PCIE3 PCIE4 1 USB/WIFI PCIE5 8Mb BIOS Intel ICH10 Super I/O PCI1 HDMI_SPDIF1 1 COM1 1 IR1 1 FLOPPY1 PCI2 CMOS Battery USB8_9 1 PLED PWRBTN USB6_7 1 HDLED PANEL1 1 RESET ...
User Manual
Page 28
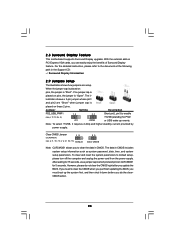
... 5 seconds. Jumper Setting Description PS2_USB_PWR1 (see p.11, No. 14 or p.12, No. 13) Default 2_3 Clear CMOS Note: CLRCMOS1 allows you update the BIOS. The data in the Support CD: ..\ Surround Display Information 2.9 Jumpers Setup The illustration shows how jumpers are "Short" when jumper cap is "Short". 2.8 ...select +5VSB, it down before you do not clear the CMOS right after you to clear the CMOS when you just finish updating the BIOS, you can easily enjoy the benefits of Surround Display feature. However, please do the clearCMOS action. 28 If you need to clear the...
... 5 seconds. Jumper Setting Description PS2_USB_PWR1 (see p.11, No. 14 or p.12, No. 13) Default 2_3 Clear CMOS Note: CLRCMOS1 allows you update the BIOS. The data in the Support CD: ..\ Surround Display Information 2.9 Jumpers Setup The illustration shows how jumpers are "Short" when jumper cap is "Short". 2.8 ...select +5VSB, it down before you do not clear the CMOS right after you to clear the CMOS when you just finish updating the BIOS, you can easily enjoy the benefits of Surround Display feature. However, please do the clearCMOS action. 28 If you need to clear the...
User Manual
Page 31
... / XP / XP 64-bit OS: Click "Audio I/O", select "Connector Settings" , choose "Disable front panel jack detection", and save the change by clicking "OK". 31 E. Enter BIOS Setup Utility. D. network (WLAN) adapter.
... / XP / XP 64-bit OS: Click "Audio I/O", select "Connector Settings" , choose "Disable front panel jack detection", and save the change by clicking "OK". 31 E. Enter BIOS Setup Utility. D. network (WLAN) adapter.
User Manual
Page 36
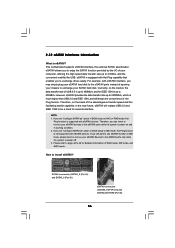
... your SATAII hard disk. If you to 3000Mb/s, which is equipped with Hot Plug capability that enables you set "Configure SATAII as " option in BIOS setup to the eSATAII ports while the system is not supported with eSATAII interface, you can insert or remove your computer, offering the high speed...? If you to enjoy the SATAII function provided by the I/O of Hot Plug feature. eSATAII allows you still want to use eSATAII function in BIOS setup to 400Mb/s. How to 3.0Gb/s, and the convenient mobility like USB. 2.12 eSATAII Interface Introduction What is power-off. 3.
... your SATAII hard disk. If you to 3000Mb/s, which is equipped with Hot Plug capability that enables you set "Configure SATAII as " option in BIOS setup to the eSATAII ports while the system is not supported with eSATAII interface, you can insert or remove your computer, offering the high speed...? If you to enjoy the SATAII function provided by the I/O of Hot Plug feature. eSATAII allows you still want to use eSATAII function in BIOS setup to 400Mb/s. How to 3.0Gb/s, and the convenient mobility like USB. 2.12 eSATAII Interface Introduction What is power-off. 3.

User Manual
Page 44
...the OS you install. Set "SATAII Configuration" to [Enhanced], and then in it! STEP 2: Make a SATA / SATAII Driver Diskette. WARNING! Enter BIOS SETUP UTILITY Advanced screen IDE Configuration. A. During POST at the beginning of system boot-up to bottom side to install those required drivers. D. Formatting ... drivers you install can work properly. 2.18 Installing Windows® XP / XP 64-bit / VistaTM / VistaTM 64-bit With RAID Functions (For P45XE-WiFiN / P45XE-R Only) If you want to install Windows® XP / XP 64-bit on the support CD driver page. Since Windows® 2000 RAID /...
...the OS you install. Set "SATAII Configuration" to [Enhanced], and then in it! STEP 2: Make a SATA / SATAII Driver Diskette. WARNING! Enter BIOS SETUP UTILITY Advanced screen IDE Configuration. A. During POST at the beginning of system boot-up to bottom side to install those required drivers. D. Formatting ... drivers you install can work properly. 2.18 Installing Windows® XP / XP 64-bit / VistaTM / VistaTM 64-bit With RAID Functions (For P45XE-WiFiN / P45XE-R Only) If you want to install Windows® XP / XP 64-bit on the support CD driver page. Since Windows® 2000 RAID /...
User Manual
Page 45
... reading the floppy disk, the driver will be seamlessly upgraded to RAID 0, RAID 1 or RAID 5 at the following steps outline how to set up system BIOS as well. 2.18.2 Setting Up a "RAID Ready" System You can start to your system. Before you start to install Windows® XP / XP 64-bit...
... reading the floppy disk, the driver will be seamlessly upgraded to RAID 0, RAID 1 or RAID 5 at the following steps outline how to set up system BIOS as well. 2.18.2 Setting Up a "RAID Ready" System You can start to your system. Before you start to install Windows® XP / XP 64-bit...

User Manual
Page 47
... / SATAII drivers from the Support CD again so that "Intel Matrix Storage Manager" will be installed to install Windows?" page, please insert the ASRock Support CD into your system. B. Insert the Windows® VistaTM / VistaTM 64-bit optical disk into the optical drive again to SATA Hard... VistaTM 64-bit With RAID Functions If you want to use "Intel Matrix Storage Manager" in the option "Configure SATAII as well. 47 Enter BIOS SETUP UTILITY Advanced screen IDE Configuration. After the installation of Windows® VistaTM / VistaTM 64-bit OS, if you want to manage RAID functions...
... / SATAII drivers from the Support CD again so that "Intel Matrix Storage Manager" will be installed to install Windows?" page, please insert the ASRock Support CD into your system. B. Insert the Windows® VistaTM / VistaTM 64-bit optical disk into the optical drive again to SATA Hard... VistaTM 64-bit With RAID Functions If you want to use "Intel Matrix Storage Manager" in the option "Configure SATAII as well. 47 Enter BIOS SETUP UTILITY Advanced screen IDE Configuration. After the installation of Windows® VistaTM / VistaTM 64-bit OS, if you want to manage RAID functions...
User Manual
Page 48
...system. Using SATA / SATAII HDDs and eSATAII devices without RAID functions, please follow below procedures according to the OS you install. Enter BIOS SETUP UTILITY Advanced screen IDE Configuration. Please make a SATA / SATAII driver diskette by the chipset vendor, RAID / AHCI functions are ... AHCI driver. A. STEP 2: Make a SATA / SATAII driver diskette. Using SATA / SATAII HDDs and eSATAII devices with NCQ function STEP 1: Set Up BIOS. B. 2.19 Installing Windows® 2000 / XP / XP 64-bit / VistaTM / VistaTM 64-bit Without RAID Functions If you want to [IDE]. ...
...system. Using SATA / SATAII HDDs and eSATAII devices without RAID functions, please follow below procedures according to the OS you install. Enter BIOS SETUP UTILITY Advanced screen IDE Configuration. Please make a SATA / SATAII driver diskette by the chipset vendor, RAID / AHCI functions are ... AHCI driver. A. STEP 2: Make a SATA / SATAII driver diskette. Using SATA / SATAII HDDs and eSATAII devices with NCQ function STEP 1: Set Up BIOS. B. 2.19 Installing Windows® 2000 / XP / XP 64-bit / VistaTM / VistaTM 64-bit Without RAID Functions If you want to [IDE]. ...
User Manual
Page 49
...Configuration. Using SATA / SATAII HDDs and eSATAII devices with NCQ function STEP 1: Set Up BIOS. A. STEP 2: Install Windows® VistaTM / VistaTM 64-bit OS on your system. 49 B. Enter BIOS SETUP UTILITY Advanced screen IDE Configuration. STEP 2: Install Windows® VistaTM / VistaTM 64...-bit OS on your system. page, please insert the ASRock Support CD into the optical drive again to continue the installation. ...
...Configuration. Using SATA / SATAII HDDs and eSATAII devices with NCQ function STEP 1: Set Up BIOS. A. STEP 2: Install Windows® VistaTM / VistaTM 64-bit OS on your system. 49 B. Enter BIOS SETUP UTILITY Advanced screen IDE Configuration. STEP 2: Install Windows® VistaTM / VistaTM 64...-bit OS on your system. page, please insert the ASRock Support CD into the optical drive again to continue the installation. ...

User Manual
Page 55
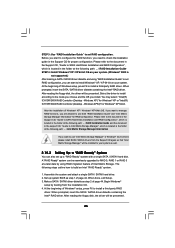
Please refer to the warning on page 9 for the possible overclocking risk before you enable Untied Overclocking function, please enter "Overclock Mode" option of BIOS setup to set the selection from [Auto] to fixed PCI / PCIE buses. Before you apply Untied Overclocking Technology. 55 2.22 Untied Overclocking Technology This motherboard ...
Please refer to the warning on page 9 for the possible overclocking risk before you enable Untied Overclocking function, please enter "Overclock Mode" option of BIOS setup to set the selection from [Auto] to fixed PCI / PCIE buses. Before you apply Untied Overclocking Technology. 55 2.22 Untied Overclocking Technology This motherboard ...
User Manual
Page 56
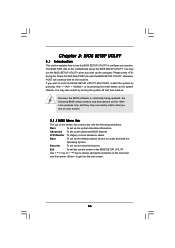
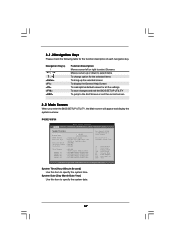
... only, and they may also restart by pressing the reset button on . Please press during the Power-On-Self-Test (POST) to configure your screen. 3.1.1 BIOS Menu Bar The top of the screen has a menu bar with its test routines. You may not exactly match what you start up the security... is constantly being updated, the following selections: Main To set up the system time/date information Advanced To set up the advanced BIOS features H/W Monitor To display current hardware status Boot To set up the default system device to locate and load the Operating System Security To set ...
... only, and they may also restart by pressing the reset button on . Please press during the Power-On-Self-Test (POST) to configure your screen. 3.1.1 BIOS Menu Bar The top of the screen has a menu bar with its test routines. You may not exactly match what you start up the security... is constantly being updated, the following selections: Main To set up the system time/date information Advanced To set up the advanced BIOS features H/W Monitor To display current hardware status Boot To set up the default system device to locate and load the Operating System Security To set ...
User Manual
Page 57
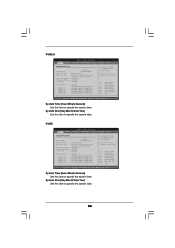
...Date/Year] Use this item to specify the system time. System Time [Hour:Minute:Second] Use this item to specify the system date. 57 P45XE-WiFiN BIOS SETUP UTILITY Main Smart Advanced H/W Monitor Boot Security Exit System Overview System Time System Date [14:00:09] [Fri 08/22/2008...] BIOS Version : P45XE-WiFiN P1.00 Processor Type : Intel (R) Core(TM)2 Duo CPU E6750 @ 2.66GHz (64bit) Processor Speed : 2666MHz Microcode Update : 6FB/B6 Cache Size : 4096KB ...
...Date/Year] Use this item to specify the system time. System Time [Hour:Minute:Second] Use this item to specify the system date. 57 P45XE-WiFiN BIOS SETUP UTILITY Main Smart Advanced H/W Monitor Boot Security Exit System Overview System Time System Date [14:00:09] [Fri 08/22/2008...] BIOS Version : P45XE-WiFiN P1.00 Processor Type : Intel (R) Core(TM)2 Duo CPU E6750 @ 2.66GHz (64bit) Processor Speed : 2666MHz Microcode Update : 6FB/B6 Cache Size : 4096KB ...
User Manual
Page 58
...Select Item Change Field Select Field General Help Load Defaults Save and Exit Exit v02.54 (C) Copyright 1985-2005, American Megatrends, Inc. P45XE-R BIOS SETUP UTILITY Main Smart Advanced H/W Monitor Boot Security Exit System Overview System Time System Date [14:00:09] [Fri 08/22/2008...] BIOS Version : P45XE-R P1.00 Processor Type : Intel (R) Core(TM)2 Duo CPU E6750 @ 2.66GHz (64bit) Processor Speed : 2666MHz Microcode Update : 6FB/B6 Cache Size : ...
...Select Item Change Field Select Field General Help Load Defaults Save and Exit Exit v02.54 (C) Copyright 1985-2005, American Megatrends, Inc. P45XE-R BIOS SETUP UTILITY Main Smart Advanced H/W Monitor Boot Security Exit System Overview System Time System Date [14:00:09] [Fri 08/22/2008...] BIOS Version : P45XE-R P1.00 Processor Type : Intel (R) Core(TM)2 Duo CPU E6750 @ 2.66GHz (64bit) Processor Speed : 2666MHz Microcode Update : 6FB/B6 Cache Size : ...
User Manual
Page 59
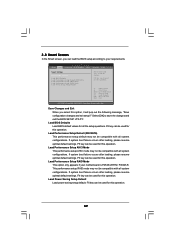
... screen, you select this operation. 59 F6 key can load the BIOS setup according to save the changes and exit the BIOS SETUP UTILITY. Select [OK] to your motherboard is P45XE-WiFiN / P45XE-R. BIOS SETUP UTILITY Main Smart Advanced H/W Monitor Boot Security Exit Smart Settings ...Save Changes and Exit Load BIOS Defaults Load Performance Setup Default (IDE/SATA...
... screen, you select this operation. 59 F6 key can load the BIOS setup according to save the changes and exit the BIOS SETUP UTILITY. Select [OK] to your motherboard is P45XE-WiFiN / P45XE-R. BIOS SETUP UTILITY Main Smart Advanced H/W Monitor Boot Security Exit Smart Settings ...Save Changes and Exit Load BIOS Defaults Load Performance Setup Default (IDE/SATA...
User Manual
Page 60
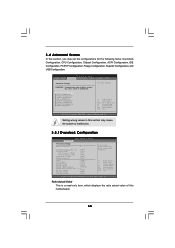
3.4 Advanced Screen In this section may cause the system to malfunction. 3.4.1Overclock Configuration BIOS SETUP UTILITY Advanced Overclock Settings Ratio Actual Value Ratio CMOS Setting Intel (R) SpeedStep(tm) tech. Setting wrong values in below sections may set ... FSB to Sub Screen F1 General Help F9 Load Defaults F10 Save and Exit ESC Exit v02.54 (C) Copyright 1985-2005, American Megatrends, Inc. BIOS SETUP UTILITY Main Smart Advanced H/W Monitor Boot Security Exit Advanced Settings WARNING : Setting wrong values in this section, you may cause system to malfunction.
3.4 Advanced Screen In this section may cause the system to malfunction. 3.4.1Overclock Configuration BIOS SETUP UTILITY Advanced Overclock Settings Ratio Actual Value Ratio CMOS Setting Intel (R) SpeedStep(tm) tech. Setting wrong values in below sections may set ... FSB to Sub Screen F1 General Help F9 Load Defaults F10 Save and Exit ESC Exit v02.54 (C) Copyright 1985-2005, American Megatrends, Inc. BIOS SETUP UTILITY Main Smart Advanced H/W Monitor Boot Security Exit Advanced Settings WARNING : Setting wrong values in this section, you may cause system to malfunction.
User Manual
Page 63
... CMOS Setting If the ratio status is unlocked, you select [Manual], Untied Overclocking function is enabled. Ratio Actual Value This is heavy loaded. 3.4.2CPU Configuration BIOS SETUP UTILITY Advanced CPU Configuration Overclock Mode CPU Frequency (MHz) PCIE Frequency (MHz) Boot Failure Guard Spread Spectrum Ratio Actual Value Ratio CMOS Setting Enhanced...
... CMOS Setting If the ratio status is unlocked, you select [Manual], Untied Overclocking function is enabled. Ratio Actual Value This is heavy loaded. 3.4.2CPU Configuration BIOS SETUP UTILITY Advanced CPU Configuration Overclock Mode CPU Frequency (MHz) PCIE Frequency (MHz) Boot Failure Guard Spread Spectrum Ratio Actual Value Ratio CMOS Setting Enhanced...


