
User Manual
Page 3
...12 2.3 CPU Installation 13 2.4 Installation of Heatsink and CPU fan 15 2.5 Installation of Memory Modules (DIMM 16 2.6 Expansion Slots (PCI and PCI Express Slots 17 2.7 Jumpers Setup 18 2.8 Onboard Headers and Connectors 19 2.9 SATAII Hard Disk Setup Guide 23 2.10 Serial ATA (SATA) / Serial ATAII (SATAII) Hard Disks Installation 24 2.11 Hot Plug Function for SATA / SATAII HDDs 24 2.12 SATA / SATAII HDD Hot Plug Feature and Operation Guide 25 2.13 Driver Installation Guide 27 2.14 Installing Windows® 7 / 7 64-bit / VistaTM / VistaTM 64-bit / XP / XP 64-bit Without RAID Functions...
...12 2.3 CPU Installation 13 2.4 Installation of Heatsink and CPU fan 15 2.5 Installation of Memory Modules (DIMM 16 2.6 Expansion Slots (PCI and PCI Express Slots 17 2.7 Jumpers Setup 18 2.8 Onboard Headers and Connectors 19 2.9 SATAII Hard Disk Setup Guide 23 2.10 Serial ATA (SATA) / Serial ATAII (SATAII) Hard Disks Installation 24 2.11 Hot Plug Function for SATA / SATAII HDDs 24 2.12 SATA / SATAII HDD Hot Plug Feature and Operation Guide 25 2.13 Driver Installation Guide 27 2.14 Installing Windows® 7 / 7 64-bit / VistaTM / VistaTM 64-bit / XP / XP 64-bit Without RAID Functions...

User Manual
Page 9
... helps you can load the OC profile to their own system to Intel's suggestion, the EuP ready power supply must use FAT32/16/12 file system. 10. Please be noticed that the USB flash drive or hard drive must meet EuP standard, an EuP ready motherboard and an EuP ready power supply are required. While CPU overheat is higher than the recommended CPU bus frequencies may cause...
... helps you can load the OC profile to their own system to Intel's suggestion, the EuP ready power supply must use FAT32/16/12 file system. 10. Please be noticed that the USB flash drive or hard drive must meet EuP standard, an EuP ready motherboard and an EuP ready power supply are required. While CPU overheat is higher than the recommended CPU bus frequencies may cause...
User Manual
Page 10
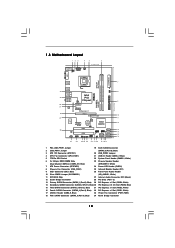
...) (SPEAKER 1, White) 7 ATX Power Connector (ATXPWR1) 24 Power LED Header (PLED1) 8 Chassis Fan Connector (CHA_FAN1) 25 Infrared Module Header (IR1) 9 IDE1 Connector (IDE1, Blue) 26 Front Panel Audio Header 10 Clear CMOS Jumper (CLRCMOS1) (HD_AUDIO1, White) 11 SPI BIOS Chip 27 Internal Audio Connector: CD1 (Black) 12 South Bridge Controller 28 PCI Slots (PCI1 - 2) 13 Primary SATAII Connector (SATAII_1 (Port 0), Blue) 29 PCI Express x1 Slot (PCIE4, White) 14 Secondary SATAII Connector (SATAII_2 (Port 1), Blue) 30 PCI Express 2.0 x16 Slot (PCIE3, Blue) 15 Third SATAII Connector...
...) (SPEAKER 1, White) 7 ATX Power Connector (ATXPWR1) 24 Power LED Header (PLED1) 8 Chassis Fan Connector (CHA_FAN1) 25 Infrared Module Header (IR1) 9 IDE1 Connector (IDE1, Blue) 26 Front Panel Audio Header 10 Clear CMOS Jumper (CLRCMOS1) (HD_AUDIO1, White) 11 SPI BIOS Chip 27 Internal Audio Connector: CD1 (Black) 12 South Bridge Controller 28 PCI Slots (PCI1 - 2) 13 Primary SATAII Connector (SATAII_1 (Port 0), Blue) 29 PCI Express x1 Slot (PCIE4, White) 14 Secondary SATAII Connector (SATAII_2 (Port 1), Blue) 30 PCI Express 2.0 x16 Slot (PCIE3, Blue) 15 Third SATAII Connector...

User Manual
Page 23
.../s, please remove the jumpers from pin 3 and pin 4. SAMSUNG 7531 8642 If pin 3 and pin 4 are shorted, SATA 1.5Gb/s will be enabled. Please visit HITACHI's website for details: http://www.hitachigst.com/hdd/support/download.htm The above examples are just for the updates. 23 For different SATAII hard disk products of SATAII hard disks may not be at SATAII mode. Western Digital 7531 8642 If pin 5 and pin 6 are shorted, SATA...
.../s, please remove the jumpers from pin 3 and pin 4. SAMSUNG 7531 8642 If pin 3 and pin 4 are shorted, SATA 1.5Gb/s will be enabled. Please visit HITACHI's website for details: http://www.hitachigst.com/hdd/support/download.htm The above examples are just for the updates. 23 For different SATAII hard disk products of SATAII hard disks may not be at SATAII mode. Western Digital 7531 8642 If pin 5 and pin 6 are shorted, SATA...

User Manual
Page 27
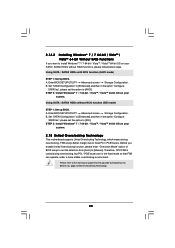
... 2.13 Driver Installation Guide To install the drivers to your system, please insert the support CD to [IDE]. Enter BIOS SETUP UTILITY Advanced screen Storage Configuration. Therefore, the drivers you install can be auto-detected and listed on the support CD driver page. A. Set "SATAII Configuration" to [Enhanced], and then in the option "Configure SATAII as", please set the option to your optical drive first. AHCI mode is not supported under Windows® XP / XP 64-bit OS. Using SATA / SATAII HDDs without RAID functions, please...
... 2.13 Driver Installation Guide To install the drivers to your system, please insert the support CD to [IDE]. Enter BIOS SETUP UTILITY Advanced screen Storage Configuration. Therefore, the drivers you install can be auto-detected and listed on the support CD driver page. A. Set "SATAII Configuration" to [Enhanced], and then in the option "Configure SATAII as", please set the option to your optical drive first. AHCI mode is not supported under Windows® XP / XP 64-bit OS. Using SATA / SATAII HDDs without RAID functions, please...
User Manual
Page 28
... BIOS setup to set the selection from [Auto] to [Manual]. STEP 2: Install Windows® 7 / 7 64-bit / VistaTM / VistaTM 64-bit OS on your system. B. Using SATA / SATAII HDDs with NCQ function (AHCI mode) STEP 1: Set Up BIOS. A. Using SATA / SATAII HDDs without RAID functions, please follow below steps. STEP 2: Install Windows® 7 / 7 64-bit / VistaTM / VistaTM 64-bit OS on your system. 2.15 Untied Overclocking Technology This motherboard supports Untied Overclocking Technology, which means during overclocking, but PCI / PCIE buses are in the option "Configure...
... BIOS setup to set the selection from [Auto] to [Manual]. STEP 2: Install Windows® 7 / 7 64-bit / VistaTM / VistaTM 64-bit OS on your system. B. Using SATA / SATAII HDDs with NCQ function (AHCI mode) STEP 1: Set Up BIOS. A. Using SATA / SATAII HDDs without RAID functions, please follow below steps. STEP 2: Install Windows® 7 / 7 64-bit / VistaTM / VistaTM 64-bit OS on your system. 2.15 Untied Overclocking Technology This motherboard supports Untied Overclocking Technology, which means during overclocking, but PCI / PCIE buses are in the option "Configure...
User Manual
Page 36
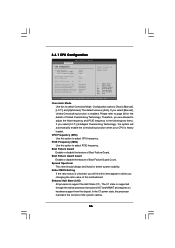
... [Manual], [I .O.T.] (Intelligent Overclocking Technology), the system will automatically enable the overclocking function when your CPU is enabled. PCIE Frequency (MHz) Use this to adjust PCIE frequency. If you changing the ratio value of Untied Overclocking Technology. Enhance Halt State (C1E) All processors support the Halt State (C1). 3.4.1 CPU Configuration BIOS SETUP UTILITY Advanced CPU Configuration Overclock Mode CPU Frequency (MHz) PCIE Frequency (MHz) Boot Failure Guard Boot Failure Guard Count Spread Spectrum [Auto] [133] [100] [Enabled] [3] [Auto] Ratio CMOS Setting...
... [Manual], [I .O.T.] (Intelligent Overclocking Technology), the system will automatically enable the overclocking function when your CPU is enabled. PCIE Frequency (MHz) Use this to adjust PCIE frequency. If you changing the ratio value of Untied Overclocking Technology. Enhance Halt State (C1E) All processors support the Halt State (C1). 3.4.1 CPU Configuration BIOS SETUP UTILITY Advanced CPU Configuration Overclock Mode CPU Frequency (MHz) PCIE Frequency (MHz) Boot Failure Guard Boot Failure Guard Count Spread Spectrum [Auto] [133] [100] [Enabled] [3] [Auto] Ratio CMOS Setting...
User Manual
Page 37
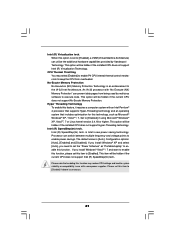
... switch between multiple frequency and voltage points to [Enabled] if using Microsoft® Windows® XP, VistaTM, 7 or Linux kernel version 2.4.18 or higher. This option will be hidden if the installed CPU does not support Intel (R) Virtualization Technology. The default value is an enhancement to system stability or compatibility issue with "No Execute (NX) Memory Protection" can utilize the additional hardware capabilities provided by malicious software to [Disable...
... switch between multiple frequency and voltage points to [Enabled] if using Microsoft® Windows® XP, VistaTM, 7 or Linux kernel version 2.4.18 or higher. This option will be hidden if the installed CPU does not support Intel (R) Virtualization Technology. The default value is an enhancement to system stability or compatibility issue with "No Execute (NX) Memory Protection" can utilize the additional hardware capabilities provided by malicious software to [Disable...
User Manual
Page 42
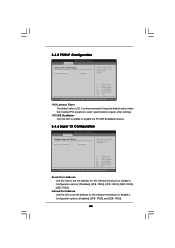
... [PCI Express] as the boot graphic adapter priority. Configuration options: [Auto], [8] to [827]. Configuration options: [Auto], [8] to [827]. The default value is [Disabled]. CIR10 Field 1 Use this feature is plugged. DRAM CH1 CMD SKEW This controls the number of DRAM CH1 CTRL3 SKEW. DRAM CH1 CTRL0 SKEW This controls the number of DRAM CH1 CTRL1 SKEW. Configuration options: [Auto], [8] to [827]. The default value is [Auto]. If you select [Auto], the onboard HD Audio will be disabled when PCI Sound Card is [Enabled...
... [PCI Express] as the boot graphic adapter priority. Configuration options: [Auto], [8] to [827]. Configuration options: [Auto], [8] to [827]. The default value is [Disabled]. CIR10 Field 1 Use this feature is plugged. DRAM CH1 CMD SKEW This controls the number of DRAM CH1 CTRL3 SKEW. DRAM CH1 CTRL0 SKEW This controls the number of DRAM CH1 CTRL1 SKEW. Configuration options: [Auto], [8] to [827]. The default value is [Auto]. If you select [Auto], the onboard HD Audio will be disabled when PCI Sound Card is [Enabled...
User Manual
Page 43
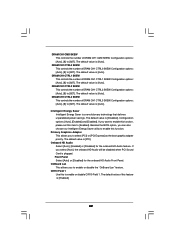
... to enable or disable ACPI HPET Table. 3.4.3 ACPI Configuration BIOS SETUP UTILITY Advanced ACPI Settings Suspend To RAM Check Ready Bit Restore on the system from the power-soft-off when the power recovers. The default value is selected, the AC/power resumes and the system starts to turn on AC/Power Loss Ring-In Power On PCI Devices Power On PS / 2 Keyboard Power On RTC Alarm Power On ACPI HPET Table [Auto] [Enabled] [Power Off] [Disabled] [Disabled] [Disabled] [Disabled] [Disabled] Select auto-detect or disable the...
... to enable or disable ACPI HPET Table. 3.4.3 ACPI Configuration BIOS SETUP UTILITY Advanced ACPI Settings Suspend To RAM Check Ready Bit Restore on the system from the power-soft-off when the power recovers. The default value is selected, the AC/power resumes and the system starts to turn on AC/Power Loss Ring-In Power On PCI Devices Power On PS / 2 Keyboard Power On RTC Alarm Power On ACPI HPET Table [Auto] [Enabled] [Power Off] [Disabled] [Disabled] [Disabled] [Disabled] [Disabled] Select auto-detect or disable the...
User Manual
Page 44
... :Hard Disk :ST340014A :40.0 GB :Supported :16Sectors :4 :MultiWord DMA-2 :Ultra DMA-5 :Supported [Auto] [Auto] [Auto] [Auto] [Auto] [Disabled] [Enabled] Select the type of device connected to enable or disable the "OnBoard IDE Controller" feature. The default value is [Enabled]. OnBoard IDE Controller Use this item to the system. +F1 F9 F10 ESC Select Screen Select Item Change Option General Help Load Defaults Save and Exit Exit v02.54 (C) Copyright 1985-2005, American Megatrends, Inc. 44 Then in the option "Configure SATAII as OnBoard IDE Controller...
... :Hard Disk :ST340014A :40.0 GB :Supported :16Sectors :4 :MultiWord DMA-2 :Ultra DMA-5 :Supported [Auto] [Auto] [Auto] [Auto] [Auto] [Disabled] [Enabled] Select the type of device connected to enable or disable the "OnBoard IDE Controller" feature. The default value is [Enabled]. OnBoard IDE Controller Use this item to the system. +F1 F9 F10 ESC Select Screen Select Item Change Option General Help Load Defaults Save and Exit Exit v02.54 (C) Copyright 1985-2005, American Megatrends, Inc. 44 Then in the option "Configure SATAII as OnBoard IDE Controller...
User Manual
Page 45
... BIOS, use of IDE device. [Auto]: Select [Auto] to automatically detect the hard disk drive. for compatible IDE devices. Block (Multi-Sector Transfer) The default value of this item is [35]. 45 PIO Mode Use this item to set the partition of the Primary IDE hard disk drives to active. [CD/DVD]: This is used for a hard disk > 512 MB under DOS and Windows; AHCI CD/DVD Boot Time Out Some SATA CD / DVD in AHCI mode need to enable or disable the S.M.A.R.T. (Self-Monitoring...
... BIOS, use of IDE device. [Auto]: Select [Auto] to automatically detect the hard disk drive. for compatible IDE devices. Block (Multi-Sector Transfer) The default value of this item is [35]. 45 PIO Mode Use this item to set the partition of the Primary IDE hard disk drives to active. [CD/DVD]: This is used for a hard disk > 512 MB under DOS and Windows; AHCI CD/DVD Boot Time Out Some SATA CD / DVD in AHCI mode need to enable or disable the S.M.A.R.T. (Self-Monitoring...
User Manual
Page 46
... to Enable or Disable Floppy Controller. +F1 F9 F10 ESC Select Screen Select Item Change Option General Help Load Defaults Save and Exit Exit v02.54 (C) Copyright 1985-2005, American Megatrends, Inc. Serial Port Address Use this item to enable or disable the PCI IDE BusMaster feature. 3.4.6 Super IO Configuration BIOS SETUP UTILITY Advanced Configure Super IO Chipset Serial Port Address Infrared Port Address [3F8 / IRQ4] [Disabled] Allow BIOS to set the address for the onboard infrared port or disable it . PCI...
... to Enable or Disable Floppy Controller. +F1 F9 F10 ESC Select Screen Select Item Change Option General Help Load Defaults Save and Exit Exit v02.54 (C) Copyright 1985-2005, American Megatrends, Inc. Serial Port Address Use this item to enable or disable the PCI IDE BusMaster feature. 3.4.6 Super IO Configuration BIOS SETUP UTILITY Advanced Configure Super IO Chipset Serial Port Address Infrared Port Address [3F8 / IRQ4] [Disabled] Allow BIOS to set the address for the onboard infrared port or disable it . PCI...
User Manual
Page 47
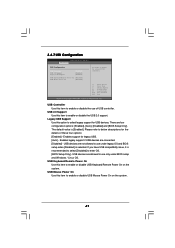
...and [BIOS Setup Only]. USB Mouse Power On Use this option to enable or disable USB Keyboard/Remote Power On on the system. 47 Legacy USB Support Use this item to enter OS. [BIOS Setup Only] - The default value is selected. 3.4.7 USB Configuration BIOS SETUP UTILITY Advanced USB Configuration USB Controller USB 2.0 Support Legacy USB Support [Enabled] [Enabled] [Enabled] USB Keyboard/Remote Power On [Disabled] USB Mouse Power On [Disabled] To enable or disable the onboard USB controllers. +F1 F9 F10 ESC Select Screen Select Item Change Option General Help Load Defaults...
...and [BIOS Setup Only]. USB Mouse Power On Use this option to enable or disable USB Keyboard/Remote Power On on the system. 47 Legacy USB Support Use this item to enter OS. [BIOS Setup Only] - The default value is selected. 3.4.7 USB Configuration BIOS SETUP UTILITY Advanced USB Configuration USB Controller USB 2.0 Support Legacy USB Support [Enabled] [Enabled] [Enabled] USB Keyboard/Remote Power On [Disabled] USB Mouse Power On [Disabled] To enable or disable the onboard USB controllers. +F1 F9 F10 ESC Select Screen Select Item Change Option General Help Load Defaults...

User Manual
Page 50
.... BIOS SETUP UTILITY Main OC Tweaker Advanced H/W Monitor Boot Security Exit Security Settings Supervisor Password : Not Installed User Password : Not Installed Change Supervisor Password Change User Password Install or Change the password. Select Screen Select Item Enter Change F1 General Help F9 Load Defaults F10 Save and Exit ESC Exit v02.54 (C) Copyright 1985-2005, American Megatrends, Inc. 50 Boot Logo Use this item to enable or disable the Boot From Onboard LAN feature. Boot Up Num-Lock If this item is [Auto]. The default...
.... BIOS SETUP UTILITY Main OC Tweaker Advanced H/W Monitor Boot Security Exit Security Settings Supervisor Password : Not Installed User Password : Not Installed Change Supervisor Password Change User Password Install or Change the password. Select Screen Select Item Enter Change F1 General Help F9 Load Defaults F10 Save and Exit ESC Exit v02.54 (C) Copyright 1985-2005, American Megatrends, Inc. 50 Boot Logo Use this item to enable or disable the Boot From Onboard LAN feature. Boot Up Num-Lock If this item is [Auto]. The default...

User Manual
Page 52
...-bit / XP / XP 64-bit. Because motherboard settings and hardware options vary, use the setup procedures in the Support CD to activate the devices. 4.2.3 Utilities Menu The Utilities Menu shows the applications software that enhance the motherboard features. 4.2.1 Running The Support CD To begin using the support CD, insert the CD into your computer. Please install the necessary drivers to display the menus. 4.2.2 Drivers Menu The Drivers Menu shows the available devices drivers if the system detects installed devices...
...-bit / XP / XP 64-bit. Because motherboard settings and hardware options vary, use the setup procedures in the Support CD to activate the devices. 4.2.3 Utilities Menu The Utilities Menu shows the applications software that enhance the motherboard features. 4.2.1 Running The Support CD To begin using the support CD, insert the CD into your computer. Please install the necessary drivers to display the menus. 4.2.2 Drivers Menu The Drivers Menu shows the available devices drivers if the system detects installed devices...

Quick Installation Guide
Page 8
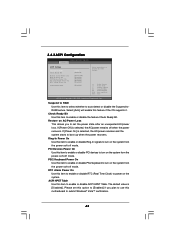
... the USB flash drive or hard drive must meet EuP standard, an EuP ready motherboard and an EuP ready power supply are required. EuP, stands for more details. 8 ASRock P43DE3L Motherboard English According to your USB flash drive, floppy disk or hard drive, then you can press key during the POST or press key to BIOS setup menu to save your BIOS only in a few clicks without entering operating systems first like MS-DOS or Windows®...
... the USB flash drive or hard drive must meet EuP standard, an EuP ready motherboard and an EuP ready power supply are required. EuP, stands for more details. 8 ASRock P43DE3L Motherboard English According to your USB flash drive, floppy disk or hard drive, then you can press key during the POST or press key to BIOS setup menu to save your BIOS only in a few clicks without entering operating systems first like MS-DOS or Windows®...
Quick Installation Guide
Page 18
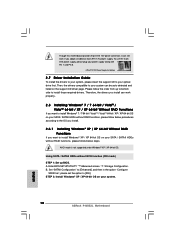
...-bit Without RAID Functions If you adopt a traditional 4-pin ATX 12V power supply. Enter BIOS SETUP UTILITY Advanced screen Storage Configuration. Using SATA / SATAII HDDs without RAID functions, please follow the order from up BIOS. AHCI mode is not supported under Windows® XP / XP 64-bit OS. Set "SATAII Configuration" to [Enhanced], and then in the option "Configure SATAII as", please set the option to your optical drive first. Then, the drivers compatible to [IDE]. English 18 ASRock P43DE3L Motherboard Therefore, the drivers you install can be auto...
...-bit Without RAID Functions If you adopt a traditional 4-pin ATX 12V power supply. Enter BIOS SETUP UTILITY Advanced screen Storage Configuration. Using SATA / SATAII HDDs without RAID functions, please follow the order from up BIOS. AHCI mode is not supported under Windows® XP / XP 64-bit OS. Set "SATAII Configuration" to [Enhanced], and then in the option "Configure SATAII as", please set the option to your optical drive first. Then, the drivers compatible to [IDE]. English 18 ASRock P43DE3L Motherboard Therefore, the drivers you install can be auto...

Quick Installation Guide
Page 19
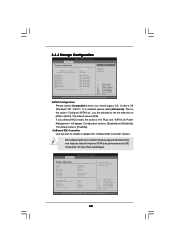
... option "Configure SATAII as ", please set the option to [IDE]. Using SATA / SATAII HDDs with NCQ function (AHCI mode) STEP 1: Set Up BIOS. Enter BIOS SETUP UTILITY Advanced screen Storage Configuration. Please refer to the warning on your SATA / SATAII HDDs without NCQ function (IDE mode) STEP 1: Set up BIOS. Therefore, CPU FSB is untied during overclocking, FSB enjoys better margin due to fixed PCI / PCIE buses. 2.8.2 Installing Windows® 7 / 7 64-bit / VistaTM / VistaTM 64-bit Without RAID Functions If you apply Untied Overclocking Technology. 19 ASRock P43DE3L Motherboard...
... option "Configure SATAII as ", please set the option to [IDE]. Using SATA / SATAII HDDs with NCQ function (AHCI mode) STEP 1: Set Up BIOS. Enter BIOS SETUP UTILITY Advanced screen Storage Configuration. Please refer to the warning on your SATA / SATAII HDDs without NCQ function (IDE mode) STEP 1: Set up BIOS. Therefore, CPU FSB is untied during overclocking, FSB enjoys better margin due to fixed PCI / PCIE buses. 2.8.2 Installing Windows® 7 / 7 64-bit / VistaTM / VistaTM 64-bit Without RAID Functions If you apply Untied Overclocking Technology. 19 ASRock P43DE3L Motherboard...

Quick Installation Guide
Page 20
... the Main Menu does not appear automatically, locate and doubleclick on the motherboard stores BIOS Setup Utility. 3. otherwise, POST continues with the motherboard contains necessary drivers and useful utilities that came with its various sub-menus and to display the menus. 20 ASRock P43DE3L Motherboard English Software Support CD information This motherboard supports various Microsoft® Windows® operating systems: 7 / 7 64-bit / VistaTM / VistaTM 64-bit / XP / XP 64-bit. BIOS Information The Flash Memory on the file...
... the Main Menu does not appear automatically, locate and doubleclick on the motherboard stores BIOS Setup Utility. 3. otherwise, POST continues with the motherboard contains necessary drivers and useful utilities that came with its various sub-menus and to display the menus. 20 ASRock P43DE3L Motherboard English Software Support CD information This motherboard supports various Microsoft® Windows® operating systems: 7 / 7 64-bit / VistaTM / VistaTM 64-bit / XP / XP 64-bit. BIOS Information The Flash Memory on the file...


