
User Manual
Page 6
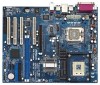
... CPU: ATX Form Factor: 12.0-in x 9.6-in, 30.5 cm x 24.4 cm 1. 775-Pin Socket Supporting Intel® Pentium® 4 / Celeron® processor (in 775-land LGA package) 2. 478-Pin Socket Supporting Intel® Pentium® 4 / Celeron® (Prescott, Northwood, Willimate) processor Chipsets: North ...10/100 Ethernet), supports Wake-On-LAN Hardware Monitor: CPU temperature sensing, Motherboard temperature sensing, CPU overheat shutdown to protect CPU life (ASRock U-COP)(see CAUTION 3), CPU fan tachometer, Chassis fan tachometer, Voltage monitoring: +12V, +5V, +3V, Vcore PCI slots: ...
... CPU: ATX Form Factor: 12.0-in x 9.6-in, 30.5 cm x 24.4 cm 1. 775-Pin Socket Supporting Intel® Pentium® 4 / Celeron® processor (in 775-land LGA package) 2. 478-Pin Socket Supporting Intel® Pentium® 4 / Celeron® (Prescott, Northwood, Willimate) processor Chipsets: North ...10/100 Ethernet), supports Wake-On-LAN Hardware Monitor: CPU temperature sensing, Motherboard temperature sensing, CPU overheat shutdown to protect CPU life (ASRock U-COP)(see CAUTION 3), CPU fan tachometer, Chassis fan tachometer, Voltage monitoring: +12V, +5V, +3V, Vcore PCI slots: ...

User Manual
Page 8
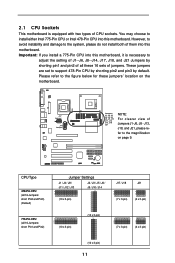
...J2 1111111111 CPU_FAN1 J14 J8 J18 1111111111 J21 1111111 1111 1111111111 1111111111 J4 J11 1111111111 1111111111 J1 P4-478 J3 1111111111 1111111111 Intel 848P Chipset 1.5V_AGP1 PCI1 P4 Combo Prescott 800 FSB800 USB2.0 DDR400 5.1CH AGP8X SATA CD1 AUX1 AUDIO1 1 JR1 JL1 AUDIO ... 15 14 13 6 7 8 9 10 11 12 1 PS2_USB_PWR1 Jumper 2 ATX 12V Connector (ATX12V1) 3 775-Pin CPU Socket 4 CPU Heatsink Retention Module (for 478-Pin CPU) 5 478-Pin CPU Socket 6 J1- J13 Jumpers, J18 / J21 Jumpers 7 North Bridge Controller 8 CPU Fan Connector (CPU_FAN1) 9 184-pin DDR...
...J2 1111111111 CPU_FAN1 J14 J8 J18 1111111111 J21 1111111 1111 1111111111 1111111111 J4 J11 1111111111 1111111111 J1 P4-478 J3 1111111111 1111111111 Intel 848P Chipset 1.5V_AGP1 PCI1 P4 Combo Prescott 800 FSB800 USB2.0 DDR400 5.1CH AGP8X SATA CD1 AUX1 AUDIO1 1 JR1 JL1 AUDIO ... 15 14 13 6 7 8 9 10 11 12 1 PS2_USB_PWR1 Jumper 2 ATX 12V Connector (ATX12V1) 3 775-Pin CPU Socket 4 CPU Heatsink Retention Module (for 478-Pin CPU) 5 478-Pin CPU Socket 6 J1- J13 Jumpers, J18 / J21 Jumpers 7 North Bridge Controller 8 CPU Fan Connector (CPU_FAN1) 9 184-pin DDR...
User Manual
Page 11
... 2 1 (7 x 3-pin) 2 1 (4 x 3-pin) (10 x 3-pin) 11 Important: If you install a 775-Pin CPU into this motherboard, it is equipped with two types of CPU sockets. CPU Type 478-Pin CPU (all 16 Jumpers: short Pin2 and Pin3) (Default) Jumper Settings J1 / J4 / J8 / J11 / J12 / J13 3 2 J2 / J3 / J5 / J6 / J9 / ...refer to the figure below for these 16 sets of jumpers. You may choose to install either Intel 775-Pin CPU or Intel 478-Pin CPU into this motherboard. 2.1 CPU Sockets This motherboard is necessary to adjust the setting of J1--J6, J8--J14, J17, J18, and J21 Jumpers by default.
... 2 1 (7 x 3-pin) 2 1 (4 x 3-pin) (10 x 3-pin) 11 Important: If you install a 775-Pin CPU into this motherboard, it is equipped with two types of CPU sockets. CPU Type 478-Pin CPU (all 16 Jumpers: short Pin2 and Pin3) (Default) Jumper Settings J1 / J4 / J8 / J11 / J12 / J13 3 2 J2 / J3 / J5 / J6 / J9 / ...refer to the figure below for these 16 sets of jumpers. You may choose to install either Intel 775-Pin CPU or Intel 478-Pin CPU into this motherboard. 2.1 CPU Sockets This motherboard is necessary to adjust the setting of J1--J6, J8--J14, J17, J18, and J21 Jumpers by default.

User Manual
Page 12
... not force to install either Intel 775-Pin CPU or Intel 478-Pin CPU into the socket, please check if the CPU surface is unclean or if there is found. Otherwise, the CPU will be seriously damaged. Open the socket: Step 1-1. Rotate the load lever to clear retention tab. However, to avoid ... open position at approximately 100 degrees. 12 Step 1-3. Step 1-2. For the installation of Intel 775-Pin CPU, please follow the steps below. 775-Pin Socket Overview Before you insert the 775-Pin CPU into this motherboard. Rotate the load plate to the system, please do not install both of CPU...
... not force to install either Intel 775-Pin CPU or Intel 478-Pin CPU into the socket, please check if the CPU surface is unclean or if there is found. Otherwise, the CPU will be seriously damaged. Open the socket: Step 1-1. Rotate the load lever to clear retention tab. However, to avoid ... open position at approximately 100 degrees. 12 Step 1-3. Step 1-2. For the installation of Intel 775-Pin CPU, please follow the steps below. 775-Pin Socket Overview Before you insert the 775-Pin CPU into this motherboard. Rotate the load plate to the system, please do not install both of CPU...

User Manual
Page 14
... fits only in place, press it firmly on the side tab to secure the CPU. When the CPU is locked. The lever clicks on the socket while you push down the socket lever to indicate that its marked corner matches the base of the pins. For the installation of Intel... 478-Pin CPU, please follow the steps below. Unlock the socket by lifting the lever up to The Socket Marked Corner STEP 4: Push Down And Lock The Socket Lever 14 II. Step 2. Step 4. Lift Lever Up to 90° CPU Marked...
... fits only in place, press it firmly on the side tab to secure the CPU. When the CPU is locked. The lever clicks on the socket while you push down the socket lever to indicate that its marked corner matches the base of the pins. For the installation of Intel... 478-Pin CPU, please follow the steps below. Unlock the socket by lifting the lever up to The Socket Marked Corner STEP 4: Push Down And Lock The Socket Lever 14 II. Step 2. Step 4. Lift Lever Up to 90° CPU Marked...

User Manual
Page 15
... and the heatsink to install either Intel 775-Pin CPU or Intel 478-Pin CPU into this motherboard. Then connect the CPU fan to the CPU fan connector on the socket surface. Place the heatsink onto the socket. Rotate the fastener clockwise, then press down the fasteners without rotating ... choose to improve heat dissipation. Step 2. For proper installation, please kindly refer to ensure cable does not interfere with two types of CPU sockets. Secure excess cable with tie-wrap to the instruction manuals of the heatsink for 775-Pin CPU. 2.3 Installation of CPU Fan and Heatsink This...
... and the heatsink to install either Intel 775-Pin CPU or Intel 478-Pin CPU into this motherboard. Then connect the CPU fan to the CPU fan connector on the socket surface. Place the heatsink onto the socket. Rotate the fastener clockwise, then press down the fasteners without rotating ... choose to improve heat dissipation. Step 2. For proper installation, please kindly refer to ensure cable does not interfere with two types of CPU sockets. Secure excess cable with tie-wrap to the instruction manuals of the heatsink for 775-Pin CPU. 2.3 Installation of CPU Fan and Heatsink This...
