
User Manual
Page 3
Introduction 5 1.1 Package Contents 5 1.2 Specifications 6 1.3 Motherboard Layout 11 1.4 I/O Panel 12 2 . Installation 13 Pre-installation Precautions 13 2.1 CPU Installation 14 2.2 Installation of CPU Fan and Heatsink 14 2.3 Installation of Memory Modules (DIMM 15 2.4 Expansion Slots (PCI and PCI Express Slots 17 2.5 Easy Multi Monitor Feature 18 2.6 Jumpers Setup 19 2.7 Onboard Headers ...
Introduction 5 1.1 Package Contents 5 1.2 Specifications 6 1.3 Motherboard Layout 11 1.4 I/O Panel 12 2 . Installation 13 Pre-installation Precautions 13 2.1 CPU Installation 14 2.2 Installation of CPU Fan and Heatsink 14 2.3 Installation of Memory Modules (DIMM 15 2.4 Expansion Slots (PCI and PCI Express Slots 17 2.5 Easy Multi Monitor Feature 18 2.6 Jumpers Setup 19 2.7 Onboard Headers ...

User Manual
Page 9
...preparing an additional floppy diskette or other than the recommended CPU bus frequencies may cause the instability of Intelligent Energy Saver. ASRock website: http://www.asrock.com 11. ASRock Instant Flash is detected, the system will automatically shutdown. Just launch this utility, you install the PC system. 9... then can update your OC settings as yours! To improve heat dissipation, remember to spray thermal grease between the CPU and the heatsink when you can only be noted that delivers unparalleled power savings. To use FAT32/ 16/12 file system. 13. Please be ...
...preparing an additional floppy diskette or other than the recommended CPU bus frequencies may cause the instability of Intelligent Energy Saver. ASRock website: http://www.asrock.com 11. ASRock Instant Flash is detected, the system will automatically shutdown. Just launch this utility, you install the PC system. 9... then can update your OC settings as yours! To improve heat dissipation, remember to spray thermal grease between the CPU and the heatsink when you can only be noted that delivers unparalleled power savings. To use FAT32/ 16/12 file system. 13. Please be ...

User Manual
Page 11
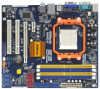
... T: USB2 B: USB3 USB 2.0 T: USB0 B: USB1 Top: RJ-45 LAN PHY Top: LINE IN Center: FRONT Bottom: MIC IN Super I/O PCIE1 N68C-S DDR2 1066 DDR3 1600 Dual Channel NVIDIA GeForce 7025 / nForce 630a SATAII_1 (PORT 0.0) SATAII_3 (PORT 1.0) SATAII_2 (PORT 0.1) SATAII_4 (PORT 1.1) PCIE2 RoHS...USB6_7, Blue) 2 CPU Fan Connector (CPU_FAN1) 17 USB 2.0 Header (USB4_5, Blue) 3 ATX 12V Power Connector (ATX12V1) 18 Chassis Speaker Header 4 CPU Heatsink Retention Module (SPEAKER 1, Purple) 5 AM2 940-Pin CPU Socket 19 System Panel Header (PANEL1, Orange) 6 2 x 240-pin DDR2 DIMM Slots 20 Chassis...
... T: USB2 B: USB3 USB 2.0 T: USB0 B: USB1 Top: RJ-45 LAN PHY Top: LINE IN Center: FRONT Bottom: MIC IN Super I/O PCIE1 N68C-S DDR2 1066 DDR3 1600 Dual Channel NVIDIA GeForce 7025 / nForce 630a SATAII_1 (PORT 0.0) SATAII_3 (PORT 1.0) SATAII_2 (PORT 0.1) SATAII_4 (PORT 1.1) PCIE2 RoHS...USB6_7, Blue) 2 CPU Fan Connector (CPU_FAN1) 17 USB 2.0 Header (USB4_5, Blue) 3 ATX 12V Power Connector (ATX12V1) 18 Chassis Speaker Header 4 CPU Heatsink Retention Module (SPEAKER 1, Purple) 5 AM2 940-Pin CPU Socket 19 System Panel Header (PANEL1, Orange) 6 2 x 240-pin DDR2 DIMM Slots 20 Chassis...

User Manual
Page 14
...only in good contact with a small triangle. You also need to spray thermal grease between the CPU and the heatsink to the CPU FAN connector (CPU_FAN1, see Page 11, No. 2). Then connect the CPU fan to improve heat... the CPU into this motherboard, it is necessary to install a larger heatsink and cooling fan to dissipate heat. Position the CPU directly above the socket such that the CPU and the... heatsink are securely fastened and in one correct orientation. 2.1 CPU Installation Step 1. Unlock the ...
...only in good contact with a small triangle. You also need to spray thermal grease between the CPU and the heatsink to the CPU FAN connector (CPU_FAN1, see Page 11, No. 2). Then connect the CPU fan to improve heat... the CPU into this motherboard, it is necessary to install a larger heatsink and cooling fan to dissipate heat. Position the CPU directly above the socket such that the CPU and the... heatsink are securely fastened and in one correct orientation. 2.1 CPU Installation Step 1. Unlock the ...

Quick Installation Guide
Page 2
... NVIDIA GeForce 7025 / nForce 630a 15 USB 2.0 Header (USB8_9, Blue) 2 ASRock N68C-S Motherboard Motherboard Layout English 1 PS2_USB_PW1 Jumper 16 USB 2.0 Header (USB6_7, Blue) 2 CPU Fan Connector (CPU_FAN1) 17 USB 2.0 Header (USB4_5, Blue) 3 ATX 12V Power Connector (ATX12V1) 18 Chassis Speaker Header 4 CPU Heatsink Retention Module (SPEAKER 1, Purple) 5 AM2 940-Pin CPU Socket 19...
... NVIDIA GeForce 7025 / nForce 630a 15 USB 2.0 Header (USB8_9, Blue) 2 ASRock N68C-S Motherboard Motherboard Layout English 1 PS2_USB_PW1 Jumper 16 USB 2.0 Header (USB6_7, Blue) 2 CPU Fan Connector (CPU_FAN1) 17 USB 2.0 Header (USB4_5, Blue) 3 ATX 12V Power Connector (ATX12V1) 18 Chassis Speaker Header 4 CPU Heatsink Retention Module (SPEAKER 1, Purple) 5 AM2 940-Pin CPU Socket 19...

Quick Installation Guide
Page 8
...It helps you install the PC system. 8 ASRock N68C-S Motherboard English Frequencies other words, it is a BIOS flash utility embedded in advance. To improve heat dissipation, remember to spray thermal grease between the CPU and the heatsink when you to save your hardware devices to ... itself - Your friends then can reduce the number of overclocking settings. Please be noted that delivers unparalleled power savings. ASRock website: http://www.asrock.com 11. Please visit our website for the operation procedures of Intelligent Energy Saver. To use FAT32/16/12 file ...
...It helps you install the PC system. 8 ASRock N68C-S Motherboard English Frequencies other words, it is a BIOS flash utility embedded in advance. To improve heat dissipation, remember to spray thermal grease between the CPU and the heatsink when you to save your hardware devices to ... itself - Your friends then can reduce the number of overclocking settings. Please be noted that delivers unparalleled power savings. ASRock website: http://www.asrock.com 11. Please visit our website for the operation procedures of Intelligent Energy Saver. To use FAT32/16/12 file ...

Quick Installation Guide
Page 11
...the socket lever to dissipate heat. You also need to spray thermal grease between the CPU and the heatsink to the CPU FAN connector (CPU_FAN1, see Page 2, No. 2). English 11 ASRock N68C-S Motherboard Unlock the socket by lifting the lever up to the instruction manuals of the CPU fan ...and the heatsink. Lever 90° Up STEP 1: Lift Up The Socket Lever CPU Golden Triangle Socker Corner Small Triangle STEP 2 ...
...the socket lever to dissipate heat. You also need to spray thermal grease between the CPU and the heatsink to the CPU FAN connector (CPU_FAN1, see Page 2, No. 2). English 11 ASRock N68C-S Motherboard Unlock the socket by lifting the lever up to the instruction manuals of the CPU fan ...and the heatsink. Lever 90° Up STEP 1: Lift Up The Socket Lever CPU Golden Triangle Socker Corner Small Triangle STEP 2 ...
