RAID Installation Guide
Page 1
... 2.7 Creating a New Logical Drive 14 2.8 Connecting to RAID 2 1.2 RAID Configurations Precautions 3 1.3 Installing Windows XP / XP 64-bit / Vista / Vista 64-bit With RAID Funtions 3 1.3.1 Installing Windows XP / XP 64-bit With RAID Funtions 3 1.3.2 Installing Windows Vista / Vista 64-bit With RAID Funtions 4 1.4 Create Disk Array 5 2. AMD BIOS RAID Installation Guide 2 1.1 Introduction to RAIDXpert from...
... 2.7 Creating a New Logical Drive 14 2.8 Connecting to RAID 2 1.2 RAID Configurations Precautions 3 1.3 Installing Windows XP / XP 64-bit / Vista / Vista 64-bit With RAID Funtions 3 1.3.1 Installing Windows XP / XP 64-bit With RAID Funtions 3 1.3.2 Installing Windows Vista / Vista 64-bit With RAID Funtions 4 1.4 Create Disk Array 5 2. AMD BIOS RAID Installation Guide 2 1.1 Introduction to RAIDXpert from...

RAID Installation Guide
Page 3
... from two to four physical drives with RAID functions, please follow below procedures according to install Windows XP, Windows XP 64-bit, Windows Vista or Windows Vista 64-bit on a RAID disk composed of different sizes, the smaller capacity hard disk will recognize it as a JBOD. If...for performance. WARNING!! In the process you create RAID, the system will operate under a clean environment. 1.3 Installing Windows XP / XP 64-bit / Vista / Vista 64-bit With RAID Functions If you want to four physical drives, more SATA / SATAII HDDs with online capacity expansion. It is 60GB. ...
... from two to four physical drives with RAID functions, please follow below procedures according to install Windows XP, Windows XP 64-bit, Windows Vista or Windows Vista 64-bit on a RAID disk composed of different sizes, the smaller capacity hard disk will recognize it as a JBOD. If...for performance. WARNING!! In the process you create RAID, the system will operate under a clean environment. 1.3 Installing Windows XP / XP 64-bit / Vista / Vista 64-bit With RAID Functions If you want to four physical drives, more SATA / SATAII HDDs with online capacity expansion. It is 60GB. ...
RAID Installation Guide
Page 4
...floppy diskette and copy SATA / SATAII drivers into your optical drive to boot your system. (There are two ASRock Support CD in this document for Windows XP / XP 64-bit.) B. When prompted, insert the SATA / SATAII driver diskette containing AMD RAID driver. STEP 4: Install Windows... boot devices selection appears. Enter BIOS SETUP UTILITY → Advanced screen →IDE Configuration. STEP 2: Make a SATA / SATAII driver diskette. Insert the ASRock Support CD into the floppy diskette. C. STEP 1: Set up , press key, and then a window for details. 4 STEP 3: Use "RAID Installation ...
...floppy diskette and copy SATA / SATAII drivers into your optical drive to boot your system. (There are two ASRock Support CD in this document for Windows XP / XP 64-bit.) B. When prompted, insert the SATA / SATAII driver diskette containing AMD RAID driver. STEP 4: Install Windows... boot devices selection appears. Enter BIOS SETUP UTILITY → Advanced screen →IDE Configuration. STEP 2: Make a SATA / SATAII driver diskette. Insert the ASRock Support CD into the floppy diskette. C. STEP 1: Set up , press key, and then a window for details. 4 STEP 3: Use "RAID Installation ...
RAID Installation Guide
Page 5
...start to configure RAID function, you need to set up BIOS. Insert the Windows Vista / Windows Vista 64-bit optical disk into the optical drive again to continue the installation. page, please insert the ASRock Support CD into your optical drive, and click the "Load Driver" button on the left on your...you want to install Windows Vista or Windows Vista 64-bit on a RAID disk composed of 2 or more SATA / SATAII HDDs with the disk drives installed, the AMD onboard BIOS will display the following path in our Support CD: (There are two ASRock Support CD in the motherboard gift box pack, ...
...start to configure RAID function, you need to set up BIOS. Insert the Windows Vista / Windows Vista 64-bit optical disk into the optical drive again to continue the installation. page, please insert the ASRock Support CD into your optical drive, and click the "Load Driver" button on the left on your...you want to install Windows Vista or Windows Vista 64-bit on a RAID disk composed of 2 or more SATA / SATAII HDDs with the disk drives installed, the AMD onboard BIOS will display the following path in our Support CD: (There are two ASRock Support CD in the motherboard gift box pack, ...

RAID Installation Guide
Page 16
.... 10. The choices are physical drives available, the Select RAID Level screen appears again, where you can create an additional logical drive. If there are 64 and 128 KB. Choose a Stripe Block Size from the dropdown menu.
.... 10. The choices are physical drives available, the Select RAID Level screen appears again, where you can create an additional logical drive. If there are 64 and 128 KB. Choose a Stripe Block Size from the dropdown menu.

User Manual
Page 3
... Operation Guide ..... 33 2.13 Driver Installation Guide 35 2.14 Installing Windows® XP / XP 64-bit / VistaTM / VistaTM 64-bit With RAID Functions 35 2.14.1 Installing Windows® XP / XP 64-bit With RAID Functions 35 2.14.2 Installing Windows® VistaTM / VistaTM 64-bit With RAID Functions 36 2.15 Installing Windows® XP / XP...
... Operation Guide ..... 33 2.13 Driver Installation Guide 35 2.14 Installing Windows® XP / XP 64-bit / VistaTM / VistaTM 64-bit With RAID Functions 35 2.14.1 Installing Windows® XP / XP 64-bit With RAID Functions 35 2.14.2 Installing Windows® VistaTM / VistaTM 64-bit With RAID Functions 36 2.15 Installing Windows® XP / XP...

User Manual
Page 8
... required) (see CAUTION 15) * For detailed product information, please visit our website: http://www.asrock.com WARNING Please realize that there is a certain risk involved with 64-bit CPU, there is subject to read "Untied Overclocking Technology" on page 39 for proper installation....Fan Tachometer - Voltage Monitoring: +12V, +5V, +3.3V, Vcore OS - ASRock website http://www.asrock.com 4. Please read the installation guide of your own risk and expense. For Windows® XP 64-bit and Windows® VistaTM 64bit with overclocking, including adjusting the setting in ...
... required) (see CAUTION 15) * For detailed product information, please visit our website: http://www.asrock.com WARNING Please realize that there is a certain risk involved with 64-bit CPU, there is subject to read "Untied Overclocking Technology" on page 39 for proper installation....Fan Tachometer - Voltage Monitoring: +12V, +5V, +3.3V, Vcore OS - ASRock website http://www.asrock.com 4. Please read the installation guide of your own risk and expense. For Windows® XP 64-bit and Windows® VistaTM 64bit with overclocking, including adjusting the setting in ...

User Manual
Page 9
... heat dissipation, remember to get the best system performance under Microsoft® Windows® VistaTM 64-bit / VistaTM / XP 64-bit / XP SP1 or SP2. 10. With this tool and save the new BIOS file to access ASRock Instant Flash. While CPU overheat is able to perform over-clocking. 7. It is a BIOS flash...
... heat dissipation, remember to get the best system performance under Microsoft® Windows® VistaTM 64-bit / VistaTM / XP 64-bit / XP SP1 or SP2. 10. With this tool and save the new BIOS file to access ASRock Instant Flash. While CPU overheat is able to perform over-clocking. 7. It is a BIOS flash...
User Manual
Page 11
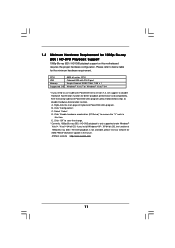
... CyberLink PowerDVD Ultra program. Right-click the main page of 1080p Blu-ray (BD) / HD-DVD playback is only supported under Windows® VistaTM / VistaTM 64-bit OS. E. C. If you need to use CyberLink PowerDVD Ultra version 7.3, we suggest to disable Hardware Acceleration function. Click "Configuration". Select "Video". After executing CyberLink... program, please follow below table for 1080p Blu-ray (BD) / HD-DVD Playback Support 1080p Blu-ray (BD) / HD-DVD playback support on this item. D. ASRock website http://www.asrock.com 11
... CyberLink PowerDVD Ultra program. Right-click the main page of 1080p Blu-ray (BD) / HD-DVD playback is only supported under Windows® VistaTM / VistaTM 64-bit OS. E. C. If you need to use CyberLink PowerDVD Ultra version 7.3, we suggest to disable Hardware Acceleration function. Click "Configuration". Select "Video". After executing CyberLink... program, please follow below table for 1080p Blu-ray (BD) / HD-DVD Playback Support 1080p Blu-ray (BD) / HD-DVD playback support on this item. D. ASRock website http://www.asrock.com 11

User Manual
Page 12
... CPU AM3 all series CPU VGA Onboard VGA with DVI-D port Memory Single Channel DDR3 1066, 1GB x 1 OS Windows® VistaTM or Windows® VistaTM 64 Playback Software CyberLink PowerDVD Ultra (Version 7.3 or above refers to the same format of H.264. * Above passed films are tested under below configuration. 1.4 Passed 1080p...
... CPU AM3 all series CPU VGA Onboard VGA with DVI-D port Memory Single Channel DDR3 1066, 1GB x 1 OS Windows® VistaTM or Windows® VistaTM 64 Playback Software CyberLink PowerDVD Ultra (Version 7.3 or above refers to the same format of H.264. * Above passed films are tested under below configuration. 1.4 Passed 1080p...

User Manual
Page 13
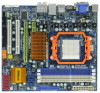
...64 bit, 240-pin module) DDR3_A1 (64 bit, 240-FpinSBmo8d0ul0e) AM3 Phenom II HT3.0 DDR3 1600 EUP Ready SOCKET AM3 HDMI1 IEEE 1394 eSATAII 34 33 32 31 30 29 Optical SPDIF MIC IN Bottom: Center: Top: SIDE SPK USB 2.0 T: USB0 Top: B: USB1 RJ-45 CPU_FAN1 M3A790GMH/128M... IDE1 RoHS REAR SPK FRONT Top: LINE IN Center: Bottom: LAN Super I/O IR1 1 AUDIO CODEC HD_AUDIO1 1 CD1 PCIE1 RoHS AMD 790GX Chipset CLRCMOS1 1 PCIE2 Sideport memory 128M PCI Express 2.0 PCI1 CMOS BATTERY COM1 1 PCI2 FLOPPY1 8Mb BIOS...
...64 bit, 240-pin module) DDR3_A1 (64 bit, 240-FpinSBmo8d0ul0e) AM3 Phenom II HT3.0 DDR3 1600 EUP Ready SOCKET AM3 HDMI1 IEEE 1394 eSATAII 34 33 32 31 30 29 Optical SPDIF MIC IN Bottom: Center: Top: SIDE SPK USB 2.0 T: USB0 Top: B: USB1 RJ-45 CPU_FAN1 M3A790GMH/128M... IDE1 RoHS REAR SPK FRONT Top: LINE IN Center: Bottom: LAN Super I/O IR1 1 AUDIO CODEC HD_AUDIO1 1 CD1 PCIE1 RoHS AMD 790GX Chipset CLRCMOS1 1 PCIE2 Sideport memory 128M PCI Express 2.0 PCI1 CMOS BATTERY COM1 1 PCI2 FLOPPY1 8Mb BIOS...

User Manual
Page 21
...] or [512MB] to the corresponding connectors of VGA/D-sub. Install the onboard VGA driver and the add-on PCIE2 slot. For Windows® XP / XP 64-bit OS: Right click the desktop, choose "Properties", and select the "Settings" tab so that the value you use multiple monitors with your primary monitor...
...] or [512MB] to the corresponding connectors of VGA/D-sub. Install the onboard VGA driver and the add-on PCIE2 slot. For Windows® XP / XP 64-bit OS: Right click the desktop, choose "Properties", and select the "Settings" tab so that the value you use multiple monitors with your primary monitor...

User Manual
Page 22
... Digital Content Protection, a specification developed by the number three and four. 6. C. To use . Click the items "This is compatible. 22 For Windows® VistaTM / VistaTM 64-bit OS: Right click the desktop, choose "Personalize", and select the "Display Settings" tab so that the HDTV or LCD monitor you purchase is my...
... Digital Content Protection, a specification developed by the number three and four. 6. C. To use . Click the items "This is compatible. 22 For Windows® VistaTM / VistaTM 64-bit OS: Right click the desktop, choose "Personalize", and select the "Display Settings" tab so that the HDTV or LCD monitor you purchase is my...

User Manual
Page 28
...audio panel. Click the icon on the chassis must support HDA to connect them for HD audio panel only. For Windows® XP / XP 64-bit OS: Click "Audio I/O", select "Connector Settings" , choose "Disable front panel jack detection", and save the change by clicking "OK". System...28 You don't need to function correctly. Enter Advanced Settings, and then select Chipset Configuration. Enter Windows system. For Windows® VistaTM / VistaTM 64-bit OS: Click the right-top "Folder" icon , choose "Disable front panel jack detection", and save the change by clicking "OK". For ...
...audio panel. Click the icon on the chassis must support HDA to connect them for HD audio panel only. For Windows® XP / XP 64-bit OS: Click "Audio I/O", select "Connector Settings" , choose "Disable front panel jack detection", and save the change by clicking "OK". System...28 You don't need to function correctly. Enter Advanced Settings, and then select Chipset Configuration. Enter Windows system. For Windows® VistaTM / VistaTM 64-bit OS: Click the right-top "Folder" icon , choose "Disable front panel jack detection", and save the change by clicking "OK". For ...

User Manual
Page 35
...refer to set RAID configuration. Then, the drivers compatible to your system can work properly. 2.14 Installing Windows® XP / XP 64-bit / VistaTM / VistaTM 64-bit With RAID Functions If you start to format the floppy diskette and copy SATA / SATAII drivers into the floppy diskette. The system ...drivers to your system, please insert the support CD to your system. (There are two ASRock Support CD in the motherboard gift box pack, please choose the one for proper configuration. Insert the ASRock Support CD into the floppy drive, and press any key to start Please insert a ...
...refer to set RAID configuration. Then, the drivers compatible to your system can work properly. 2.14 Installing Windows® XP / XP 64-bit / VistaTM / VistaTM 64-bit With RAID Functions If you start to format the floppy diskette and copy SATA / SATAII drivers into the floppy diskette. The system ...drivers to your system, please insert the support CD to your system. (There are two ASRock Support CD in the motherboard gift box pack, please choose the one for proper configuration. Insert the ASRock Support CD into the floppy drive, and press any key to start Please insert a ...
User Manual
Page 36
... install Windows? STEP 1: Set up "SATA Operation Mode" to install Windows® VistaTM / Windows® VistaTM 64-bit OS on your system. B. " page, please insert the ASRock Support CD into your system. Then, please set the RAID configuration by using the Windows RAID installation guide in the... following path in our Support CD: (There are two ASRock Support CD in the Support CD for proper configuration. Set the "SATA Operation Mode" option to continue the installation. 36 Please refer to...
... install Windows? STEP 1: Set up "SATA Operation Mode" to install Windows® VistaTM / Windows® VistaTM 64-bit OS on your system. B. " page, please insert the ASRock Support CD into your system. Then, please set the RAID configuration by using the Windows RAID installation guide in the... following path in our Support CD: (There are two ASRock Support CD in the Support CD for proper configuration. Set the "SATA Operation Mode" option to continue the installation. 36 Please refer to...

User Manual
Page 37
... floppy disk, the driver will be presented. Then, please set up "SATA Operation Mode" to install Windows® XP / Windows® XP 64-bit OS on your system. Enter BIOS SETUP UTILITY Advanced screen IDE Configuration. STEP 2: Make a SATA / SATAII driver diskette. You can start ...Using SATA / SATAII HDDs with NCQ and Hot Plug functions STEP 1: Set Up BIOS. B. STEP 4: Install Windows® XP / Windows® XP 64-bit OS on your system. B. When prompted, insert the SATA / SATAII driver diskette containing the AMD AHCI driver. Make a SATA / SATAII driver diskette...
... floppy disk, the driver will be presented. Then, please set up "SATA Operation Mode" to install Windows® XP / Windows® XP 64-bit OS on your system. Enter BIOS SETUP UTILITY Advanced screen IDE Configuration. STEP 2: Make a SATA / SATAII driver diskette. You can start ...Using SATA / SATAII HDDs with NCQ and Hot Plug functions STEP 1: Set Up BIOS. B. STEP 4: Install Windows® XP / Windows® XP 64-bit OS on your system. B. When prompted, insert the SATA / SATAII driver diskette containing the AMD AHCI driver. Make a SATA / SATAII driver diskette...

User Manual
Page 38
... Using SATA / SATAII HDDs without NCQ and Hot Plug functions STEP 1: Set up BIOS. A. STEP 2: Install Windows® XP / Windows® XP 64-bit OS on your system. Using SATA / SATAII HDDs with NCQ and Hot Plug functions STEP 1: Set Up BIOS. Insert the Windows® VistaTM / Windows...; VistaTM / Windows® VistaTM 64-bit OS on your optical drive, and click the "Load Driver" button on the left on the bottom to install Windows® VistaTM or Windows® VistaTM 64-bit on your system. 38 " page, please insert the ASRock Support CD into the optical drive ...
... Using SATA / SATAII HDDs without NCQ and Hot Plug functions STEP 1: Set up BIOS. A. STEP 2: Install Windows® XP / Windows® XP 64-bit OS on your system. Using SATA / SATAII HDDs with NCQ and Hot Plug functions STEP 1: Set Up BIOS. Insert the Windows® VistaTM / Windows...; VistaTM / Windows® VistaTM 64-bit OS on your optical drive, and click the "Load Driver" button on the left on the bottom to install Windows® VistaTM or Windows® VistaTM 64-bit on your system. 38 " page, please insert the ASRock Support CD into the optical drive ...
User Manual
Page 63
...Running The Support CD To begin using the support CD, insert the CD into your OS documentation for more about ASRock, welcome to visit ASRock's website at http://www.asrock.com; 4. The CD automatically displays the Main Menu if "AUTORUN" is enabled in your dealer for general ... 4.1 Install Operating System This motherboard supports various Microsoft® Windows® operating systems: XP / XP Media Center / XP 64-bit / VistaTM / VistaTM 64-bit. Because motherboard settings and hardware options vary, use the setup procedures in the Support CD to install it. 4.2.4 Contact Information...
...Running The Support CD To begin using the support CD, insert the CD into your OS documentation for more about ASRock, welcome to visit ASRock's website at http://www.asrock.com; 4. The CD automatically displays the Main Menu if "AUTORUN" is enabled in your dealer for general ... 4.1 Install Operating System This motherboard supports various Microsoft® Windows® operating systems: XP / XP Media Center / XP 64-bit / VistaTM / VistaTM 64-bit. Because motherboard settings and hardware options vary, use the setup procedures in the Support CD to install it. 4.2.4 Contact Information...

Quick Installation Guide
Page 7
...overclocking tools. Please refer to page 10 and 11 for possible damage caused by the chipset vendor and is a certain risk involved with 64-bit CPU, there is supported depends on the AM3 CPU you want to adopt DDR3 1600 memory module on this motherboard, please refer ... list on our website for the latest information. 6. 1080p Blu-ray (BD) / HD-DVD playback support on page 14 for proper installation. 3. English 7 ASRock M3A790GMH/128M Motherboard Voltage Monitoring: +12V, +5V, +3.3V, Vcore OS - FCC, CE, Microsoft® WHQL Certificated - Microsoft® Windows® XP / XP Media Center...
...overclocking tools. Please refer to page 10 and 11 for possible damage caused by the chipset vendor and is a certain risk involved with 64-bit CPU, there is supported depends on the AM3 CPU you want to adopt DDR3 1600 memory module on this motherboard, please refer ... list on our website for the latest information. 6. 1080p Blu-ray (BD) / HD-DVD playback support on page 14 for proper installation. 3. English 7 ASRock M3A790GMH/128M Motherboard Voltage Monitoring: +12V, +5V, +3.3V, Vcore OS - FCC, CE, Microsoft® WHQL Certificated - Microsoft® Windows® XP / XP Media Center...