
User Manual
Page 3
... Windows® XP / XP 64-bit / VistaTM / VistaTM 64-bit With RAID Functions 33 2.15.1 Installing Windows® XP / XP 64-bit With RAID Functions 33 2.15.2 Installing Windows® VistaTM / VistaTM 64-bit With RAID Functions 34 2.16 Installing Windows® XP / XP 64-bit / VistaTM /... VistaTM 64-bit Without RAID Functions 35 2.16.1 Installing Windows® XP / XP 64-bit Without RAID Functions 35 2.16.2 Installing Windows® VistaTM / VistaTM 64-bit Without RAID Functions 36 2.17 Untied...
... Windows® XP / XP 64-bit / VistaTM / VistaTM 64-bit With RAID Functions 33 2.15.1 Installing Windows® XP / XP 64-bit With RAID Functions 33 2.15.2 Installing Windows® VistaTM / VistaTM 64-bit With RAID Functions 34 2.16 Installing Windows® XP / XP 64-bit / VistaTM /... VistaTM 64-bit Without RAID Functions 35 2.16.1 Installing Windows® XP / XP 64-bit Without RAID Functions 35 2.16.2 Installing Windows® VistaTM / VistaTM 64-bit Without RAID Functions 36 2.17 Untied...

User Manual
Page 7
... ports) (see CAUTION 12) - Supports "Plug and Play" - SMBIOS 2.3.1 Support - Drivers, Utilities, AntiVirus Software (Trial Version), AMD OverDriveTM Utility - ASRock Instant Flash (see CAUTION 6) - 1 x ATA133 IDE connector (supports 2 x IDE devices) - 1 x Floppy connector - 1 x IR header - 1... HDMI_SPDIF header - Connector BIOS Feature Support CD Unique Feature Hardware Monitor OS Certifications - 4 x Serial ATAII 3.0Gb/s connectors, support RAID (RAID 0, RAID 1, RAID 10 and JBOD), NCQ, AHCI and "Hot Plug" functions (see CAUTION 10) - CD in header - Chassis Temperature Sensing ...
... ports) (see CAUTION 12) - Supports "Plug and Play" - SMBIOS 2.3.1 Support - Drivers, Utilities, AntiVirus Software (Trial Version), AMD OverDriveTM Utility - ASRock Instant Flash (see CAUTION 6) - 1 x ATA133 IDE connector (supports 2 x IDE devices) - 1 x Floppy connector - 1 x IR header - 1... HDMI_SPDIF header - Connector BIOS Feature Support CD Unique Feature Hardware Monitor OS Certifications - 4 x Serial ATAII 3.0Gb/s connectors, support RAID (RAID 0, RAID 1, RAID 10 and JBOD), NCQ, AHCI and "Hot Plug" functions (see CAUTION 10) - CD in header - Chassis Temperature Sensing ...

User Manual
Page 30
..." for the action to insert and remove the SATA / SATAII HDDs while the system is still power-on this motherboard for SATA / SATAII Devices in RAID / AHCI mode. This section will guide you need to install at least 4 SATA / SATAII hard disks. 2.12 Hot Plug and Hot Swap Functions for SATA... This motherboard supports Hot Plug and Hot Swap functions for internal storage devices. STEP 3: Connect one end of your chassis. If you plan to use RAID 10 function, you need to install at least 2 SATA / SATAII hard disks. NOTE What is Hot Swap Function? If the SATA / SATAII HDDs are built...
..." for the action to insert and remove the SATA / SATAII HDDs while the system is still power-on this motherboard for SATA / SATAII Devices in RAID / AHCI mode. This section will guide you need to install at least 4 SATA / SATAII hard disks. 2.12 Hot Plug and Hot Swap Functions for SATA... This motherboard supports Hot Plug and Hot Swap functions for internal storage devices. STEP 3: Connect one end of your chassis. If you plan to use RAID 10 function, you need to install at least 2 SATA / SATAII hard disks. NOTE What is Hot Swap Function? If the SATA / SATAII HDDs are built...

User Manual
Page 31
...SATA 15-pin power connector and IDE 1x4-pin conventional power connector interfaces, the IDE 1x4-pin conventional power connector interface is indicated in RAID / AHCI mode. SATA power cable with SATA 15-pin power connector interface A. Please read below operation guide of attention, before you ...data loss. 31 Before you process the Hot Plug: 1. Please make sure the SATA / SATAII driver is available on our website: www.asrock.com 2. Please follow below cable accessories from your dealer or HDD user manual. Without SATA 15-pin power connector interface, the SATA / ...
...SATA 15-pin power connector and IDE 1x4-pin conventional power connector interfaces, the IDE 1x4-pin conventional power connector interface is indicated in RAID / AHCI mode. SATA power cable with SATA 15-pin power connector interface A. Please read below operation guide of attention, before you ...data loss. 31 Before you process the Hot Plug: 1. Please make sure the SATA / SATAII driver is available on our website: www.asrock.com 2. Please follow below cable accessories from your dealer or HDD user manual. Without SATA 15-pin power connector interface, the SATA / ...
User Manual
Page 33
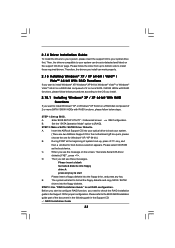
... driver diskette [YN]?", press . A. During POST at the beginning of system boot-up BIOS. STEP 3: Use "RAID Installation Guide" to set RAID configuration. Insert the ASRock Support CD into the floppy diskette. D. Enter BIOS SETUP UTILITY Advanced screen IDE Configuration. B. Please follow below procedures ...diskette and copy SATA / SATAII drivers into your optical drive to boot your system. (There are two ASRock Support CD in the Support CD: .. \ RAID Installation Guide 33 2.14 Driver Installation Guide To install the drivers to your system, please insert the ...
... driver diskette [YN]?", press . A. During POST at the beginning of system boot-up BIOS. STEP 3: Use "RAID Installation Guide" to set RAID configuration. Insert the ASRock Support CD into the floppy diskette. D. Enter BIOS SETUP UTILITY Advanced screen IDE Configuration. B. Please follow below procedures ...diskette and copy SATA / SATAII drivers into your optical drive to boot your system. (There are two ASRock Support CD in the Support CD: .. \ RAID Installation Guide 33 2.14 Driver Installation Guide To install the drivers to your system, please insert the ...
User Manual
Page 34
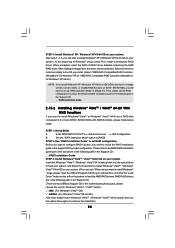
... install according to set RAID configuration. STEP 2: Use "RAID Installation Guide" to the OS you start to [RAID] first. Please refer to continue the installation. 34 AMD RAID drivers are in the following path in our Support CD: (There are two ASRock Support CD in the ... Before you install. (Select "AMD AHCI Compatible RAID Controllerx86 platform" for Windows® XP, or "AMD AHCI Compatible RAID Controller-x64 platform" for proper configuration. Then, please set up BIOS. " page, please insert the ASRock Support CD into the optical drive to boot your ...
... install according to set RAID configuration. STEP 2: Use "RAID Installation Guide" to the OS you start to [RAID] first. Please refer to continue the installation. 34 AMD RAID drivers are in the following path in our Support CD: (There are two ASRock Support CD in the ... Before you install. (Select "AMD AHCI Compatible RAID Controllerx86 platform" for Windows® XP, or "AMD AHCI Compatible RAID Controller-x64 platform" for proper configuration. Then, please set up BIOS. " page, please insert the ASRock Support CD into the optical drive to boot your ...

User Manual
Page 35
...-party AHCI driver. You can start to install Windows® XP / Windows® XP 64-bit OS on your SATA / SATAII HDDs without RAID functions, please follow below procedures according to install Windows® XP, Windows® XP 64-bit, Windows® VistaTM or Windows® VistaTM ..., the driver will be presented. Then, please set up "SATA Operation Mode" to [IDE]. Make a SATA / SATAII driver diskette by using the Windows RAID installation guide in the following section 2.15.1 step 2 on your system. At the beginning of Windows® setup, press F6 to [AHCI]. Using SATA...
...-party AHCI driver. You can start to install Windows® XP / Windows® XP 64-bit OS on your SATA / SATAII HDDs without RAID functions, please follow below procedures according to install Windows® XP, Windows® XP 64-bit, Windows® VistaTM or Windows® VistaTM ..., the driver will be presented. Then, please set up "SATA Operation Mode" to [IDE]. Make a SATA / SATAII driver diskette by using the Windows RAID installation guide in the following section 2.15.1 step 2 on your system. At the beginning of Windows® setup, press F6 to [AHCI]. Using SATA...

User Manual
Page 36
...system. 2.17 Untied Overclocking Technology This motherboard supports Untied Overclocking Technology, which means during overclocking, but PCI / PCIE buses are two ASRock Support CD in the fixed mode so that , please insert Windows® VistaTM / Windows® VistaTM 64-bit optical disk into...untied during overclocking, FSB enjoys better margin due to [CPU, PCIE, Async.]. STEP 1: Set up BIOS. A. Using SATA / SATAII HDDs without RAID functions, please follow the instruction to install Windows® VistaTM / Windows® VistaTM 64-bit OS on page 8 for Windows® VistaTM /...
...system. 2.17 Untied Overclocking Technology This motherboard supports Untied Overclocking Technology, which means during overclocking, but PCI / PCIE buses are two ASRock Support CD in the fixed mode so that , please insert Windows® VistaTM / Windows® VistaTM 64-bit optical disk into...untied during overclocking, FSB enjoys better margin due to [CPU, PCIE, Async.]. STEP 1: Set up BIOS. A. Using SATA / SATAII HDDs without RAID functions, please follow the instruction to install Windows® VistaTM / Windows® VistaTM 64-bit OS on page 8 for Windows® VistaTM /...

User Manual
Page 39
...operation. Load BIOS Defaults Load BIOS default values for this operation. F4 key can be compatible with all system configurations. ASRock Instant Flash ASRock Instant Flash is a BIOS flash utility embedded in a few clicks without entering operating systems first like MS-DOS or ...Load BIOS Defaults Load Performance Setup Default (IDE/SATA) Load Performance Setup AHCI Mode Load Performance Setup RAID Mode Load Power Saving Setup Default BIOS Update Utility ASRock Instant Flash Exit system setup after loading, please resume optimal default settings. 3.3 Smart Screen In the...
...operation. Load BIOS Defaults Load BIOS default values for this operation. F4 key can be compatible with all system configurations. ASRock Instant Flash ASRock Instant Flash is a BIOS flash utility embedded in a few clicks without entering operating systems first like MS-DOS or ...Load BIOS Defaults Load Performance Setup Default (IDE/SATA) Load Performance Setup AHCI Mode Load Performance Setup RAID Mode Load Power Saving Setup Default BIOS Update Utility ASRock Instant Flash Exit system setup after loading, please resume optimal default settings. 3.3 Smart Screen In the...

User Manual
Page 49
..." as the example in the following instruction, which can be applied to the configurations of this item to operate RAID function on SATA / SATAII HDDs, please select [RAID]. We will use this motherboard to enable or disable ACPI HPET Table. SATA Operation Mode Use this option is ...[Disabled]. If you specify. Configuration options: [IDE], [RAID] and [AHCI]. The default value is [IDE]. Please set the IDE ...
..." as the example in the following instruction, which can be applied to the configurations of this item to operate RAID function on SATA / SATAII HDDs, please select [RAID]. We will use this motherboard to enable or disable ACPI HPET Table. SATA Operation Mode Use this option is ...[Disabled]. If you specify. Configuration options: [IDE], [RAID] and [AHCI]. The default value is [IDE]. Please set the IDE ...

Quick Installation Guide
Page 7
...SMBIOS 2.3.1 Support - Supports Smart BIOS - ASRock OC Tuner (see CAUTION 11) - ASRock U-COP (see CAUTION 7) - 8Mb AMI BIOS - CPU/Chassis/Power Fan Tachometer - FCC, CE, Microsoft® WHQL Certificated English 7 ASRock M3A770DE Motherboard CPU/Chassis/Power FAN connector - 24 ... Guard (B.F.G.) - Connector BIOS Feature Support CD Unique Feature Hardware Monitor OS Certifications - 4 x Serial ATAII 3.0Gb/s connectors, support RAID (RAID 0, RAID 1, RAID 10 and JBOD), NCQ, AHCI and "Hot Plug" functions (see CAUTION 9) - CD in header - ACPI 1.1 Compliance Wake Up...
...SMBIOS 2.3.1 Support - Supports Smart BIOS - ASRock OC Tuner (see CAUTION 11) - ASRock U-COP (see CAUTION 7) - 8Mb AMI BIOS - CPU/Chassis/Power Fan Tachometer - FCC, CE, Microsoft® WHQL Certificated English 7 ASRock M3A770DE Motherboard CPU/Chassis/Power FAN connector - 24 ... Guard (B.F.G.) - Connector BIOS Feature Support CD Unique Feature Hardware Monitor OS Certifications - 4 x Serial ATAII 3.0Gb/s connectors, support RAID (RAID 0, RAID 1, RAID 10 and JBOD), NCQ, AHCI and "Hot Plug" functions (see CAUTION 9) - CD in header - ACPI 1.1 Compliance Wake Up...

Quick Installation Guide
Page 24
... end (2-pin) C. Therefore, the drivers you install can be auto-detected and listed on your SATA / SATAII HDDs without RAID functions, please follow below steps. 24 ASRock M3A770DE Motherboard English Then connect the white end (B or C) of HDMI VGA card. Please follow below procedures according to the OS ...you install. 2.11.1 Installing Windows® XP / XP 64-bit Without RAID Functions If you want to install ...
... end (2-pin) C. Therefore, the drivers you install can be auto-detected and listed on your SATA / SATAII HDDs without RAID functions, please follow below steps. 24 ASRock M3A770DE Motherboard English Then connect the white end (B or C) of HDMI VGA card. Please follow below procedures according to the OS ...you install. 2.11.1 Installing Windows® XP / XP 64-bit Without RAID Functions If you want to install ...

Quick Installation Guide
Page 25
...Hot Plug functions STEP 1: Set Up BIOS. A. B. AMD AHCI drivers are in the following path in our Support CD: (There are two ASRock Support CD in the motherboard gift box pack, please choose the one for Windows® VistaTM / VistaTM 64-bit.) .. \ I386 (For Windows...bit OS on your SATA / SATAII HDDs without RAID functions, please follow below steps. A. Set the "SATA Operation Mode" option to [IDE]. English 25 ASRock M3A770DE Motherboard Enter BIOS SETUP UTILITY Advanced screen IDE Configuration. page, please insert the ASRock Support CD into the optical drive again to [...
...Hot Plug functions STEP 1: Set Up BIOS. A. B. AMD AHCI drivers are in the following path in our Support CD: (There are two ASRock Support CD in the motherboard gift box pack, please choose the one for Windows® VistaTM / VistaTM 64-bit.) .. \ I386 (For Windows...bit OS on your SATA / SATAII HDDs without RAID functions, please follow below steps. A. Set the "SATA Operation Mode" option to [IDE]. English 25 ASRock M3A770DE Motherboard Enter BIOS SETUP UTILITY Advanced screen IDE Configuration. page, please insert the ASRock Support CD into the optical drive again to [...

RAID Installation Guide
Page 1
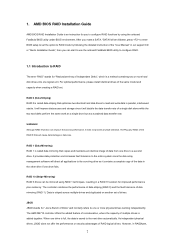
... 2.7 Creating a New Logical Drive 14 2.8 Connecting to RAID 2 1.2 RAID Configurations Precautions 3 1.3 Installing Windows XP / XP 64-bit / Vista / Vista 64-bit With RAID Funtions 3 1.3.1 Installing Windows XP / XP 64-bit With RAID Funtions 3 1.3.2 Installing Windows Vista / Vista 64-bit With RAID Funtions 4 1.4 Create Disk Array 5 2. AMD BIOS RAID Installation Guide 2 1.1 Introduction to RAIDXpert from the Internet...
... 2.7 Creating a New Logical Drive 14 2.8 Connecting to RAID 2 1.2 RAID Configurations Precautions 3 1.3 Installing Windows XP / XP 64-bit / Vista / Vista 64-bit With RAID Funtions 3 1.3.1 Installing Windows XP / XP 64-bit With RAID Funtions 3 1.3.2 Installing Windows Vista / Vista 64-bit With RAID Funtions 4 1.4 Create Disk Array 5 2. AMD BIOS RAID Installation Guide 2 1.1 Introduction to RAIDXpert from the Internet...
RAID Installation Guide
Page 2
... called data mirroring that optimizes two identical hard disk drives to one or more hard disk drives into one drive fails. 1. RAID 0 (Data Striping) RAID 0 is a method combining two or more physical drives working independently. After you make a SATA / SATAII driver diskette, press... to enter BIOS setup to set the option to RAID mode by using RAID 1 techniques, resulting in parallel, interleaved stacks. WARNING!! RAID 1 (Data Mirroring) RAID 1 is saved to the surviving drive as a single drive but at a sustained data transfer ...
... called data mirroring that optimizes two identical hard disk drives to one or more hard disk drives into one drive fails. 1. RAID 0 (Data Striping) RAID 0 is a method combining two or more physical drives working independently. After you make a SATA / SATAII driver diskette, press... to enter BIOS setup to set the option to RAID mode by using RAID 1 techniques, resulting in parallel, interleaved stacks. WARNING!! RAID 1 (Data Mirroring) RAID 1 is saved to the surviving drive as a single drive but at a sustained data transfer ...

RAID Installation Guide
Page 3
...security advantages of different sizes, the smaller capacity hard disk will be the base storage size. In RAIDXpert, you create, manage, and delete a RAID Ready the same as a logical drive. Please use two SATA drives of different sizes, the smaller capacity hard disk will operate under a clean ... the status of 2 or more than the existing drive). Please backup your future data building will be of your physical drives as RAID Ready. 1.2 RAID Configurations Precautions 1. If you can designate from one hard disk has an 80GB storage capacity and the other hard disk has 60GB, the...
...security advantages of different sizes, the smaller capacity hard disk will be the base storage size. In RAIDXpert, you create, manage, and delete a RAID Ready the same as a logical drive. Please use two SATA drives of different sizes, the smaller capacity hard disk will operate under a clean ... the status of 2 or more than the existing drive). Please backup your future data building will be of your physical drives as RAID Ready. 1.2 RAID Configurations Precautions 1. If you can designate from one hard disk has an 80GB storage capacity and the other hard disk has 60GB, the...
RAID Installation Guide
Page 4
...press any key. Select your system. (There are two ASRock Support CD in this document for proper configuration. If you install Windows XP / Windows XP 64-bit on IDE HDDs and want to manage (create, convert, delete, or rebuild) RAID functions on your system. A. E. Enter BIOS SETUP ...disk, the driver will be presented. A. Insert the ASRock Support CD into the floppy drive, and press any key to start to configure RAID function, you need to set RAID configuration. 1.3.1 Installing Windows XP / XP 64-bit With RAID Functions If you want to generate Serial ATA driver diskette...
...press any key. Select your system. (There are two ASRock Support CD in this document for proper configuration. If you install Windows XP / Windows XP 64-bit on IDE HDDs and want to manage (create, convert, delete, or rebuild) RAID functions on your system. A. E. Enter BIOS SETUP ...disk, the driver will be presented. A. Insert the ASRock Support CD into the floppy drive, and press any key to start to configure RAID function, you need to set RAID configuration. 1.3.1 Installing Windows XP / XP 64-bit With RAID Functions If you want to generate Serial ATA driver diskette...

RAID Installation Guide
Page 5
... optical drive to boot your system, and follow below steps. Before you start to configure RAID function, you install Windows Vista / Windows Vista 64-bit on IDE HDDs and there are two ASRock Support CD in this document for Windows Vista / Vista 64-bit.) .. \ I386 (... the installation. Currently, if you need to [non-RAID] in this document for proper configuration. page, please insert the ASRock Support CD into the optical drive again to [RAID] first. STEP 1: Set up "SATA Operation Mode" to set RAID configuration. A. Enter BIOS SETUP UTILITY → Advanced...
... optical drive to boot your system, and follow below steps. Before you start to configure RAID function, you install Windows Vista / Windows Vista 64-bit on IDE HDDs and there are two ASRock Support CD in this document for Windows Vista / Vista 64-bit.) .. \ I386 (... the installation. Currently, if you need to [non-RAID] in this document for proper configuration. page, please insert the ASRock Support CD into the optical drive again to [RAID] first. STEP 1: Set up "SATA Operation Mode" to set RAID configuration. A. Enter BIOS SETUP UTILITY → Advanced...

RAID Installation Guide
Page 7
...among two logical drives: Please read "One Logical Drive" below. 2. Press again to cycle through logical drive types, including RAID 0, RAID 1, RAID Ready, JBOD and RAID 10. One Logical Drive After selecting the logical drive in Disk Assignments as the above-mentioned procedures, press any other key ... Then press to your logical drive. Press to toggle between N and Y for one logical drive. You have successfully created a new RAID logical drive. Press the spacebar to restart your logical drive configuration. While you want. Use the full capacity of the disk drives for...
...among two logical drives: Please read "One Logical Drive" below. 2. Press again to cycle through logical drive types, including RAID 0, RAID 1, RAID Ready, JBOD and RAID 10. One Logical Drive After selecting the logical drive in Disk Assignments as the above-mentioned procedures, press any other key ... Then press to your logical drive. Press to toggle between N and Y for one logical drive. You have successfully created a new RAID logical drive. Press the spacebar to restart your logical drive configuration. While you want. Use the full capacity of the disk drives for...
RAID Installation Guide
Page 9
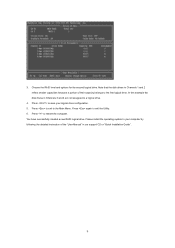
.... 4. In this example the disk drives in our support CD or "Quick Installation Guide". 9 Press to your logical drive configuration. 5. You have successfully created a new RAID logical drive. 3. Choose the RAID level and options for the second logical drive.
.... 4. In this example the disk drives in our support CD or "Quick Installation Guide". 9 Press to your logical drive configuration. 5. You have successfully created a new RAID logical drive. 3. Choose the RAID level and options for the second logical drive.


