User Manual
Page 13
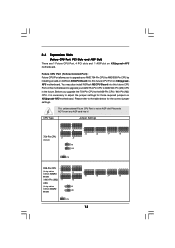
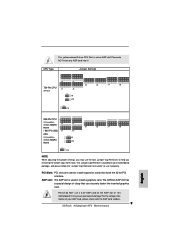
...card into it is not an AGP slot! CPU Type Jumper Settings 3 3 2 2 J3 J4 3 3 2 2 754-Pin CPU J1 J2 (Default) 1_2 J9 1_2 J10 3 2 J5 3 2 J6 3 2 J7 3 2 J8 2_3 J15 939-Pin CPU 2 (Using add-on 1 J3 ASRock 939CPU Board) 2 1 / 940-Pin (M2) J1 CPU (Using add-on K8Upgrade-NF3 motherboard. 2.4 Expansion... Slots (Future CPU Port, PCI Slots and AGP Slot) There are 1 Future CPU Port, 4 PCI slots and 1 AGP slot on ASRock M2CPU Board) 2 1 ...
...card into it is not an AGP slot! CPU Type Jumper Settings 3 3 2 2 J3 J4 3 3 2 2 754-Pin CPU J1 J2 (Default) 1_2 J9 1_2 J10 3 2 J5 3 2 J6 3 2 J7 3 2 J8 2_3 J15 939-Pin CPU 2 (Using add-on 1 J3 ASRock 939CPU Board) 2 1 / 940-Pin (M2) J1 CPU (Using add-on K8Upgrade-NF3 motherboard. 2.4 Expansion... Slots (Future CPU Port, PCI Slots and AGP Slot) There are 1 Future CPU Port, 4 PCI slots and 1 AGP slot on ASRock M2CPU Board) 2 1 ...
User Manual
Page 14
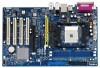
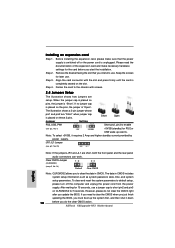
... necessary hardware settings for later use a 3.3V AGP card on the slot. Step 6. The ASRock AGP slot has a special design of this motherboard! Step 2. Keep the screws for the card before you start the installation. Installing an expansion card Step 1. Step 3. Replace the system cover. 14 ... Slots: PCI slots are used to install expansion cards that you intend to use . AGP slot: The AGP slot is used to install a graphics card. Step 4. Align the card connector with the slot and press firmly until the card is already installed in your motherboard package, ...
... necessary hardware settings for later use a 3.3V AGP card on the slot. Step 6. The ASRock AGP slot has a special design of this motherboard! Step 2. Keep the screws for the card before you start the installation. Installing an expansion card Step 1. Step 3. Replace the system cover. 14 ... Slots: PCI slots are used to install expansion cards that you intend to use . AGP slot: The AGP slot is used to install a graphics card. Step 4. Align the card connector with the slot and press firmly until the card is already installed in your motherboard package, ...
User Manual
Page 32
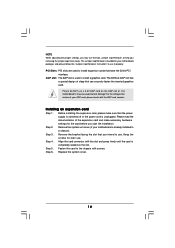
... register. Configuration options: [Disabled], [Auto], [Enabled]. 32-Bit Data Transfer Use this section may cause system to keep the default value unless the installed PCI expansion cards' specifications require other settings. PCI Latency Timer The default value is recommended to malfunction.
... register. Configuration options: [Disabled], [Auto], [Enabled]. 32-Bit Data Transfer Use this section may cause system to keep the default value unless the installed PCI expansion cards' specifications require other settings. PCI Latency Timer The default value is recommended to malfunction.
Quick Installation Guide
Page 9
... When adjusting the jumper settings, you removing the jumper caps more easily. This Jumper Cap Remover is bundled in your AGP card, please check with the AGP card vendors. 9 ASRock K8Upgrade-NF3 Motherboard English CPU Type Jumper Settings J3 J4 754-Pin CPU J1 J2 (Default) J9 J10 J15 J5 J6 J7 J8...939-Pin CPU (Using add-on J3 J4 ASRock 939CPU Board) / 940-Pin (M2) J1 J2 CPU (Using add-on the AGP slot of clasp that have the 32-bit PCI interface. This yellow-colored Future CPU Port is used to install expansion cards that can securely fasten the inserted graphics...
... When adjusting the jumper settings, you removing the jumper caps more easily. This Jumper Cap Remover is bundled in your AGP card, please check with the AGP card vendors. 9 ASRock K8Upgrade-NF3 Motherboard English CPU Type Jumper Settings J3 J4 754-Pin CPU J1 J2 (Default) J9 J10 J15 J5 J6 J7 J8...939-Pin CPU (Using add-on J3 J4 ASRock 939CPU Board) / 940-Pin (M2) J1 J2 CPU (Using add-on the AGP slot of clasp that have the 32-bit PCI interface. This yellow-colored Future CPU Port is used to install expansion cards that can securely fasten the inserted graphics...
Quick Installation Guide
Page 10
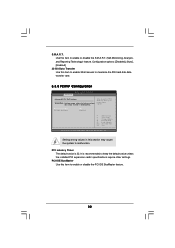
... no jumper cap is placed on the slot. The data in CMOS. However, please do the clear-CMOS action. Step 3. Step 4. ASRock K8Upgrade-NF3 Motherboard JR1 JL1 Jumper (see p.2, No. 14) Default Clear CMOS Note: CLRCMOS2 allows you start the installation. Remove the bracket facing the... in CMOS includes system setup information such as system password, date, time, and system setup parameters. Installing an expansion card Step 1. After waiting for the card before you must boot up events. When the jumper cap is placed on pins, the jumper is "Open". ...
... no jumper cap is placed on the slot. The data in CMOS. However, please do the clear-CMOS action. Step 3. Step 4. ASRock K8Upgrade-NF3 Motherboard JR1 JL1 Jumper (see p.2, No. 14) Default Clear CMOS Note: CLRCMOS2 allows you start the installation. Remove the bracket facing the... in CMOS includes system setup information such as system password, date, time, and system setup parameters. Installing an expansion card Step 1. After waiting for the card before you must boot up events. When the jumper cap is placed on pins, the jumper is "Open". ...

