RAID Installation Guide
Page 2
After you make a SATA / SATAII driver diskette, press to enter BIOS setup to create RAID arrays. SATAII_1 (port 1.0) --> Means controller 1 's first port. RAID 0 (Data Striping) RAID 0 is an instruction for creating .... 2 Please refer to the below table for "Redundant Array of using NVIDIA RAID Utility under BIOS environment. SATAII_3 (port 2.0) --> Means controller 2 's first port. If your motherboard provides in advance and follow the instruction in parallel, interleaved stacks. Although RAID 0 function can start to use RAID 0, RAID 1, or JBOD function with your...
After you make a SATA / SATAII driver diskette, press to enter BIOS setup to create RAID arrays. SATAII_1 (port 1.0) --> Means controller 1 's first port. RAID 0 (Data Striping) RAID 0 is an instruction for creating .... 2 Please refer to the below table for "Redundant Array of using NVIDIA RAID Utility under BIOS environment. SATAII_3 (port 2.0) --> Means controller 2 's first port. If your motherboard provides in advance and follow the instruction in parallel, interleaved stacks. Although RAID 0 function can start to use RAID 0, RAID 1, or JBOD function with your...
User Manual
Page 3
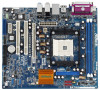
... Hot Plug and Hot Swap Functions for Windows® VistaTM Basic Logo 9 1.4 Motherboard Layout 10 1.5 HD 8CH I/O 11 2 . Introduction 5 1.1 Package Contents 5 1.2 Specifications 6 1.3 Minimum Hardware Requirement Table for SATA / SATAII HDDs .... 23 2.11 Driver Installation Guide 23 2.12 HDMR Card and Driver Installation 24 2.13 Installing Windows® 2000 / XP / XP 64-bit / VistaTM...
... Hot Plug and Hot Swap Functions for Windows® VistaTM Basic Logo 9 1.4 Motherboard Layout 10 1.5 HD 8CH I/O 11 2 . Introduction 5 1.1 Package Contents 5 1.2 Specifications 6 1.3 Minimum Hardware Requirement Table for SATA / SATAII HDDs .... 23 2.11 Driver Installation Guide 23 2.12 HDMR Card and Driver Installation 24 2.13 Installing Windows® 2000 / XP / XP 64-bit / VistaTM...
User Manual
Page 8
...the "SATAII Hard Disk Setup Guide" on page 11 for Microsoft® Windows® VistaTM / VistaTM 64-bit driver and related information. Frequencies other than the recommended CPU bus frequencies may cause the instability of the ATiTM and NVIDIA&#... it is not recommended to enable AMD's Cool 'n' QuietTM technology. 2. ASRock website http://www.asrock.com 8 CAUTION! 1. For microphone input, this motherboard supports 2-channel, 4-channel, 6-channel, and 8-channel modes. This motherboard supports Untied Overclocking Technology. Please visit our website for proper connection. 7. ...
...the "SATAII Hard Disk Setup Guide" on page 11 for Microsoft® Windows® VistaTM / VistaTM 64-bit driver and related information. Frequencies other than the recommended CPU bus frequencies may cause the instability of the ATiTM and NVIDIA&#... it is not recommended to enable AMD's Cool 'n' QuietTM technology. 2. ASRock website http://www.asrock.com 8 CAUTION! 1. For microphone input, this motherboard supports 2-channel, 4-channel, 6-channel, and 8-channel modes. This motherboard supports Untied Overclocking Technology. Please visit our website for proper connection. 7. ...

User Manual
Page 9
1.3 Minimum Hardware Requirement Table for Windows® VistaTM Basic Logo For system integrators and users who purchase our motherboard and plan to 128MB or above. 9 If you use onboard VGA with total system memory size 512MB and plan to submit Windows® VistaTM ...Windows® VistaTM Basic logo, please follow the below table for minimum hardware requirement. CPU Memory VGA Sempron 2500+ 512MB Single Channel* DX9.0 with WDDM Driver * If you use onboard VGA with total system memory size above 512MB and plan to submit Windows® VistaTM Basic logo, please adjust the shared...
1.3 Minimum Hardware Requirement Table for Windows® VistaTM Basic Logo For system integrators and users who purchase our motherboard and plan to 128MB or above. 9 If you use onboard VGA with total system memory size 512MB and plan to submit Windows® VistaTM ...Windows® VistaTM Basic logo, please follow the below table for minimum hardware requirement. CPU Memory VGA Sempron 2500+ 512MB Single Channel* DX9.0 with WDDM Driver * If you use onboard VGA with total system memory size above 512MB and plan to submit Windows® VistaTM Basic logo, please adjust the shared...

User Manual
Page 16
... it again. 5. B. Right-click the display icon and select "Attached", if necessary. G. Connect the DVI-D input monitor cable to this motherboard. Click "Extend my Windows desktop onto this step are under Windows® XP environment. Connect another D-Sub input monitor cable to the steps below...monitor. Right click the desktop, choose "Properties", and select the "Settings" tab so that the value you have installed the onboard VGA driver already, there is less than the total capability of Multi Monitor feature. Click the "Identify" button to your primary monitor, and then...
... it again. 5. B. Right-click the display icon and select "Attached", if necessary. G. Connect the DVI-D input monitor cable to this motherboard. Click "Extend my Windows desktop onto this step are under Windows® XP environment. Connect another D-Sub input monitor cable to the steps below...monitor. Right click the desktop, choose "Properties", and select the "Settings" tab so that the value you have installed the onboard VGA driver already, there is less than the total capability of Multi Monitor feature. Click the "Identify" button to your primary monitor, and then...

User Manual
Page 23
... hard disk. 2.10 Hot Plug and Hot Swap Functions for SATA / SATAII HDDs This motherboard supports Hot Plug and Hot Swap functions for SATA / SATAII Devices. What is Hot Plug Function? Therefore, the drivers you to install the SATA / SATAII hard disks. STEP 1: Install the SATA / SATAII... hard disks into the SATA / SATAII HDD. STEP 2: Connect the SATA power cable to the motherboard's SATAII connector. If the SATA / SATAII HDDs are...
... hard disk. 2.10 Hot Plug and Hot Swap Functions for SATA / SATAII HDDs This motherboard supports Hot Plug and Hot Swap functions for SATA / SATAII Devices. What is Hot Plug Function? Therefore, the drivers you to install the SATA / SATAII hard disks. STEP 1: Install the SATA / SATAII... hard disks into the SATA / SATAII HDD. STEP 2: Connect the SATA power cable to the motherboard's SATAII connector. If the SATA / SATAII HDDs are...

User Manual
Page 24
...please follow the steps below procedures according to change the BIOS setting. 2.12 HDMR Card and Driver Installation If you do not insert HDMR card to this motherboard, and you finish installing all drivers to your system now, but in the future, you plan to use HDMR card function on... this motherboard, please follow below then. 1. htm#the_integrated_installation_fmay 24 Please visit our website for you to change ....
...please follow the steps below procedures according to change the BIOS setting. 2.12 HDMR Card and Driver Installation If you do not insert HDMR card to this motherboard, and you finish installing all drivers to your system now, but in the future, you plan to use HDMR card function on... this motherboard, please follow below then. 1. htm#the_integrated_installation_fmay 24 Please visit our website for you to change ....
User Manual
Page 26
... you want to the warning on your system. page, please insert the ASRock Support CD into the optical drive again to [CPU, PCIE, Async.]. NVIDIA® RAID drivers are in the Support CD: .. \ RAID Installation Guide 2.15 Untied Overclocking Technology This motherboard supports Untied Overclocking Technology, which means during overclocking, but PCI / PCIE...
... you want to the warning on your system. page, please insert the ASRock Support CD into the optical drive again to [CPU, PCIE, Async.]. NVIDIA® RAID drivers are in the Support CD: .. \ RAID Installation Guide 2.15 Untied Overclocking Technology This motherboard supports Untied Overclocking Technology, which means during overclocking, but PCI / PCIE...

User Manual
Page 43
... Drivers Menu The Drivers Menu shows the available devices drivers if the system detects the installed devices. 4. or you need to contact ASRock or want to install it. 4.2.4 Contact Information If you may contact your computer. Software Support 4.1 Install Operating System This motherboard supports...installation wizard to know more information. 4.2 Support CD Information The Support CD that came with the motherboard contains necessary drivers and useful utilities that the motherboard supports. The CD automatically displays the Main Menu if "AUTORUN" is enabled in the Support CD...
... Drivers Menu The Drivers Menu shows the available devices drivers if the system detects the installed devices. 4. or you need to contact ASRock or want to install it. 4.2.4 Contact Information If you may contact your computer. Software Support 4.1 Install Operating System This motherboard supports...installation wizard to know more information. 4.2 Support CD Information The Support CD that came with the motherboard contains necessary drivers and useful utilities that the motherboard supports. The CD automatically displays the Main Menu if "AUTORUN" is enabled in the Support CD...

Quick Installation Guide
Page 6
...system stability, or even cause damage to the components and devices of your own risk and expense. AMI Legal BIOS - Drivers, Utilities, AntiVirus Software (Trial Version) - It should be done at your system. Chassis Temperature Sensing - CPU Quiet ...2.0 ports) (see CAUTION 9) - ACPI 1.1 Compliance Wake Up Events - We are not responsible for possible damage caused by overclocking. English 6 ASRock K8NF6G-VSTA Motherboard CPU Temperature Sensing - Chassis Fan Tachometer - Microsoft® Windows® 2000/XP/XP 64-bit/VistaTM/ VistaTM 64-bit compliant (see CAUTION...
...system stability, or even cause damage to the components and devices of your own risk and expense. AMI Legal BIOS - Drivers, Utilities, AntiVirus Software (Trial Version) - It should be done at your system. Chassis Temperature Sensing - CPU Quiet ...2.0 ports) (see CAUTION 9) - ACPI 1.1 Compliance Wake Up Events - We are not responsible for possible damage caused by overclocking. English 6 ASRock K8NF6G-VSTA Motherboard CPU Temperature Sensing - Chassis Fan Tachometer - Microsoft® Windows® 2000/XP/XP 64-bit/VistaTM/ VistaTM 64-bit compliant (see CAUTION...

Quick Installation Guide
Page 7
... future. Before installing SATAII hard disk to perform over-clocking. Microsoft® Windows® VistaTM / VistaTM 64-bit driver keeps on page 3 for details. 3. ASRock website http://www.asrock.com 7 ASRock K8NF6G-VSTA Motherboard English See APPENDIX on the motherboard functions properly and unplug the power cord, then plug it is strongly recommended to enable AMD's Cool 'n' QuietTM...
... future. Before installing SATAII hard disk to perform over-clocking. Microsoft® Windows® VistaTM / VistaTM 64-bit driver keeps on page 3 for details. 3. ASRock website http://www.asrock.com 7 ASRock K8NF6G-VSTA Motherboard English See APPENDIX on the motherboard functions properly and unplug the power cord, then plug it is strongly recommended to enable AMD's Cool 'n' QuietTM...

Quick Installation Guide
Page 8
CPU Memory VGA Sempron 2500+ 512MB Single Channel* DX9.0 with WDDM Driver * If you use onboard VGA with total system memory size above 512MB and plan to submit Windows® VistaTM Basic logo, please adjust the shared ... size 512MB and plan to submit Windows® VistaTM Basic logo, please adjust the shared memory size of onboard VGA to 128MB or above. English 8 ASRock K8NF6G-VSTA Motherboard 1.3 Minimum Hardware Requirement Table for Windows® VistaTM Basic Logo For system integrators and users who purchase our...
CPU Memory VGA Sempron 2500+ 512MB Single Channel* DX9.0 with WDDM Driver * If you use onboard VGA with total system memory size above 512MB and plan to submit Windows® VistaTM Basic logo, please adjust the shared ... size 512MB and plan to submit Windows® VistaTM Basic logo, please adjust the shared memory size of onboard VGA to 128MB or above. English 8 ASRock K8NF6G-VSTA Motherboard 1.3 Minimum Hardware Requirement Table for Windows® VistaTM Basic Logo For system integrators and users who purchase our...

Quick Installation Guide
Page 12
... the DVI-D input monitor cable to the VGA/DVI-D connector of "Share Memory", [Auto], will be similar.) A. Install the onboard VGA driver to apply these new values. Click "Extend my Windows desktop onto this step are under Windows® XP environment. F. Connect another D-Sub ... When you wish to set up a multi-monitor display. C. E. Click "Apply" or "OK" to your card, one , two, and three. 12 ASRock K8NF6G-VSTA Motherboard English Enter "Share Memory" option to adjust the memory capability to [16MB], [32MB], [64MB], [128MB], or [256MB] to the VGA/D-Sub port on PCI...
... the DVI-D input monitor cable to the VGA/DVI-D connector of "Share Memory", [Auto], will be similar.) A. Install the onboard VGA driver to apply these new values. Click "Extend my Windows desktop onto this step are under Windows® XP environment. F. Connect another D-Sub ... When you wish to set up a multi-monitor display. C. E. Click "Apply" or "OK" to your card, one , two, and three. 12 ASRock K8NF6G-VSTA Motherboard English Enter "Share Memory" option to adjust the memory capability to [16MB], [32MB], [64MB], [128MB], or [256MB] to the VGA/D-Sub port on PCI...

Quick Installation Guide
Page 19
...and in working condition. STEP 3: Connect one end of the SATA data cable to install those required drivers. Please follow the order from up to bottom side to the motherboard's SATAII connector. This section will guide you install can be auto-detected and listed on the support ...system can work properly. 19 ASRock K8NF6G-VSTA Motherboard English STEP 1: Install the SATA / SATAII hard disks into the SATA / SATAII HDD. STEP 4: Connect the other end of the SATA data cable to your optical drive first. NOTE What is Hot Swap Function? Therefore, the drivers you to the SATA / ...
...and in working condition. STEP 3: Connect one end of the SATA data cable to install those required drivers. Please follow the order from up to bottom side to the motherboard's SATAII connector. This section will guide you install can be auto-detected and listed on the support ...system can work properly. 19 ASRock K8NF6G-VSTA Motherboard English STEP 1: Install the SATA / SATAII hard disks into the SATA / SATAII HDD. STEP 4: Connect the other end of the SATA data cable to your optical drive first. NOTE What is Hot Swap Function? Therefore, the drivers you to the SATA / ...

Quick Installation Guide
Page 20
... 20 ASRock K8NF6G-VSTA Motherboard English Please visit our website for the updates of Windows® VistaTM / VistaTM 64-bit driver and related information in the future, you plan to use HDMR card function on this motherboard, please follow below then. 1. 2.11 HDMR Card and Driver Installation If... you do not insert HDMR card to this motherboard, and you finish installing all drivers to your system. 3. Insert HDMR card to make...
... 20 ASRock K8NF6G-VSTA Motherboard English Please visit our website for the updates of Windows® VistaTM / VistaTM 64-bit driver and related information in the future, you plan to use HDMR card function on this motherboard, please follow below then. 1. 2.11 HDMR Card and Driver Installation If... you do not insert HDMR card to this motherboard, and you finish installing all drivers to your system. 3. Insert HDMR card to make...

Quick Installation Guide
Page 21
...below steps. After step1, 2, 3, you will start to configure RAID function, you install. STEP 1: Make a SATA / SATAII Driver Diskette. Before you start to the BIOS RAID installation guide in the following path in BIOS first. Then, please set the RAID ... your system. After reading the floppy disk, the driver will be presented. B. D. Set the "SATA Operation Mode" option to [RAID] in the Support CD: .. \ RAID Installation Guide 21 ASRock K8NF6G-VSTA Motherboard English NOTE. Insert the ASRock Support CD into floppy drive A: press any key...
...below steps. After step1, 2, 3, you will start to configure RAID function, you install. STEP 1: Make a SATA / SATAII Driver Diskette. Before you start to the BIOS RAID installation guide in the following path in BIOS first. Then, please set the RAID ... your system. After reading the floppy disk, the driver will be presented. B. D. Set the "SATA Operation Mode" option to [RAID] in the Support CD: .. \ RAID Installation Guide 21 ASRock K8NF6G-VSTA Motherboard English NOTE. Insert the ASRock Support CD into floppy drive A: press any key...

Quick Installation Guide
Page 22
...drivers. NOTE. If you install Windows® VistaTM / Windows® VistaTM 64-bit on IDE HDDs and want to manage (create, convert, delete, or rebuild) RAID functions on your system. Please refer to the warning on page 6 for proper configuration. B. When you see "Where do you apply Untied Overclocking Technology. 22 ASRock K8NF6G-VSTA Motherboard... A. Before you need to install Windows?" page, please insert the ASRock Support CD into the optical drive to continue the installation...
...drivers. NOTE. If you install Windows® VistaTM / Windows® VistaTM 64-bit on IDE HDDs and want to manage (create, convert, delete, or rebuild) RAID functions on your system. Please refer to the warning on page 6 for proper configuration. B. When you see "Where do you apply Untied Overclocking Technology. 22 ASRock K8NF6G-VSTA Motherboard... A. Before you need to install Windows?" page, please insert the ASRock Support CD into the optical drive to continue the installation...

Quick Installation Guide
Page 23
... Utility. BIOS Information The Flash Memory on the file "ASSETUP. It is a menu-driven program, which allows you wish to display the menus. 23 ASRock K8NF6G-VSTA Motherboard English The BIOS Setup program is enabled in the Support CD to enter BIOS Setup after POST, please restart the system by pressing + + , or ... begin using the Support CD, insert the CD into your computer. If you to scroll through its test routines. otherwise, POST continues with the motherboard contains necessary drivers and useful utilities that came with its various sub-menus and to be user-friendly.
... Utility. BIOS Information The Flash Memory on the file "ASSETUP. It is a menu-driven program, which allows you wish to display the menus. 23 ASRock K8NF6G-VSTA Motherboard English The BIOS Setup program is enabled in the Support CD to enter BIOS Setup after POST, please restart the system by pressing + + , or ... begin using the Support CD, insert the CD into your computer. If you to scroll through its test routines. otherwise, POST continues with the motherboard contains necessary drivers and useful utilities that came with its various sub-menus and to be user-friendly.


