
User Manual
Page 5
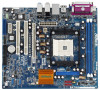
...ASRock K8NF6G-VSTA Support CD 1 x Ultra ATA 66/100/133 IDE Ribbon Cable (80-conductor) 1 x 3.5-in Floppy Drive Ribbon Cable 1 x Serial ATA (SATA) Data Cable (Optional) 1 x Serial ATA (SATA) HDD Power Cable (Optional) 1 x HD 8CH I/O Shield 1 x COM Port Bracket 1 x HDMR Card (Optional) 5 In case any modifications of this manual occur, the updated... 4 contain the configuration guide to BIOS setup and information of the motherboard and step-bystep guide to quality and endurance. Because the motherboard specifications and the BIOS software might be updated, the content of this manual, chapter...
...ASRock K8NF6G-VSTA Support CD 1 x Ultra ATA 66/100/133 IDE Ribbon Cable (80-conductor) 1 x 3.5-in Floppy Drive Ribbon Cable 1 x Serial ATA (SATA) Data Cable (Optional) 1 x Serial ATA (SATA) HDD Power Cable (Optional) 1 x HD 8CH I/O Shield 1 x COM Port Bracket 1 x HDMR Card (Optional) 5 In case any modifications of this manual occur, the updated... 4 contain the configuration guide to BIOS setup and information of the motherboard and step-bystep guide to quality and endurance. Because the motherboard specifications and the BIOS software might be updated, the content of this manual, chapter...

User Manual
Page 17
... placed on pins, the jumper is "Open". Jumper Setting PS2_USB_PW1 1_2 2_3 Short pin2, pin3 to clear the CMOS when you just finish updating the BIOS, you must boot up the system first, and then shut it requires 2 Amp and higher standby current provided by power supply. The data... 17 After waiting for 5 seconds. Click and drag the display icons to positions representing the physical setup of display icons determines how you update the BIOS. The placement of your monitors that you to default setup, please turn off the computer and unplug the power cord from one monitor to...
... placed on pins, the jumper is "Open". Jumper Setting PS2_USB_PW1 1_2 2_3 Short pin2, pin3 to clear the CMOS when you just finish updating the BIOS, you must boot up the system first, and then shut it requires 2 Amp and higher standby current provided by power supply. The data... 17 After waiting for 5 seconds. Click and drag the display icons to positions representing the physical setup of display icons determines how you update the BIOS. The placement of your monitors that you to default setup, please turn off the computer and unplug the power cord from one monitor to...

User Manual
Page 24
... driver from our support CD to make sure that the HDMR card is no need for the updates of making a SP4 disk: http://www.microsoft.com/Windows2000/downloads/servicepacks/sp4/spdeploy. If you just...® 2000 / XP / XP 64-bit / VistaTM / VistaTM 64-bit Without RAID Functions The installation procedures for the updates of Windows® VistaTM / VistaTM 64-bit driver and related information in the future. 2. If there is completely seated on... function on this motherboard, please follow below procedures according to change the BIOS setting. Please make a SATA / SATAII driver diskette.
... driver from our support CD to make sure that the HDMR card is no need for the updates of making a SP4 disk: http://www.microsoft.com/Windows2000/downloads/servicepacks/sp4/spdeploy. If you just...® 2000 / XP / XP 64-bit / VistaTM / VistaTM 64-bit Without RAID Functions The installation procedures for the updates of Windows® VistaTM / VistaTM 64-bit driver and related information in the future. 2. If there is completely seated on... function on this motherboard, please follow below procedures according to change the BIOS setting. Please make a SATA / SATAII driver diskette.

User Manual
Page 27
...start up the security features Exit To exit the current screen or the BIOS SETUP UTILITY Use < > key or < > key to choose among the selections on your system. Because the BIOS software is constantly being updated, the following selections: Main To set up the system time/date ...information Advanced To set up the advanced BIOS features H/W Monitor To display current hardware status Boot To set up the default...
...start up the security features Exit To exit the current screen or the BIOS SETUP UTILITY Use < > key or < > key to choose among the selections on your system. Because the BIOS software is constantly being updated, the following selections: Main To set up the system time/date ...information Advanced To set up the advanced BIOS features H/W Monitor To display current hardware status Boot To set up the default...

User Manual
Page 28
... H/W Monitor Boot Security Exit System Overview System Time System Date [17:00:09] [Wed 07/12/2006] BIOS Version : K8NF6G-VSTA BIOS P1.0 Processor Type : AMD Athlon(tm) 64 Processor 3400+ (64bit supported) Processor Speed : 2200 MHz Microcode Update : F7A/3A L1 Cache Size : 128KB L2 Cache Size : 512KB Total Memory DDR 1 DDR 2 : 256MB ... Use this item to specify the system time. 3.1.2 Navigation Keys Please check the following table for all the settings To save changes and exit the BIOS SETUP UTILITY To jump to the Exit Screen or exit the current screen 3.2 Main Screen When you enter the...
... H/W Monitor Boot Security Exit System Overview System Time System Date [17:00:09] [Wed 07/12/2006] BIOS Version : K8NF6G-VSTA BIOS P1.0 Processor Type : AMD Athlon(tm) 64 Processor 3400+ (64bit supported) Processor Speed : 2200 MHz Microcode Update : F7A/3A L1 Cache Size : 128KB L2 Cache Size : 512KB Total Memory DDR 1 DDR 2 : 256MB ... Use this item to specify the system time. 3.1.2 Navigation Keys Please check the following table for all the settings To save changes and exit the BIOS SETUP UTILITY To jump to the Exit Screen or exit the current screen 3.2 Main Screen When you enter the...

Quick Installation Guide
Page 4
...BIOS software might be updated, the content of this manual will be found in the user manual presented in Floppy Drive Ribbon Cable 1 x Serial ATA (SATA) Data Cable (Optional) 1 x Serial ATA (SATA) HDD Power Cable (Optional) 1 x HD 8CH I/O Shield 1 x COM Port Bracket 1 x HDMR Card (Optional) 4 ASRock K8NF6G-VSTA... Motherboard English In case any modifications of this manual occur, the updated version will be subject to quality and endurance. It delivers excellent performance with robust design ...
...BIOS software might be updated, the content of this manual will be found in the user manual presented in Floppy Drive Ribbon Cable 1 x Serial ATA (SATA) Data Cable (Optional) 1 x Serial ATA (SATA) HDD Power Cable (Optional) 1 x HD 8CH I/O Shield 1 x COM Port Bracket 1 x HDMR Card (Optional) 4 ASRock K8NF6G-VSTA... Motherboard English In case any modifications of this manual occur, the updated version will be subject to quality and endurance. It delivers excellent performance with robust design ...

Quick Installation Guide
Page 13
... cap is placed on pins, the jumper is "Open". The illustration shows a 3-pin jumper whose pin1 and pin2 are setup. If you update the BIOS. If no jumper cap is placed on pins, the jumper is placed on CLRCMOS1 for 15 seconds, use a jumper cap to default setup,...5 seconds. Use Multi Monitor feature. To clear and reset the system parameters to short pin2 and pin3 on these 2 pins. English 13 ASRock K8NF6G-VSTA Motherboard However, please do the clear-CMOS action. The placement of your monitors that you must boot up events. Short Open Jumper Setting PS2_USB_PW1...
... cap is placed on pins, the jumper is "Open". The illustration shows a 3-pin jumper whose pin1 and pin2 are setup. If you update the BIOS. If no jumper cap is placed on pins, the jumper is placed on CLRCMOS1 for 15 seconds, use a jumper cap to default setup,...5 seconds. Use Multi Monitor feature. To clear and reset the system parameters to short pin2 and pin3 on these 2 pins. English 13 ASRock K8NF6G-VSTA Motherboard However, please do the clear-CMOS action. The placement of your monitors that you must boot up events. Short Open Jumper Setting PS2_USB_PW1...

Quick Installation Guide
Page 20
...SP4 disk: http://www.microsoft.com/Windows2000/downloads/servicepacks/sp4/spdeploy. htm#the_integrated_installation_fmay 20 ASRock K8NF6G-VSTA Motherboard English 2.11 HDMR Card and Driver Installation If you do not insert HDMR card...disk is supposed to your system, your disk, please visit the below website for the updates of Windows® VistaTM / VistaTM 64-bit driver and related information in the future.... HDDs with RAID functions, please follow the steps below procedures according to change the BIOS setting. Insert HDMR card to make sure that the HDMR card is no need ...
...SP4 disk: http://www.microsoft.com/Windows2000/downloads/servicepacks/sp4/spdeploy. htm#the_integrated_installation_fmay 20 ASRock K8NF6G-VSTA Motherboard English 2.11 HDMR Card and Driver Installation If you do not insert HDMR card...disk is supposed to your system, your disk, please visit the below website for the updates of Windows® VistaTM / VistaTM 64-bit driver and related information in the future.... HDDs with RAID functions, please follow the steps below procedures according to change the BIOS setting. Insert HDMR card to make sure that the HDMR card is no need ...


