
User Manual
Page 5
1.2 Specifications Platform: ATX Form Factor: 12.0-in x 7.0-in, 30.5 cm x 17.8 cm CPU: Supports Socket A (462 pins) for AMD AthlonTM / AthlonTM XP / DuronTM processor Chipsets: North Bridge: VIA KT600, FSB@400 MHz South Bridge: VIA VT8237, ...: Speed: 802.3u (10/100 Ethernet), Supports Wake-On-LAN Hardware Monitor: CPU Temperature Sensing Motherboard Temperature Sensing CPU Overheat Shutdown to Protect CPU Life (ASRock U-COP)(see CAUTION 1) CPU Fan Tachometer Chassis Fan Tachometer Voltage Monitoring: +12V, +5V, +3.3V, Vcore PCI slots: 5 Slots with PCI Specification 2.2 ...
1.2 Specifications Platform: ATX Form Factor: 12.0-in x 7.0-in, 30.5 cm x 17.8 cm CPU: Supports Socket A (462 pins) for AMD AthlonTM / AthlonTM XP / DuronTM processor Chipsets: North Bridge: VIA KT600, FSB@400 MHz South Bridge: VIA VT8237, ...: Speed: 802.3u (10/100 Ethernet), Supports Wake-On-LAN Hardware Monitor: CPU Temperature Sensing Motherboard Temperature Sensing CPU Overheat Shutdown to Protect CPU Life (ASRock U-COP)(see CAUTION 1) CPU Fan Tachometer Chassis Fan Tachometer Voltage Monitoring: +12V, +5V, +3.3V, Vcore PCI slots: 5 Slots with PCI Specification 2.2 ...

User Manual
Page 7
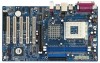
...RJ-45 B: USB1 USB 2.0 T: USB4 1 B: USB5 JUSB45 VIA KT600 CHIPSET Top: Line In Center: Line Out Bottom: Mic In 27 2MB BIOS AGP 8X K7VT6 LAN PHY SUPER I/O 1.5V_AGP1 IDE1 IDE2 7 8 9 26 25 24 23 22 GAME1 1 DDR400 PCI1 PCI2 1 FSB_SEL0 1 FSB_SEL1 1 FSB_SEL2 1 AUDIO1 JR1 ...PLED PWRBTN 1 USB67 1 HDLED RST CHA_FAN1 10 11 12 13 14 15 21 20 19 18 17 16 1 PS2_USB_PWR1 Jumper 2 CPU Fan Connector (CPU_FAN1) 3 CPU Socket 4 North Bridge Controller 5 184-pin DDR DIMM Slots (DDR1- 2) 6 ATX Power Connector (ATXPWR1) 7 Secondary IDE Connector (IDE2, Black) 8 Primary IDE Connector...
...RJ-45 B: USB1 USB 2.0 T: USB4 1 B: USB5 JUSB45 VIA KT600 CHIPSET Top: Line In Center: Line Out Bottom: Mic In 27 2MB BIOS AGP 8X K7VT6 LAN PHY SUPER I/O 1.5V_AGP1 IDE1 IDE2 7 8 9 26 25 24 23 22 GAME1 1 DDR400 PCI1 PCI2 1 FSB_SEL0 1 FSB_SEL1 1 FSB_SEL2 1 AUDIO1 JR1 ...PLED PWRBTN 1 USB67 1 HDLED RST CHA_FAN1 10 11 12 13 14 15 21 20 19 18 17 16 1 PS2_USB_PWR1 Jumper 2 CPU Fan Connector (CPU_FAN1) 3 CPU Socket 4 North Bridge Controller 5 184-pin DDR DIMM Slots (DDR1- 2) 6 ATX Power Connector (ATXPWR1) 7 Secondary IDE Connector (IDE2, Black) 8 Primary IDE Connector...

User Manual
Page 9
... ICs. 4. Whenever you install or remove any component, place it . When placing screws into it on the carpet or the like. 2. Installation K7VT6 is detached from the wall socket before you handle components. 3. Before you uninstall any component, ensure that the power is switched off or the power cord is an ATX...
... ICs. 4. Whenever you install or remove any component, place it . When placing screws into it on the carpet or the like. 2. Installation K7VT6 is detached from the wall socket before you handle components. 3. Before you uninstall any component, ensure that the power is switched off or the power cord is an ATX...

User Manual
Page 10
... locked. For proper installation, please kindly refer to the instruction manuals of the pins. 2.1 CPU Installation Step 1. The lever clicks on the socket while you push down the socket lever to indicate that its marked corner matches the base of CPU Fan and Heatsink AMD AthlonTM / AthlonTM XP/ DuronTM family CPUs with... to avoid bending of the CPU fan and heatsink vendors. 10 Then connect the CPU fan to a 90o angle. Carefully insert the CPU into the socket to improve heat transfer. Step 2. Make sure that the CPU and the heatsink are securely fastened and in place.
... locked. For proper installation, please kindly refer to the instruction manuals of the pins. 2.1 CPU Installation Step 1. The lever clicks on the socket while you push down the socket lever to indicate that its marked corner matches the base of CPU Fan and Heatsink AMD AthlonTM / AthlonTM XP/ DuronTM family CPUs with... to avoid bending of the CPU fan and heatsink vendors. 10 Then connect the CPU fan to a 90o angle. Carefully insert the CPU into the socket to improve heat transfer. Step 2. Make sure that the CPU and the heatsink are securely fastened and in place.