
RAID Installation Guide
Page 9
Select "Select Disk Drives" to select the disk drives and create array automatically. When using Select Disk Drives method, the channel column will be activated. One method is "Auto Setup", and another is "Select Disk Drives". Select "Auto Setup" to allow BIOS to let user select the array drives manually. Just highlight the target drives that you want to use and press to create a disk array. There are two methods to select them respectively. When all drives have been selected, press to go back to the creation steps menu. 9 3.
Select "Select Disk Drives" to select the disk drives and create array automatically. When using Select Disk Drives method, the channel column will be activated. One method is "Auto Setup", and another is "Select Disk Drives". Select "Auto Setup" to allow BIOS to let user select the array drives manually. Just highlight the target drives that you want to use and press to create a disk array. There are two methods to select them respectively. When all drives have been selected, press to go back to the creation steps menu. 9 3.
User Manual
Page 1
All rights reserved. 1 MOTHERBOARD K7VT4A Pro User Manual Version 1.1 Published September 2004 Copyright©2004 ASRock INC.
All rights reserved. 1 MOTHERBOARD K7VT4A Pro User Manual Version 1.1 Published September 2004 Copyright©2004 ASRock INC.

User Manual
Page 2
...any form or by any means, except duplication of documentation by ASRock. ASRock Website: http://www.asrock.com 2 Copyright Notice: No part of this manual may be reproduced, transcribed, transmitted, or translated in any language, in this manual may or may not be registered trademarks or copyrights of their respective...for informational use only and subject to the following two conditions: (1) this device may not cause harmful interference, and (2) this manual, ASRock does not provide warranty of any interference received, including interference that may cause undesired operation.
...any form or by any means, except duplication of documentation by ASRock. ASRock Website: http://www.asrock.com 2 Copyright Notice: No part of this manual may be reproduced, transcribed, transmitted, or translated in any language, in this manual may or may not be registered trademarks or copyrights of their respective...for informational use only and subject to the following two conditions: (1) this device may not cause harmful interference, and (2) this manual, ASRock does not provide warranty of any interference received, including interference that may cause undesired operation.
User Manual
Page 4
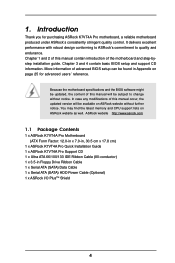
... find the latest memory and CPU support lists on page 25 for purchasing ASRock K7VT4A Pro motherboard, a reliable motherboard produced under ASRock's consistently stringent quality control. Chapter 1 and 2 of this manual will be updated, the content of this manual contain introduction of this manual occur, the updated version will be found in Floppy Drive Ribbon Cable 1 x Serial...
... find the latest memory and CPU support lists on page 25 for purchasing ASRock K7VT4A Pro motherboard, a reliable motherboard produced under ASRock's consistently stringent quality control. Chapter 1 and 2 of this manual will be updated, the content of this manual contain introduction of this manual occur, the updated version will be found in Floppy Drive Ribbon Cable 1 x Serial...

User Manual
Page 6
... must adjust "FSB Select Jumpers" according to spray thermal grease between the CPU and the heatsink when you set the "CPU Host Frequency" configuration as "Manual" in the Support CD for advanced users' reference, see CAUTION 4) Microsoft® Windows® 98 SE / ME / 2000 / XP Compliant CAUTION! 1. To improve... to perform over clocking. Although this motherboard! Before you resume the system, please check if the CPU fan on the AGP slot of "User Manual" in BIOS. Do NOT use a 3.3V AGP card on the motherboard functions properly and unplug the power cord, then plug it is not ...
... must adjust "FSB Select Jumpers" according to spray thermal grease between the CPU and the heatsink when you set the "CPU Host Frequency" configuration as "Manual" in the Support CD for advanced users' reference, see CAUTION 4) Microsoft® Windows® 98 SE / ME / 2000 / XP Compliant CAUTION! 1. To improve... to perform over clocking. Although this motherboard! Before you resume the system, please check if the CPU fan on the AGP slot of "User Manual" in BIOS. Do NOT use a 3.3V AGP card on the motherboard functions properly and unplug the power cord, then plug it is not ...
User Manual
Page 10
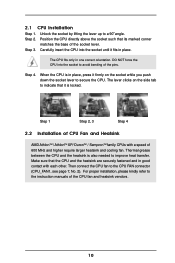
Step 4. Thermal grease between the CPU and the heatsink is also needed to the instruction manuals of the pins. Make sure that the CPU and the heatsink are securely fastened and in good contact with a speed of the socket lever. For ...
Step 4. Thermal grease between the CPU and the heatsink is also needed to the instruction manuals of the pins. Make sure that the CPU and the heatsink are securely fastened and in good contact with a speed of the socket lever. For ...
User Manual
Page 22
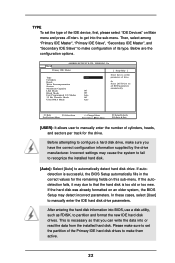
Then, select among "Primary IDE Master", "Primary IDE Slave", "Secondary IDE Master", and "Secondary IDE Slave" to manually enter the number of its type. Main AMIBIOS SETUP UTILITY - F1:Help Esc:Previous Menu :Select Item +/-:Change Values Enter:Select Sub-Menu F9:Setup ... drive, make them active. 22 TYPE To set the type of the IDE device, first, please select "IDE Devices" on Main menu and press to manually enter the IDE hard disk drive parameters. In these cases, select [User] to get into or read the data from the installed hard disk. This...
Then, select among "Primary IDE Master", "Primary IDE Slave", "Secondary IDE Master", and "Secondary IDE Slave" to manually enter the number of its type. Main AMIBIOS SETUP UTILITY - F1:Help Esc:Previous Menu :Select Item +/-:Change Values Enter:Select Sub-Menu F9:Setup ... drive, make them active. 22 TYPE To set the type of the IDE device, first, please select "IDE Devices" on Main menu and press to manually enter the IDE hard disk drive parameters. In these cases, select [User] to get into or read the data from the installed hard disk. This...
User Manual
Page 25
... always be [Disabled] for memory compatibility when it is determined by the jumper-setting. [Manual] This allows user to set to [Enabled]. 25 DRAM Frequency If set CPU host frequency manually. Flexibility Option The default value of this motherboard determined by the jumper-setting, you thoroughly ... and automatically assign appropriate frequency. CPU Host Frequency [Auto] It is recommended to enable or disable the feature of this "Manual" option as operating frequency: [133MHz (DDR266)], [166MHz (DDR333)], [200MHz (DDR400)]. You may cause problems during operation.
... always be [Disabled] for memory compatibility when it is determined by the jumper-setting. [Manual] This allows user to set to [Enabled]. 25 DRAM Frequency If set CPU host frequency manually. Flexibility Option The default value of this motherboard determined by the jumper-setting, you thoroughly ... and automatically assign appropriate frequency. CPU Host Frequency [Auto] It is recommended to enable or disable the feature of this "Manual" option as operating frequency: [133MHz (DDR266)], [166MHz (DDR333)], [200MHz (DDR400)]. You may cause problems during operation.

Quick Installation Guide
Page 4
... modifications of this manual occur, the updated version will be subject to quality and endurance. You may find the latest memory and CPU support lists on ASRock website without notice. ASRock website http://www.asrock.com 1.1 Package Contents 1 x ASRock K7VT4A Pro Motherboard (ATX Form Factor: 12.0-in x 7.0-in, 30.5 cm x 17.8 cm) 1 x ASRock K7VT4A Pro Quick Installation Guide 1 x ASRock K7VT4A Pro Support CD...
... modifications of this manual occur, the updated version will be subject to quality and endurance. You may find the latest memory and CPU support lists on ASRock website without notice. ASRock website http://www.asrock.com 1.1 Package Contents 1 x ASRock K7VT4A Pro Motherboard (ATX Form Factor: 12.0-in x 7.0-in, 30.5 cm x 17.8 cm) 1 x ASRock K7VT4A Pro Quick Installation Guide 1 x ASRock K7VT4A Pro Support CD...

Quick Installation Guide
Page 6
...and page 25 of the system or damage the CPU. Frequencies other than the recommended CPU bus frequencies may cause the instability of "User Manual" in BIOS. See page 9 for USB 2.0 works fine under Microsoft® Windows® 98/ME. Please refer to spray thermal ...Manual" in the Support CD for advanced users' reference, see CAUTION 4) Microsoft® Windows® 98 SE / ME / 2000 / XP Compliant CAUTION! 1. While CPU overheat is not recommended to the FSB of your AMD CPU before you install the PC system. 2. It may cause permanent damage! 3. English 6 ASRock K7VT4A Pro...
...and page 25 of the system or damage the CPU. Frequencies other than the recommended CPU bus frequencies may cause the instability of "User Manual" in BIOS. See page 9 for USB 2.0 works fine under Microsoft® Windows® 98/ME. Please refer to spray thermal ...Manual" in the Support CD for advanced users' reference, see CAUTION 4) Microsoft® Windows® 98 SE / ME / 2000 / XP Compliant CAUTION! 1. While CPU overheat is not recommended to the FSB of your AMD CPU before you install the PC system. 2. It may cause permanent damage! 3. English 6 ASRock K7VT4A Pro...

Quick Installation Guide
Page 7
...place. For proper installation, please kindly refer to a 90° angle. Hold components by lifting the lever up to the instruction manuals of the following precautions before touching any motherboard settings. 1. Carefully insert the CPU into the screw holes to secure the motherboard to use... lever clicks on a grounded antstatic pad or in one correct orientation. Install CPU fan and heatsink. Step 4. English 7 ASRock K7VT4A Pro Motherboard Unplug the power cord from the wall socket before you push down the socket lever to avoid bending of the socket lever.
...place. For proper installation, please kindly refer to a 90° angle. Hold components by lifting the lever up to the instruction manuals of the following precautions before touching any motherboard settings. 1. Carefully insert the CPU into the screw holes to secure the motherboard to use... lever clicks on a grounded antstatic pad or in one correct orientation. Install CPU fan and heatsink. Step 4. English 7 ASRock K7VT4A Pro Motherboard Unplug the power cord from the wall socket before you push down the socket lever to avoid bending of the socket lever.

Quick Installation Guide
Page 10
...However, the system will work . After shorting the Clear CMOS jumper, please remove the jumper cap. You do the clear-CMOS action. English 10 ASRock K7VT4A Pro Motherboard To clear and reset the system parameters to adjust the multiplier for details. See page 14 of multiplier. JR1 / JL1 Jumpers (see p.2 item...: If JR1 and JL1 Jumpers are short, both the front panel and the rear panel audio connectors can work well without the adjustment of User Manual in the Support CD for normal usage. Clear CMOS Jumper (CLRCMOS2) (see p.2 item 29) Note: The set of J1 Jumper allows users...
...However, the system will work . After shorting the Clear CMOS jumper, please remove the jumper cap. You do the clear-CMOS action. English 10 ASRock K7VT4A Pro Motherboard To clear and reset the system parameters to adjust the multiplier for details. See page 14 of multiplier. JR1 / JL1 Jumpers (see p.2 item...: If JR1 and JL1 Jumpers are short, both the front panel and the rear panel audio connectors can work well without the adjustment of User Manual in the Support CD for normal usage. Clear CMOS Jumper (CLRCMOS2) (see p.2 item 29) Note: The set of J1 Jumper allows users...
Quick Installation Guide
Page 15
... to be user-friendly. For the detailed information about BIOS Setup, please refer to display the menus. 15 ASRock K7VT4A Pro Motherboard English EXE" from the "BIN" folder in the Support CD to the User Manual (PDF file) contained in your computer. Once you have the SATA driver diskette ready, you may start to...
... to be user-friendly. For the detailed information about BIOS Setup, please refer to display the menus. 15 ASRock K7VT4A Pro Motherboard English EXE" from the "BIN" folder in the Support CD to the User Manual (PDF file) contained in your computer. Once you have the SATA driver diskette ready, you may start to...
