RAID Installation Guide
Page 1
Guide to SATA Hard Disks Installation 2 1.1 Serial ATA (SATA) Hard Disks Installation 2 1.2 Making An SATA Driver Diskette 3 2. Guide to RAID Configurations 4 2.1 Introduction of Windows 2000 / Windows XP 15 1 Installation of RAID 4 2.2 RAID Configuration Precautions 6 2.3 BIOS Configuration Utility 7 2.3.1 Enter BIOS Configuration Utility 7 2.3.2 Create Disk Array 8 2.3.3 Delete Disk Array 13 2.3.4 Select Boot Array 14 3. Guide to SATA Hard Disks Installation and RAID Configuration 1.
Guide to SATA Hard Disks Installation 2 1.1 Serial ATA (SATA) Hard Disks Installation 2 1.2 Making An SATA Driver Diskette 3 2. Guide to RAID Configurations 4 2.1 Introduction of Windows 2000 / Windows XP 15 1 Installation of RAID 4 2.2 RAID Configuration Precautions 6 2.3 BIOS Configuration Utility 7 2.3.1 Enter BIOS Configuration Utility 7 2.3.2 Create Disk Array 8 2.3.3 Delete Disk Array 13 2.3.4 Select Boot Array 14 3. Guide to SATA Hard Disks Installation and RAID Configuration 1.

RAID Installation Guide
Page 3
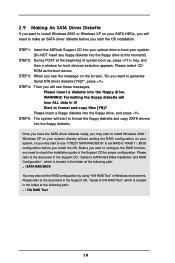
... VIA RAID Tool", which is located in Windows environment. Once you have the SATA driver diskette ready, you may start to use "VT8237 SATA RAID BIOS" to set the RAID configuration by using "VIA RAID Tool" in the folder at the beginning of system boot-up, press key, and then a window... for boot devices selection appears. STEP 1: Insert the ASRock Support CD into the floppy diskette. STEP 4: Then you will start to format the floppy diskette and copy SATA drivers into your optical drive to...
... VIA RAID Tool", which is located in Windows environment. Once you have the SATA driver diskette ready, you may start to use "VT8237 SATA RAID BIOS" to set the RAID configuration by using "VIA RAID Tool" in the folder at the beginning of system boot-up, press key, and then a window... for boot devices selection appears. STEP 1: Insert the ASRock Support CD into the floppy diskette. STEP 4: Then you will start to format the floppy diskette and copy SATA drivers into your optical drive to...

RAID Installation Guide
Page 7
The main interface of BIOS configuration utility is as below: 7 Press 'Tab' key to enter BIOS configuration utility. 2.3 BIOS Configuration Utility 2.3.1 Enter BIOS Configuration Utility After the system powers on, the following information will appear on the screen.
The main interface of BIOS configuration utility is as below: 7 Press 'Tab' key to enter BIOS configuration utility. 2.3 BIOS Configuration Utility 2.3.1 Enter BIOS Configuration Utility After the system powers on, the following information will appear on the screen.

RAID Installation Guide
Page 9
One method is "Auto Setup", and another is "Select Disk Drives". When using Select Disk Drives method, the channel column will be activated. Select "Select Disk Drives" to select the disk drives and create array automatically. Select "Auto Setup" to allow BIOS to let user select the array drives manually. Just highlight the target drives that you want to use and press to the creation steps menu. 9 When all drives have been selected, press to go back to select them respectively. There are two methods to create a disk array. 3.
One method is "Auto Setup", and another is "Select Disk Drives". When using Select Disk Drives method, the channel column will be activated. Select "Select Disk Drives" to select the disk drives and create array automatically. Select "Auto Setup" to allow BIOS to let user select the array drives manually. Just highlight the target drives that you want to use and press to the creation steps menu. 9 When all drives have been selected, press to go back to select them respectively. There are two methods to create a disk array. 3.

User Manual
Page 3
... Hard Disks Installation 18 2.8 Hot Plug and Hot Swap Functions for SATA HDDs 18 2.9 Making An SATA Driver Diskette 19 3. Advanced BIOS Setup Menu 25 2. Boot Setup Menu 32 5. Software Support 24 4.1 Install Operating System 24 4.2 Support CD Information 24 4.2.1 Running ...Support CD 24 4.2.2 Drivers Menu 24 4.2.3 Utilities Menu 24 4.2.4 Contact Information 24 Appendix 25 1. BIOS Setup 20 3.1 BIOS Setup Utility 20 3.1.1 BIOS Menu Bar 20 3.1.2 Legend Bar 21 3.2 Main Menu 21 3.3 Advanced, Security, Power, Boot, and Exit Menus 23 4. ...
... Hard Disks Installation 18 2.8 Hot Plug and Hot Swap Functions for SATA HDDs 18 2.9 Making An SATA Driver Diskette 19 3. Advanced BIOS Setup Menu 25 2. Boot Setup Menu 32 5. Software Support 24 4.1 Install Operating System 24 4.2 Support CD Information 24 4.2.1 Running ...Support CD 24 4.2.2 Drivers Menu 24 4.2.3 Utilities Menu 24 4.2.4 Contact Information 24 Appendix 25 1. BIOS Setup 20 3.1 BIOS Setup Utility 20 3.1.1 BIOS Menu Bar 20 3.1.2 Legend Bar 21 3.2 Main Menu 21 3.3 Advanced, Security, Power, Boot, and Exit Menus 23 4. ...
User Manual
Page 4
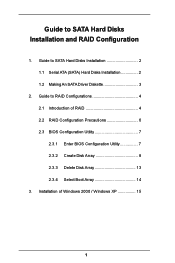
... (ATX Form Factor: 12.0-in x 7.0-in, 30.5 cm x 17.8 cm) 1 x ASRock K7VT4A Pro Quick Installation Guide 1 x ASRock K7VT4A Pro Support CD 1 x Ultra ATA 66/100/133 IDE Ribbon Cable (80-conductor) 1 x 3.5-in Appendix on ASRock website as well. More information of advanced BIOS setup can be available on ASRock website without notice. You may find the latest memory and...
... (ATX Form Factor: 12.0-in x 7.0-in, 30.5 cm x 17.8 cm) 1 x ASRock K7VT4A Pro Quick Installation Guide 1 x ASRock K7VT4A Pro Support CD 1 x Ultra ATA 66/100/133 IDE Ribbon Cable (80-conductor) 1 x 3.5-in Appendix on ASRock website as well. More information of advanced BIOS setup can be available on ASRock website without notice. You may find the latest memory and...

User Manual
Page 6
.../USB2support.mspx 4. It may cause the instability of the system or damage the CPU. Please refer to the FSB of "User Manual" in BIOS. Power Management for "CPU Host Frequency" configuration. 6 To improve heat dissipation, remember to perform over clocking. See page 13 for the details...page 25 of your AMD CPU before you resume the system, please check if the CPU fan on the AGP slot of this motherboard! BIOS: OS: AMI legal BIOS, Supports "Plug and Play", ACPI 1.1 Compliance Wake-Up Events, SMBIOS 2.3.1 Support, CPU Frequency Stepless Control (only for advanced users' ...
.../USB2support.mspx 4. It may cause the instability of the system or damage the CPU. Please refer to the FSB of "User Manual" in BIOS. Power Management for "CPU Host Frequency" configuration. 6 To improve heat dissipation, remember to perform over clocking. See page 13 for the details...page 25 of your AMD CPU before you resume the system, please check if the CPU fan on the AGP slot of this motherboard! BIOS: OS: AMI legal BIOS, Supports "Plug and Play", ACPI 1.1 Compliance Wake-Up Events, SMBIOS 2.3.1 Support, CPU Frequency Stepless Control (only for advanced users' ...

User Manual
Page 7
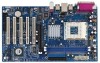
... USB 2.0 T: USB0 Top: RJ-45 B: USB1 USB 2.0 T: USB4 1 B: USB5 JUSB45 VIA KT400A CHIPSET Top: Line In Center: Line Out Bottom: Mic In 27 2MB BIOS AGP 8X K7VT4A PRO LAN PHY SUPER I/O 1.5V_AGP1 IDE1 IDE2 7 8 9 26 25 24 23 22 GAME1 1 DDR400 PCI1 PCI2 1 FSB_SEL0 1 FSB_SEL1 1 FSB_SEL2 1 AUDIO1 JR1 JL1 CMOS BATTERY USB2...
... USB 2.0 T: USB0 Top: RJ-45 B: USB1 USB 2.0 T: USB4 1 B: USB5 JUSB45 VIA KT400A CHIPSET Top: Line In Center: Line Out Bottom: Mic In 27 2MB BIOS AGP 8X K7VT4A PRO LAN PHY SUPER I/O 1.5V_AGP1 IDE1 IDE2 7 8 9 26 25 24 23 22 GAME1 1 DDR400 PCI1 PCI2 1 FSB_SEL0 1 FSB_SEL1 1 FSB_SEL2 1 AUDIO1 JR1 JL1 CMOS BATTERY USB2...

User Manual
Page 13
... item 23) JR1 JL1 Note: If JR1 and JL1 Jumpers are setup. If you need to clear the CMOS when you just finish updating the BIOS, you must adjust "FSB Select Jumpers" according to short the Clear CMOS jumper for PS/2 or USB wake up the system first, and then shut... it requires 2 Amp and higher standby current provided by jumper-setting. Note: To select +5VSB, it down before you update the BIOS. JR1 / JL1 Jumpers (see p.7 item 10) Setting 1_2 FSB_SEL0 OPEN FSB_SEL1 1_2 FSB_SEL2 FSB 200MHz OPEN FSB_SEL0 2_3 FSB_SEL1 1_2 FSB_SEL2 FSB 266MHz 2_3 ...
... item 23) JR1 JL1 Note: If JR1 and JL1 Jumpers are setup. If you need to clear the CMOS when you just finish updating the BIOS, you must adjust "FSB Select Jumpers" according to short the Clear CMOS jumper for PS/2 or USB wake up the system first, and then shut... it requires 2 Amp and higher standby current provided by jumper-setting. Note: To select +5VSB, it down before you update the BIOS. JR1 / JL1 Jumpers (see p.7 item 10) Setting 1_2 FSB_SEL0 OPEN FSB_SEL1 1_2 FSB_SEL2 FSB 200MHz OPEN FSB_SEL0 2_3 FSB_SEL1 1_2 FSB_SEL2 FSB 266MHz 2_3 ...
User Manual
Page 19
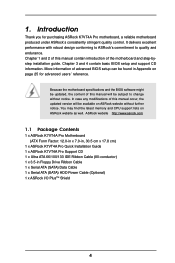
... SATA HDDs, you will lose ALL data in it! Before you start to use "VT8237 SATA RAID BIOS" to SATA Hard Disks Installation and RAID Configuration", which is located in Windows environment. Formatting the floppy...the RAID configuration by using "VIA RAID Tool" in the folder at the following path: .. \ SATA RAID BIOS You may start to configure the RAID function, you need to boot your system. (Do NOT insert any ...and copy SATA drivers into the floppy diskette. STEP 1: Insert the ASRock Support CD into your optical drive to make an SATA driver diskette before you install the OS.
... SATA HDDs, you will lose ALL data in it! Before you start to use "VT8237 SATA RAID BIOS" to SATA Hard Disks Installation and RAID Configuration", which is located in Windows environment. Formatting the floppy...the RAID configuration by using "VIA RAID Tool" in the folder at the following path: .. \ SATA RAID BIOS You may start to configure the RAID function, you need to boot your system. (Do NOT insert any ...and copy SATA drivers into the floppy diskette. STEP 1: Insert the ASRock Support CD into your optical drive to make an SATA driver diskette before you install the OS.

User Manual
Page 20
...start up the security features POWER Configures Power Management features BOOT Configures the default system device that is used to configure your screen. 3.1.1 BIOS Menu Bar The top of the screen has a menu bar with the following selections: MAIN Sets up the basic system configuration ADVANCED ... 3. The Flash Memory on . It is designed to scroll through its test routines. The following BIOS setup screens and descriptions are for reference purpose only, and may run the BIOS Setup when you to be user-friendly. You may not exactly match what you wish to enter ...
...start up the security features POWER Configures Power Management features BOOT Configures the default system device that is used to configure your screen. 3.1.1 BIOS Menu Bar The top of the screen has a menu bar with the following selections: MAIN Sets up the basic system configuration ADVANCED ... 3. The Flash Memory on . It is designed to scroll through its test routines. The following BIOS setup screens and descriptions are for reference purpose only, and may run the BIOS Setup when you to be user-friendly. You may not exactly match what you wish to enter ...

User Manual
Page 21
... Processor Type Processor Speed L1 Cache Size L2 Cache Size Total Memory DDR1 DDR2 AMIBIOS SETUP UTILITY - Dec Day: 01 - 31 Year: 1980 - 2099 K7VT4A Pro BIOS P1.00 AMD Athlon(tm) XP 2600+ 2133 MHz 128 KB 256 KB 512 MB 512 MB / 200 MHz (DDR400) None F1:Help Esc:Exit :... Menu When you specify. Use keys to set the type of floppy drives installed. Floppy Drives Use this to the time that you enter the BIOS Setup Utility, the following screen appears. VERSION 3.31a Security Power Boot Exit Sep 24 2004 Fri 20:07:40 [ Setup Help ] Month: Jan...
... Processor Type Processor Speed L1 Cache Size L2 Cache Size Total Memory DDR1 DDR2 AMIBIOS SETUP UTILITY - Dec Day: 01 - 31 Year: 1980 - 2099 K7VT4A Pro BIOS P1.00 AMD Athlon(tm) XP 2600+ 2133 MHz 128 KB 256 KB 512 MB 512 MB / 200 MHz (DDR400) None F1:Help Esc:Exit :... Menu When you specify. Use keys to set the type of floppy drives installed. Floppy Drives Use this to the time that you enter the BIOS Setup Utility, the following screen appears. VERSION 3.31a Security Power Boot Exit Sep 24 2004 Fri 20:07:40 [ Setup Help ] Month: Jan...
User Manual
Page 22
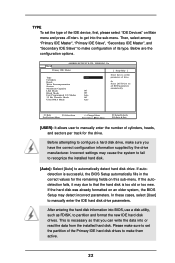
... Before attempting to configure a hard disk drive, make them active. 22 If the hard disk was already formatted on an older system, the BIOS Setup may cause the system to fail to recognize the installed hard disk. [Auto]: Select [Auto] to that you have the correct configuration ...USER]: It allows user to manually enter the IDE hard disk drive parameters. This is necessary so that the hard disk is successful, the BIOS Setup automatically fills in the correct values for the drive. Below are the configuration options. If the autodetection fails, it may due to automatically...
... Before attempting to configure a hard disk drive, make them active. 22 If the hard disk was already formatted on an older system, the BIOS Setup may cause the system to fail to recognize the installed hard disk. [Auto]: Select [Auto] to that you have the correct configuration ...USER]: It allows user to manually enter the IDE hard disk drive parameters. This is necessary so that the hard disk is successful, the BIOS Setup automatically fills in the correct values for the drive. Below are the configuration options. If the autodetection fails, it may due to automatically...

User Manual
Page 23
.../DVD]: This is used for IDE CD/DVD drives. [ARMD]: This is used for IDE ARMD (ATAPI Removable Media Device), such as calculated by the BIOS based on the drive information you entered. for Netware and UNIX user, select [Off] to select the LBA mode for compatible IDE devices. Heads This...
.../DVD]: This is used for IDE CD/DVD drives. [ARMD]: This is used for IDE ARMD (ATAPI Removable Media Device), such as calculated by the BIOS based on the drive information you entered. for Netware and UNIX user, select [Off] to select the LBA mode for compatible IDE devices. Heads This...
User Manual
Page 25
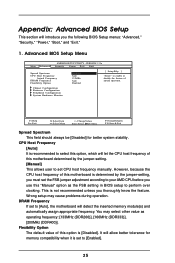
... select this option, which will allow better tolerance for better system stability. This is set to your AMD CPU before you the following BIOS Setup menus: "Advanced," "Security," "Power," "Boot," and "Exit." 1. You may cause problems during operation. Chipset Configuration Resource...133MHz Auto Disabled [ Setup Help ] to perform over clocking. Flexibility Option The default value of spread spectrum. Appendix: Advanced BIOS Setup This section will detect the inserted memory module(s) and automatically assign appropriate frequency. Wrong setup may select other value as ...
... select this option, which will allow better tolerance for better system stability. This is set to your AMD CPU before you the following BIOS Setup menus: "Advanced," "Security," "Power," "Boot," and "Exit." 1. You may cause problems during operation. Chipset Configuration Resource...133MHz Auto Disabled [ Setup Help ] to perform over clocking. Flexibility Option The default value of spread spectrum. Appendix: Advanced BIOS Setup This section will detect the inserted memory module(s) and automatically assign appropriate frequency. Wrong setup may select other value as ...

User Manual
Page 30
Configuration options: [Setup], [Always]. If [Setup] option is selected, the "Password Check" is performed before BIOS setup. If you already have a password, you need to enter your current password first in order to set . Password Check: Select the check point for.... Set User Password: Press to set the User Password. If [Always] option is selected, the "Password Check" is performed before both boot-up and BIOS setup. 30 Password Check Setup F1:Help Esc:Exit :Select Item :Select Menu +/-:Change Values Enter:Select Sub-Menu F9:Setup Defaults F10:Save & Exit...
Configuration options: [Setup], [Always]. If [Setup] option is selected, the "Password Check" is performed before BIOS setup. If you already have a password, you need to enter your current password first in order to set . Password Check: Select the check point for.... Set User Password: Press to set the User Password. If [Always] option is selected, the "Password Check" is performed before both boot-up and BIOS setup. 30 Password Check Setup F1:Help Esc:Exit :Select Item :Select Menu +/-:Change Values Enter:Select Sub-Menu F9:Setup Defaults F10:Save & Exit...

User Manual
Page 32
Boot To OS/2 This enables boot-up to enable or disable VIA VT8237 SATA Raid BIOS Utility during POST. VIA SATA Raid Utility Use this is enabled, it will speed up the boot-up . Boot Device Priority This allows you to ...
Boot To OS/2 This enables boot-up to enable or disable VIA VT8237 SATA Raid BIOS Utility during POST. VIA SATA Raid Utility Use this is enabled, it will speed up the boot-up . Boot Device Priority This allows you to ...

User Manual
Page 33
If you press , you press , original values will exit the BIOS Setup Utility without saving changes" will appear. If you will be restored and all the setup configuration. VERSION 3.31a Security Power Boot Exit Exit Saving ... Changes After you press , it will appear. If you enter the submenu, the message "Load default settings" will save the current settings and exit the BIOS SETUP Utility. Load Default Settings After you press , it will appear. 5.
If you press , you press , original values will exit the BIOS Setup Utility without saving changes" will appear. If you will be restored and all the setup configuration. VERSION 3.31a Security Power Boot Exit Exit Saving ... Changes After you press , it will appear. If you enter the submenu, the message "Load default settings" will save the current settings and exit the BIOS SETUP Utility. Load Default Settings After you press , it will appear. 5.

Quick Installation Guide
Page 4
... and the BIOS software might be updated, the content of this manual will be available on ASRock website as well. More detailed information of the motherboard and step-bystep installation guide. ASRock website http://www.asrock.com 1.1 Package Contents 1 x ASRock K7VT4A Pro Motherboard (ATX Form Factor: 12.0-in x 7.0-in, 30.5 cm x 17.8 cm) 1 x ASRock K7VT4A Pro Quick Installation Guide 1 x ASRock K7VT4A Pro Support...
... and the BIOS software might be updated, the content of this manual will be available on ASRock website as well. More detailed information of the motherboard and step-bystep installation guide. ASRock website http://www.asrock.com 1.1 Package Contents 1 x ASRock K7VT4A Pro Motherboard (ATX Form Factor: 12.0-in x 7.0-in, 30.5 cm x 17.8 cm) 1 x ASRock K7VT4A Pro Quick Installation Guide 1 x ASRock K7VT4A Pro Support...

Quick Installation Guide
Page 6
...slot of "User Manual" in BIOS. You must adjust "FSB Select Jumpers" according to Microsoft® official document at http://www.microsoft.com/whdc/hwdev/bus/USB/USB2support.mspx 4. It may cause permanent damage! 3. English 6 ASRock K7VT4A Pro Motherboard The CPU host frequency of.../ ME / 2000 / XP Compliant CAUTION! 1. Power Management for USB 2.0 works fine under Microsoft® Windows® 98/ME. BIOS: OS: AMI legal BIOS, Supports "Plug and Play", ACPI 1.1 Compliance Wake-Up Events, SMBIOS 2.3.1 Support, CPU Frequency Stepless Control (only for "CPU Host Frequency" ...
...slot of "User Manual" in BIOS. You must adjust "FSB Select Jumpers" according to Microsoft® official document at http://www.microsoft.com/whdc/hwdev/bus/USB/USB2support.mspx 4. It may cause permanent damage! 3. English 6 ASRock K7VT4A Pro Motherboard The CPU host frequency of.../ ME / 2000 / XP Compliant CAUTION! 1. Power Management for USB 2.0 works fine under Microsoft® Windows® 98/ME. BIOS: OS: AMI legal BIOS, Supports "Plug and Play", ACPI 1.1 Compliance Wake-Up Events, SMBIOS 2.3.1 Support, CPU Frequency Stepless Control (only for "CPU Host Frequency" ...


