
RAID Installation Guide
Page 6
... the SATA / SATAII driver diskette containing the NVIDIA® RAID driver. Enter BIOS SETUP UTILITY Advanced screen IDE Configuration. A. STEP 4: Use "RAID Installation Guide" to the BIOS RAID installation guide part of the document in the following path in the Support CD: .. \ RAID Installation Guide 6 NVIDIA nForce Storage Controller (required) Please select A and B for Windows® XP / XP 64-bit in the Support CD for the second one.) NOTE. STEP 3: Set Up BIOS. If you install Windows® XP / Windows® XP 64-bit on IDE HDDs...
... the SATA / SATAII driver diskette containing the NVIDIA® RAID driver. Enter BIOS SETUP UTILITY Advanced screen IDE Configuration. A. STEP 4: Use "RAID Installation Guide" to the BIOS RAID installation guide part of the document in the following path in the Support CD: .. \ RAID Installation Guide 6 NVIDIA nForce Storage Controller (required) Please select A and B for Windows® XP / XP 64-bit in the Support CD for the second one.) NOTE. STEP 3: Set Up BIOS. If you install Windows® XP / Windows® XP 64-bit on IDE HDDs...

RAID Installation Guide
Page 7
... 64-bit optical disk into the optical drive to boot your optical drive, and click the "Load Driver" button on the left on IDE HDDs and want to [RAID] in the Support CD: .. \ RAID Installation Guide 7 NOTE. B. Please refer to [RAID]. Then, please set RAID configuration. A. Set the "SATA Operation Mode" option to the BIOS RAID installation guide part of the document in the following path in our Support CD: (There are in the following path in the motherboard gift...
... 64-bit optical disk into the optical drive to boot your optical drive, and click the "Load Driver" button on the left on IDE HDDs and want to [RAID] in the Support CD: .. \ RAID Installation Guide 7 NOTE. B. Please refer to [RAID]. Then, please set RAID configuration. A. Set the "SATA Operation Mode" option to the BIOS RAID installation guide part of the document in the following path in our Support CD: (There are in the following path in the motherboard gift...
RAID Installation Guide
Page 11
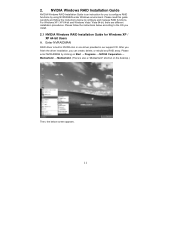
... Corporation → Mediashield → Mediashield. (There is also a "Mediashield" shortcut on the desktop.) Then, the below to configure RAID functions by using NVIDIAMAN under Windows environment. NVIDIA Windows RAID Installation Guide NVIDIA Windows RAID Installation Guide is built in NVIDIA ALL in one driver provided in our support CD. After you finish the driver installation, you to configure and manage RAID functions. Enter NVRAIDMAN RAID driver is an instruction for Windows XP / XP 64-bit Users A.
... Corporation → Mediashield → Mediashield. (There is also a "Mediashield" shortcut on the desktop.) Then, the below to configure RAID functions by using NVIDIAMAN under Windows environment. NVIDIA Windows RAID Installation Guide NVIDIA Windows RAID Installation Guide is built in NVIDIA ALL in one driver provided in our support CD. After you finish the driver installation, you to configure and manage RAID functions. Enter NVRAIDMAN RAID driver is an instruction for Windows XP / XP 64-bit Users A.
User Manual
Page 12
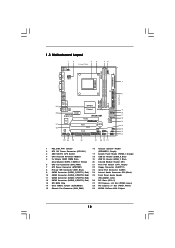
... Hybrid SLI Gigabit LAN Super I/O AUDIO CODEC HD_AUDIO1 1 CD1 COM1 1 FLOPPY1 PCIE2 K10N78M PCI1 RAID PCI2 LPT1 1 CMOS BATTERY 1 CLRCMOS1 IR1 1 USB8_9 1 USB6_7 1 RoHS 8Mb BIOS CHA_FAN1 SPEAKER1 1 PLED PWRBTN PANEL 1 1 HDLED RESET 10 11 12 13 14 15 16 17 25 24 23 22 21 20 19 18 1 PS2_USB_PW1 Jumper 16 Chassis Speaker Header 2 ATX 12V Power Connector (ATX12V1) (SPEAKER 1, Purple) 3 AM2 940-Pin CPU Socket 17 System Panel Header (PANEL1, Orange) 4 CPU Heatsink...
... Hybrid SLI Gigabit LAN Super I/O AUDIO CODEC HD_AUDIO1 1 CD1 COM1 1 FLOPPY1 PCIE2 K10N78M PCI1 RAID PCI2 LPT1 1 CMOS BATTERY 1 CLRCMOS1 IR1 1 USB8_9 1 USB6_7 1 RoHS 8Mb BIOS CHA_FAN1 SPEAKER1 1 PLED PWRBTN PANEL 1 1 HDLED RESET 10 11 12 13 14 15 16 17 25 24 23 22 21 20 19 18 1 PS2_USB_PW1 Jumper 16 Chassis Speaker Header 2 ATX 12V Power Connector (ATX12V1) (SPEAKER 1, Purple) 3 AM2 940-Pin CPU Socket 17 System Panel Header (PANEL1, Orange) 4 CPU Heatsink...

User Manual
Page 20
... section "Expansion Slots". Enter "Advanced" screen, and enter "Chipset Settings". Step 4. Install one for Windows® VistaTM / VistaTM 64-bit.) ..\Drivers\Hybrid SLI driver\Vista * Currently, Hybrid SLITM driver only has VistaTM 32 version, please visit our website for future update. Step 6. Install Hybrid SLITM driver from our support CD to PCIE2 slot (green). Press to the correspondent connector on your computer. Power off your system. Step 5. Connect the monitor cable to enter BIOS setup. Step 4. Hybrid...
... section "Expansion Slots". Enter "Advanced" screen, and enter "Chipset Settings". Step 4. Install one for Windows® VistaTM / VistaTM 64-bit.) ..\Drivers\Hybrid SLI driver\Vista * Currently, Hybrid SLITM driver only has VistaTM 32 version, please visit our website for future update. Step 6. Install Hybrid SLITM driver from our support CD to PCIE2 slot (green). Press to the correspondent connector on your computer. Power off your system. Step 5. Connect the monitor cable to enter BIOS setup. Step 4. Hybrid...

User Manual
Page 21
... set the option "Share Memory" to enter BIOS setup. Then your system. For the proper installation procedures, please refer to HybridPowerTM mode (Save Power). Connect one for Windows® VistaTM / VistaTM 64-bit.) ..\Drivers\Hybrid SLI driver\Vista * Currently, Hybrid SLITM driver only has VistaTM 32 version, please visit our website for future update. Click the desktop. Boot your system is in the following path of ASRock support CD: (There are two ASRock support...
... set the option "Share Memory" to enter BIOS setup. Then your system. For the proper installation procedures, please refer to HybridPowerTM mode (Save Power). Connect one for Windows® VistaTM / VistaTM 64-bit.) ..\Drivers\Hybrid SLI driver\Vista * Currently, Hybrid SLITM driver only has VistaTM 32 version, please visit our website for future update. Click the desktop. Boot your system is in the following path of ASRock support CD: (There are two ASRock support...

User Manual
Page 25
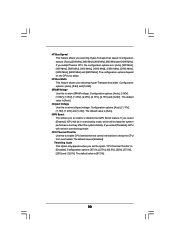
...HDMI monitor on this motherboard and enable HDMI audio function, the film you install. 1. Change the default setting "Speaker" to [Auto]. Step 3: Reboot your system. Step 2: Install HDMI audio driver to set up your system. Step 2: Enter Windows® to your system manually. 2.7 HDMI Audio Function Operation Guide The DVI-D port for further information. 2. Enter BIOS SETUP UTILITY Advanced screen Chipset Configuration. Click "Start" button, select "Settings", and then click "Control Panel". A. Set the option "OnBoard HDMI HD Audio" to "Digital Output Device (HDMI...
...HDMI monitor on this motherboard and enable HDMI audio function, the film you install. 1. Change the default setting "Speaker" to [Auto]. Step 3: Reboot your system. Step 2: Install HDMI audio driver to set up your system. Step 2: Enter Windows® to your system manually. 2.7 HDMI Audio Function Operation Guide The DVI-D port for further information. 2. Enter BIOS SETUP UTILITY Advanced screen Chipset Configuration. Click "Start" button, select "Settings", and then click "Control Panel". A. Set the option "OnBoard HDMI HD Audio" to "Digital Output Device (HDMI...

User Manual
Page 35
... be auto-detected and listed on your SATA / SATAII HDDs without RAID functions, please follow below steps. B. Please select CD-ROM as the boot device. D. A. 2.14 Driver Installation Guide To install the drivers to your system, please insert the support CD to your system. (There are two ASRock Support CD in the motherboard gift box pack, please choose the one for Windows® XP / XP 64-bit.) B. A. Set the "SATA Operation Mode" option...
... be auto-detected and listed on your SATA / SATAII HDDs without RAID functions, please follow below steps. B. Please select CD-ROM as the boot device. D. A. 2.14 Driver Installation Guide To install the drivers to your system, please insert the support CD to your system. (There are two ASRock Support CD in the motherboard gift box pack, please choose the one for Windows® XP / XP 64-bit.) B. A. Set the "SATA Operation Mode" option...

User Manual
Page 36
... optical drive to boot your system, and follow step 1 to set up the BIOS option "SATA Operation Mode" to [IDE]. Enter BIOS SETUP UTILITY Advanced screen IDE Configuration. Set the "SATA Operation Mode" option to [AHCI]. Using SATA / SATAII HDDs with NCQ and Hot Plug functions STEP 1: Set Up BIOS. After reading the floppy disk, the drivers will start to format the floppy diskette and copy SATA / SATAII drivers into the floppy drive. NVIDIA nForce Storage Controller (required) Windows XP64 Please select A for Windows® XP 64-bit in our Support...
... optical drive to boot your system, and follow step 1 to set up the BIOS option "SATA Operation Mode" to [IDE]. Enter BIOS SETUP UTILITY Advanced screen IDE Configuration. Set the "SATA Operation Mode" option to [AHCI]. Using SATA / SATAII HDDs with NCQ and Hot Plug functions STEP 1: Set Up BIOS. After reading the floppy disk, the drivers will start to format the floppy diskette and copy SATA / SATAII drivers into the floppy drive. NVIDIA nForce Storage Controller (required) Windows XP64 Please select A for Windows® XP 64-bit in our Support...

User Manual
Page 38
... SATA / SATAII HDDs, you need to [RAID]. A. The drivers are two ASRock Support CD in the Support CD: .. \ RAID Installation Guide STEP 3: Install Windows® VistaTM / VistaTM 64-bit OS on your optical drive, and click the "Load Driver" button on the left on your system, and follow below : A. NVIDIA nForce Storage Controller (required) Please select A and B for Windows® XP / XP 64-bit in the Support CD for proper configuration. Set the "SATA Operation Mode" option...
... SATA / SATAII HDDs, you need to [RAID]. A. The drivers are two ASRock Support CD in the Support CD: .. \ RAID Installation Guide STEP 3: Install Windows® VistaTM / VistaTM 64-bit OS on your optical drive, and click the "Load Driver" button on the left on your system, and follow below : A. NVIDIA nForce Storage Controller (required) Please select A and B for Windows® XP / XP 64-bit in the Support CD for proper configuration. Set the "SATA Operation Mode" option...
User Manual
Page 50
... [2600 MHz]. DRAM Voltage Use this to select chipset voltage. Chipset Voltage Use this to enable CPU internal thermal control mechanism to keep the CPU from overheated. The default value is [87.5%]. 50 If you select [Enabled], iGPU will be in overclocking mode, which will not be in overclocking mode. If you select [Disabled], iGPU will increase the system performance but may affect the system stability. The default value is [Auto]. Configuration options: [87...
... [2600 MHz]. DRAM Voltage Use this to select chipset voltage. Chipset Voltage Use this to enable CPU internal thermal control mechanism to keep the CPU from overheated. The default value is [87.5%]. 50 If you select [Enabled], iGPU will be in overclocking mode, which will not be in overclocking mode. If you select [Disabled], iGPU will increase the system performance but may affect the system stability. The default value is [Auto]. Configuration options: [87...

User Manual
Page 52
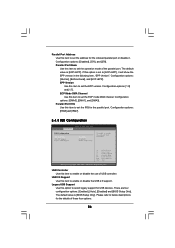
... instruction, which can not be accessed until you specify. OnBoard IDE Controller Use this motherboard to enable or disable the "Onboard SATA Controller" feature. Configuration options: [IDE], [RAID] and [AHCI]. * If you select [RAID] mode, SATA / SATAII HDDs can be applied to the configurations of this item to operate RAID function on SATA / SATAII HDDs, please do not change the setting of this item to submit Windows® VistaTM certification. 3.4.4IDE Configuration BIOS SETUP UTILITY Advanced IDE Configuration OnBoard IDE Controller Onboard SATA Controller SATA Operation...
... instruction, which can not be accessed until you specify. OnBoard IDE Controller Use this motherboard to enable or disable the "Onboard SATA Controller" feature. Configuration options: [IDE], [RAID] and [AHCI]. * If you select [RAID] mode, SATA / SATAII HDDs can be applied to the configurations of this item to operate RAID function on SATA / SATAII HDDs, please do not change the setting of this item to submit Windows® VistaTM certification. 3.4.4IDE Configuration BIOS SETUP UTILITY Advanced IDE Configuration OnBoard IDE Controller Onboard SATA Controller SATA Operation...
User Manual
Page 54
... PCI IDE BusMaster Use this item to enable 32-bit access to enable or disable the S.M.A.R.T. (Self-Monitoring, Analysis, and Reporting Technology) feature. Setting wrong values in this item to maximize the IDE hard disk data transfer rate. 3.4.5 PCIPnP Configuration BIOS SETUP UTILITY Advanced Advanced PCI / PnP Settings PCI Latency Timer PCI IDE BusMaster [32] [Enabled] Value in units of PCI clocks for PCI device latency timer register. +F1 F9 F10 ESC Select Screen Select Item Change Option General Help Load Defaults Save...
... PCI IDE BusMaster Use this item to enable 32-bit access to enable or disable the S.M.A.R.T. (Self-Monitoring, Analysis, and Reporting Technology) feature. Setting wrong values in this item to maximize the IDE hard disk data transfer rate. 3.4.5 PCIPnP Configuration BIOS SETUP UTILITY Advanced Advanced PCI / PnP Settings PCI Latency Timer PCI IDE BusMaster [32] [Enabled] Value in units of PCI clocks for PCI device latency timer register. +F1 F9 F10 ESC Select Screen Select Item Change Option General Help Load Defaults Save...
User Manual
Page 56
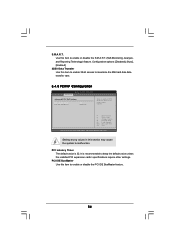
... Version". Please refer to set the operation mode of these four options: 56 Parallel Port Mode Use this item to select legacy support for the parallel port. The default value is [BIOS Setup Only]. EPP Version Use this option to set the EPP version. Configuration options: [IRQ5] and [IRQ7]. 3.4.8 USB Configuration BIOS SETUP UTILITY Advanced USB Configuration USB Controller USB 2.0 Support Legacy USB Support [Enabled] [Enabled] [BIOS Setup Only] To enable or disable the onboard USB controllers. +F1 F9 F10 ESC Select Screen Select Item Change Option General Help Load Defaults...
... Version". Please refer to set the operation mode of these four options: 56 Parallel Port Mode Use this item to select legacy support for the parallel port. The default value is [BIOS Setup Only]. EPP Version Use this option to set the EPP version. Configuration options: [IRQ5] and [IRQ7]. 3.4.8 USB Configuration BIOS SETUP UTILITY Advanced USB Configuration USB Controller USB 2.0 Support Legacy USB Support [Enabled] [Enabled] [BIOS Setup Only] To enable or disable the onboard USB controllers. +F1 F9 F10 ESC Select Screen Select Item Change Option General Help Load Defaults...
User Manual
Page 59
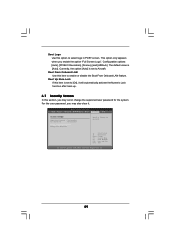
...Screen In this section, you may set or change the supervisor/user password for the system. Boot Up Num-Lock If this item to select logo in POST screen. Configuration options: [Auto], [PCIE2.0 Revolution], [Scenery] and [ASRock]. Boot From Onboard LAN Use this item is [Auto]. This option only appears when you enable the option "Full Screen Logo". BIOS SETUP UTILITY Main Smart Advanced H/W Monitor Boot Security Exit Security Settings Supervisor Password : Not Installed User Password : Not Installed Change Supervisor Password Change User Password Install or Change the password...
...Screen In this section, you may set or change the supervisor/user password for the system. Boot Up Num-Lock If this item to select logo in POST screen. Configuration options: [Auto], [PCIE2.0 Revolution], [Scenery] and [ASRock]. Boot From Onboard LAN Use this item is [Auto]. This option only appears when you enable the option "Full Screen Logo". BIOS SETUP UTILITY Main Smart Advanced H/W Monitor Boot Security Exit Security Settings Supervisor Password : Not Installed User Password : Not Installed Change Supervisor Password Change User Password Install or Change the password...
User Manual
Page 61
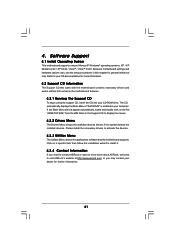
... 64-bit / VistaTM / VistaTM 64-bit. Because motherboard settings and hardware options vary, use the setup procedures in your dealer for further information. 61 The CD automatically displays the Main Menu if "AUTORUN" is enabled in this chapter for more about ASRock, welcome to display the menus. 4.2.2 Drivers Menu The Drivers Menu shows the available devices drivers if the system detects the installed devices. If the Main Menu did not appear automatically, locate and...
... 64-bit / VistaTM / VistaTM 64-bit. Because motherboard settings and hardware options vary, use the setup procedures in your dealer for further information. 61 The CD automatically displays the Main Menu if "AUTORUN" is enabled in this chapter for more about ASRock, welcome to display the menus. 4.2.2 Drivers Menu The Drivers Menu shows the available devices drivers if the system detects the installed devices. If the Main Menu did not appear automatically, locate and...

Quick Installation Guide
Page 2
Motherboard Layout English 1 PS2_USB_PW1 Jumper 16 Chassis Speaker Header 2 ATX 12V Power Connector (ATX12V1) (SPEAKER 1, Purple) 3 AM2 940-Pin CPU Socket 17 System Panel Header (PANEL1, Orange) 4 CPU Heatsink Retention Module 18 USB 2.0 Header (USB8_9, Blue) 5 2 x 240-pin DDR2 DIMM Slots 19 USB 2.0 Header (USB6_7, Blue) (Dual Channel: DDRII_1, DDRII_2; Yellow) 20 Infrared Module Header (IR1) 6 CPU Fan Connector (CPU_FAN1) 21 Print Port Header (LPT1, Purple) 7 ATX Power Connector (ATXPWR1) 22 Floppy Connector (FLOPPY1) 8 Primary IDE Connector (IDE1, Blue) 23 Serial Port ...
Motherboard Layout English 1 PS2_USB_PW1 Jumper 16 Chassis Speaker Header 2 ATX 12V Power Connector (ATX12V1) (SPEAKER 1, Purple) 3 AM2 940-Pin CPU Socket 17 System Panel Header (PANEL1, Orange) 4 CPU Heatsink Retention Module 18 USB 2.0 Header (USB8_9, Blue) 5 2 x 240-pin DDR2 DIMM Slots 19 USB 2.0 Header (USB6_7, Blue) (Dual Channel: DDRII_1, DDRII_2; Yellow) 20 Infrared Module Header (IR1) 6 CPU Fan Connector (CPU_FAN1) 21 Print Port Header (LPT1, Purple) 7 ATX Power Connector (ATXPWR1) 22 Floppy Connector (FLOPPY1) 8 Primary IDE Connector (IDE1, Blue) 23 Serial Port ...

Quick Installation Guide
Page 17
... 17 ASRock K10N78M Motherboard Then you will find the Hybrid icon on the I/O shield. You do not need to your computer. Step 2. Enter "Advanced" screen, and enter "Chipset Settings". Restart your BIOS change and exit BIOS setup. Step 6. B. Save your computer. Then you will find the Hybrid icon on your Windows® taskbar. Step 5. Connect the monitor cable to [256MB] or [512MB]. Install Hybrid SLITM driver from our support...
... 17 ASRock K10N78M Motherboard Then you will find the Hybrid icon on the I/O shield. You do not need to your computer. Step 2. Enter "Advanced" screen, and enter "Chipset Settings". Restart your BIOS change and exit BIOS setup. Step 6. B. Save your computer. Then you will find the Hybrid icon on your Windows® taskbar. Step 5. Connect the monitor cable to [256MB] or [512MB]. Install Hybrid SLITM driver from our support...

Quick Installation Guide
Page 18
... is switched to Dual Monitors mode (Additional Displays). 18 ASRock K10N78M Motherboard English Install one compatible PCI Express graphics card to [32MB], [64MB], [128MB], [256MB] or [512MB]. Step 4. Step 5. Click the desktop. Step 3. Boot into OS. Please click the icon and select the item "Additional Displays". Then set the option "Share Memory" to PCIE2 slot (green). Step 2. Boot your computer. Restart your system. Step 8. For the proper installation procedures, please refer to enter BIOS setup. Press...
... is switched to Dual Monitors mode (Additional Displays). 18 ASRock K10N78M Motherboard English Install one compatible PCI Express graphics card to [32MB], [64MB], [128MB], [256MB] or [512MB]. Step 4. Step 5. Click the desktop. Step 3. Boot into OS. Please click the icon and select the item "Additional Displays". Then set the option "Share Memory" to PCIE2 slot (green). Step 2. Boot your computer. Restart your system. Step 8. For the proper installation procedures, please refer to enter BIOS setup. Press...

Quick Installation Guide
Page 22
...click "Control Panel". B. D. 2.7 HDMI Audio Function Operation Guide The DVI-D port for further information. 2. Enter BIOS SETUP UTILITY Advanced screen Chipset Configuration. Set the option "OnBoard HDMI HD Audio" to finish the setting. After HDMI audio driver is available. B. Click "Hardware and Sound", and click "Sound". C. Click "OK" to [Auto]. A. Step 3: Reboot your system. Step 3: Reboot your system. English 22 ASRock K10N78M Motherboard Please follow below steps to enable HDMI audio function according to HDMI interface. For Windows®...
...click "Control Panel". B. D. 2.7 HDMI Audio Function Operation Guide The DVI-D port for further information. 2. Enter BIOS SETUP UTILITY Advanced screen Chipset Configuration. Set the option "OnBoard HDMI HD Audio" to finish the setting. After HDMI audio driver is available. B. Click "Hardware and Sound", and click "Sound". C. Click "OK" to [Auto]. A. Step 3: Reboot your system. Step 3: Reboot your system. English 22 ASRock K10N78M Motherboard Please follow below steps to enable HDMI audio function according to HDMI interface. For Windows®...


