User Manual
Page 14
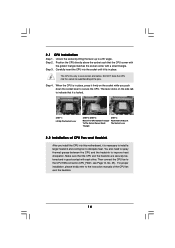
... to the CPU FAN connector (CPU_FAN1, see Page 10, No. 35). Carefully insert the CPU into the socket to a 90o angle. Step 4. 2.1 CPU Installation Step 1. Unlock the socket by lifting the lever up to avoid bending of the pins.
... to the CPU FAN connector (CPU_FAN1, see Page 10, No. 35). Carefully insert the CPU into the socket to a 90o angle. Step 4. 2.1 CPU Installation Step 1. Unlock the socket by lifting the lever up to avoid bending of the pins.

User Manual
Page 16
... DIMM matches the break on the slot. Step 3. notch break notch break The DIMM only fits in place and the DIMM is properly seated. 16 Unlock a DIMM slot by pressing the retaining clips outward. It will cause permanent damage to disconnect power supply before adding or removing DIMMs or the system...
... DIMM matches the break on the slot. Step 3. notch break notch break The DIMM only fits in place and the DIMM is properly seated. 16 Unlock a DIMM slot by pressing the retaining clips outward. It will cause permanent damage to disconnect power supply before adding or removing DIMMs or the system...
Quick Installation Guide
Page 11
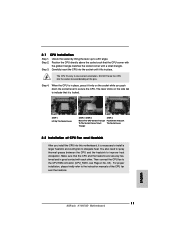
...heatsink to the CPU FAN connector (CPU_FAN1, see Page 2, No. 35). Step 4. Then connect the CPU fan to improve heat dissipation. English 11 ASRock K10N78D Motherboard Lever 90° Up STEP 1: Lift Up The Socket Lever CPU Golden Triangle Socket Corner Small Triangle STEP 2 / STEP 3: Match The CPU...bending of the CPU fan and the heatsink. The CPU fits only in good contact with a small triangle. 2.1 CPU Installation Step 1. Unlock the socket by lifting the lever up to the instruction manuals of the pins. Carefully insert the CPU into the socket until it fits in...
...heatsink to the CPU FAN connector (CPU_FAN1, see Page 2, No. 35). Step 4. Then connect the CPU fan to improve heat dissipation. English 11 ASRock K10N78D Motherboard Lever 90° Up STEP 1: Lift Up The Socket Lever CPU Golden Triangle Socket Corner Small Triangle STEP 2 / STEP 3: Match The CPU...bending of the CPU fan and the heatsink. The CPU fits only in good contact with a small triangle. 2.1 CPU Installation Step 1. Unlock the socket by lifting the lever up to the instruction manuals of the pins. Carefully insert the CPU into the socket until it fits in...

Quick Installation Guide
Page 13
Step 2. The DIMM only fits in place and the DIMM is properly seated. 13 ASRock K10N78D Motherboard English Unlock a DIMM slot by pressing the retaining clips outward. Align a DIMM on the slot such that the notch on the DIMM matches the break on the ...
Step 2. The DIMM only fits in place and the DIMM is properly seated. 13 ASRock K10N78D Motherboard English Unlock a DIMM slot by pressing the retaining clips outward. Align a DIMM on the slot such that the notch on the DIMM matches the break on the ...
