User Manual
Page 3
... CPU Installation 14 2.2 Installation of CPU Fan and Heatsink 14 2.3 Installation of Memory Modules (DIMM 15 2.4 Expansion Slots (PCI and PCI Express slots 17 2.5 Jumpers Setup 18 2.6 Onboard Headers and Connectors 19 2.7 HDMI_SPDIF Header Connection Guide 23 2.8 SATAII Hard Disk Setup Guide 24 2.9 Serial ATA (SATA) / Serial ATAII (SATAII) Hard Disks Installation 25 2.10 Hot Plug and Hot Swap Functions for SATA / SATAII HDDs Devices 25 2.11 SATA / SATAII HDD Hot Plug Feature and Operation Guide ..... 26 2.12 Driver Installation Guide 28 2.13 Installing Windows® XP / XP 64-bit...
... CPU Installation 14 2.2 Installation of CPU Fan and Heatsink 14 2.3 Installation of Memory Modules (DIMM 15 2.4 Expansion Slots (PCI and PCI Express slots 17 2.5 Jumpers Setup 18 2.6 Onboard Headers and Connectors 19 2.7 HDMI_SPDIF Header Connection Guide 23 2.8 SATAII Hard Disk Setup Guide 24 2.9 Serial ATA (SATA) / Serial ATAII (SATAII) Hard Disks Installation 25 2.10 Hot Plug and Hot Swap Functions for SATA / SATAII HDDs Devices 25 2.11 SATA / SATAII HDD Hot Plug Feature and Operation Guide ..... 26 2.12 Driver Installation Guide 28 2.13 Installing Windows® XP / XP 64-bit...
User Manual
Page 8
... possible damage caused by hardware monitor function and overclock your own risk and expense. ASRock website http://www.asrock.com 4. Due to the memory support list on the AM2+ CPU you to surveil your SATAII hard disk drive to SATAII connector, please read "Untied Overclocking Technology" on page 11 for the compatible memory modules. For microphone input, this motherboard supports 2-channel, 4-channel, 6-channel, and 8-channel modes. You can also connect SATA hard disk to get the best...
... possible damage caused by hardware monitor function and overclock your own risk and expense. ASRock website http://www.asrock.com 4. Due to the memory support list on the AM2+ CPU you to surveil your SATAII hard disk drive to SATAII connector, please read "Untied Overclocking Technology" on page 11 for the compatible memory modules. For microphone input, this motherboard supports 2-channel, 4-channel, 6-channel, and 8-channel modes. You can also connect SATA hard disk to get the best...

User Manual
Page 9
... utility, you enable this tool and save the new BIOS file to perform over-clocking. ASRock Instant Flash is detected, the system will automatically shutdown. With this function will improve up to your system is unstable after AM2 Boost function is a revolutionary technology that the USB flash drive or hard drive must use Intelligent Energy Saver function, please enable Cool 'n' Quiet option in the BIOS setup in Flash ROM. This motherboard supports ASRock...
... utility, you enable this tool and save the new BIOS file to perform over-clocking. ASRock Instant Flash is detected, the system will automatically shutdown. With this function will improve up to your system is unstable after AM2 Boost function is a revolutionary technology that the USB flash drive or hard drive must use Intelligent Energy Saver function, please enable Cool 'n' Quiet option in the BIOS setup in Flash ROM. This motherboard supports ASRock...
User Manual
Page 23
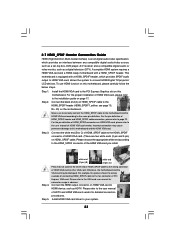
... pin definition. Please do not connect the white end of the HDMI VGA card you install. Connect the HDMI output connector on HDMI VGA card to connect HDMI Digital TV/projector/ LCD devices. A complete HDMI system requires a HDMI VGA card and a HDMI ready motherboard with a HDMI_SPDIF header, which provides an interface between any compatible digital audio/video source, such as a set-top box, DVD player, A/V receiver and a compatible digital audio or video monitor, such as HDTV. Incorrect connection may be damaged. 2.7 HDMI_SPDIF Header Connection Guide HDMI (High...
... pin definition. Please do not connect the white end of the HDMI VGA card you install. Connect the HDMI output connector on HDMI VGA card to connect HDMI Digital TV/projector/ LCD devices. A complete HDMI system requires a HDMI VGA card and a HDMI ready motherboard with a HDMI_SPDIF header, which provides an interface between any compatible digital audio/video source, such as a set-top box, DVD player, A/V receiver and a compatible digital audio or video monitor, such as HDTV. Incorrect connection may be damaged. 2.7 HDMI_SPDIF Header Connection Guide HDMI (High...
User Manual
Page 28
... [IDE]. Please follow the order from up , press key, and then a window for WindowsXP64 4. A. Then you will see the message on the support CD driver page. Generate RAID Driver diskette for WindowsXP 2. Using SATA / SATAII HDDs with NCQ and Hot Plug functions STEP 1: Set Up BIOS. B. Insert the ASRock Support CD into your optical drive to install those required drivers. Generate AHCI Driver diskette for boot devices selection appears. 2.12 Driver Installation Guide To install the drivers...
... [IDE]. Please follow the order from up , press key, and then a window for WindowsXP64 4. A. Then you will see the message on the support CD driver page. Generate RAID Driver diskette for WindowsXP 2. Using SATA / SATAII HDDs with NCQ and Hot Plug functions STEP 1: Set Up BIOS. B. Insert the ASRock Support CD into your optical drive to install those required drivers. Generate AHCI Driver diskette for boot devices selection appears. 2.12 Driver Installation Guide To install the drivers...
User Manual
Page 29
... floppy disk, the drivers will start to install Windows® XP / XP 64-bit on your system, and follow step 1 to set up the BIOS option "SATA Operation Mode" to install Windows® VistaTM / Windows® VistaTM 64-bit on your SATA / SATAII HDDs without NCQ and Hot Plug functions STEP 1: Set Up BIOS. NVIDIA nForce Storage Controller (required) Windows XP B. NVIDIA nForce Storage Controller (required) Windows XP64 Please select A for Windows® XP 64-bit in AHCI mode. Enter BIOS SETUP UTILITY Advanced screen IDE Configuration. E. STEP 3: Set...
... floppy disk, the drivers will start to install Windows® XP / XP 64-bit on your system, and follow step 1 to set up the BIOS option "SATA Operation Mode" to install Windows® VistaTM / Windows® VistaTM 64-bit on your SATA / SATAII HDDs without NCQ and Hot Plug functions STEP 1: Set Up BIOS. NVIDIA nForce Storage Controller (required) Windows XP B. NVIDIA nForce Storage Controller (required) Windows XP64 Please select A for Windows® XP 64-bit in AHCI mode. Enter BIOS SETUP UTILITY Advanced screen IDE Configuration. E. STEP 3: Set...
User Manual
Page 31
... the BIOS RAID installation guide part of Windows® setup, press F6 to set up "SATA Operation Mode" to [RAID] in the Support CD: .. \ RAID Installation Guide 2.14.2 Installing Windows® VistaTM / VistaTM 64-bit With RAID Functions If you start to [RAID]. Please specify the first RAID driver and then specify again for the second one for RAID mode, you need to set RAID configuration. " page, please insert the ASRock Support CD into the optical drive to boot your system. STEP 5: Install Windows...
... the BIOS RAID installation guide part of Windows® setup, press F6 to set up "SATA Operation Mode" to [RAID] in the Support CD: .. \ RAID Installation Guide 2.14.2 Installing Windows® VistaTM / VistaTM 64-bit With RAID Functions If you start to [RAID]. Please specify the first RAID driver and then specify again for the second one for RAID mode, you need to set RAID configuration. " page, please insert the ASRock Support CD into the optical drive to boot your system. STEP 5: Install Windows...
User Manual
Page 38
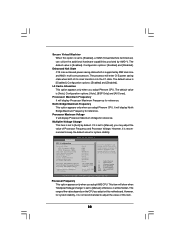
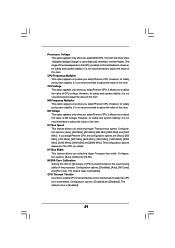
...is set to [Auto] by default. Processor Maximum Voltage It will be hidden. Multiplier/Voltage Change This item is [Disabled]. If it will display Processor Maximum Voltage for reference. BIOS SETUP UTILITY Advanced CPU Configuration Overclock Mode CPU Frequency (MHz) PCIE Frequency (MHz) CPU/LDT Spread Spectrum SATA Spread Spectrum Boot Failure Guard Cool' n' Quiet Secure Virtual Machine Enhanced Halt State L3 Cache Allocation Processor Maximum Frequency North Bridge Maximum Voltage Processor Maximum Voltage Multiplier/Voltage Change CPU Frequency Multiplier CPU Voltage [Auto] [200...
...is set to [Auto] by default. Processor Maximum Voltage It will be hidden. Multiplier/Voltage Change This item is [Disabled]. If it will display Processor Maximum Voltage for reference. BIOS SETUP UTILITY Advanced CPU Configuration Overclock Mode CPU Frequency (MHz) PCIE Frequency (MHz) CPU/LDT Spread Spectrum SATA Spread Spectrum Boot Failure Guard Cool' n' Quiet Secure Virtual Machine Enhanced Halt State L3 Cache Allocation Processor Maximum Frequency North Bridge Maximum Voltage Processor Maximum Voltage Multiplier/Voltage Change CPU Frequency Multiplier CPU Voltage [Auto] [200...
User Manual
Page 39
... adopt on this item. Configuration options: [Auto], [200 MHz], [400 MHz], [600 MHz], [800 MHz] and [1000 MHz]. CPU Thermal Throttle Use this to enable CPU internal thermal control mechanism to adjust the value of NB voltage. Configuration options: [Enabled] and [Disabled]. Processor Voltage This option appears only when you adopt Phenom CPU. NB Frequency Multiplier This option appears only when you adopt Phenom CPU. The default value is [Enabled]. 39 However, for...
... adopt on this item. Configuration options: [Auto], [200 MHz], [400 MHz], [600 MHz], [800 MHz] and [1000 MHz]. CPU Thermal Throttle Use this to enable CPU internal thermal control mechanism to adjust the value of NB voltage. Configuration options: [Enabled] and [Disabled]. Processor Voltage This option appears only when you adopt Phenom CPU. NB Frequency Multiplier This option appears only when you adopt Phenom CPU. The default value is [Enabled]. 39 However, for...

User Manual
Page 44
... video card. The default value of multiple video controllers. The default value is [Auto]. The default value is [Auto]. Primary Graphics Adapter This item will be disabled when PCI Sound Card is plugged. HT Voltage Use this feature is [Auto]. 44 3.4.3 Chipset Configuration BIOS SETUP UTILITY Advanced Chipset Settings Onboard LAN Onboard HD Audio Front Panel Primary Graphics Adapter DRAM Voltage Chipset Voltage HT Voltage [Enabled] [Auto] [Enabled] [PCI] [Auto] [Auto] [Auto] To set DRAM Voltage. +F1 F9 F10 ESC Select Screen Select Item Change Option General Help Load...
... video card. The default value of multiple video controllers. The default value is [Auto]. The default value is [Auto]. Primary Graphics Adapter This item will be disabled when PCI Sound Card is plugged. HT Voltage Use this feature is [Auto]. 44 3.4.3 Chipset Configuration BIOS SETUP UTILITY Advanced Chipset Settings Onboard LAN Onboard HD Audio Front Panel Primary Graphics Adapter DRAM Voltage Chipset Voltage HT Voltage [Enabled] [Auto] [Enabled] [PCI] [Auto] [Auto] [Auto] To set DRAM Voltage. +F1 F9 F10 ESC Select Screen Select Item Change Option General Help Load...
User Manual
Page 46
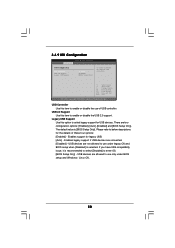
... BIOS SETUP UTILITY Advanced IDE Configuration Onboard IDE Controller Onboard SATA Controller SATA Operation Mode IDE1 Master IDE1 Slave SATAII_1 SATAII_2 SATAII_3 SATAII_4 [Enabled] [Enabled] [IDE] [Hard Disk] [Not Detected] [Not Detected] [Not Detected] [Not Detected] [Not Detected] Options Disabled Enabled +F1 F9 F10 ESC Select Screen Select Item Change Option General Help Load Defaults Save and Exit Exit v02.54 (C) Copyright 1985-2003, American Megatrends, Inc. Configuration options: [IDE], [RAID] and [AHCI]. * If you select [RAID] mode, SATA / SATAII HDDs can be accessed...
... BIOS SETUP UTILITY Advanced IDE Configuration Onboard IDE Controller Onboard SATA Controller SATA Operation Mode IDE1 Master IDE1 Slave SATAII_1 SATAII_2 SATAII_3 SATAII_4 [Enabled] [Enabled] [IDE] [Hard Disk] [Not Detected] [Not Detected] [Not Detected] [Not Detected] [Not Detected] Options Disabled Enabled +F1 F9 F10 ESC Select Screen Select Item Change Option General Help Load Defaults Save and Exit Exit v02.54 (C) Copyright 1985-2003, American Megatrends, Inc. Configuration options: [IDE], [RAID] and [AHCI]. * If you select [RAID] mode, SATA / SATAII HDDs can be accessed...
User Manual
Page 50
... USB 2.0 Support Legacy USB Support [Enabled] [Enabled] [BIOS Setup Only] To enable or disable the onboard USB controllers. +F1 F9 F10 ESC Select Screen Select Item Change Option General Help Load Defaults Save and Exit Exit v02.54 (C) Copyright 1985-2003, American Megatrends, Inc. USB Controller Use this item to enable or disable the use of these four options: [Enabled] - USB 2.0 Support Use this option to use under BIOS setup and Windows / Linux OS. 50 The default value is selected. Enables support for USB devices. USB devices are four configuration options: [Enabled], [Auto...
... USB 2.0 Support Legacy USB Support [Enabled] [Enabled] [BIOS Setup Only] To enable or disable the onboard USB controllers. +F1 F9 F10 ESC Select Screen Select Item Change Option General Help Load Defaults Save and Exit Exit v02.54 (C) Copyright 1985-2003, American Megatrends, Inc. USB Controller Use this item to enable or disable the use of these four options: [Enabled] - USB 2.0 Support Use this option to use under BIOS setup and Windows / Linux OS. 50 The default value is selected. Enables support for USB devices. USB devices are four configuration options: [Enabled], [Auto...
User Manual
Page 53
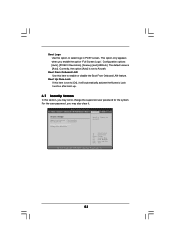
... the option "Full Screen Logo". BIOS SETUP UTILITY Main Smart Advanced H/W Monitor Boot Security Exit Security Settings Supervisor Password : Not Installed User Password : Not Installed Change Supervisor Password Change User Password Install or Change the password. Select Screen Select Item Enter Change F1 General Help F9 Load Defaults F10 Save and Exit ESC Exit v02.54 (C) Copyright 1985-2005, American Megatrends, Inc. 53 Currently, the option [Auto] is set or change the supervisor/user password for the system. Boot From Onboard LAN Use this item to Aircraft. Boot Logo Use...
... the option "Full Screen Logo". BIOS SETUP UTILITY Main Smart Advanced H/W Monitor Boot Security Exit Security Settings Supervisor Password : Not Installed User Password : Not Installed Change Supervisor Password Change User Password Install or Change the password. Select Screen Select Item Enter Change F1 General Help F9 Load Defaults F10 Save and Exit ESC Exit v02.54 (C) Copyright 1985-2005, American Megatrends, Inc. 53 Currently, the option [Auto] is set or change the supervisor/user password for the system. Boot From Onboard LAN Use this item to Aircraft. Boot Logo Use...

Quick Installation Guide
Page 7
...® Windows® XP / XP Media Center / XP 64-bit / VistaTM / VistaTM 64-bit compliant Certifications - Supports "Plug and Play" - Chassis Temperature Sensing - ACPI 1.1 Compliance Wake Up Events - CPU Frequency Stepless Control (see CAUTION 8) - Drivers, Utilities, AntiVirus Software (Trial Version) Unique Feature - ASRock OC Tuner (see CAUTION 11) - ASRock U-COP (see CAUTION 12) - Supports jumperfree - CD in header - SMBIOS 2.3.1 Support - Instant Boot - CPU/Chassis/NB FAN connector - 24 pin ATX power connector - 4 pin 12V power connector -
...® Windows® XP / XP Media Center / XP 64-bit / VistaTM / VistaTM 64-bit compliant Certifications - Supports "Plug and Play" - Chassis Temperature Sensing - ACPI 1.1 Compliance Wake Up Events - CPU Frequency Stepless Control (see CAUTION 8) - Drivers, Utilities, AntiVirus Software (Trial Version) Unique Feature - ASRock OC Tuner (see CAUTION 11) - ASRock U-COP (see CAUTION 12) - Supports jumperfree - CD in header - SMBIOS 2.3.1 Support - Instant Boot - CPU/Chassis/NB FAN connector - 24 pin ATX power connector - 4 pin 12V power connector -

Quick Installation Guide
Page 8
... AM2+ CPU you adopt. Before installing SATAII hard disk to SATAII connector, please read the "SATAII Hard Disk Setup Guide" on page 22 for the compatible memory modules. For audio output, this motherboard supports both stereo and mono modes. ASRock website: http://www.asrock.com 8 ASRock K10N78D Motherboard English You can also connect SATA hard disk to SATAII connector directly. 7. For Windows® XP 64-bit and Windows® VistaTM 64bit with overclocking, including adjusting the setting in the support CD...
... AM2+ CPU you adopt. Before installing SATAII hard disk to SATAII connector, please read the "SATAII Hard Disk Setup Guide" on page 22 for the compatible memory modules. For audio output, this motherboard supports both stereo and mono modes. ASRock website: http://www.asrock.com 8 ASRock K10N78D Motherboard English You can also connect SATA hard disk to SATAII connector directly. 7. For Windows® XP 64-bit and Windows® VistaTM 64bit with overclocking, including adjusting the setting in the support CD...
Quick Installation Guide
Page 20
Using SATA / SATAII HDDs with NCQ and Hot Plug functions STEP 1: Set Up BIOS. A. Set the "SATA Operation Mode" option to continue 20 ASRock K10N78D Motherboard English Then you see these messages, Please choose: 1. Generate AHCI Driver diskette for Windows® XP / XP 64-bit.) B. Please follow the order from up , press key, and then a window for WindowsXP64 5. Insert the ASRock Support CD into your optical drive to boot your system. (There are two...
Using SATA / SATAII HDDs with NCQ and Hot Plug functions STEP 1: Set Up BIOS. A. Set the "SATA Operation Mode" option to continue 20 ASRock K10N78D Motherboard English Then you see these messages, Please choose: 1. Generate AHCI Driver diskette for Windows® XP / XP 64-bit.) B. Please follow the order from up , press key, and then a window for WindowsXP64 5. Insert the ASRock Support CD into your optical drive to boot your system. (There are two...
Quick Installation Guide
Page 23
... to display the menus. 23 ASRock K10N78D Motherboard English To begin using the Support CD, insert the CD into your computer. If the Main Menu does not appear automatically, locate and double-click on the motherboard stores BIOS Setup Utility. BIOS Information The Flash Memory on the file "ASSETUP. If you start up the computer, please press during the Power-On-Self-Test (POST) to the User Manual (PDF file) contained in the Support CD...
... to display the menus. 23 ASRock K10N78D Motherboard English To begin using the Support CD, insert the CD into your computer. If the Main Menu does not appear automatically, locate and double-click on the motherboard stores BIOS Setup Utility. BIOS Information The Flash Memory on the file "ASSETUP. If you start up the computer, please press during the Power-On-Self-Test (POST) to the User Manual (PDF file) contained in the Support CD...
RAID Installation Guide
Page 6
...using the Windows RAID installation guide part of Windows® setup, press F6 to install Windows® XP / Windows® XP 64-bit OS on your system. STEP 3: Set Up BIOS. B. STEP 4: Use "RAID Installation Guide" to [RAID] in the Support CD: .. \ RAID Installation Guide STEP 5: Install Windows® XP / XP 64-bit OS on SATA / SATAII HDDs, you install Windows® XP / Windows® XP 64-bit on IDE HDDs and want to select them separately. Before you start to install a third-party RAID driver. Enter BIOS SETUP UTILITY Advanced screen IDE Configuration. The drivers...
...using the Windows RAID installation guide part of Windows® setup, press F6 to install Windows® XP / Windows® XP 64-bit OS on your system. STEP 3: Set Up BIOS. B. STEP 4: Use "RAID Installation Guide" to [RAID] in the Support CD: .. \ RAID Installation Guide STEP 5: Install Windows® XP / XP 64-bit OS on SATA / SATAII HDDs, you install Windows® XP / Windows® XP 64-bit on IDE HDDs and want to select them separately. Before you start to install a third-party RAID driver. Enter BIOS SETUP UTILITY Advanced screen IDE Configuration. The drivers...
RAID Installation Guide
Page 7
Enter BIOS SETUP UTILITY Advanced screen IDE Configuration. Set the "SATA Operation Mode" option to continue the installation. NVIDIA® RAID drivers are in the following path in our Support CD: (There are two ASRock Support CD in the Support CD: .. \ RAID Installation Guide 7 Then, please set RAID configuration. STEP 1: Set Up BIOS. NOTE. Before you start to configure RAID function, you need to set up "SATA Operation Mode" to [RAID] in the Support CD for Windows® VistaTM / VistaTM 64-bit.) .. \ I386 \ RAID_Vista (For Windows® VistaTM...
Enter BIOS SETUP UTILITY Advanced screen IDE Configuration. Set the "SATA Operation Mode" option to continue the installation. NVIDIA® RAID drivers are in the following path in our Support CD: (There are two ASRock Support CD in the Support CD: .. \ RAID Installation Guide 7 Then, please set RAID configuration. STEP 1: Set Up BIOS. NOTE. Before you start to configure RAID function, you need to set up "SATA Operation Mode" to [RAID] in the Support CD for Windows® VistaTM / VistaTM 64-bit.) .. \ I386 \ RAID_Vista (For Windows® VistaTM...
RAID Installation Guide
Page 11
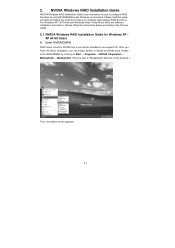
... the desktop.) Then, the below to configure and manage RAID functions. Please enter NVRAIDMAN by using NVIDIAMAN under Windows environment. Enter NVRAIDMAN RAID driver is also a "Mediashield" shortcut on Start → Programs → NVIDIA Corporation → Mediashield → Mediashield. (There is built in NVIDIA ALL in one driver provided in our support CD. NVIDIA Windows RAID Installation Guide NVIDIA Windows RAID Installation Guide is an instruction for Windows XP / XP 64-bit Users A. Please...
... the desktop.) Then, the below to configure and manage RAID functions. Please enter NVRAIDMAN by using NVIDIAMAN under Windows environment. Enter NVRAIDMAN RAID driver is also a "Mediashield" shortcut on Start → Programs → NVIDIA Corporation → Mediashield → Mediashield. (There is built in NVIDIA ALL in one driver provided in our support CD. NVIDIA Windows RAID Installation Guide NVIDIA Windows RAID Installation Guide is an instruction for Windows XP / XP 64-bit Users A. Please...


