RAID Installation Guide
Page 2
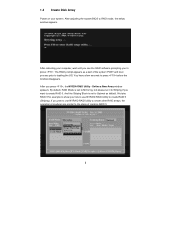
...the RAID functions your motherboard according to the SATA / SATAII HDDs amount you make a SATA / SATAII driver diskette, press to enter BIOS setup to set . It provides data protection and increases fault tolerance to the entire system since it contains a complete copy of using NVIDIA RAID Utility ...under BIOS environment. Please refer to RAID The term "RAID" stands for creating RAID arrays. RAID 0 (Data Striping) RAID 0 is called...
...the RAID functions your motherboard according to the SATA / SATAII HDDs amount you make a SATA / SATAII driver diskette, press to enter BIOS setup to set . It provides data protection and increases fault tolerance to the entire system since it contains a complete copy of using NVIDIA RAID Utility ...under BIOS environment. Please refer to RAID The term "RAID" stands for creating RAID arrays. RAID 0 (Data Striping) RAID 0 is called...

RAID Installation Guide
Page 5
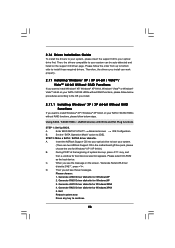
... 1.3.1 Installing Windows® XP / XP 64-bit With RAID Functions If you want to [non-RAID]. Enter BIOS SETUP UTILITY Advanced screen IDE Configuration. Insert the ASRock Support CD into your optical drive to install Windows® XP or Windows® XP 64-bit on IDE HDD... the floppy diskette. Then you want to boot your system. (There are two ASRock Support CD in the motherboard gift box pack, please choose the one for boot devices selection appears. A. STEP 3: Set Up BIOS. Set the "SATA Operation Mode" option to enable Hot Plug function on the screen, ...
... 1.3.1 Installing Windows® XP / XP 64-bit With RAID Functions If you want to [non-RAID]. Enter BIOS SETUP UTILITY Advanced screen IDE Configuration. Insert the ASRock Support CD into your optical drive to install Windows® XP or Windows® XP 64-bit on IDE HDD... the floppy diskette. Then you want to boot your system. (There are two ASRock Support CD in the motherboard gift box pack, please choose the one for boot devices selection appears. A. STEP 3: Set Up BIOS. Set the "SATA Operation Mode" option to enable Hot Plug function on the screen, ...
RAID Installation Guide
Page 6
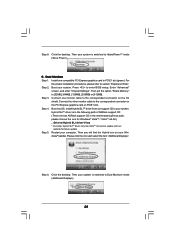
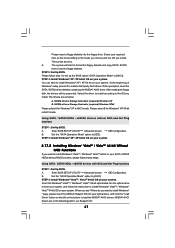
...IDE HDDs and want to manage (create, convert, delete, or rebuild) RAID functions on SATA / SATAII HDDs, you need to set up "SATA Operation Mode" to [RAID] in BIOS first. NVIDIA RAID Driver (required) B. Before you start to install a third-party RAID driver. You can start to configure ...RAID Installation Guide" to set the RAID configuration by using the Windows RAID installation guide in the following path in the Support CD: .. \ RAID Installation Guide STEP 5: Install Windows® XP / Windows® XP 64-bit OS on your system. Please refer to the BIOS RAID installation guide in the...
...IDE HDDs and want to manage (create, convert, delete, or rebuild) RAID functions on SATA / SATAII HDDs, you need to set up "SATA Operation Mode" to [RAID] in BIOS first. NVIDIA RAID Driver (required) B. Before you start to install a third-party RAID driver. You can start to configure ...RAID Installation Guide" to set the RAID configuration by using the Windows RAID installation guide in the following path in the Support CD: .. \ RAID Installation Guide STEP 5: Install Windows® XP / Windows® XP 64-bit OS on your system. Please refer to the BIOS RAID installation guide in the...
RAID Installation Guide
Page 7
... "RAID Installation Guide" to boot your system, and follow below steps. " page, please insert the ASRock Support CD into the optical drive to set the RAID configuration by using the Windows RAID installation guide in the following path in BIOS first. Before you start to configure RAID function, you need to... delete, or rebuild) RAID functions on the bottom to [RAID] in the Support CD: .. \ RAID Installation Guide 7 Please refer to install Windows? STEP 1: Set Up BIOS. If you install Windows® VistaTM / Windows® VistaTM 64-bit on IDE HDDs and want to the...
... "RAID Installation Guide" to boot your system, and follow below steps. " page, please insert the ASRock Support CD into the optical drive to set the RAID configuration by using the Windows RAID installation guide in the following path in BIOS first. Before you start to configure RAID function, you need to... delete, or rebuild) RAID functions on the bottom to [RAID] in the Support CD: .. \ RAID Installation Guide 7 Please refer to install Windows? STEP 1: Set Up BIOS. If you install Windows® VistaTM / Windows® VistaTM 64-bit on IDE HDDs and want to the...
RAID Installation Guide
Page 8
... default. By default, RAID Mode is set it to Striping if you want to create RAID 0. We take RAID 0 for example to show you press , the NVIDIA RAID Utility - You have a few seconds to RAID mode, the below window appears. After adjusting the system BIOS to press before the window disappears. After...
... default. By default, RAID Mode is set it to Striping if you want to create RAID 0. We take RAID 0 for example to show you press , the NVIDIA RAID Utility - You have a few seconds to RAID mode, the below window appears. After adjusting the system BIOS to press before the window disappears. After...
User Manual
Page 4
...Functions 49 2.19 Untied Overclocking Technology 50 3 . BIOS SETUP UTILITY 51 3.1 Introduction 51 3.1.1 BIOS Menu Bar 51 3.1.2 Navigation Keys 52 3.2 Main ...Screen 52 3.3 Smart Screen 53 3.4 Advanced Screen 54 3.4.1 CPU Configuration 55 3.4.2 Chipset Configuration 59 3.4.3 ACPI Configuration 62 3.4.4 IDE Configuration 63 3.4.5 PCIPnP Configuration 65 3.4.6 Floppy Configuration 66 3.4.7 Super IO Configuration 66 3.4.8 USB Configuration 67 3.5 Hardware Health Event Monitoring Screen 68 3.6 Boot Screen 69 3.6.1 Boot Settings...
...Functions 49 2.19 Untied Overclocking Technology 50 3 . BIOS SETUP UTILITY 51 3.1 Introduction 51 3.1.1 BIOS Menu Bar 51 3.1.2 Navigation Keys 52 3.2 Main ...Screen 52 3.3 Smart Screen 53 3.4 Advanced Screen 54 3.4.1 CPU Configuration 55 3.4.2 Chipset Configuration 59 3.4.3 ACPI Configuration 62 3.4.4 IDE Configuration 63 3.4.5 PCIPnP Configuration 65 3.4.6 Floppy Configuration 66 3.4.7 Super IO Configuration 66 3.4.8 USB Configuration 67 3.5 Hardware Health Event Monitoring Screen 68 3.6 Boot Screen 69 3.6.1 Boot Settings...

User Manual
Page 8
... the AM2+ CPU you adopt. Whether 1066MHz memory speed is a certain risk involved with overclocking, including adjusting the setting in the BIOS, applying Untied Overclocking Technology, or using the thirdparty overclocking tools. ASRock website http://www.asrock.com 8 CPU Fan Tachometer - Microsoft® Windows® XP / XP Media Center / XP 64-bit / VistaTM / VistaTM...
... the AM2+ CPU you adopt. Whether 1066MHz memory speed is a certain risk involved with overclocking, including adjusting the setting in the BIOS, applying Untied Overclocking Technology, or using the thirdparty overclocking tools. ASRock website http://www.asrock.com 8 CPU Fan Tachometer - Microsoft® Windows® XP / XP Media Center / XP 64-bit / VistaTM / VistaTM...
User Manual
Page 23
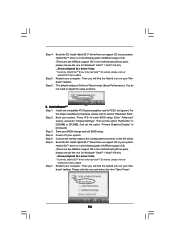
... below steps: A. GeForce® Boost Step 1. Step 3. Enter "Advanced" screen, and enter "Chipset Settings". If you want to use . Switch your BIOS change and exit BIOS setup. Supported PCI Express Card for the graphics cards update in the future. Step 2. Press to the connector...). Boot your system. A. For the proper installation procedures, please refer to [Onboard], and save your monitor cable to enter BIOS setup. C. Set up the BIOS option "Primary Graphics Display" to section "Expansion Slots". For users using single monitor: If you connect the monitor to your...
... below steps: A. GeForce® Boost Step 1. Step 3. Enter "Advanced" screen, and enter "Chipset Settings". If you want to use . Switch your BIOS change and exit BIOS setup. Supported PCI Express Card for the graphics cards update in the future. Step 2. Press to the connector...). Boot your system. A. For the proper installation procedures, please refer to [Onboard], and save your monitor cable to enter BIOS setup. C. Set up the BIOS option "Primary Graphics Display" to section "Expansion Slots". For users using single monitor: If you connect the monitor to your...
User Manual
Page 24
... visit our website for future update. Boot into OS. The default setting is in the following path of ASRock support CD: (There are two ASRock support CD in the motherboard gift box pack, please choose the one... compatible PCI Express graphics card to [Onboard]. For the proper installation procedures, please refer to enter BIOS setup. Step 4. Restart your system. HybridPowerTM Step 1. Step 2. Press to section "Expansion Slots". Step 6. Enter "Advanced" screen, and enter "Chipset Settings...
... visit our website for future update. Boot into OS. The default setting is in the following path of ASRock support CD: (There are two ASRock support CD in the motherboard gift box pack, please choose the one... compatible PCI Express graphics card to [Onboard]. For the proper installation procedures, please refer to enter BIOS setup. Step 4. Restart your system. HybridPowerTM Step 1. Step 2. Press to section "Expansion Slots". Step 6. Enter "Advanced" screen, and enter "Chipset Settings...
User Manual
Page 25
...C. Step 5. Click the desktop. Dual Monitors Step 1. Enter "Advanced" screen, and enter "Chipset Settings". Connect the other monitor cable to the correspondent connector on PCIE1 slot. Additional Displays 25 For the ... refer to [32MB], [64MB], [128MB], [256MB] or [512MB]. Boot your computer. Then set the option "Share Memory" to section "Expansion Slots". Connect one monitor cable to the correspondent connector...support CD to your system is in the following path of ASRock support CD: (There are two ASRock support CD in the motherboard gift box pack, please choose the one ...
...C. Step 5. Click the desktop. Dual Monitors Step 1. Enter "Advanced" screen, and enter "Chipset Settings". Connect the other monitor cable to the correspondent connector on PCIE1 slot. Additional Displays 25 For the ... refer to [32MB], [64MB], [128MB], [256MB] or [512MB]. Boot your computer. Then set the option "Share Memory" to section "Expansion Slots". Connect one monitor cable to the correspondent connector...support CD to your system is in the following path of ASRock support CD: (There are two ASRock support CD in the motherboard gift box pack, please choose the one ...
User Manual
Page 27
...for the second monitor. Right-click the display icon in the Display Properties dialog that you do not adjust the BIOS setup, the default value of the system memory. Set the "Screen Resolution" and "Color Quality" as Secondary. Please make sure that you have installed the onboard ...according to install them again. 5. Please refer to the following steps to enter BIOS setup. For Windows® VistaTM / VistaTM 64-bit OS: Right click the desktop, choose "Personalize", and select the "Display Settings" tab so that the value you wish to this monitor". Boot your primary ...
...for the second monitor. Right-click the display icon in the Display Properties dialog that you do not adjust the BIOS setup, the default value of the system memory. Set the "Screen Resolution" and "Color Quality" as Secondary. Please make sure that you have installed the onboard ...according to install them again. 5. Please refer to the following steps to enter BIOS setup. For Windows® VistaTM / VistaTM 64-bit OS: Right click the desktop, choose "Personalize", and select the "Display Settings" tab so that the value you wish to this monitor". Boot your primary ...
User Manual
Page 29
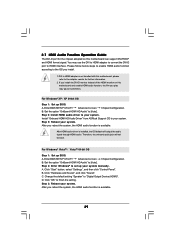
For Windows® XP / XP 64-bit OS Step 1: Set up BIOS. Enter BIOS SETUP UTILITY Advanced screen Chipset Configuration. Install "Onboard HDMI HD Audio Driver" from ASRock Support CD to your system. Step 3: Reboot your system. B. C. D. Step 3: Reboot your system. If you install the DVI-D ... the onboard audio jack will output the audio signal through HDMI audio. For Windows® VistaTM / VistaTM 64-bit OS Step 1: Set up BIOS. Enter BIOS SETUP UTILITY Advanced screen Chipset Configuration. Step 2: Enter Windows® to "Digital Output Device (HDMI)". A. Change the default...
For Windows® XP / XP 64-bit OS Step 1: Set up BIOS. Enter BIOS SETUP UTILITY Advanced screen Chipset Configuration. Install "Onboard HDMI HD Audio Driver" from ASRock Support CD to your system. Step 3: Reboot your system. B. C. D. Step 3: Reboot your system. If you install the DVI-D ... the onboard audio jack will output the audio signal through HDMI audio. For Windows® VistaTM / VistaTM 64-bit OS Step 1: Set up BIOS. Enter BIOS SETUP UTILITY Advanced screen Chipset Configuration. Step 2: Enter Windows® to "Digital Output Device (HDMI)". A. Change the default...
User Manual
Page 30
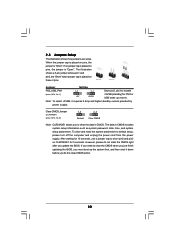
Jumper Setting PS2_USB_PW1 1_2 2_3 Short pin2, pin3 to enable (see p.13/14, No. 9) 1_2 2_3 Default Clear CMOS Note: CLRCMOS1 allows you to clear the CMOS when you just finish updating the BIOS, you must boot up events. However, please do not clear the CMOS right after you do the clear-...CMOS includes system setup information such as system password, date, time, and system setup parameters. Note: To select +5VSB, it down before you update the BIOS. When the jumper cap is placed on pins, the jumper is "Open". If no jumper cap is placed on pins, the jumper is "Short". ...
Jumper Setting PS2_USB_PW1 1_2 2_3 Short pin2, pin3 to enable (see p.13/14, No. 9) 1_2 2_3 Default Clear CMOS Note: CLRCMOS1 allows you to clear the CMOS when you just finish updating the BIOS, you must boot up events. However, please do not clear the CMOS right after you do the clear-...CMOS includes system setup information such as system password, date, time, and system setup parameters. Note: To select +5VSB, it down before you update the BIOS. When the jumper cap is placed on pins, the jumper is "Open". If no jumper cap is placed on pins, the jumper is "Short". ...
User Manual
Page 33
... infrared module. Connect Audio_R (RIN) to OUT2_R and Audio_L (LIN) to enter Realtek HD Audio Manager. Enter Advanced Settings, and then select Chipset Configuration. F. D. E. Click the icon on the chassis must support HDA to Ground (GND...). B. For Windows® XP / XP 64-bit OS: Click "Audio I/O", select "Connector Settings" , choose "Disable front panel jack detection", and save the change by clicking "OK". 33 Infrared Module Header (5-pin IR1) ... panel only. Connect Ground (GND) to function correctly. Enter BIOS Setup Utility.
... infrared module. Connect Audio_R (RIN) to OUT2_R and Audio_L (LIN) to enter Realtek HD Audio Manager. Enter Advanced Settings, and then select Chipset Configuration. F. D. E. Click the icon on the chassis must support HDA to Ground (GND...). B. For Windows® XP / XP 64-bit OS: Click "Audio I/O", select "Connector Settings" , choose "Disable front panel jack detection", and save the change by clicking "OK". 33 Infrared Module Header (5-pin IR1) ... panel only. Connect Ground (GND) to function correctly. Enter BIOS Setup Utility.
User Manual
Page 38
2.11 eSATAII Interface Introduction (Only for K10N78-1394) What is equipped with Hot Plug capability that eSATAII HDD should have. 5. eSATAII allows you can insert or remove your eSATAII HDD as a RAID disk, please set "SATA Operation Mode" option in the near future, eSATAII will replace USB 2.0 and ...the Hot Plug function that enables you to RAID mode. 4. If you want to use eSATAII function in BIOS setup to use the eSATAII HDD as a removable data disk, please set "SATA Operation Mode" option in working condition. 2. If you want to IDE mode. This motherboard supports ...
2.11 eSATAII Interface Introduction (Only for K10N78-1394) What is equipped with Hot Plug capability that eSATAII HDD should have. 5. eSATAII allows you can insert or remove your eSATAII HDD as a RAID disk, please set "SATA Operation Mode" option in the near future, eSATAII will replace USB 2.0 and ...the Hot Plug function that enables you to RAID mode. 4. If you want to use eSATAII function in BIOS setup to use the eSATAII HDD as a removable data disk, please set "SATA Operation Mode" option in working condition. 2. If you want to IDE mode. This motherboard supports ...
User Manual
Page 46
...and Hot Plug functions STEP 1: Set Up BIOS. A. B. Insert the ASRock Support CD into your optical drive to install Windows® XP / Windows® XP 64-bit on the support CD driver page. When you want to boot your system. (There are two ASRock Support CD in the motherboard ...Reboot system now Press any key to [IDE]. STEP 2: Make a SATA / SATAII driver diskette. Please select CD-ROM as the boot device. Set the "SATA Operation Mode" option to continue 46 D. Generate AHCI Driver diskette for WindowsXP64 5. Generate RAID Driver diskette for WindowsXP 2. Enter...
...and Hot Plug functions STEP 1: Set Up BIOS. A. B. Insert the ASRock Support CD into your optical drive to install Windows® XP / Windows® XP 64-bit on the support CD driver page. When you want to boot your system. (There are two ASRock Support CD in the motherboard ...Reboot system now Press any key to [IDE]. STEP 2: Make a SATA / SATAII driver diskette. Please select CD-ROM as the boot device. Set the "SATA Operation Mode" option to continue 46 D. Generate AHCI Driver diskette for WindowsXP64 5. Generate RAID Driver diskette for WindowsXP 2. Enter...
User Manual
Page 47
...on your system. B. When prompted, insert the SATA / SATAII driver diskette containing the NVIDIA® AHCI driver. " page, please insert the ASRock Support CD into the floppy drive. Please insert a floppy diskette into your required item on the list according to load the NVIDIA® AHCI...[AHCI]. Using SATA / SATAII HDDs / eSATAII devices without RAID functions, please follow step 1 to set up the BIOS option "SATA Operation Mode" to the OS you install. STEP 3: Set Up BIOS. Select your optical drive, and click the "Load Driver" button on the left on the bottom to...
...on your system. B. When prompted, insert the SATA / SATAII driver diskette containing the NVIDIA® AHCI driver. " page, please insert the ASRock Support CD into the floppy drive. Please insert a floppy diskette into your required item on the list according to load the NVIDIA® AHCI...[AHCI]. Using SATA / SATAII HDDs / eSATAII devices without RAID functions, please follow step 1 to set up the BIOS option "SATA Operation Mode" to the OS you install. STEP 3: Set Up BIOS. Select your optical drive, and click the "Load Driver" button on the left on the bottom to...
User Manual
Page 48
... driver diskette. (There are two ASRock Support CD in the motherboard gift box pack, please choose the one for proper configuration. Please follow step 1 to set RAID configuration. Please refer to [IDE]. Set the "SATA Operation Mode" option to the BIOS RAID installation guide part of the ... installation guide in the Support CD: .. \ RAID Installation Guide 48 Before you start to configure RAID function, you need to set up the BIOS option "SATA Operation Mode" to continue the installation. STEP 2: Install Windows® VistaTM / VistaTM 64-bit OS on your ...
... driver diskette. (There are two ASRock Support CD in the motherboard gift box pack, please choose the one for proper configuration. Please follow step 1 to set RAID configuration. Please refer to [IDE]. Set the "SATA Operation Mode" option to the BIOS RAID installation guide part of the ... installation guide in the Support CD: .. \ RAID Installation Guide 48 Before you start to configure RAID function, you need to set up the BIOS option "SATA Operation Mode" to continue the installation. STEP 2: Install Windows® VistaTM / VistaTM 64-bit OS on your ...
User Manual
Page 49
...for Windows® XP / XP 64-bit in BIOS first. B. At the beginning of the document in the following path in our Support CD: (There are two ASRock Support CD in the Support CD for RAID mode, you need to set RAID configuration. The drivers are two RAID drivers needed... the bottom to load the NVIDIA® RAID drivers. STEP 1: Set Up BIOS. STEP 2: Use "RAID Installation Guide" to set up "SATA Operation Mode" to install Windows? Set the "SATA Operation Mode" option to install. " page, please insert the ASRock Support CD into the optical drive to boot your system, and follow...
...for Windows® XP / XP 64-bit in BIOS first. B. At the beginning of the document in the following path in our Support CD: (There are two ASRock Support CD in the Support CD for RAID mode, you need to set RAID configuration. The drivers are two RAID drivers needed... the bottom to load the NVIDIA® RAID drivers. STEP 1: Set Up BIOS. STEP 2: Use "RAID Installation Guide" to set up "SATA Operation Mode" to install Windows? Set the "SATA Operation Mode" option to install. " page, please insert the ASRock Support CD into the optical drive to boot your system, and follow...
User Manual
Page 50
... Operation Mode" to the warning on page 8 for the possible overclocking risk before you enable Untied Overclocking function, please enter "Overclock Mode" option of BIOS setup to set the RAID configuration by using the Windows RAID installation guide in the following path in the Support CD: .. \ RAID Installation Guide 2.19 Untied Overclocking...
... Operation Mode" to the warning on page 8 for the possible overclocking risk before you enable Untied Overclocking function, please enter "Overclock Mode" option of BIOS setup to set the RAID configuration by using the Windows RAID installation guide in the following path in the Support CD: .. \ RAID Installation Guide 2.19 Untied Overclocking...


