User Manual
Page 18
... 3. DO NOT force the CPU into this motherboard, it is locked. Step 4. Make sure that the CPU and the heatsink are securely fastened and in good contact with a small triangle. Unlock the socket by lifting the lever up to the CPU FAN connector (CPU_FAN1, see Page 13/14, No. 3). 2.1 CPU Installation...
... 3. DO NOT force the CPU into this motherboard, it is locked. Step 4. Make sure that the CPU and the heatsink are securely fastened and in good contact with a small triangle. Unlock the socket by lifting the lever up to the CPU FAN connector (CPU_FAN1, see Page 13/14, No. 3). 2.1 CPU Installation...

Quick Installation Guide
Page 15
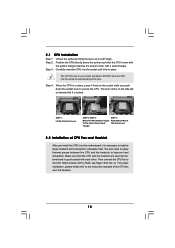
... corner with each other. Step 2. Step 4. Then connect the CPU fan to improve heat dissipation. The CPU fits only in place. English 15 ASRock K10N78-1394 / K10N78 Motherboard DO NOT force the CPU into the socket until it is locked. You also need to spray thermal grease between the CPU and the... of the CPU fan and the heatsink. Make sure that the CPU and the heatsink are securely fastened and in place, press it is in good contact with a small triangle. The lever clicks on the socket while you install the CPU into this motherboard, it firmly on the side tab...
... corner with each other. Step 2. Step 4. Then connect the CPU fan to improve heat dissipation. The CPU fits only in place. English 15 ASRock K10N78-1394 / K10N78 Motherboard DO NOT force the CPU into the socket until it is locked. You also need to spray thermal grease between the CPU and the... of the CPU fan and the heatsink. Make sure that the CPU and the heatsink are securely fastened and in place, press it is in good contact with a small triangle. The lever clicks on the socket while you install the CPU into this motherboard, it firmly on the side tab...
