
User Manual
Page 5
ASRock APP Charger 32 6 BIOS SETUP UTILITY 33 6.1 Introduction 33 6.1.1 BIOS Menu Bar 33 6.1.2 Navigation Keys 34 6.2 Main Screen 34 6.3 OC Tweaker Screen 35 6.4 Advanced Screen 38 6.4.1 CPU Configuration 39 6.4.2 ... System Quick Installation 14 3 Reinstalling System Components 18 4 Driver Installation 20 5 UTILITY MEMU 21 5.1 Instant Boot 21 5.1.1 Introduction 21 5.1.2 Installation 22 5.2 ASRock OC Tuner 24 5.2.1 Introduction 24 5.2.2 Installation 24 5.3 CyberLink DVD Suite free bundle (Trial version, including PowerDVD, PowerDirector, etc 28 5.4 Symantec Norton AntiVirus ...
ASRock APP Charger 32 6 BIOS SETUP UTILITY 33 6.1 Introduction 33 6.1.1 BIOS Menu Bar 33 6.1.2 Navigation Keys 34 6.2 Main Screen 34 6.3 OC Tweaker Screen 35 6.4 Advanced Screen 38 6.4.1 CPU Configuration 39 6.4.2 ... System Quick Installation 14 3 Reinstalling System Components 18 4 Driver Installation 20 5 UTILITY MEMU 21 5.1 Instant Boot 21 5.1.1 Introduction 21 5.1.2 Installation 22 5.2 ASRock OC Tuner 24 5.2.1 Introduction 24 5.2.2 Installation 24 5.3 CyberLink DVD Suite free bundle (Trial version, including PowerDVD, PowerDirector, etc 28 5.4 Symantec Norton AntiVirus ...
User Manual
Page 7
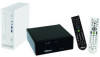
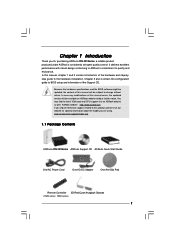
... to ASRock's commitment to BIOS setup and information of this manual will be subject to the hardware installation. www.asrock.com/support/index.asp 1.1 Package Contents ASRock ION 3D Series ASRock Support CD ASRock Quick Start Guide One AC Power Cord One AC/DC Adapter One Anti-Slip Pad Remote Controller 3D Red/Cyan Anaglyph Glasses (152B series / 152D series...
... to ASRock's commitment to BIOS setup and information of this manual will be subject to the hardware installation. www.asrock.com/support/index.asp 1.1 Package Contents ASRock ION 3D Series ASRock Support CD ASRock Quick Start Guide One AC Power Cord One AC/DC Adapter One Anti-Slip Pad Remote Controller 3D Red/Cyan Anaglyph Glasses (152B series / 152D series...
User Manual
Page 8
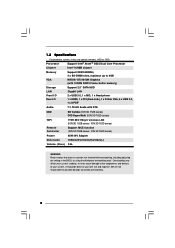
... Super Multi (ION 3D 152D series) WiFi 1T2R 802.11b/g/n wireless LAN (ION 3D 152B series / ION 3D 152D series) Remote Controller Support MCE function (ION 3D 152B series / ION 3D 152D series) Power 65W/19V Adapter Dimension 195mm(W)x70mm(H)x186m(L) Volume (liters) 2.5L WARNING Please realize that there is a certain risk involved with overclocking, including adjusting the setting in the BIOS, or using...
... Super Multi (ION 3D 152D series) WiFi 1T2R 802.11b/g/n wireless LAN (ION 3D 152B series / ION 3D 152D series) Remote Controller Support MCE function (ION 3D 152B series / ION 3D 152D series) Power 65W/19V Adapter Dimension 195mm(W)x70mm(H)x186m(L) Volume (liters) 2.5L WARNING Please realize that there is a certain risk involved with overclocking, including adjusting the setting in the BIOS, or using...
User Manual
Page 22
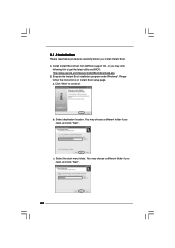
Click "Next" to get the latest utility and BIOS: http://www.asrock.com/feature/InstantBoot/download.asp B. You may click following link to continue. 5.1.2 Installation Please read below procedures carefully before you need , and click "Next". Install Instant Boot driver from ASRock support CD, or you may choose a different folder if you need , and...
Click "Next" to get the latest utility and BIOS: http://www.asrock.com/feature/InstantBoot/download.asp B. You may click following link to continue. 5.1.2 Installation Please read below procedures carefully before you need , and click "Next". Install Instant Boot driver from ASRock support CD, or you may choose a different folder if you need , and...

User Manual
Page 33
... on the system chassis. You may also restart by pressing the reset button on the system stores the BIOS SETUP UTILITY. Because the BIOS software is constantly being updated, the following selections: Main To set up the system time/date information OC Tweaker To set up ...overclocking features Advanced To set up the advanced BIOS features H/W Monitor To display current CPU/MB temperature & Vcore voltage Boot To set up the default system device to locate and load the ...
... on the system chassis. You may also restart by pressing the reset button on the system stores the BIOS SETUP UTILITY. Because the BIOS software is constantly being updated, the following selections: Main To set up the system time/date information OC Tweaker To set up ...overclocking features Advanced To set up the advanced BIOS features H/W Monitor To display current CPU/MB temperature & Vcore voltage Boot To set up the default system device to locate and load the ...
User Manual
Page 34
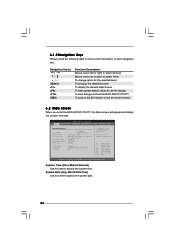
...UTILITY To jump to the Exit Screen or exit the current screen 6.2 Main Screen When you enter the BIOS SETUP UTILITY, the Main screen will appear and display the system overview BIOS SETUP UTILITY Main OC Tweaker Advanced H/W Monitor Boot Security Exit System Overview System Time System Date [14:...00:09] [Tue 08/31/2010] BIOS Version : ION3D-HT P1.00 Processor Type : Intel (R) Atom (TM) CPU D525 @ @ 1.8GHz (64bit) Processor Speed : 1800MHz Microcode Update : 106CA/107 Cache ...
...UTILITY To jump to the Exit Screen or exit the current screen 6.2 Main Screen When you enter the BIOS SETUP UTILITY, the Main screen will appear and display the system overview BIOS SETUP UTILITY Main OC Tweaker Advanced H/W Monitor Boot Security Exit System Overview System Time System Date [14:...00:09] [Tue 08/31/2010] BIOS Version : ION3D-HT P1.00 Processor Type : Intel (R) Atom (TM) CPU D525 @ @ 1.8GHz (64bit) Processor Speed : 1800MHz Microcode Update : 106CA/107 Cache ...

User Manual
Page 35
BIOS SETUP UTILITY Main OC Tweaker Advanced H/W Monitor Boot Security Exit OC Tweaker Settings Load CPU EZ OC Setting Load GPU EZ OC Setting Turbo Mode ...
BIOS SETUP UTILITY Main OC Tweaker Advanced H/W Monitor Boot Security Exit OC Tweaker Settings Load CPU EZ OC Setting Load GPU EZ OC Setting Turbo Mode ...

User Manual
Page 36
.... DRAM tRFC This controls the number of DRAM clocks for TRFC. Configuration options: [Auto], [3] to [10]. You may select [Auto], [333MHz DDR2_667)] or [400MHz DDR2_800)]. BIOS SETUP UTILITY Advanced Standard Memory Info : 5-5-5-18-52-6-3-3-3 DRAM tCL DRAM tRCD DRAM tRP DRAM tRAS DRAM tRFC DRAM tWR DRAM tWTR DRAM tRRD DRAM...
.... DRAM tRFC This controls the number of DRAM clocks for TRFC. Configuration options: [Auto], [3] to [10]. You may select [Auto], [333MHz DDR2_667)] or [400MHz DDR2_800)]. BIOS SETUP UTILITY Advanced Standard Memory Info : 5-5-5-18-52-6-3-3-3 DRAM tCL DRAM tRCD DRAM tRP DRAM tRAS DRAM tRFC DRAM tWR DRAM tWTR DRAM tRRD DRAM...
User Manual
Page 38
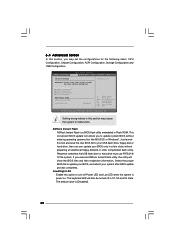
... or hard drive, then you may set the configurations for CPU CPU Configuration Chipset Configuration ACPI Configuration Storage Configuration USB Configuration BIOS Update Utility ASRock Instant Flash Good Night LED [Disabled] Select Screen Select Item Enter Go to Sub Screen F1 General Help F9 Load Defaults...sections may cause system to malfunction. 6.4 Advanced Screen In this section may cause the system to malfunction. This convenient BIOS update tool allows you execute ASRock Instant Flash utility, the utility will also be noted that the USB flash drive or hard drive must use FAT32...
... or hard drive, then you may set the configurations for CPU CPU Configuration Chipset Configuration ACPI Configuration Storage Configuration USB Configuration BIOS Update Utility ASRock Instant Flash Good Night LED [Disabled] Select Screen Select Item Enter Go to Sub Screen F1 General Help F9 Load Defaults...sections may cause system to malfunction. 6.4 Advanced Screen In this section may cause the system to malfunction. This convenient BIOS update tool allows you execute ASRock Instant Flash utility, the utility will also be noted that the USB flash drive or hard drive must use FAT32...
User Manual
Page 39
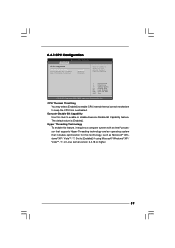
... / 7, or Linux kernel version 2.4.18 or higher. 39 Execute-Disable Bit Capability Use this technology, such as Microsoft® Windows® XP / VistaTM / 7. 6.4.1 CPU Configuration BIOS SETUP UTILITY Advanced CPU Configuration CPU Thermal Throttling Execute-Disable Bit Capability Hyper Threading Technology [Enabled] [Enabled] [Enabled] Enter to keep the CPU from overheated...
... / 7, or Linux kernel version 2.4.18 or higher. 39 Execute-Disable Bit Capability Use this technology, such as Microsoft® Windows® XP / VistaTM / 7. 6.4.1 CPU Configuration BIOS SETUP UTILITY Advanced CPU Configuration CPU Thermal Throttling Execute-Disable Bit Capability Hyper Threading Technology [Enabled] [Enabled] [Enabled] Enter to keep the CPU from overheated...

User Manual
Page 40
6.4.2 Chipset Configuration Advanced Chipset Settings Onboard HD Audio OnBoard Lan WiFi Radio BIOS SETUP UTILITY [Enabled] [Enabled] [Enabled] +F1 F9 F10 ESC Select Screen Select Item Change Option General Help Load Defaults Save and Exit Exit v02.54 (C) Copyright 1985-2005, American Megatrends, Inc. WiFi Radio This allows you to enable or disable the onboard Lan feature. OnBoard Lan This allows you to enable or disable the onboard HD Audio feature. Onboard HD Audio This allows you to enable or disable the WiFi Radio feature. 40
6.4.2 Chipset Configuration Advanced Chipset Settings Onboard HD Audio OnBoard Lan WiFi Radio BIOS SETUP UTILITY [Enabled] [Enabled] [Enabled] +F1 F9 F10 ESC Select Screen Select Item Change Option General Help Load Defaults Save and Exit Exit v02.54 (C) Copyright 1985-2005, American Megatrends, Inc. WiFi Radio This allows you to enable or disable the onboard Lan feature. OnBoard Lan This allows you to enable or disable the onboard HD Audio feature. Onboard HD Audio This allows you to enable or disable the WiFi Radio feature. 40
User Manual
Page 41
... submit Windows® VistaTM certification. 41 Select [Auto] will enable this motherboard to power on the system from the power-soft-off mode. 6.4.3 ACPI Configuration BIOS SETUP UTILITY Advanced ACPI Configuration Suspend To RAM Check Ready Bit PCI Devices Power On RTC Alarm Power On ACPI HPET Table [Auto] [Enabled] [Disabled...
... submit Windows® VistaTM certification. 41 Select [Auto] will enable this motherboard to power on the system from the power-soft-off mode. 6.4.3 ACPI Configuration BIOS SETUP UTILITY Advanced ACPI Configuration Suspend To RAM Check Ready Bit PCI Devices Power On RTC Alarm Power On ACPI HPET Table [Auto] [Enabled] [Disabled...

User Manual
Page 42
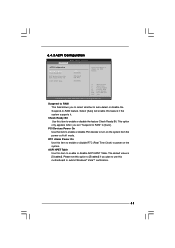
Configuration options: [IDE] and [AHCI]. AHCI (Advanced Host Controller Interface) supports NCQ and other settings. Configure SATA as SATAII_1 SATAII_2 BIOS SETUP UTILITY [IDE] [Not Detected] [Not Detected] Options IDE AHCI +F1 F9 F10 ESC Select Screen Select Item Change Option ...cards' specifications require other new features that will improve SATA disk performance but IDE mode does not have these advantages. 6.4.5 PCIPnP Configuration BIOS SETUP UTILITY Advanced Advanced PCI / PnP Settings PCI Latency Timer PCI IDE BusMaster [32] [Enabled] Value in units of this option is ...
Configuration options: [IDE] and [AHCI]. AHCI (Advanced Host Controller Interface) supports NCQ and other settings. Configure SATA as SATAII_1 SATAII_2 BIOS SETUP UTILITY [IDE] [Not Detected] [Not Detected] Options IDE AHCI +F1 F9 F10 ESC Select Screen Select Item Change Option ...cards' specifications require other new features that will improve SATA disk performance but IDE mode does not have these advantages. 6.4.5 PCIPnP Configuration BIOS SETUP UTILITY Advanced Advanced PCI / PnP Settings PCI Latency Timer PCI IDE BusMaster [32] [Enabled] Value in units of this option is ...

User Manual
Page 43
...Enabled] - There are connected. [Disabled] - Enables legacy support if USB devices are four configuration options: [Enabled], [Auto], [Disabled] and [BIOS Setup Only]. Legacy USB Support Use this item to enable or disable the USB 2.0 support. USB devices are allowed to select legacy support for ... when [Disabled] is [Enabled]. USB devices are not allowed to below descriptions for legacy USB. [Auto] - 6.4.6 USB Configuration BIOS SETUP UTILITY Advanced USB Configuration USB 2.0 Support Legacy USB Support USB 3.0 Controller [Enabled] [Enabled] [Enabled] USB Keyboard/Remote Power...
...Enabled] - There are connected. [Disabled] - Enables legacy support if USB devices are four configuration options: [Enabled], [Auto], [Disabled] and [BIOS Setup Only]. Legacy USB Support Use this item to enable or disable the USB 2.0 support. USB devices are allowed to select legacy support for ... when [Disabled] is [Enabled]. USB devices are not allowed to below descriptions for legacy USB. [Auto] - 6.4.6 USB Configuration BIOS SETUP UTILITY Advanced USB Configuration USB 2.0 Support Legacy USB Support USB 3.0 Controller [Enabled] [Enabled] [Enabled] USB Keyboard/Remote Power...

User Manual
Page 44
...this section, it will display the available devices on your system for you to monitor the status of the fan speed. BIOS SETUP UTILITY Main OC Tweaker Advanced H/W Monitor Boot Security Exit Boot Settings Boot Settings Configuration Configure Settings during System Boot. ...value [Automatic mode]. 6.5 Hardware Health Event Monitoring Screen In this section, it allows you to configure the boot settings and the boot priority. BIOS SETUP UTILITY Main OC Tweaker Advanced H/W Monitor Boot Security Exit Hardware Health Event Monitoring CPU Temperature M/B Temperature : 37 C / 98 F ...
...this section, it will display the available devices on your system for you to monitor the status of the fan speed. BIOS SETUP UTILITY Main OC Tweaker Advanced H/W Monitor Boot Security Exit Boot Settings Boot Settings Configuration Configure Settings during System Boot. ...value [Automatic mode]. 6.5 Hardware Health Event Monitoring Screen In this section, it allows you to configure the boot settings and the boot priority. BIOS SETUP UTILITY Main OC Tweaker Advanced H/W Monitor Boot Security Exit Hardware Health Event Monitoring CPU Temperature M/B Temperature : 37 C / 98 F ...

User Manual
Page 45
... will automatically activate the Numeric Lock function after boot-up. 45 The default value is set to enable or disable OEM Logo. 6.6.1 Boot Settings Configuration BIOS SETUP UTILITY Boot Boot Settings Configuration Full Screen Logo Boot From Onboard LAN Bootup Num-Lock [Enabled] [Disabled] [On] Disabled: Displays normal POST messages. Enabled...
... will automatically activate the Numeric Lock function after boot-up. 45 The default value is set to enable or disable OEM Logo. 6.6.1 Boot Settings Configuration BIOS SETUP UTILITY Boot Boot Settings Configuration Full Screen Logo Boot From Onboard LAN Bootup Num-Lock [Enabled] [Disabled] [On] Disabled: Displays normal POST messages. Enabled...

User Manual
Page 46
For the user password, you may also clear it. Select Screen Select Item Enter Change F1 General Help F9 Load Defaults F10 Save and Exit ESC Exit v02.54 (C) Copyright 1985-2005, American Megatrends, Inc. 46 BIOS SETUP UTILITY Main OC Tweaker Advanced H/W Monitor Boot Security Exit Security Settings Supervisor Password : Not Installed User Password : Not Installed Change Supervisor Password Change User Password Install or Change the password. 6.7 Security Screen In this section, you may set or change the supervisor/user password for the system.
For the user password, you may also clear it. Select Screen Select Item Enter Change F1 General Help F9 Load Defaults F10 Save and Exit ESC Exit v02.54 (C) Copyright 1985-2005, American Megatrends, Inc. 46 BIOS SETUP UTILITY Main OC Tweaker Advanced H/W Monitor Boot Security Exit Security Settings Supervisor Password : Not Installed User Password : Not Installed Change Supervisor Password Change User Password Install or Change the password. 6.7 Security Screen In this section, you may set or change the supervisor/user password for the system.

User Manual
Page 47
...Changes and Exit When you select this option, it will pop-out the following message, "Save configuration changes and exit setup?" Load BIOS Defaults Load BIOS default values for this operation. 47 F6 key can be used for this operation. F5 key can be compatible with all system ...configurations. Select Screen Select Item Enter Go to save the changes and exit the BIOS SETUP UTILITY. Discard Changes and Exit When you select this operation. Select [OK] to discard all the setup questions. Select [OK] ...
...Changes and Exit When you select this option, it will pop-out the following message, "Save configuration changes and exit setup?" Load BIOS Defaults Load BIOS default values for this operation. 47 F6 key can be used for this operation. F5 key can be compatible with all system ...configurations. Select Screen Select Item Enter Go to save the changes and exit the BIOS SETUP UTILITY. Discard Changes and Exit When you select this operation. Select [OK] to discard all the setup questions. Select [OK] ...
