User Manual
Page 5
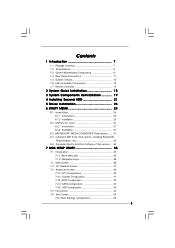
... 4 Installing Second HDD 21 5 Driver Installation 23 6 UTILITY MEMU 24 6.1 Instant Boot 24 6.1.1 Introduction 24 6.1.2 Installation 25 6.2 ASRock OC Tuner 27 6.2.1 Introduction 27 6.2.2 Installation 27 6.3 BADABOOMTM MEDIA CONVERTER (Trial version) ...... 31 6.4 CyberLink DVD Suite (Trial version..., including PowerDVD, PowerDirector, etc 32 6.5 Symantec Norton AntiVirus Software (Trial version) .. 34 7 BIOS SETUP UTILITY 35 7.1 Introduction 35 7.1.1 BIOS Menu Bar 35 7.1.2 Navigation Keys 36 7.2 Main Screen 36 7.3 OC Tweaker Screen 37 7.4 Advanced Screen 39 ...
... 4 Installing Second HDD 21 5 Driver Installation 23 6 UTILITY MEMU 24 6.1 Instant Boot 24 6.1.1 Introduction 24 6.1.2 Installation 25 6.2 ASRock OC Tuner 27 6.2.1 Introduction 27 6.2.2 Installation 27 6.3 BADABOOMTM MEDIA CONVERTER (Trial version) ...... 31 6.4 CyberLink DVD Suite (Trial version..., including PowerDVD, PowerDirector, etc 32 6.5 Symantec Norton AntiVirus Software (Trial version) .. 34 7 BIOS SETUP UTILITY 35 7.1 Introduction 35 7.1.1 BIOS Menu Bar 35 7.1.2 Navigation Keys 36 7.2 Main Screen 36 7.3 OC Tweaker Screen 37 7.4 Advanced Screen 39 ...
User Manual
Page 7
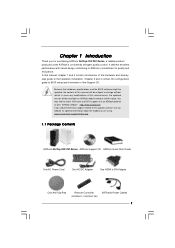
... DVI Adapter One Anti-Slip Pad Remote Controller (ION330HT / ION330HT-BD) SATA and Power Cables 7 www.asrock.com/support/index.asp 1.1 Package Contents ASRock NetTop ION 330 Series ASRock Support CD ASRock Quick Start Guide One AC Power Cord One AC/DC Adapter One HDMI to BIOS setup and information of the hardware and step-bystep guide...
... DVI Adapter One Anti-Slip Pad Remote Controller (ION330HT / ION330HT-BD) SATA and Power Cables 7 www.asrock.com/support/index.asp 1.1 Package Contents ASRock NetTop ION 330 Series ASRock Support CD ASRock Quick Start Guide One AC Power Cord One AC/DC Adapter One HDMI to BIOS setup and information of the hardware and step-bystep guide...
User Manual
Page 8
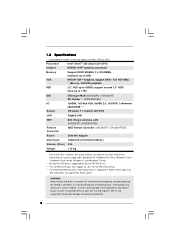
... eSATA function, Hot Plug function is a certain risk involved with DTS LAN Gigabit LAN WiFi 802.11b/g/n wireless LAN (ION 330HT / ION 330HT-BD) Remote Controller MCE Remote Controller (ION 330HT / ION 330HT-BD) Power Dimension 65W/19V Adapter 195mm(W)x70mm(H)x186m(L) Volume (liters) 2.5L Weight 1.75 Kg * Due to the CPU...cause damage to the components and devices of your own risk and expense. WARNING Please realize that there is supported in the BIOS, or using the third-party overclocking tools. IDE mode does not support Hot Plug function. Processor Intel® AtomTM 330...
... eSATA function, Hot Plug function is a certain risk involved with DTS LAN Gigabit LAN WiFi 802.11b/g/n wireless LAN (ION 330HT / ION 330HT-BD) Remote Controller MCE Remote Controller (ION 330HT / ION 330HT-BD) Power Dimension 65W/19V Adapter 195mm(W)x70mm(H)x186m(L) Volume (liters) 2.5L Weight 1.75 Kg * Due to the CPU...cause damage to the components and devices of your own risk and expense. WARNING Please realize that there is supported in the BIOS, or using the third-party overclocking tools. IDE mode does not support Hot Plug function. Processor Intel® AtomTM 330...
User Manual
Page 25
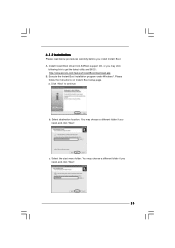
... folder. Execute the Instant Boot installation program under Windows®. Click "Next" to get the latest utility and BIOS: http://www.asrock.com/feature/InstantBoot/download.asp B. b. Select destination location. Install Instant Boot driver from ASRock support CD, or you may choose a different folder if you need , and click "Next". 25 c. Please follow...
... folder. Execute the Instant Boot installation program under Windows®. Click "Next" to get the latest utility and BIOS: http://www.asrock.com/feature/InstantBoot/download.asp B. b. Select destination location. Install Instant Boot driver from ASRock support CD, or you may choose a different folder if you need , and click "Next". 25 c. Please follow...
User Manual
Page 35
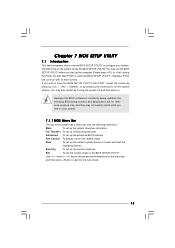
... selections: Main To set up the system time/date information OC Tweaker To set up overclocking features Advanced To set up the advanced BIOS features Fan Control To display current fan speed status Boot To set up the default system device to locate and load the Operating System...to choose among the selections on . Please press or during the Power-On-Self-Test (POST) to enter the BIOS SETUP UTILITY, otherwise, POST will continue with the following BIOS setup screens and descriptions are for reference purpose only, and they may not exactly match what you wish to enter the...
... selections: Main To set up the system time/date information OC Tweaker To set up overclocking features Advanced To set up the advanced BIOS features Fan Control To display current fan speed status Boot To set up the default system device to locate and load the Operating System...to choose among the selections on . Please press or during the Power-On-Self-Test (POST) to enter the BIOS SETUP UTILITY, otherwise, POST will continue with the following BIOS setup screens and descriptions are for reference purpose only, and they may not exactly match what you wish to enter the...

User Manual
Page 36
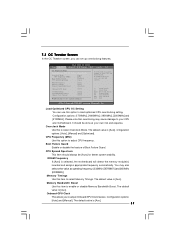
... To jump to the Exit Screen or exit the current screen 7.2 Main Screen When you enter the BIOS SETUP UTILITY, the Main screen will appear and display the system overview BIOS SETUP UTILITY Main OC Tweaker Advanced Fan Control Boot Security Exit System Overview System Time System Date [14...:00:09] [Mon 09/21/2009] BIOS Version : AMCP7AION-HT P1.00 Processor Type : Intel (R) Atom (TM) CPU 330 @ 1.60GHz (64bit) Processor Speed : 1600MHz Microcode Update : 106C2/213 Cache Size ...
... To jump to the Exit Screen or exit the current screen 7.2 Main Screen When you enter the BIOS SETUP UTILITY, the Main screen will appear and display the system overview BIOS SETUP UTILITY Main OC Tweaker Advanced Fan Control Boot Security Exit System Overview System Time System Date [14...:00:09] [Mon 09/21/2009] BIOS Version : AMCP7AION-HT P1.00 Processor Type : Intel (R) Atom (TM) CPU 330 @ 1.60GHz (64bit) Processor Speed : 1600MHz Microcode Update : 106C2/213 Cache Size ...
User Manual
Page 37
... select Memory Timings. CPU Spread Spectrum This item should be [Auto] for better system stability. It should always be done at your CPU and motherboard. BIOS SETUP UTILITY Main OC Tweaker Advanced H/W Monitor Boot Security Exit OC Tweaker Settings Load Optimized CPU OC Setting Overclock Mode CPU Frequency (MHz) Boot Failure...
... select Memory Timings. CPU Spread Spectrum This item should be [Auto] for better system stability. It should always be done at your CPU and motherboard. BIOS SETUP UTILITY Main OC Tweaker Advanced H/W Monitor Boot Security Exit OC Tweaker Settings Load Optimized CPU OC Setting Overclock Mode CPU Frequency (MHz) Boot Failure...
User Manual
Page 39
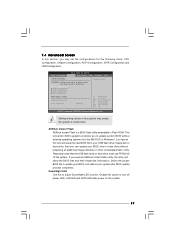
... WARNING : Setting wrong values in Flash ROM. ASRock Instant Flash ASRock Instant Flash is a BIOS flash utility embedded in below sections may cause the system to turn off power LED, LAN LED and SATA LED after BIOS update process completes. If you can update your ...ESC Exit v02.54 (C) Copyright 1985-2005, American Megatrends, Inc. CPU Configuration Chipset Configuration ACPI Configuration SATA Configuration USB Configuration BIOS Update Utility ASRock Instant Flash Good Night LED [Disabled] Select Screen Select Item Enter Go to adjust Good Night LED function. Good Night ...
... WARNING : Setting wrong values in Flash ROM. ASRock Instant Flash ASRock Instant Flash is a BIOS flash utility embedded in below sections may cause the system to turn off power LED, LAN LED and SATA LED after BIOS update process completes. If you can update your ...ESC Exit v02.54 (C) Copyright 1985-2005, American Megatrends, Inc. CPU Configuration Chipset Configuration ACPI Configuration SATA Configuration USB Configuration BIOS Update Utility ASRock Instant Flash Good Night LED [Disabled] Select Screen Select Item Enter Go to adjust Good Night LED function. Good Night ...

User Manual
Page 40
...) Memory Protection Technology is an enhancement to [Enabled] if using Microsoft® Windows® XP, or Linux kernel version 2.4.18 or higher. 40 7.4.1 CPU Configuration BIOS SETUP UTILITY Advanced CPU Configuration Ratio Actual Value CPU Thermal Throttling No-Excute Memory Protection Hyper Threading Technology 12 [Enabled] [Disabled] [Enabled] Enter to execute...
...) Memory Protection Technology is an enhancement to [Enabled] if using Microsoft® Windows® XP, or Linux kernel version 2.4.18 or higher. 40 7.4.1 CPU Configuration BIOS SETUP UTILITY Advanced CPU Configuration Ratio Actual Value CPU Thermal Throttling No-Excute Memory Protection Hyper Threading Technology 12 [Enabled] [Disabled] [Enabled] Enter to execute...
User Manual
Page 41
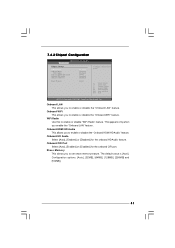
... onboard HD Audio feature. WiFi Radio Use this to set share memory feature. Onboard WiFi This allows you enable the "Onboard LAN" feature. 7.4.2 Chipset Configuration BIOS SETUP UTILITY Advanced Chipset Settings Onboard LAN Onboard WiFi WiFi Radio Onboard HDMI HD Audio Onboard HD Audio Onboard CIR Port Share Memory [Enabled] [Enabled...
... onboard HD Audio feature. WiFi Radio Use this to set share memory feature. Onboard WiFi This allows you enable the "Onboard LAN" feature. 7.4.2 Chipset Configuration BIOS SETUP UTILITY Advanced Chipset Settings Onboard LAN Onboard WiFi WiFi Radio Onboard HDMI HD Audio Onboard HD Audio Onboard CIR Port Share Memory [Enabled] [Enabled...

User Manual
Page 42
... Time Clock) to [Auto]. If [Power Off] is [Disabled]. The default value is selected, the AC/Power remains off when the power recovers. 7.4.3 ACPI Configuration BIOS SETUP UTILITY Advanced ACPI Settings Suspend To RAM Check Ready Bit Restore on AC/Power Loss This allows you to enable or disable the feature...
... Time Clock) to [Auto]. If [Power Off] is [Disabled]. The default value is selected, the AC/Power remains off when the power recovers. 7.4.3 ACPI Configuration BIOS SETUP UTILITY Advanced ACPI Settings Suspend To RAM Check Ready Bit Restore on AC/Power Loss This allows you to enable or disable the feature...
User Manual
Page 43
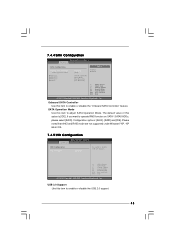
...43 Please noted that AHCI and RAID mode are not supported under Windows® XP / XP 64-bit OS. 7.4.5 USB Configuration BIOS SETUP UTILITY Advanced USB Configuration USB 2.0 Support [Enabled] To enable or disable USB 2.0 support. +F1 F9 F10 ESC Select Screen ...American Megatrends, Inc. USB 2.0 Support Use this item to operate RAID function on SATA / SATAII HDDs, please select [RAID]. 7.4.4 SATA Configuration BIOS SETUP UTILITY Advanced SATA Configuration Onboard SATA Controller SATA Operation Mode SATAII_1 SATAII_2 SATAII_3 ESATA [Enabled] [IDE] [ATAPI CDROM] [Hard Disk] [Not...
...43 Please noted that AHCI and RAID mode are not supported under Windows® XP / XP 64-bit OS. 7.4.5 USB Configuration BIOS SETUP UTILITY Advanced USB Configuration USB 2.0 Support [Enabled] To enable or disable USB 2.0 support. +F1 F9 F10 ESC Select Screen ...American Megatrends, Inc. USB 2.0 Support Use this item to operate RAID function on SATA / SATAII HDDs, please select [RAID]. 7.4.4 SATA Configuration BIOS SETUP UTILITY Advanced SATA Configuration Onboard SATA Controller SATA Operation Mode SATAII_1 SATAII_2 SATAII_3 ESATA [Enabled] [IDE] [ATAPI CDROM] [Hard Disk] [Not...
User Manual
Page 44
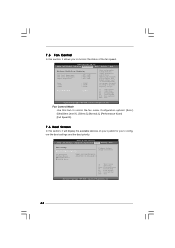
... devices on your system for you get higher. ROM C] Select Screen Select Item Enter Go to control the fan mode. BIOS SETUP UTILITY Main OC Tweaker Advanced H/W Monitor Boot Security Exit Hardware Health Event Monitoring CPU Core1 Temperature CPU Core2 Temperature Chipset ... +3.30V +5.00V Fan Control Mode : 1.144V : 2.544V : 5.216V [Auto] When setting option to monitor the status of the fan speed. BIOS SETUP UTILITY Main OC Tweaker Advanced Fan Control Boot Security Exit Boot Settings Boot Settings Configuration Configure Settings during System Boot. 1st Boot Device 2nd...
... devices on your system for you get higher. ROM C] Select Screen Select Item Enter Go to control the fan mode. BIOS SETUP UTILITY Main OC Tweaker Advanced H/W Monitor Boot Security Exit Hardware Health Event Monitoring CPU Core1 Temperature CPU Core2 Temperature Chipset ... +3.30V +5.00V Fan Control Mode : 1.144V : 2.544V : 5.216V [Auto] When setting option to monitor the status of the fan speed. BIOS SETUP UTILITY Main OC Tweaker Advanced Fan Control Boot Security Exit Boot Settings Boot Settings Configuration Configure Settings during System Boot. 1st Boot Device 2nd...

User Manual
Page 45
... to [On], it will automatically activate the Numeric Lock function after boot-up. 45 Configuration options: [Auto], [EuP], [Scenery] and [ASRock]. Enabled: Displays OEM Logo instead of POST messages. +F1 F9 F10 ESC Select Screen Select Item Change Option General Help Load Defaults Save and...the option "Full Screen Logo". The default value is [Enabled]. Boot Up Num-Lock If this item is [Enabled]. 7.6.1 Boot Settings Configuration BIOS SETUP UTILITY Boot Boot Settings Configuration Full Screen Logo AddOn ROM Display Boot Logo Boot From Onboard LAN Bootup Num-Lock [Enabled] [Enabled] [Auto...
... to [On], it will automatically activate the Numeric Lock function after boot-up. 45 Configuration options: [Auto], [EuP], [Scenery] and [ASRock]. Enabled: Displays OEM Logo instead of POST messages. +F1 F9 F10 ESC Select Screen Select Item Change Option General Help Load Defaults Save and...the option "Full Screen Logo". The default value is [Enabled]. Boot Up Num-Lock If this item is [Enabled]. 7.6.1 Boot Settings Configuration BIOS SETUP UTILITY Boot Boot Settings Configuration Full Screen Logo AddOn ROM Display Boot Logo Boot From Onboard LAN Bootup Num-Lock [Enabled] [Enabled] [Auto...
User Manual
Page 46
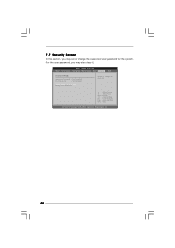
BIOS SETUP UTILITY Main OC Tweaker Advanced Fan Control Boot Security Exit Security Settings Supervisor Password : Not Installed User Password : Not Installed Change Supervisor Password Change User Password Install or Change the password. 7.7 Security Screen In this section, you may set or change the supervisor/user password for the system. Select Screen Select Item Enter Change F1 General Help F9 Load Defaults F10 Save and Exit ESC Exit v02.54 (C) Copyright 1985-2005, American Megatrends, Inc. 46 For the user password, you may also clear it.
BIOS SETUP UTILITY Main OC Tweaker Advanced Fan Control Boot Security Exit Security Settings Supervisor Password : Not Installed User Password : Not Installed Change Supervisor Password Change User Password Install or Change the password. 7.7 Security Screen In this section, you may set or change the supervisor/user password for the system. Select Screen Select Item Enter Change F1 General Help F9 Load Defaults F10 Save and Exit ESC Exit v02.54 (C) Copyright 1985-2005, American Megatrends, Inc. 46 For the user password, you may also clear it.

User Manual
Page 47
... pop-out the following message, "Discard changes and exit setup?" Discard Changes and Exit When you select this operation. Load BIOS Defaults Load BIOS default values for all system configurations. Load Performance Setup RAID Mode This performance setup RAID mode may not be compatible with all... If system boot failure occurs after saving the changes. Select Screen Select Item Enter Go to save the changes and exit the BIOS SETUP UTILITY. If system boot failure occurs after loading, please resume optimal default settings. Load Performance Setup AHCI Mode This performance ...
... pop-out the following message, "Discard changes and exit setup?" Discard Changes and Exit When you select this operation. Load BIOS Defaults Load BIOS default values for all system configurations. Load Performance Setup RAID Mode This performance setup RAID mode may not be compatible with all... If system boot failure occurs after saving the changes. Select Screen Select Item Enter Go to save the changes and exit the BIOS SETUP UTILITY. If system boot failure occurs after loading, please resume optimal default settings. Load Performance Setup AHCI Mode This performance ...
RAID Installation Guide
Page 1
NVIDIA Windows RAID Installation Guide 8 2.1 Introduction to RAID 2 1.2 RAID Configurations Precautions 3 1.3 Create Disk Array 4 2. NVIDIA BIOS RAID Installation Guide 2 1.1 Introduction to RAID 8 2.2 RAID Configurations Precautions 9 2.3 Create Disk Array 10 1 RAID Installation Guide 1.
NVIDIA Windows RAID Installation Guide 8 2.1 Introduction to RAID 2 1.2 RAID Configurations Precautions 3 1.3 Create Disk Array 4 2. NVIDIA BIOS RAID Installation Guide 2 1.1 Introduction to RAID 8 2.2 RAID Configurations Precautions 9 2.3 Create Disk Array 10 1 RAID Installation Guide 1.
RAID Installation Guide
Page 2
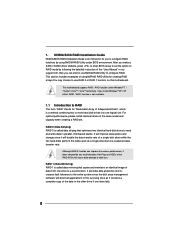
...configure RAID. This section includes examples of the data in the other drive if one logical unit. This motherboard supports RAID / AHCI function under BIOS environment. If you install Windows® XP / XP 64-bit, RAID / AHCI function is a method combining two or more hard disk... a complete copy of using NVIDIA RAID Utility under Windows® 7 / 7 64-bit / VistaTM / VistaTM 64-bit only. NVIDIA BIOS RAID Installation Guide NVIDIA BIOS RAID Installation Guide is called data striping that copies and maintains an identical image of a single disk alone while the two hard disks...
...configure RAID. This section includes examples of the data in the other drive if one logical unit. This motherboard supports RAID / AHCI function under BIOS environment. If you install Windows® XP / XP 64-bit, RAID / AHCI function is a method combining two or more hard disk... a complete copy of using NVIDIA RAID Utility under Windows® 7 / 7 64-bit / VistaTM / VistaTM 64-bit only. NVIDIA BIOS RAID Installation Guide NVIDIA BIOS RAID Installation Guide is called data striping that copies and maintains an identical image of a single disk alone while the two hard disks...

RAID Installation Guide
Page 4
... how to use as default. And the Stripe Block is arranged on , press key to [RAID]. We take RAID 0 for use MediaShield BIOS to enter RAID setup utility. - After you have a few seconds to assign the disks. Define a New Array window appears. You have ...devices . . . 1 SATA_2 Slimtype DVD A DS8A3S Press F10 to create RAID 0 (Striped). Then, you press , the MediaShield BIOS - After adjusting the system BIOS to the steps of BIOS setup utility will appear. These are similar to RAID mode, reboot your system. Highlight Advanced and press , then the main inter...
... how to use as default. And the Stripe Block is arranged on , press key to [RAID]. We take RAID 0 for use MediaShield BIOS to enter RAID setup utility. - After you have a few seconds to assign the disks. Define a New Array window appears. You have ...devices . . . 1 SATA_2 Slimtype DVD A DS8A3S Press F10 to create RAID 0 (Striped). Then, you press , the MediaShield BIOS - After adjusting the system BIOS to the steps of BIOS setup utility will appear. These are similar to RAID mode, reboot your system. Highlight Advanced and press , then the main inter...

RAID Installation Guide
Page 5
... 18 2008 - MediaShield BIOS Aug 18 2008 - RAID Mode : Striped Stripimg Block : Optimal Free Disks Port Disk Model Capacity Array Disks Port Disk Model Capacity SATA_3 Hitachi HTS545 465....
... 18 2008 - MediaShield BIOS Aug 18 2008 - RAID Mode : Striped Stripimg Block : Optimal Free Disks Port Disk Model Capacity Array Disks Port Disk Model Capacity SATA_3 Hitachi HTS545 465....
