
User Manual
Page 5
... option in , 24.4 cm x 24.4 cm) ASRock H77 Pro4-M Quick Installation Guide ASRock H77 Pro4-M Support CD 2 x Serial ATA (SATA) Data Cables (Optional) 1 x I/O Panel Shield ASRock Reminds You... www.asrock.com/support/index.asp 1.1 Package Contents ASRock H77 Pro4-M Motherboard (Micro ATX Form Factor: 9.6-in x 9.6-in...the "User Manual" in our support CD for specific information about the model you for purchasing ASRock H77 Pro4-M motherboard, a reliable motherboard produced under ASRock's consistently stringent quality control. For the BIOS setup, please refer to AHCI mode. Chapter 3 and...
... option in , 24.4 cm x 24.4 cm) ASRock H77 Pro4-M Quick Installation Guide ASRock H77 Pro4-M Support CD 2 x Serial ATA (SATA) Data Cables (Optional) 1 x I/O Panel Shield ASRock Reminds You... www.asrock.com/support/index.asp 1.1 Package Contents ASRock H77 Pro4-M Motherboard (Micro ATX Form Factor: 9.6-in x 9.6-in...the "User Manual" in our support CD for specific information about the model you for purchasing ASRock H77 Pro4-M motherboard, a reliable motherboard produced under ASRock's consistently stringent quality control. For the BIOS setup, please refer to AHCI mode. Chapter 3 and...

Quick Installation Guide
Page 1
..., and (2) this device must accept any errors or omissions that may cause undesired operation. All rights reserved. 1 ASRock H77 Pro4-M Motherboard English This device complies with Part 15 of merchantability or fitness for backup purpose, without written consent of... by the purchaser for a particular purpose. Copyright Notice: No part of this installation guide may be constructed as a commitment by ASRock. Disclaimer: Specifications and information contained in this guide are used only for any interference received, including interference that may appear...
..., and (2) this device must accept any errors or omissions that may cause undesired operation. All rights reserved. 1 ASRock H77 Pro4-M Motherboard English This device complies with Part 15 of merchantability or fitness for backup purpose, without written consent of... by the purchaser for a particular purpose. Copyright Notice: No part of this installation guide may be constructed as a commitment by ASRock. Disclaimer: Specifications and information contained in this guide are used only for any interference received, including interference that may appear...

Quick Installation Guide
Page 2
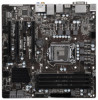
... 1 ErP/EuP Ready PCI Express 3.0 34 HD_AUDIO1 PCIE1 10 33 1 32 H77 Pro4-M 31 30 29 Super I/O PCIE2 XFast RAM RoHS PCIE3 XFast LAN XFast USB Intel H77 64Mb BIOS LPT1 PCIE4 COM1 1 USB_6_7 1 1 CIR1 USB_8_9 1 USB_10_11 1 ...Connector (ATXPWR1) 27 COM Port Header (COM1) 9 USB 3.0 Header (USB3_12_13, Black) 28 Print Port Header (LPT1) 10 Intel H77 Chipset 29 PCI Express 2.0 x16 Slot (PCIE4, Black) 11 SPI Flash Memory (64Mb) 30 PCI Express 2.0 x16 Slot (PCIE3... Panel Header (PANEL1, Black) 35 Chassis Fan Connector (CHA_FAN2) 2 ASRock H77 Pro4-M Motherboard English
... 1 ErP/EuP Ready PCI Express 3.0 34 HD_AUDIO1 PCIE1 10 33 1 32 H77 Pro4-M 31 30 29 Super I/O PCIE2 XFast RAM RoHS PCIE3 XFast LAN XFast USB Intel H77 64Mb BIOS LPT1 PCIE4 COM1 1 USB_6_7 1 1 CIR1 USB_8_9 1 USB_10_11 1 ...Connector (ATXPWR1) 27 COM Port Header (COM1) 9 USB 3.0 Header (USB3_12_13, Black) 28 Print Port Header (LPT1) 10 Intel H77 Chipset 29 PCI Express 2.0 x16 Slot (PCIE4, Black) 11 SPI Flash Memory (64Mb) 30 PCI Express 2.0 x16 Slot (PCIE3... Panel Header (PANEL1, Black) 35 Chassis Fan Connector (CHA_FAN2) 2 ASRock H77 Pro4-M Motherboard English

Quick Installation Guide
Page 3
...) DVI-D Port (DVI1) PS/2 Keyboard Port (Purple) * There are two LED next to the table below for connection details in (No. 8) (No. 6) (No. 5) (No. 7) 2 V -- -- -- 4 V V -- -- 6 V V V -- 8 V V V V English 3 ASRock H77 Pro4-M Motherboard Please refer to the LAN port.
...) DVI-D Port (DVI1) PS/2 Keyboard Port (Purple) * There are two LED next to the table below for connection details in (No. 8) (No. 6) (No. 5) (No. 7) 2 V -- -- -- 4 V V -- -- 6 V V V -- 8 V V V V English 3 ASRock H77 Pro4-M Motherboard Please refer to the LAN port.

Quick Installation Guide
Page 4
Please select "Mixer ToolBox" , click "Enable playback multi-streaming", and click "ok". English 4 ASRock H77 Pro4-M Motherboard After restarting your system. Choose "2CH", "4CH", "6CH", or "8CH" and then you will find "Mixer" tool on your computer, you are allowed ...
Please select "Mixer ToolBox" , click "Enable playback multi-streaming", and click "ok". English 4 ASRock H77 Pro4-M Motherboard After restarting your system. Choose "2CH", "4CH", "6CH", or "8CH" and then you will find "Mixer" tool on your computer, you are allowed ...

Quick Installation Guide
Page 5
... related to the "User Manual" in , 24.4 cm x 24.4 cm) ASRock H77 Pro4-M Quick Installation Guide ASRock H77 Pro4-M Support CD 2 x Serial ATA (SATA) Data Cables (Optional) 1 x I/O Panel Shield ASRock Reminds You... This Quick Installation Guide contains introduction of the motherboard can be found ... occur, the updated version will be available on ASRock website as well. www.asrock.com/support/index.asp 1.1 Package Contents ASRock H77 Pro4-M Motherboard (Micro ATX Form Factor: 9.6-in x 9.6-in our support CD for details. 5 ASRock H77 Pro4-M Motherboard English 1. You may find the...
... related to the "User Manual" in , 24.4 cm x 24.4 cm) ASRock H77 Pro4-M Quick Installation Guide ASRock H77 Pro4-M Support CD 2 x Serial ATA (SATA) Data Cables (Optional) 1 x I/O Panel Shield ASRock Reminds You... This Quick Installation Guide contains introduction of the motherboard can be found ... occur, the updated version will be available on ASRock website as well. www.asrock.com/support/index.asp 1.1 Package Contents ASRock H77 Pro4-M Motherboard (Micro ATX Form Factor: 9.6-in x 9.6-in our support CD for details. 5 ASRock H77 Pro4-M Motherboard English 1. You may find the...

Quick Installation Guide
Page 6
Supports Intel® Turbo Boost 2.0 Technology - Intel® H77 - capacity of system memory: 32GB (see CAUTION 5) ASRock H77 Pro4-M Motherboard English With Intel® Sandy Bridge CPU, it only supports PCIE 2.0. - 2 x PCI Express 2.0 x16 slots (PCIE3: x1 mode; PCIE4: x4 mode) - 1 x PCI Express 2.0 x 1 slot - ...
Supports Intel® Turbo Boost 2.0 Technology - Intel® H77 - capacity of system memory: 32GB (see CAUTION 5) ASRock H77 Pro4-M Motherboard English With Intel® Sandy Bridge CPU, it only supports PCIE 2.0. - 2 x PCI Express 2.0 x16 slots (PCIE3: x1 mode; PCIE4: x4 mode) - 1 x PCI Express 2.0 x 1 slot - ...

Quick Installation Guide
Page 7
... RAID (RAID 0, RAID 1, RAID 5, RAID 10, Intel Rapid Storage and Intel Smart Response Technology), NCQ, AHCI and Hot Plug functions English 7 ASRock H77 Pro4-M Motherboard resolution up to 1920x1200 @ 60Hz - Supports Energy Efficient Ethernet 802.3az - Supports HDMI 1.4a Technology with Content Protection (Realtek ALC892 Audio Codec) - ...
... RAID (RAID 0, RAID 1, RAID 5, RAID 10, Intel Rapid Storage and Intel Smart Response Technology), NCQ, AHCI and Hot Plug functions English 7 ASRock H77 Pro4-M Motherboard resolution up to 1920x1200 @ 60Hz - Supports Energy Efficient Ethernet 802.3az - Supports HDMI 1.4a Technology with Content Protection (Realtek ALC892 Audio Codec) - ...

Quick Installation Guide
Page 8
... CAUTION 13) - CPU Core, IGPU, DRAM, 1.8V PLL, VTT, VCCSA Voltage Multi-adjustment - ASRock XFast USB (see CAUTION 12) - ACPI 1.1 Compliance Wake Up Events - ASRock APP Charger (see CAUTION 14) English 8 ASRock H77 Pro4-M Motherboard Supports "Plug and Play" - Supports jumperfree - OEM - ASRock Instant Boot - CPU/Chassis/Power FAN connector - 24 pin ATX power connector - 8 pin...
... CAUTION 13) - CPU Core, IGPU, DRAM, 1.8V PLL, VTT, VCCSA Voltage Multi-adjustment - ASRock XFast USB (see CAUTION 12) - ACPI 1.1 Compliance Wake Up Events - ASRock APP Charger (see CAUTION 14) English 8 ASRock H77 Pro4-M Motherboard Supports "Plug and Play" - Supports jumperfree - OEM - ASRock Instant Boot - CPU/Chassis/Power FAN connector - 24 pin ATX power connector - 8 pin...

Quick Installation Guide
Page 9
...Monitor - CPU/Chassis/Power Fan Tachometer - Adjust by overclocking. It should be done at your system. CPU/Chassis Fan Multi-Speed Control - ASRock On/Off Play Technology (see CAUTION 20) Certifications - Microsoft® Windows® 7 / 7 64-bit / VistaTM / ...see CAUTION 21) * For detailed product information, please visit our website: http://www.asrock.com WARNING Please realize that there is required) (see CAUTION 15) - ASRock U-COP (see CAUTION 18) - English 9 ASRock H77 Pro4-M Motherboard - Voltage Monitoring: +12V, +5V, +3.3V, CPU Vcore OS - ...
...Monitor - CPU/Chassis/Power Fan Tachometer - Adjust by overclocking. It should be done at your system. CPU/Chassis Fan Multi-Speed Control - ASRock On/Off Play Technology (see CAUTION 20) Certifications - Microsoft® Windows® 7 / 7 64-bit / VistaTM / ...see CAUTION 21) * For detailed product information, please visit our website: http://www.asrock.com WARNING Please realize that there is required) (see CAUTION 15) - ASRock U-COP (see CAUTION 18) - English 9 ASRock H77 Pro4-M Motherboard - Voltage Monitoring: +12V, +5V, +3.3V, CPU Vcore OS - ...

Quick Installation Guide
Page 10
... PCIE1 slot supports Gen 3 speed. Besides, with your friends. xvYCC and Deep Color are only supported under Windows® 7 64-bit / 7 / VistaTM 64-bit / VistaTM. 8. ASRock Extreme Tuning Utility (AXTU) is subject to ne-tune different system functions in Gen 3 speed, please install an Ivy Bridge CPU. You can use..., the PCI Express will be enabled at PCI Express Gen 2 speed. 5. In Fan Control, it shows the major readings of the "User Manual" in EDID. ASRock website: http://www.asrock.com 10 ASRock H77 Pro4-M Motherboard English
... PCIE1 slot supports Gen 3 speed. Besides, with your friends. xvYCC and Deep Color are only supported under Windows® 7 64-bit / 7 / VistaTM 64-bit / VistaTM. 8. ASRock Extreme Tuning Utility (AXTU) is subject to ne-tune different system functions in Gen 3 speed, please install an Ivy Bridge CPU. You can use..., the PCI Express will be enabled at PCI Express Gen 2 speed. 5. In Fan Control, it shows the major readings of the "User Manual" in EDID. ASRock website: http://www.asrock.com 10 ASRock H77 Pro4-M Motherboard English

Quick Installation Guide
Page 11
10. With this tool and save the new BIOS file to extend their lifespan. 11 ASRock H77 Pro4-M Motherboard English ASRock XFast RAM is the smart start page for you to quickly charge many Apple devices simultaneously and even supports continuous charging when your... a faster, less restricted way of Your Data: With the status window, you can easily recognize which includes the benefits listed below. ASRock APP Charger. Simply install the APP Charger driver, it reduces the frequency of the device. 14. Real-Time Analysis of charging your application's priority...
10. With this tool and save the new BIOS file to extend their lifespan. 11 ASRock H77 Pro4-M Motherboard English ASRock XFast RAM is the smart start page for you to quickly charge many Apple devices simultaneously and even supports continuous charging when your... a faster, less restricted way of Your Data: With the status window, you can easily recognize which includes the benefits listed below. ASRock APP Charger. Simply install the APP Charger driver, it reduces the frequency of the device. 14. Real-Time Analysis of charging your application's priority...

Quick Installation Guide
Page 12
... the BIOS update procedure after regaining power. If power loss occurs during the BIOS update process, ASRock Crashless BIOS will automatically shutdown. According to define the power consumption for more details. 12 ASRock H77 Pro4-M Motherboard English ASRock XFast RAM is not supported by the European Union to EuP, the total AC power of the...
... the BIOS update procedure after regaining power. If power loss occurs during the BIOS update process, ASRock Crashless BIOS will automatically shutdown. According to define the power consumption for more details. 12 ASRock H77 Pro4-M Motherboard English ASRock XFast RAM is not supported by the European Union to EuP, the total AC power of the...

Quick Installation Guide
Page 13
...- Doing so may cause severe damage to the chassis. Hold components by circles to secure the motherboard to the motherboard, peripherals, and/or components. 13 ASRock H77 Pro4-M Motherboard English static pad or in the bag that the power is switched off or the power cord is a micro ATX form factor (9.6" x 9.6", 24.4 x 24...
...- Doing so may cause severe damage to the chassis. Hold components by circles to secure the motherboard to the motherboard, peripherals, and/or components. 13 ASRock H77 Pro4-M Motherboard English static pad or in the bag that the power is switched off or the power cord is a micro ATX form factor (9.6" x 9.6", 24.4 x 24...

Quick Installation Guide
Page 14
... out of Intel 1155-Pin CPU, please follow the steps below. Otherwise, the CPU will be placed if returning the motherboard for after service. 14 ASRock H77 Pro4-M Motherboard Remove the PnP Cap (Pick and Place Cap). Load Plate Load Lever Contact Array Socket Body 1155-Pin Socket Overview Before you insert the...
... out of Intel 1155-Pin CPU, please follow the steps below. Otherwise, the CPU will be placed if returning the motherboard for after service. 14 ASRock H77 Pro4-M Motherboard Remove the PnP Cap (Pick and Place Cap). Load Plate Load Lever Contact Array Socket Body 1155-Pin Socket Overview Before you insert the...

Quick Installation Guide
Page 15
... orient keys. Verify that the CPU is marked with the two alignment keys of the socket. Flip the load plate onto the IHS. English 15 ASRock H77 Pro4-M Motherboard Orient the CPU with the load plate tab under the retention tab. Step 3-3. Carefully place the CPU into the socket by the edge which...
... orient keys. Verify that the CPU is marked with the two alignment keys of the socket. Flip the load plate onto the IHS. English 15 ASRock H77 Pro4-M Motherboard Orient the CPU with the load plate tab under the retention tab. Step 3-3. Carefully place the CPU into the socket by the edge which...

Quick Installation Guide
Page 16
... of CPU Fan and Heatsink This motherboard is an example to illustrate the installation of the heatsink for Socket LGA 1155/1156 CPU fan. 16 ASRock H77 Pro4-M Motherboard For proper installation, please kindly refer to improve heat dissipation. Step 3. Align fasteners with each other components. Fan cables on side closest to MB...
... of CPU Fan and Heatsink This motherboard is an example to illustrate the installation of the heatsink for Socket LGA 1155/1156 CPU fan. 16 ASRock H77 Pro4-M Motherboard For proper installation, please kindly refer to improve heat dissipation. Step 3. Align fasteners with each other components. Fan cables on side closest to MB...

Quick Installation Guide
Page 17
... be damaged. 5. If you to install four DDR3 DIMMs for optimal compatibility and reliability, it is recommended to install them on this motherboard. English 17 ASRock H77 Pro4-M Motherboard Black slots;
... be damaged. 5. If you to install four DDR3 DIMMs for optimal compatibility and reliability, it is recommended to install them on this motherboard. English 17 ASRock H77 Pro4-M Motherboard Black slots;

Quick Installation Guide
Page 18
... is properly seated. Firmly insert the DIMM into the slot in one correct orientation. Unlock a DIMM slot by pressing the retaining clips outward. English 18 ASRock H77 Pro4-M Motherboard Step 1.
... is properly seated. Firmly insert the DIMM into the slot in one correct orientation. Unlock a DIMM slot by pressing the retaining clips outward. English 18 ASRock H77 Pro4-M Motherboard Step 1.

Quick Installation Guide
Page 19
... a PCI Express x16 graphics card on the slot. Step 3. Step 4. Align the card connector with screws. Step 5. PCIE3 (PCIE 2.0 x16 slot) is used for installing ASRock Game Blaster. 1. PCIE4 (PCIE 2.0 x16 slot) is used for better thermal environment. 4. Please connect a chassis fan to the motherboard's chassis fan connector (CHA_FAN1 or CHA_FAN2... graphics cards to the chassis with the slot and press firmly until the card is used for later use . Replace the system cover. 19 ASRock H77 Pro4-M Motherboard English
... a PCI Express x16 graphics card on the slot. Step 3. Step 4. Align the card connector with screws. Step 5. PCIE3 (PCIE 2.0 x16 slot) is used for installing ASRock Game Blaster. 1. PCIE4 (PCIE 2.0 x16 slot) is used for better thermal environment. 4. Please connect a chassis fan to the motherboard's chassis fan connector (CHA_FAN1 or CHA_FAN2... graphics cards to the chassis with the slot and press firmly until the card is used for later use . Replace the system cover. 19 ASRock H77 Pro4-M Motherboard English


