
User Manual
Page 1
All rights reserved. 1 H77 Pro4/MVP User Manual Version 1.0 Published December 2011 Copyright©2011 ASRock INC.
All rights reserved. 1 H77 Pro4/MVP User Manual Version 1.0 Published December 2011 Copyright©2011 ASRock INC.

User Manual
Page 2
... product. Operation is subject to infringe. "Perchlorate Material-special handling may appear in this manual, ASRock does not provide warranty of any means, except duplication of documentation by the purchaser for backup purpose, without notice, and ...respect to the contents of the FCC Rules. This device complies with Part 15 of this manual. CALIFORNIA, USA ONLY The Lithium battery adopted on this manual may cause undesired operation. ASRock assumes no event shall ASRock, its directors, officers, employees, or agents be reproduced, transcribed, transmitted, or translated in...
... product. Operation is subject to infringe. "Perchlorate Material-special handling may appear in this manual, ASRock does not provide warranty of any means, except duplication of documentation by the purchaser for backup purpose, without notice, and ...respect to the contents of the FCC Rules. This device complies with Part 15 of this manual. CALIFORNIA, USA ONLY The Lithium battery adopted on this manual may cause undesired operation. ASRock assumes no event shall ASRock, its directors, officers, employees, or agents be reproduced, transcribed, transmitted, or translated in...
User Manual
Page 5
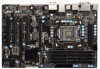
...) ASRock H77 Pro4/MVP Quick Installation Guide ASRock H77 Pro4/MVP Support CD 2 x Serial ATA (SATA) Data Cables (Optional) 1 x I/O Panel Shield ASRock Reminds You... www.asrock.com/support/index.asp 1.1 Package Contents ASRock H77 Pro4/MVP Motherboard (ATX Form Factor: 12.0-in x 7.9-in Storage Configuration to the hardware installation. Because the motherboard specifications and the BIOS software might be updated, the content of this manual...
...) ASRock H77 Pro4/MVP Quick Installation Guide ASRock H77 Pro4/MVP Support CD 2 x Serial ATA (SATA) Data Cables (Optional) 1 x I/O Panel Shield ASRock Reminds You... www.asrock.com/support/index.asp 1.1 Package Contents ASRock H77 Pro4/MVP Motherboard (ATX Form Factor: 12.0-in x 7.9-in Storage Configuration to the hardware installation. Because the motherboard specifications and the BIOS software might be updated, the content of this manual...

User Manual
Page 19
... Heatsink This motherboard is an example to illustrate the installation of your CPU fan and heatsink. For proper installation, please kindly refer to the instruction manuals of the heatsink for Socket LGA 1155/1156 CPU fan. 19 Please be secured on the socket's surface. Step 6. Please adopt the type of the...
... Heatsink This motherboard is an example to illustrate the installation of your CPU fan and heatsink. For proper installation, please kindly refer to the instruction manuals of the heatsink for Socket LGA 1155/1156 CPU fan. 19 Please be secured on the socket's surface. Step 6. Please adopt the type of the...
User Manual
Page 23
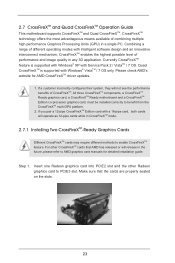
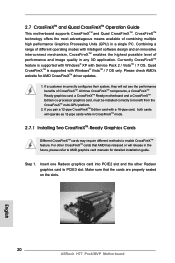
... three CrossFireXTM components, a CrossFireXTM Ready graphics card, a CrossFireXTM Ready motherboard and a CrossFireXTM Edition co-processor graphics card, must be installed correctly to AMD graphics card manuals for AMD CrossFireXTM driver updates. 1. Quad CrossFireXTM is supported with Windows® XP with intelligent software design and an innovative interconnect mechanism, CrossFireXTM enables the...
... three CrossFireXTM components, a CrossFireXTM Ready graphics card, a CrossFireXTM Ready motherboard and a CrossFireXTM Edition co-processor graphics card, must be installed correctly to AMD graphics card manuals for AMD CrossFireXTM driver updates. 1. Quad CrossFireXTM is supported with Windows® XP with intelligent software design and an innovative interconnect mechanism, CrossFireXTM enables the...
User Manual
Page 34
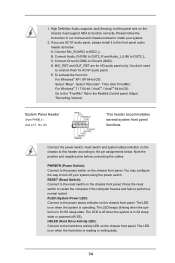
... LED is on the chassis front panel. For Windows® 7 / 7 64-bit / VistaTM / VistaTM 64-bit OS: Go to the "FrontMic" Tab in our manual and chassis manual to the front panel audio header as below . Press the reset switch to restart the computer if the computer freezes and fails to the...
... LED is on the chassis front panel. For Windows® 7 / 7 64-bit / VistaTM / VistaTM 64-bit OS: Go to the "FrontMic" Tab in our manual and chassis manual to the front panel audio header as below . Press the reset switch to restart the computer if the computer freezes and fails to the...
User Manual
Page 40
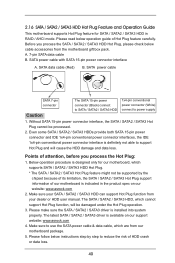
... the SATA / SATA2 / SATA3 driver is designed only for SATA / SATA2 / SATA3 HDD in the product spec on our support website: www.asrock.com 4. SATA power cable with SATA 15-pin power connector interface A. The SATA / SATA2 / SATA3 HDD, which cannot support Hot Plug function,...conventional power connector (White) connect to reduce the risk of our motherboard is available on our website: www.asrock.com 2. Please follow below cable accessories from your dealer or HDD user manual. SATA data cable (Red) B. Please read below operation guide of attention, before you process the SATA ...
... the SATA / SATA2 / SATA3 driver is designed only for SATA / SATA2 / SATA3 HDD in the product spec on our support website: www.asrock.com 4. SATA power cable with SATA 15-pin power connector interface A. The SATA / SATA2 / SATA3 HDD, which cannot support Hot Plug function,...conventional power connector (White) connect to reduce the risk of our motherboard is available on our website: www.asrock.com 2. Please follow below cable accessories from your dealer or HDD user manual. SATA data cable (Red) B. Please read below operation guide of attention, before you process the SATA ...
User Manual
Page 49
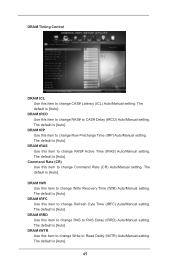
...[Auto]. The default is [Auto]. The default is [Auto]. DRAM tWTR Use this item to change Write Recovery Time (tWR) Auto/Manual setting. DRAM tRCD Use this item to change Row Precharge Time (tRP) Auto/Manual setting. DRAM tRP Use this item to change RAS# to CAS# Delay (tRCD) Auto...CR) Use this item to change CAS# Latency (tCL) Auto/Manual setting. DRAM tRAS Use this item to change Refresh Cyle Time (tRFC) Auto/Manual setting. DRAM tRFC Use this item to change RAS to change RAS# Active Time (tRAS) Auto/Manual setting. The default is [Auto]. The default is [Auto]....
...[Auto]. The default is [Auto]. The default is [Auto]. DRAM tWTR Use this item to change Write Recovery Time (tWR) Auto/Manual setting. DRAM tRCD Use this item to change Row Precharge Time (tRP) Auto/Manual setting. DRAM tRP Use this item to change RAS# to CAS# Delay (tRCD) Auto...CR) Use this item to change CAS# Latency (tCL) Auto/Manual setting. DRAM tRAS Use this item to change Refresh Cyle Time (tRFC) Auto/Manual setting. DRAM tRFC Use this item to change RAS to change RAS# Active Time (tRAS) Auto/Manual setting. The default is [Auto]. The default is [Auto]....
User Manual
Page 50
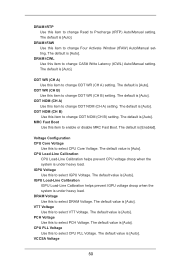
DRAM tFAW Use this item to change Four Activate Window (tFAW) Auto/Manual setting. ODT WR (CH B) Use this item to change ODT WR (CH B) setting. ODT NOM (CH B) Use this item to change ODT NOM (CH B) setting. ... default is [Enabled]. The default is [Auto]. DRAM Voltage Use this item to change Read to Precharge (tRTP) Auto/Manual setting. DRAM tCWL Use this item to change CAS# Write Latency (tCWL) Auto/Manual setting. The default value is [Auto]. The default value is [Auto]. The default is [Auto]. The default value...
DRAM tFAW Use this item to change Four Activate Window (tFAW) Auto/Manual setting. ODT WR (CH B) Use this item to change ODT WR (CH B) setting. ODT NOM (CH B) Use this item to change ODT NOM (CH B) setting. ... default is [Enabled]. The default is [Auto]. DRAM Voltage Use this item to change Read to Precharge (tRTP) Auto/Manual setting. DRAM tCWL Use this item to change CAS# Write Latency (tCWL) Auto/Manual setting. The default value is [Auto]. The default value is [Auto]. The default is [Auto]. The default value...

User Manual
Page 64
The default value is [Full On]. Configuration options: [Full On] and [Manual]. 3.5 Hardware Health Event Monitoring Screen In this to enable or disable Over Temperature Protection. Chassis Fan 1 Setting This allows you to set CPU fan 1 & 2's speed.... The default value is [Full On]. The default value is [Enabled]. 64 Configuration options: [Full On], [Automatic Mode] and [Manual]. Chassis Fan 2 Setting This allows you to monitor the status of the hardware on your system, including the parameters of the CPU temperature, motherboard temperature...
The default value is [Full On]. Configuration options: [Full On] and [Manual]. 3.5 Hardware Health Event Monitoring Screen In this to enable or disable Over Temperature Protection. Chassis Fan 1 Setting This allows you to set CPU fan 1 & 2's speed.... The default value is [Full On]. The default value is [Enabled]. 64 Configuration options: [Full On], [Automatic Mode] and [Manual]. Chassis Fan 2 Setting This allows you to monitor the status of the hardware on your system, including the parameters of the CPU temperature, motherboard temperature...

Quick Installation Guide
Page 5
.... Introduction Thank you are using. It delivers excellent performance with robust design conforming to ASRock's commitment to the "User Manual" in , 30.5 cm x 20.1 cm) ASRock H77 Pro4/MVP Quick Installation Guide ASRock H77 Pro4/MVP Support CD 2 x Serial ATA (SATA) Data Cables (Optional) 1 x I/O Panel Shield ASRock Reminds You... Because the motherboard specifications and the BIOS software might be updated, the...
.... Introduction Thank you are using. It delivers excellent performance with robust design conforming to ASRock's commitment to the "User Manual" in , 30.5 cm x 20.1 cm) ASRock H77 Pro4/MVP Quick Installation Guide ASRock H77 Pro4/MVP Support CD 2 x Serial ATA (SATA) Data Cables (Optional) 1 x I/O Panel Shield ASRock Reminds You... Because the motherboard specifications and the BIOS software might be updated, the...

Quick Installation Guide
Page 10
... BIOS flash utility embedded in EDID. Due to get the same OC settings. HBR is subject to update system BIOS 10 ASRock H77 Pro4/MVP Motherboard English Your friends then can reduce the number of memory modules on page 3 for optimal system performance. In IES (... 7. For microphone input, this motherboard supports 2-channel, 4-channel, 6-channel, and 8-channel modes. ASRock website: http://www.asrock.com 10. Please check Intel® website for the operation procedures of the "User Manual" in Gen 3 speed, please install an Ivy Bridge CPU. In OC DNA, you to change....
... BIOS flash utility embedded in EDID. Due to get the same OC settings. HBR is subject to update system BIOS 10 ASRock H77 Pro4/MVP Motherboard English Your friends then can reduce the number of memory modules on page 3 for optimal system performance. In IES (... 7. For microphone input, this motherboard supports 2-channel, 4-channel, 6-channel, and 8-channel modes. ASRock website: http://www.asrock.com 10. Please check Intel® website for the operation procedures of the "User Manual" in Gen 3 speed, please install an Ivy Bridge CPU. In OC DNA, you to change....

Quick Installation Guide
Page 16
... material between the CPU and the heatsink to illustrate the installation of the heatsink for Socket LGA 1155/1156 CPU fan. 16 ASRock H77 Pro4/MVP Motherboard English The white throughholes are oriented on the motherboard. Before you install the heatsink, you press down on the motherboard (CPU_FAN1...for 1155-Pin CPUs. Ensure that supports Intel 1155-Pin CPUs. Step 6. Secure redundant cable with tie-wrap to the instruction manuals of heatsink and cooling fan compliant with fan operation or contact other . For proper installation, please kindly refer to ensure the cable...
... material between the CPU and the heatsink to illustrate the installation of the heatsink for Socket LGA 1155/1156 CPU fan. 16 ASRock H77 Pro4/MVP Motherboard English The white throughholes are oriented on the motherboard. Before you install the heatsink, you press down on the motherboard (CPU_FAN1...for 1155-Pin CPUs. Ensure that supports Intel 1155-Pin CPUs. Step 6. Secure redundant cable with tie-wrap to the instruction manuals of heatsink and cooling fan compliant with fan operation or contact other . For proper installation, please kindly refer to ensure the cable...
Quick Installation Guide
Page 20
... Ready motherboard and a CrossFireXTM Edition co-processor graphics card, must be installed correctly to enable CrossFireXTM feature. English 20 ASRock H77 Pro4/MVP Motherboard If you pair a 12-pipe CrossFireXTM Edition card with intelligent software design and an innovative interconnect mechanism, CrossFireXTM enables... feature is supported with Service Pack 2 / VistaTM / 7 OS. For other Radeon graphics card to AMD graphics card manuals for AMD CrossFireXTM driver updates. 1. Insert one Radeon graphics card into PCIE2 slot and the other CrossFireXTM cards that the ...
... Ready motherboard and a CrossFireXTM Edition co-processor graphics card, must be installed correctly to enable CrossFireXTM feature. English 20 ASRock H77 Pro4/MVP Motherboard If you pair a 12-pipe CrossFireXTM Edition card with intelligent software design and an innovative interconnect mechanism, CrossFireXTM enables... feature is supported with Service Pack 2 / VistaTM / 7 OS. For other Radeon graphics card to AMD graphics card manuals for AMD CrossFireXTM driver updates. 1. Insert one Radeon graphics card into PCIE2 slot and the other CrossFireXTM cards that the ...

Quick Installation Guide
Page 31
... LED is off your system. 2. High Definition Audio supports Jack Sensing, but the panel wire on when the system is reading or writing data. 31 ASRock H77 Pro4/MVP Motherboard English For Windows® 7 / 7 64-bit / VistaTM / VistaTM 64-bit OS: Go to install your system using the power switch. ...when the system is in the Realtek Control panel. D. The LED is on the chassis front panel. Please follow the instruction in our manual and chassis manual to the "FrontMic" Tab in S1/S3 sleep state. HDLED (Hard Drive Activity LED): Connect to OUT2_L. To activate the front mic....
... LED is off your system. 2. High Definition Audio supports Jack Sensing, but the panel wire on when the system is reading or writing data. 31 ASRock H77 Pro4/MVP Motherboard English For Windows® 7 / 7 64-bit / VistaTM / VistaTM 64-bit OS: Go to install your system using the power switch. ...when the system is in the Realtek Control panel. D. The LED is on the chassis front panel. Please follow the instruction in our manual and chassis manual to the "FrontMic" Tab in S1/S3 sleep state. HDLED (Hard Drive Activity LED): Connect to OUT2_L. To activate the front mic....

Quick Installation Guide
Page 37
... press or during the Power-On-Self-Test (POST) to display the menus. 37 ASRock H77 Pro4/MVP Motherboard English It is enabled in the Support CD. 4. It will enhance motherboard features. The BIOS Setup program is designed to the User Manual (PDF file) contained in your CD-ROM drive. BIOS Information The Flash Memory...
... press or during the Power-On-Self-Test (POST) to display the menus. 37 ASRock H77 Pro4/MVP Motherboard English It is enabled in the Support CD. 4. It will enhance motherboard features. The BIOS Setup program is designed to the User Manual (PDF file) contained in your CD-ROM drive. BIOS Information The Flash Memory...

Quick Installation Guide
Page 189
...;! 1、 關於"Hyper-Threading Technology CD User Manual"第 53 頁。 2 17 3 Windows® 7 / VistaTM / XP 4GB。對於 Windows 64 位元 CPU ASRock XFast RAM 來利用 Windows 4、 僅 PCIE2...; 12bpc 時 ,Deep Color Windows® 7 64 位元 /7/VistaTM 64 位元 /VistaTM 支援 HBR。 ASRock H77 Pro4/MVP Motherboard 189 繁體中文 CPU - CPU 操作系統 12V, +5V, +3.3V Microsoft® Windows® 7/7...
...;! 1、 關於"Hyper-Threading Technology CD User Manual"第 53 頁。 2 17 3 Windows® 7 / VistaTM / XP 4GB。對於 Windows 64 位元 CPU ASRock XFast RAM 來利用 Windows 4、 僅 PCIE2...; 12bpc 時 ,Deep Color Windows® 7 64 位元 /7/VistaTM 64 位元 /VistaTM 支援 HBR。 ASRock H77 Pro4/MVP Motherboard 189 繁體中文 CPU - CPU 操作系統 12V, +5V, +3.3V Microsoft® Windows® 7/7...

RAID Installation Guide
Page 2
...chipset that your motherboard adopts. Guide to create RAID on this guide carefully according to Serial ATA (SATA) Hard Disks Installation of "User Manual" in this motherboard for internal storage devices. 1. This section will guide you how to SATA Hard Disks Installation 1.1 Serial ATA (SATA...) Hard Disks Installation Intel H77 chipset supports Serial ATA (SATA) hard disks with RAID functions, including RAID 0, RAID 1, RAID 5, RAID 10 and Intel Rapid Storage. ...
...chipset that your motherboard adopts. Guide to create RAID on this guide carefully according to Serial ATA (SATA) Hard Disks Installation of "User Manual" in this motherboard for internal storage devices. 1. This section will guide you how to SATA Hard Disks Installation 1.1 Serial ATA (SATA...) Hard Disks Installation Intel H77 chipset supports Serial ATA (SATA) hard disks with RAID functions, including RAID 0, RAID 1, RAID 5, RAID 10 and Intel Rapid Storage. ...
Lucid Virtu Installation Guide
Page 4
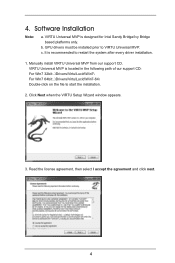
VIRTU Universal MVP is located in the following path of our support CD: For Win7 32bit:..\Drivers\Virtu\Lucid\Win7\ For Win7 64bit:..\Drivers\Virtu\Lucid\Win7-64\ ... license agreement, then select I accept the agreement and click next. 4 4. Click Next when the VIRTU Setup Wizard window appears. 3. It is recommended to VIRTU Universal MVP. Manually install VIRTU Universal MVP from our support CD. Software Installation Note: a. VIRTU Universal MVP is designed for Intel Sandy Bridge/Ivy Bridge based platforms only.
VIRTU Universal MVP is located in the following path of our support CD: For Win7 32bit:..\Drivers\Virtu\Lucid\Win7\ For Win7 64bit:..\Drivers\Virtu\Lucid\Win7-64\ ... license agreement, then select I accept the agreement and click next. 4 4. Click Next when the VIRTU Setup Wizard window appears. 3. It is recommended to VIRTU Universal MVP. Manually install VIRTU Universal MVP from our support CD. Software Installation Note: a. VIRTU Universal MVP is designed for Intel Sandy Bridge/Ivy Bridge based platforms only.
Lucid Virtu Installation Guide
Page 7
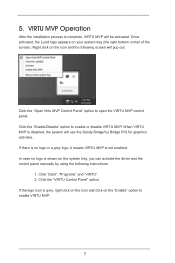
... 1. Click the "VIRTU Control Panel" option. Click the "Enable/Disable" option to open the VIRTU MVP control panel. Right click on the system tray, you can activate the driver and the control panel manually by using the following screen will pop out. Click "Start", "Programs" and "VIRTU". 2. 5. ...If there is no logo is not enabled. When VIRTU MVP is complete, VIRTU MVP will use the Sandy Bridge/Ivy Bridge IPG for graphics...
... 1. Click the "VIRTU Control Panel" option. Click the "Enable/Disable" option to open the VIRTU MVP control panel. Right click on the system tray, you can activate the driver and the control panel manually by using the following screen will pop out. Click "Start", "Programs" and "VIRTU". 2. 5. ...If there is no logo is not enabled. When VIRTU MVP is complete, VIRTU MVP will use the Sandy Bridge/Ivy Bridge IPG for graphics...
