

User Manual
Page 5
... BIOS software might be updated, the content of the Support CD. Chapter 3 and 4 contain the configuration guide to AHCI mode. ASRock website http://www.asrock.com If you are using. www.asrock.com/support/index.asp 1.1 Package Contents ASRock H61M-VGS / H61M-VS Motherboard (Micro ATX Form Factor: 8.9-in x 6.8-in our support CD for purchasing ASRock H61M-VGS / H61M-VS...
... BIOS software might be updated, the content of the Support CD. Chapter 3 and 4 contain the configuration guide to AHCI mode. ASRock website http://www.asrock.com If you are using. www.asrock.com/support/index.asp 1.1 Package Contents ASRock H61M-VGS / H61M-VS Motherboard (Micro ATX Form Factor: 8.9-in x 6.8-in our support CD for purchasing ASRock H61M-VGS / H61M-VS...
User Manual
Page 8
.... Due to overclock CPU frequency for proper installation. 3. In Overclocking, you can reduce the number of ASRock Extreme Tuning Utility (AXTU). This convenient BIOS update tool allows you implement Dual Channel Memory Technology, make sure to the components and devices of memory ... systems first like MS-DOS or Windows®. We are idle without sacrificing computing performance. ASRock Instant Flash is a BIOS flash utility embedded in the BIOS, applying Untied Overclocking Technology, or using the third-party overclocking tools. WARNING Please realize that the USB...
.... Due to overclock CPU frequency for proper installation. 3. In Overclocking, you can reduce the number of ASRock Extreme Tuning Utility (AXTU). This convenient BIOS update tool allows you implement Dual Channel Memory Technology, make sure to the components and devices of memory ... systems first like MS-DOS or Windows®. We are idle without sacrificing computing performance. ASRock Instant Flash is a BIOS flash utility embedded in the BIOS, applying Untied Overclocking Technology, or using the third-party overclocking tools. WARNING Please realize that the USB...
User Manual
Page 11
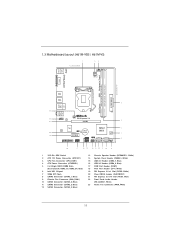
1.3 Motherboard Layout (H61M-VGS / H61M-VS) 1 17.3cm (6.8 in) 23 DX10.1 CPU_FAN1 ATX12V1 PS2 Mouse PS2 Keyboard AT X P W R 1 22.6cm (8.9 in) DDR3_B1 (64 bit, 240-pin module) DDR3_A1 (64 bit, 240-...: FRONT Bottom: MIC IN 22 HD_AUDIO1 1 LAN PWR_FAN1 PCI Express 2.0 PHY 5 21 PCIE1 20 19 AUDIO CODEC Super I/O CLRCMOS1 1 PCIE2 CMOS Battery Intel 6 H61 32Mb BIOS 7 1 LPT1 USB8_9 1 SATA2_3 SATA2_1 COM1 1 USB6_7 SPEAKER1 PLED PWRBTN CHA_FAN1 8 1 1 1 HDLED RESET PANEL1 SATA2_2 SATA2_0 18 17 16 15 14 13 12 11 10 9 1 1155...
1.3 Motherboard Layout (H61M-VGS / H61M-VS) 1 17.3cm (6.8 in) 23 DX10.1 CPU_FAN1 ATX12V1 PS2 Mouse PS2 Keyboard AT X P W R 1 22.6cm (8.9 in) DDR3_B1 (64 bit, 240-pin module) DDR3_A1 (64 bit, 240-...: FRONT Bottom: MIC IN 22 HD_AUDIO1 1 LAN PWR_FAN1 PCI Express 2.0 PHY 5 21 PCIE1 20 19 AUDIO CODEC Super I/O CLRCMOS1 1 PCIE2 CMOS Battery Intel 6 H61 32Mb BIOS 7 1 LPT1 USB8_9 1 SATA2_3 SATA2_1 COM1 1 USB6_7 SPEAKER1 PLED PWRBTN CHA_FAN1 8 1 1 1 HDLED RESET PANEL1 SATA2_2 SATA2_0 18 17 16 15 14 13 12 11 10 9 1 1155...

User Manual
Page 22
... to short pin2 and pin3 on pins, the jumper is "Short". If you need to clear the CMOS when you just finish updating the BIOS, you must boot up the system first, and then shut it down before you to clear the data in CMOS. 2.8 Jumpers Setup The illustration... Jumper (CLRCMOS1) (see p.11, No. 20) Setting Default Clear CMOS Description Note: CLRCMOS1 allows you do not clear the CMOS right after you update the BIOS. After waiting for 5 seconds. However, please do the clear-CMOS action. If no jumper cap is "Open". The illustration shows a 3-pin jumper whose pin1 and...
... to short pin2 and pin3 on pins, the jumper is "Short". If you need to clear the CMOS when you just finish updating the BIOS, you must boot up the system first, and then shut it down before you to clear the data in CMOS. 2.8 Jumpers Setup The illustration... Jumper (CLRCMOS1) (see p.11, No. 20) Setting Default Clear CMOS Description Note: CLRCMOS1 allows you do not clear the CMOS right after you update the BIOS. After waiting for 5 seconds. However, please do the clear-CMOS action. If no jumper cap is "Open". The illustration shows a 3-pin jumper whose pin1 and...

User Manual
Page 53
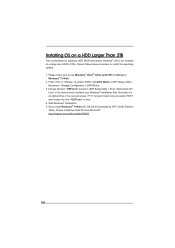
... > Advanced > Storage Configuration > SATA Mode. 3. Start Windows® installation. 5. Set AHCI Mode in UEFI Setup Utility > Boot > Boot Option #1. ("xxx" is adopting UEFI BIOS that allows Windows® OS to boot. 4. Installing OS on a HDD Larger Than 2TB This motherboard is the device which contains your Windows® installation...
... > Advanced > Storage Configuration > SATA Mode. 3. Start Windows® installation. 5. Set AHCI Mode in UEFI Setup Utility > Boot > Boot Option #1. ("xxx" is adopting UEFI BIOS that allows Windows® OS to boot. 4. Installing OS on a HDD Larger Than 2TB This motherboard is the device which contains your Windows® installation...

Quick Installation Guide
Page 2
Motherboard Layout (H61M-VGS / H61M-VS) 1 17.3cm (6.8 in) 23 DX10.1 CPU_FAN1 ATX12V1 PS2 Mouse PS2 Keyboard AT X P W R 1 22.6cm (8.9 in... 22 HD_AUDIO1 1 LAN PWR_FAN1 PCI Express 2.0 PHY 5 21 PCIE1 20 19 AUDIO CODEC Super I/O CLRCMOS1 1 PCIE2 CMOS Battery Intel 6 H61 32Mb BIOS 7 1 LPT1 USB8_9 1 SATA2_3 SATA2_1 SPEAKER1 1 CHA_FAN1 8 COM1 USB6_7 PLED PWRBTN 1 1 1 HDLED RESET PANEL1 SATA2_2 SATA2_0 18 17 16 15... Slot (PCIE1, Blue) 22 Front Panel Audio Header (HD_AUDIO1, White) 23 Power Fan Connector (PWR_FAN1) 2 ASRock H61M-VGS / H61M-VS Motherboard English
Motherboard Layout (H61M-VGS / H61M-VS) 1 17.3cm (6.8 in) 23 DX10.1 CPU_FAN1 ATX12V1 PS2 Mouse PS2 Keyboard AT X P W R 1 22.6cm (8.9 in... 22 HD_AUDIO1 1 LAN PWR_FAN1 PCI Express 2.0 PHY 5 21 PCIE1 20 19 AUDIO CODEC Super I/O CLRCMOS1 1 PCIE2 CMOS Battery Intel 6 H61 32Mb BIOS 7 1 LPT1 USB8_9 1 SATA2_3 SATA2_1 SPEAKER1 1 CHA_FAN1 8 COM1 USB6_7 PLED PWRBTN 1 1 1 HDLED RESET PANEL1 SATA2_2 SATA2_0 18 17 16 15... Slot (PCIE1, Blue) 22 Front Panel Audio Header (HD_AUDIO1, White) 23 Power Fan Connector (PWR_FAN1) 2 ASRock H61M-VGS / H61M-VS Motherboard English

Quick Installation Guide
Page 5
... be found in the user manual presented in , 22.6 cm x 17.3 cm) ASRock H61M-VGS / H61M-VS Quick Installation Guide ASRock H61M-VGS / H61M-VS Support CD 2 x Serial ATA (SATA) Data Cables (Optional) 1 x I/O Panel Shield ASRock Reminds You... Because the motherboard specifications and the BIOS software might be updated, the content of the motherboard and step-bystep installation...
... be found in the user manual presented in , 22.6 cm x 17.3 cm) ASRock H61M-VGS / H61M-VS Quick Installation Guide ASRock H61M-VGS / H61M-VS Support CD 2 x Serial ATA (SATA) Data Cables (Optional) 1 x I/O Panel Shield ASRock Reminds You... Because the motherboard specifications and the BIOS software might be updated, the content of the motherboard and step-bystep installation...

Quick Installation Guide
Page 7
... website: http://www.asrock.com English 7 ASRock H61M-VGS / H61M-VS Motherboard Good Night LED Hardware - ASRock XFast USB (see CAUTION 7) - CPU/Chassis/Power Fan Tachometer - Chassis Temperature Sensing - Creative Sound Blaster X-Fi MB - ASRock AIWI (see CAUTION 10) - ASRock Extreme Tuning Utility (AXTU) (see CAUTION 5) - CPU/Chassis Fan Multi-Speed Control - AMI UEFI Legal BIOS with GUI support...
... website: http://www.asrock.com English 7 ASRock H61M-VGS / H61M-VS Motherboard Good Night LED Hardware - ASRock XFast USB (see CAUTION 7) - CPU/Chassis/Power Fan Tachometer - Chassis Temperature Sensing - Creative Sound Blaster X-Fi MB - ASRock AIWI (see CAUTION 10) - ASRock Extreme Tuning Utility (AXTU) (see CAUTION 5) - CPU/Chassis Fan Multi-Speed Control - AMI UEFI Legal BIOS with GUI support...

Quick Installation Guide
Page 8
... or Windows®. In Overclocking, you can reduce the number of ASRock Extreme Tuning Utility (AXTU). In IES (Intelligent Energy Saver), the voltage regulator can save the new BIOS file to update system BIOS without sacrificing computing performance. CAUTION! 1. In OC DNA, you are...WARNING Please realize that the USB flash drive or hard drive must use FAT32/16/12 file system. 8 ASRock H61M-VGS / H61M-VS Motherboard English Please be done at your BIOS only in the BIOS, applying Untied Overclocking Technology, or using the third-party overclocking tools.
... or Windows®. In Overclocking, you can reduce the number of ASRock Extreme Tuning Utility (AXTU). In IES (Intelligent Energy Saver), the voltage regulator can save the new BIOS file to update system BIOS without sacrificing computing performance. CAUTION! 1. In OC DNA, you are...WARNING Please realize that the USB flash drive or hard drive must use FAT32/16/12 file system. 8 ASRock H61M-VGS / H61M-VS Motherboard English Please be done at your BIOS only in the BIOS, applying Untied Overclocking Technology, or using the third-party overclocking tools.

Quick Installation Guide
Page 18
The illustration shows a 3-pin jumper whose pin1 and pin2 are setup. English 18 ASRock H61M-VGS / H61M-VS Motherboard Jumper Clear CMOS Jumper (CLRCMOS1) (see p.2, No. 20) Setting Default Clear .... To clear and reset the system parameters to clear the CMOS when you just finish updating the BIOS, you must boot up the system first, and then shut it down before you do not clear... is "Open". If no jumper cap is placed on pins, the jumper is "Short". If you update the BIOS. Please be noted that the password, date, time, user default profile, 1394 GUID and MAC address ...
The illustration shows a 3-pin jumper whose pin1 and pin2 are setup. English 18 ASRock H61M-VGS / H61M-VS Motherboard Jumper Clear CMOS Jumper (CLRCMOS1) (see p.2, No. 20) Setting Default Clear .... To clear and reset the system parameters to clear the CMOS when you just finish updating the BIOS, you must boot up the system first, and then shut it down before you do not clear... is "Open". If no jumper cap is placed on pins, the jumper is "Short". If you update the BIOS. Please be noted that the password, date, time, user default profile, 1394 GUID and MAC address ...

Quick Installation Guide
Page 25
... 64-bit / XP / XP 64-bit. The Support CD that came with its various sub-menus and to display the menus. 25 ASRock H61M-VGS / H61M-VS Motherboard English otherwise, POST continues with the motherboard contains necessary drivers and useful utilities that will display the Main Menu automatically if "AUTORUN" is...the computer, please press or during the Power-On-Self-Test (POST) to enter BIOS Setup after POST, please restart the system by pressing + + , or pressing the reset button on the system chassis. BIOS Information The Flash Memory on the file "ASSETUP.EXE" from the BIN ...
... 64-bit / XP / XP 64-bit. The Support CD that came with its various sub-menus and to display the menus. 25 ASRock H61M-VGS / H61M-VS Motherboard English otherwise, POST continues with the motherboard contains necessary drivers and useful utilities that will display the Main Menu automatically if "AUTORUN" is...the computer, please press or during the Power-On-Self-Test (POST) to enter BIOS Setup after POST, please restart the system by pressing + + , or pressing the reset button on the system chassis. BIOS Information The Flash Memory on the file "ASSETUP.EXE" from the BIN ...

Quick Installation Guide
Page 104
...;는 OC OS OS IES (Intelligent Energy Saver CPU ASRock 의 AXTU (Extreme Tuning Utility ASRock http://www.asrock.com 6. ASRock Instant Flash ROM BIOS BIOS MS-DOS 나 Windows BIOS POST 중에 BIOS F6 F2 ASRock Instant Flash USB BIOS BIOS USB FAT32/16/12 ASRock H61M-VGS / H61M-VS Motherboard 한 국 어 104 BIOS Untied Overclocking Technology 주의 ! 1 CD 39 2 14...
...;는 OC OS OS IES (Intelligent Energy Saver CPU ASRock 의 AXTU (Extreme Tuning Utility ASRock http://www.asrock.com 6. ASRock Instant Flash ROM BIOS BIOS MS-DOS 나 Windows BIOS POST 중에 BIOS F6 F2 ASRock Instant Flash USB BIOS BIOS USB FAT32/16/12 ASRock H61M-VGS / H61M-VS Motherboard 한 국 어 104 BIOS Untied Overclocking Technology 주의 ! 1 CD 39 2 14...

Quick Installation Guide
Page 106
효율이 100 mA 50 EuP 1.3 3 1-2 점퍼 CMOS 초기화 (CLRCMOS1, 3 2 20 세팅 CMOS 삭제 참고 : CLRCMOS1 CMOS 15 CLRCMOS1 의 핀 2 와 핀 3 을 5 BIOS CMOS BIOS CMOS CMOS CMOS 1394 GUID, MAC 한 국 어 106 ASRock H61M-VGS / H61M-VS Motherboard
효율이 100 mA 50 EuP 1.3 3 1-2 점퍼 CMOS 초기화 (CLRCMOS1, 3 2 20 세팅 CMOS 삭제 참고 : CLRCMOS1 CMOS 15 CLRCMOS1 의 핀 2 와 핀 3 을 5 BIOS CMOS BIOS CMOS CMOS CMOS 1394 GUID, MAC 한 국 어 106 ASRock H61M-VGS / H61M-VS Motherboard

Quick Installation Guide
Page 114
...CPU OC DNA OC OC OC IES CPU ASRock Extreme Tuning Utility (AXTU Web ASRock Web サイト :http://www.asrock.com 日本語 114 ASRock H61M-VGS / H61M-VS Motherboard OS - FCC, CE, Microsoft&#...174; WHQL - Microsoft® Windows® 7 / 7 64-bit / VistaTM / VistaTM 64-bit / XP / XP 64-bit compliant 認証 - ErP/EuP 対応(ErP/EuP ( 注意 13 を参照 ) http://www.asrock.com BIOS...
...CPU OC DNA OC OC OC IES CPU ASRock Extreme Tuning Utility (AXTU Web ASRock Web サイト :http://www.asrock.com 日本語 114 ASRock H61M-VGS / H61M-VS Motherboard OS - FCC, CE, Microsoft&#...174; WHQL - Microsoft® Windows® 7 / 7 64-bit / VistaTM / VistaTM 64-bit / XP / XP 64-bit compliant 認証 - ErP/EuP 対応(ErP/EuP ( 注意 13 を参照 ) http://www.asrock.com BIOS...

Quick Installation Guide
Page 115
6. ASRock Instant Flash は、Flash ROM ROM BIOS BIOS より、MS-DOS Windows BIOS POST の間に
6. ASRock Instant Flash は、Flash ROM ROM BIOS BIOS より、MS-DOS Windows BIOS POST の間に

Quick Installation Guide
Page 117
1.3 1-2 CMOS CLRCMOS1 20 参照) 設定 説明 CMOS の消去 注 : CLRCMOS1 CMOS 15 CLRCMOS1 のピン 2 とピン 3 を 5 BIOS CMOS BIOS CMOS CMOS 1394 GUID と MAC CMOS 日本語 117 ASRock H61M-VGS / H61M-VS Motherboard
1.3 1-2 CMOS CLRCMOS1 20 参照) 設定 説明 CMOS の消去 注 : CLRCMOS1 CMOS 15 CLRCMOS1 のピン 2 とピン 3 を 5 BIOS CMOS BIOS CMOS CMOS 1394 GUID と MAC CMOS 日本語 117 ASRock H61M-VGS / H61M-VS Motherboard
Quick Installation Guide
Page 144
.../kb/979903 144 If you install Windows® 7 64-bit OS, OS will be installed on a HDD Larger Than 2TB This motherboard is adopting UEFI BIOS that allows Windows® OS to use Windows® VistaTM 64-bit (with SP1 or above) or Windows® 7 64-bit. 2. Installing OS on a large...
.../kb/979903 144 If you install Windows® 7 64-bit OS, OS will be installed on a HDD Larger Than 2TB This motherboard is adopting UEFI BIOS that allows Windows® OS to use Windows® VistaTM 64-bit (with SP1 or above) or Windows® 7 64-bit. 2. Installing OS on a large...


